In today’s tech world, most of the applications being developed under Logistics, Inventory, Internal Transaction and other domains require day-to-day data in excel files and prefer excel file operations in their applications.
I will be sharing one of the Nuget Package tool, which wil very minimal lines of code will export an excel file for us.
The Tool is Closed XML.

Just write a few lines of code and done! It is developer friendly. If we have used the Open XML, there are a lot of lines of code which are required to export an excel fron data. We can create excel file of 2007/2010 configuration without even Excel application.
To add the closed XML package, we add directly through the user interface, from the Nuget Gallery and also, we can use the Package Manager console to add the package using the below command
PM> Install-Package ClosedXML
Snippet!
DataTable dt = new DataTable();
dt.Columns.AddRange(new DataColumn[3] { new DataColumn("Id", typeof(int)),
new DataColumn("Name", typeof(string)),
new DataColumn("Country",typeof(string)) });
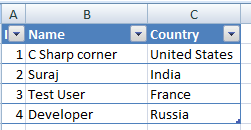
dt.Rows.Add(1, "C Sharp corner", "United States");
dt.Rows.Add(2, "Suraj", "India");
dt.Rows.Add(3, "Test User", "France");
dt.Rows.Add(4, "Developer", "Russia");
//Exporting to Excel
string folderPath = "C:\\Excel\\";
if (!Directory.Exists(folderPath))
{
Directory.CreateDirectory(folderPath);
}
//Codes for the Closed XML
using (XLWorkbook wb = new XLWorkbook())
{
wb.Worksheets.Add(dt, "Customers");
//wb.SaveAs(folderPath + "DataGridViewExport.xlsx");
string myName = Server.UrlEncode("Test" + "_" + DateTime.Now.ToShortDateString() + ".xlsx");
MemoryStream stream = GetStream(wb);// The method is defined below
Response.Clear();
Response.Buffer = true;
Response.AddHeader("content-disposition", "attachment; filename=" + myName);
Response.ContentType = "application/vnd.ms-excel";
Response.BinaryWrite(stream.ToArray());
Response.End();
}The above code, instantiates a data table, with few data initialization.
public MemoryStream GetStream(XLWorkbook excelWorkbook)
        {
            MemoryStream fs = new MemoryStream();
            excelWorkbook.SaveAs(fs);
            fs.Position = 0;
            return fs;
        }
We are using this method, so as to return a stream inorder to download the file in response using the stream. The save as method of the Closed XMl, helps create the stream.
Downloaded file looks like below:
Conclusion
Here, I have shared the code where hard coded values are added, this is not the case everytime. We can always use the records from the database and create them as a datatable and then use the Closed XML. This really reduces a lot of codes which is used in Open XML package. So, developers try it!! I will be sharing another article where I would show, how to Import the same exported excel file using Bulk copy using SQL Bulk copy.
]]>An interesting topic to share again! Recently while I was using GIT, the options in the browser on the GITHUB site, launched the application installed on my system! I wondered if that is possible I can run any exe from my web application and create wonders!
Nice story huh! Actually, that is possible and I will be sharing the process how we can achieve the same from code.
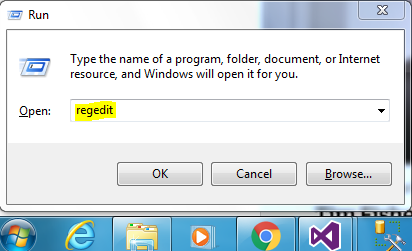
I will be using windows registry to register my exe to be pinged from any web application. Now wondering what is Windows Registry!
The Windows Registry is a hierarchical database that stores low-level settings for the Microsoft Windows operating system and for applications that opt to use the Registry..Wiki
Now yes, windows registry is an important section of the windows operating system having all the low level settings, but very essential for the applications to run on the OS. Windows registry is basically used to store all the important information for the software programs, hardware devices connected. There are basically few root keys pre-defined under the registry belt!
They are:
- HKEY_LOCAL_MACHINE:- Setting are stored which are local or specific to the system.
- HKEY_CURRENT_CONFIG:- All the gathered run time information are contained withing this key. This key is never in the memory, but generated at the boot time process.
- HKEY_CURRENT_USER:- Settings that are valid/applicable to the current logged in user on the system.
- HKEY_USERS:- All sub keys corresponding to the current user are stored.
- HKEY_CLASSES_ROOT:- Information about any registered application on the system is contained.
Each of the above root keys have sub-keys attached to them.
For example: HKEY_CURRENT_USER\Software\Classes\ means ‘Classes’ is the sub key of the ‘Software’ sub key under the ‘HKEY_CURRENT_USER’ root key.
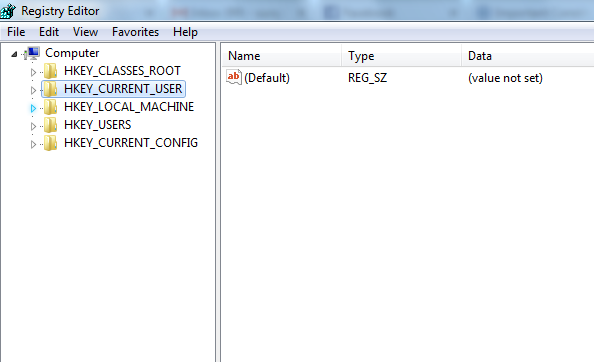
We will be creating a key inside the HKEY_CURRENT_USER in order to ping the exe. We have chosen this root key as that would not require any Admin access to add/edit any key inside this root. So the exe can be pinged by any user.
Diving into the code!
Here, what we would be doing is, we will be creating one console application(.exe), which will act as a medium to add a registry sub key to the “HKEY_CURRENT_USER/Software/Classes”. The same console application will be used to be executed/run from the web application. alert is the key command name which is used for this purpose.
using Microsoft.Win32;
using System;
using System.IO;
using System.Linq;

namespace WMConsole
{
    class Program
    {
        static void Main(string[] args)
        {
            Console.WriteLine("Listening..");

            //Gets the current location where the file is downloaded
            var loc = System.Reflection.Assembly.GetExecutingAssembly().Location;
            if (!Directory.Exists(@"D:\Console\"))
            {
                System.IO.Directory.CreateDirectory(@"D:\Console\");
            }
            //Creates the Downloaded file in the specified folder
            if (!File.Exists(@"D:\Console\" + loc.Split('\\').Last()))
            {
                File.Move(loc, @"D:\Console\" + loc.Split('\\').Last());
            }
            var KeyTest = Registry.CurrentUser.OpenSubKey("Software", true).OpenSubKey("Classes", true);
            RegistryKey key = KeyTest.CreateSubKey("alert");
            key.SetValue("URL Protocol", "wnPing");
            key.CreateSubKey(@"shell\open\command").SetValue("", @"D:\Console\WMConsole.exe %1");
        }

    }
}
Understanding the code!
In the above snippet, we are first creating folder where the same exe will be downloaded from the web application and stored. The path is being dynamically generated and used.
- Then we open the existing root key of the registry, i.e. HKEY_CURRENT_USER through the Registry class field “CurrentUser” and the “OpenSubKey(“Software”, true)”, opens the instance of the sub-key or allows the write access to it. Same with the sub-key “Classes” which lies under the Software key.
- Then, we are creating a new key using the “CreateSubKey(“alert”)” command, with the name “alert”.
- Then we set the value to the sub key “alert”, as “URL protocol” and the name to be used in the anchor tag in web application as “wnPing”.
Subkey alert created, also gets a subkey added to it in the following hierarchy:
shell->open->command
and to this, the value is set as the path to the exe file, which will run.
Once the registry is created, we add the below anchor tag for the exe application to be triggered from any web.
<a href="alert:wmPing">Click to trigger</a>
And done, click to see the magic!
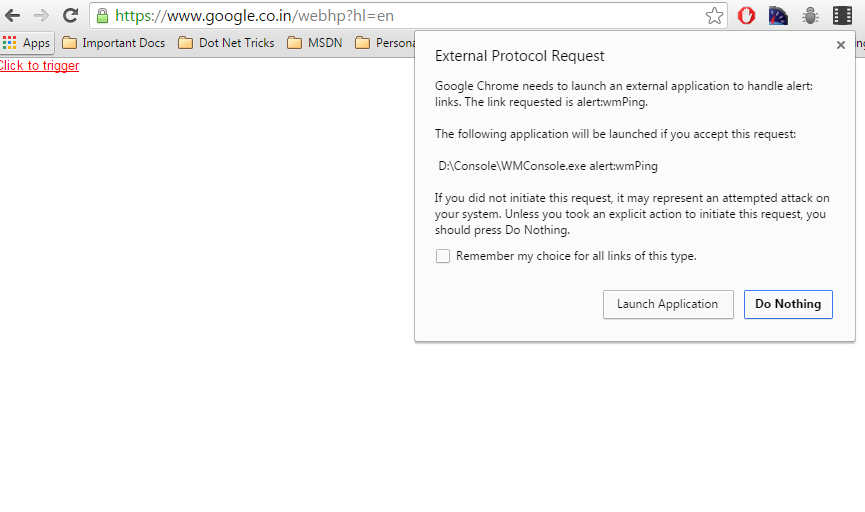
The above window comes up, asking user to Launch the application. Done!!
You can always click the check box to remember the action, if you want the exe to run in the background without prompting.
Conclusion
This is it. I hope you find this topic interesting and try the same. This can be helpful in any web application when you are dealing with any hardware components attached to local client systems and your server needs input from them.
Please share your thoughts and views on any improvement!
Keep learning and keep sharing!
Introduction
Here I would be demonstrating an application to chat and chat private as well, using SignalR.
Before that we need to know first what is SignalR! SignalR is an open and free library which can be used to have real-time functionality integrated to your web applications. There are a hell lot of areas where SignalR can come handy to make your application more handy and more integrated and more responsive to the end user as well. Real-time means having your server respond as quick as possible to the client as and when a request is made.
Now, take for an instance, we have a requirement to show the user uploading a file, the percentage of that file been uploaded on the server. Or I had come across a scenario where, we had to show the end user, who would be uploading a CSV file with ‘n’ number of rows and process each row for some validations. End user would be wondering what would be going on in the back-end. So, would it be great if we could show him how many rows have been processed and how many are left out! Similar to a progress window. Here, comes the SignalR magic!
Most of us think SignalR would be useful in making chat applications, but NO!,it has much more than just chat! I don’t think the makers of SignalR would have a thought in mind to make a chat application out of it! 
Much of a story now! Lets get into a bit of theory!
Theory
We will look into a simple image below and from that image we will try and gain some knowledge on the flow:
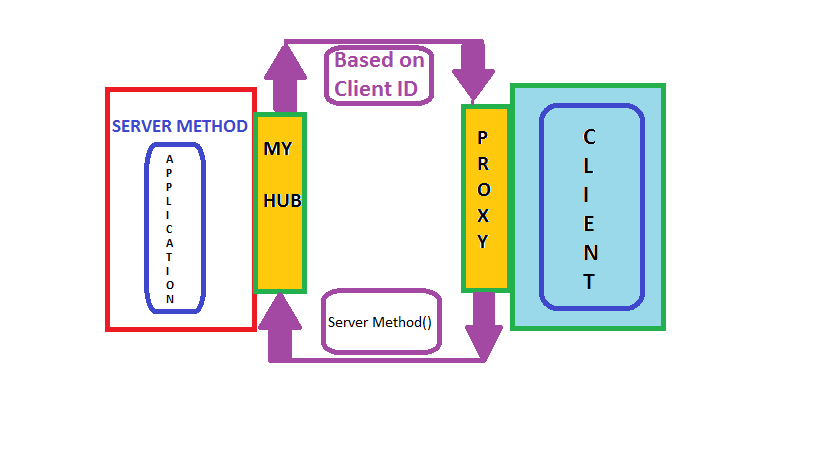
Now a days, every application requires a load of server response in the real time to sustain in the market, as the user expectations have raised high.
Remote Procedure Calls (RPC) is the concept that takes place in the SignalR internally. SignalR provides an API which helps in making the RPC between the server and the client. Actually, from the client side, server side functions are called using JavaScript, once the connection to server is set. The SignalR API also helps creating connections and manage them when required. In simple terms, SignalR provides connection between server and client, letting server to call the funcitons on the client side and from the client side, calling the server side. That somehow is called “Server-Push”.
SignalR starts with HTTP and then to a WebSocket if connection is available. From Wiki,
“WebSocket is a protocol providing full-duplex communication channels over a single TCP connection.”
An advantage of using WebSocket is it can be used by both client and server applications. WebSocket is considered to be the most efficient and consistent medium of communication as, it has the ability to manage server memory in a proper manner and being a full duplex communication, has low latency. These are the considerations made with SignalR which make it more efficient.
The SignalR decides the transport based on the browser, i.e. if the browsers support the kind of transport required by the SignalR. We will discuss the kinds of transports next:
HTML 5 Transports
- WebSockets as we have already discussed. This transport is considered to be true-persistent, creating a two way connection between client and server if the browsers support.
- Server Sent events also called Event Source, which is supported by all browsers except IE.
Comet Transports
Comet usually,is a web application model in which a long-held HTTP request allows server to post data to a client (browser).
- Forever frame This is supported by Internet Explorer only. Creates a hidden frame making a request to endpoint on the server. Server keeps pinging client or sends script to the client, thus providing a one way connection, creating a new connection on every request.
- Ajax Polling This is actually long polling, which is never persistent. This polls the request and waits until and unless the response is received from the server. This introduces latency and the connection resets.
Practical
We will be creating a chat application in order to explain the flow of SignalR. We install the SignalR, create a hub to which the client will interact, calling the server methods and in return the server responds and interact with the client.
You can directly add a new project in VS for the SignalR or create an MVC project and install the SignalR package/libraries from the Nuget.
PM > Install-Package Microsoft.AspNet.SignalR
This is download all the dependencies required for the SignalR.
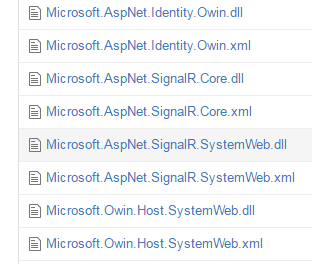
After the successful installation, the above dll’s or packages are installed into your project.
There will be a class file which needs to be added to the root of your project, which would look like:
using Owin;
using Microsoft.Owin;
[assembly: OwinStartup(typeof(SignalRChat.Startup))]
namespace SignalRChat
{
    public class Startup
    {
        public void Configuration(IAppBuilder app)
        {
            // Any connection or hub wire up and configuration should go here
            app.MapSignalR();
        }
    }
}
This is OWIN based applicaiton. Every OWIN application will have a startup.cs class, where the component for the application pipeline are added. The OWIN attribute which specifies the type of property, specifying the project’s start up and the configuration method, sets up the SignalR mapping for the App.
There will be another two script files that would be added as we install the packages for SignalR.
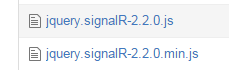
These script files are mandatory to be loaded onto the .cshtml page in order to activate the SignalR.
Lets look into the code straight away:
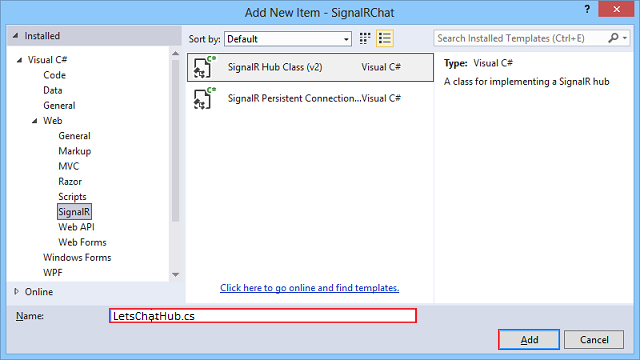
We need to add a new hub class inside a Hub folder. Lets name that LetsChatHub.cs, which would look like:
using System;
using System.Collections.Generic;
using System.Linq;
using System.Web;
using Microsoft.AspNet.SignalR;

namespace LetsChatApplication.Hubs
{
    public class LetsChatHub : Hub
    {
        public void Send(string name, string message,string connId)
        {
            Clients.Client(connId).appendNewMessage(name, message);
        }
    }
}
The above send method accepts the parameters, name (which you would be giving once you navigate onto the url), the message (which the user would be sending from the UI). The other parameter is connId, which would help us have chat private and not send to every user who navigates to the site. If you would like to have every user receive and send the messages who navigates to the URL. To allow every users the access, the code you change as below:
namespace LetsChatApplication.Hubs
{
    public class LetsChatHub : Hub
    {
        public void Send(string name, string message)
        {
            Clients.All.appendNewMessage(name, message);
        }
    }
}
The Send method, is requested from the client with the parameters after the connection is set on the client side and once the server receives the request, it processes and sends back the response to the client, using the appendNewMessage. This appendNewMessage method is added on the client side to receive the response and display on the UI to the client.
You need to add a controller, lets suppose: “LetsChat” with an action “LetsChat”, add a view to that with the below code to it.
The client side code would look like below:
@{
ViewBag.Title = "LetsChat";
}
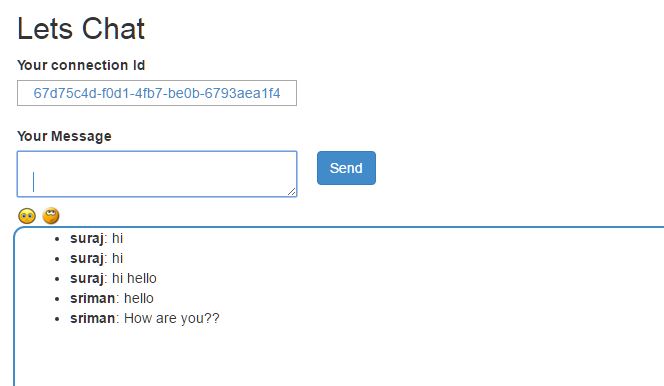
<h2>Lets Chat</h2>
<link href="~/Content/sweetalert.css" rel="stylesheet" />
<div class="form-group col-xl-12">
<label class="control-label">Your connection Id</label><br />
<input type="text" class="col-lg-12 text-primary" id="frndConnId" placeholder="Paste your friend's connection Id" /><br /><br />
<label class="control-label">Your Message</label><br />
<textarea type="text" class="col-lg-10 text-primary" id="message"></textarea>
<input type="button" class="btn btn-primary" id="sendmessage" value="Send" /><br /><br />
<img src="~/Content/smile.jpg" width="20" height="20" id="smile" style="cursor:pointer"/>
<img src="~/Content/uff.jpg" width="20" height="20" id="ufff" style="cursor:pointer" />
<div class="container chatArea">
<input type="hidden" id="displayname" />
<ul id="discussion"></ul>
</div>
</div>
<br />
<input type="hidden" id="connId" />
<!--Reference the autogenerated SignalR hub script. -->
@section scripts {
<script src="~/Scripts/jquery-1.10.2.min.js"></script>
<script src="~/Content/sweetalert.min.js"></script>
<script src="~/Scripts/jquery.signalR-2.2.0.min.js"></script>
<script src="~/signalr/hubs"></script>
<script>
//var userName = "";
//var sessionVal = '';
$(function () {
// Reference the auto-generated proxy for the hub.
var chat = $.connection.letsChatHub;
debugger;
// Create a function that the hub can call back to display messages.
chat.client.addNewMessageToPage = function (name, message) {
// Add the message to the page.
$('#discussion').append('<li><strong>' + htmlEncode(name)
+ '</strong>: ' + htmlEncode(message) + '</li>');
};
// Get the user name and store it to prepend to messages.
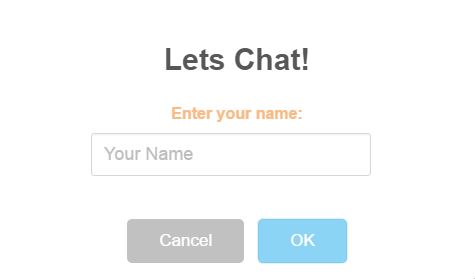
swal({
title: "Lets Chat!",
text: "<span style='color:#f8bb86;font-weight:700;'>Enter your name:</span>",
type: "input",
html: true,
showCancelButton: true,
closeOnConfirm: true,
animation: "slide-from-top",
inputPlaceholder: "Your Name"
},
function (inputValue) {
userName = inputValue;
if (inputValue === false) return false;
if (inputValue === "") {
swal.showInputError("You need to type your name!");
return false;
}
$('#displayname').val(inputValue);
});
// Set initial focus to message input box.
$('#message').focus();
$('#message').keypress(function (e) {
if (e.which == 13) {//Enter key pressed
$('#sendmessage').trigger('click');//Trigger search button click event
}
});
$("#smile").click(function () {
});
// Start the connection.
$.connection.hub.start().done(function () {
$('#sendmessage').click(function () {
// Call the Send method on the hub.
var connId = $("#connId").val();
var frndConnId = $("#frndConnId").val();
var finalConnId = frndConnId == "" ? $.connection.hub.id : frndConnId;
chat.server.send($('#displayname').val(), $('#message').val(), finalConnId);
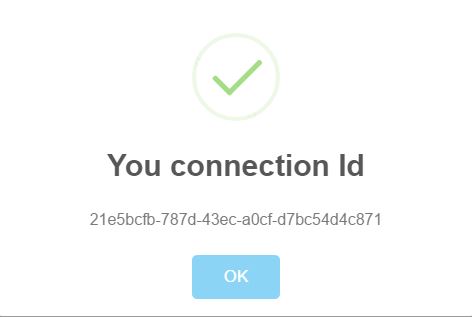
$("#connId").val($.connection.hub.id);
if (frndConnId == "") {
swal("You connection Id", $.connection.hub.id, "success");
}
// Clear text box and reset focus for next comment.
$('#discussion').append('<li><strong>' + htmlEncode($('#displayname').val())
+ '</strong>: ' + htmlEncode($('#message').val()) + '</li>');
$('#message').val('').focus();
});
});
});
// This optional function html-encodes messages for display in the page.
function htmlEncode(value) {
var encodedValue = $('<div />').text(value).html();
return encodedValue;
}
</script>
}
Lets Chat
We have a normal UI in place to add your message and send button to call the server methods.
Lets understand the code above part by part.
var chat = $.connection.letsChatHub;
Here, we set the connection to the Hub class. As you can notice here, letsChatHub, is the same hub class file name which we added to set up the server. The convention as follows, the intial of the methods or the class name starts with lowercase. From here, we use chat to access the Send method.
$.connection.hub.start().done(function () {
                $('#sendmessage').click(function () {
                    // Calls the Send method on the hub.
                    chat.server.send($('#displayname').val(), $('#message').val(), finalConnId);
chat.server.send,is self explanatory, it sets the chat connection to call the server Send method once the connection is set and started.
chat.client.appendNewMessage = function (name, message) {
//
}
This is called, when the Server receives the request and calls back the method on client side.
How the sample would work!
The sample provided for download, will be having few instructions to follow:
- When you navigate to the LetsChat/LetsChat route, an alert would pop up asking you for the name with which you would like to chat. Sweet Alert !!
- Once you enter the name, you see a textbox which asks you for “Your friend’s connection Id”, but since you are starting the chat, you just send a message, and another pop up comes up, with your connection ID, which you need to share with your friends to share your message. Remember, only those who have your ID use it while chatting will be able to see and send through messages to you.
- When you friend navigates, he ought to generate his connection ID and share with you inorder to set up your connection completely. Thus, you need to have the connID to whom you will be sending and vice-versa with your friend as well. Then just chat!!

If you would want to send message to all and make that common, then use the Clients.All code snippet to send all.
Another interesting thing, which was figured out is, the use of @section scripts{}, that lets the Signal R scripts render and active on your page and also using the @section scripts provides your code a good outlook.
Share and Send files using SignalR!!
Ooops!! Nice question right!
It is ideally not advised, rather I would not recommend to send or share files using Signal R. There always is better way to accomplish that. The idea would be using API, you can have an upload area, and use SignalR to show the progress and once upload completes, update the user regarding the completion and generate a download link on the UI for the users to download and view the file.
This is not always the best idea, but is just another idea.
Conclusion
This is just a simple Chat application, which you can use to chat with your friends, if you host on Azure or any other domain. But again,SignalR is not just this much. There is a lot of other effective use of SignalR. Will be sharing more utility of SignalR in few articles more.
References
]]>In this article I will be sharing a basic stuff which comes handy in MVC applications. The HTML helpers provided by the Razor are smart enough to understand and process the work as required.
We will be discussing in brief about the Ajax.BeginForm, which has few concepts hidden within. When we face the difficulty or the issue, we explore and resolve. Same has happened recently with me. So lets start exploring what the hidden secrets are, which actually are very few.
Adding Unobstrusive- Ajax JS
This can be added from the Nuget package manager directly. I find adding from the Package Manager console easy. The script goes like below:
Install-Package jQuery.Ajax.Unobtrusive
Snippet & Learning
AjaxExtensions.BeginForm is a part of System.Web.Mvc.Ajax namespace under the System.Web.MVC assembly. When used in the response it writes the HTML
With an anticipation and hope, this article would be an interesting and effective somehow. This article will be covering the Asp.Net 5’s MVC6 Welcome application. a brief about the all new concepts of MVC6 and the new structure it beholds. Then we create our first Welcome application and then have a walk through of the new Azure Portal and deploy our first web application.
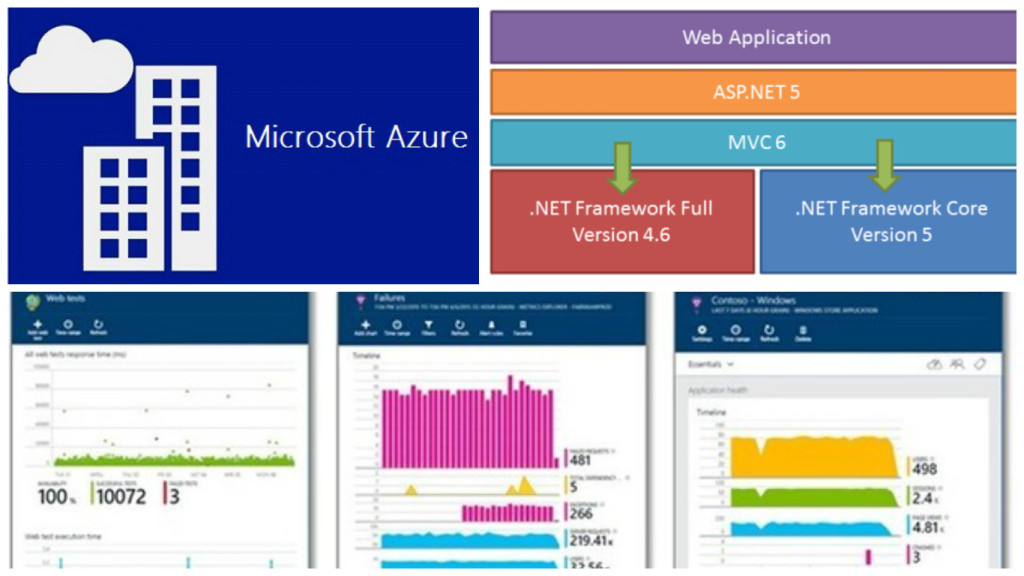
The above image is all that we will be covering in our article.
Get Started
A perfect blend of cloud and web application is what Asp.Net 5 is intended for. Asp.Net 5 is now being called off as .NET core is what that stands out today. It is a framework with open source & cross platform for building cloud based web applications. Here Azure comes integrated to the Visual Studio applications. Web applications either can be deployed to cloud or be running on On-premise. .Net core is available on Visual Studio 2015 build. You can download the community edition of the Visual Studio which is actually free.
Community Edition Download. Give a try for sure!
.Net 5 core contains a small optimized run time environment called “CoreCLR” One more important point to note is, .Net Core is opensource and the progress can be updated on Github. They have the code exposed and the build can be tracked easily. .Net core is said to contain a set of libraries known as “CoreFx”. Below are the links to the Github. Just have a look:
Another important benefit is termed as “Portability”. What this means is, we can package and deploy the Core CLR which can in turn help you eliminate the dependency on the installed version of .Net framework. Multiple application running on different versions of CLR can be set ups well. This is the magic the team wanted to result out, which is great!
With .NET 5 and VS 2015 comes MVC6 into picture. Microsoft builds are moving faster than the world! 
When I first looked at the structure of the Solution when i added a new MVC project, I was like What!!

Where is Global.asax.cs? Where is Web.config, App_Start?. Did I download the correct files and selected the correct template. These sort of questions were flickering in my mind. When ran the application it ran successfully as well. Strange!!
Let’s have a small trip into the MVC6
Unified MVC Controllers
MVC6, the merger, the blend of three frameworks, i.e. MVC, Web API2 & Web Pages. Previous versions of MVC, while adding a new template would prompt to check whether we want Web API along with MVC. Here we select the MVC project and we get the opportunity to work with API as well.
In previous versions there were two base controller classes, separate for normal controller and also for the Api controller, i.e. ApiController
public class TestController: Controller {

}

public class ApiTestController ; ApiController {

}
In earlier version as shown above, the controller base class were from System.Web.MVC.Controller and for API, System.Web.Http.ApiController. But in MVC6 it is only one, i.e. Microsoft.AspNet.Mvc.Controller.
Different style of HTML helpers
In MVC6 there comes a new title termed as Tag Helpers. They make life much more simpler. How! We will get to know once we see the code snippet.
For normal web pages, as we know the HTML helpers are defined within the System.Web.WebPages.Html under System.Web.WebPages
, whereas in MVC6, it is under the System.Web.MVC assembly..
The HTML helpers which we used to use in Razor or ASPX, were quite difficult for normal HTML developers to understand (suppose designers). Now i MVC6 that has been simplifies using the Tag Helpers.
@using (Html.BeginForm())
{
        @Html.LabelFor(m => p.EmpName, "Employee Name:")
        @Html.TextBoxFor(m => p.EmpName)

        <input type="submit" value="Create" />
}
But in MVC6 ,
@model AzureDemoProject.Models.Employee
@addtaghelper "Microsoft.AspNet.Mvc.TagHelpers"
<form method="post">
<div><label>Employee Name:</label> <input type="text" /></div>
<input type="submit" value="Save" />

</form>
Now the second snippet looks more like HTML friendly and also a bit simple.
Mr. Damian Edwards, has posted the source code on Github which has examples of Tag Helpers. Please go through for better live understanding
Git Hub Tag Helpers Download and play around.
Support for Grunt, NPM & Bower
These are the latest trending front end development tools. These are quite new to me as well, but will be learning and posting articles on these as well in coming days. Stay tuned!!
Ok branding apart,  lets have a brief idea on what these are.
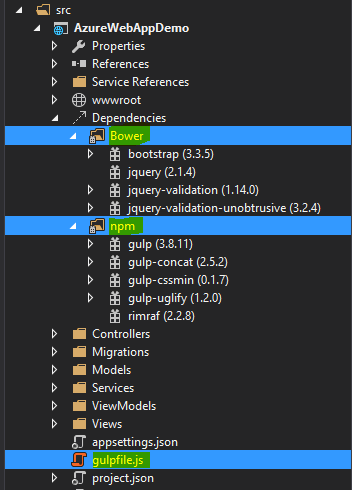
Bower:-This is a client side item added by default to MVC6 project. If not added, then Right click on the project-> Add->New Item
->Installed(Client Side)-> Bower.json. You can find then the file is already installed. The file is inside the wwwroot->lib->bootsrap->bower.json. As you open up the file, you can find the client side tool packages added to the project and their versions. Thus, we got to know that the bower is a client side package manager which is used to add the front-end packages like bootstrap, jQuery, angular, etc.
Grunt:-In MVC6 project when we add, we can find the gulpfile.js, this is kind of an alternative to the Grunt as both perform the same kind of functions. The operations they perform is minification, cleaning, concatenation, etc. of both js & css files.
NPM:- Node Package Manager is present under the project with the name project.json. This holds the dependencies and their versions required by the web application we have set up.
"dependencies": {
    "EntityFramework.Commands": "7.0.0-rc1-final",
    "EntityFramework.MicrosoftSqlServer": "7.0.0-rc1-final",
    "Microsoft.ApplicationInsights.AspNet": "1.0.0-rc1",
    "Microsoft.AspNet.Authentication.Cookies": "1.0.0-rc1-final",
    "Microsoft.AspNet.Diagnostics.Entity": "7.0.0-rc1-final",
    "Microsoft.AspNet.Identity.EntityFramework": "3.0.0-rc1-final",
    "Microsoft.AspNet.IISPlatformHandler": "1.0.0-rc1-final",
    "Microsoft.AspNet.Mvc": "6.0.0-rc1-final",
    "Microsoft.AspNet.Mvc.TagHelpers": "6.0.0-rc1-final",
    "Microsoft.AspNet.Server.Kestrel": "1.0.0-rc1-final",
    "Microsoft.AspNet.StaticFiles": "1.0.0-rc1-final",
    "Microsoft.AspNet.Tooling.Razor": "1.0.0-rc1-final",
    "Microsoft.Extensions.CodeGenerators.Mvc": "1.0.0-rc1-final",
    "Microsoft.Extensions.Configuration.FileProviderExtensions" : "1.0.0-rc1-final",
    "Microsoft.Extensions.Configuration.Json": "1.0.0-rc1-final",
    "Microsoft.Extensions.Configuration.UserSecrets": "1.0.0-rc1-final",
    "Microsoft.Extensions.Logging": "1.0.0-rc1-final",
    "Microsoft.Extensions.Logging.Console": "1.0.0-rc1-final",
    "Microsoft.Extensions.Logging.Debug": "1.0.0-rc1-final",
    "Microsoft.VisualStudio.Web.BrowserLink.Loader": "14.0.0-rc1-final"
  },
 "scripts": {
    "prepublish": [ "npm install", "bower install", "gulp clean", "gulp min" ]
  }
As we can see in the above snippet, which is just a part of the project.json file. This is to show the default dependencies added to the project and the pre publish scripts mentioned. When we suppose add a new dependency, suppose I try and add System.Linq, it will list up the Nuget package as intellisense and then we add the version which also comes under the intellisense. Like below image:

Then after hitting Ctrl+S, the restoring of the references packages starts.
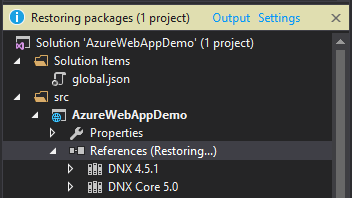
Then we see the references added. For more information on the project.json file and its contents, please visit the below link:
Project.json
Integration to Cloud & optimized: This is another major boost feature added to MVC6 application. Now it comes integrated to the cloud with Microsoft Azure and also the optimizing and monitoring tool provided by Azure, i.e. Application Insights.
We will have a walk through of adding the cloud Web application and then a brief on Application insights as well.
Boosted Dependency Injection: Now MVC6 application has in built and integrated dependency injection facility. There is no more need for the packages like, Ninject, Unity, Structure Map3 and all. The code for the configuration setting for the dependency injection is added inside the StartUp.cs class file as below:
// This method gets called by the runtime. Use this method to add services to the container.
        public void ConfigureServices(IServiceCollection services)
        {
            // Add framework services.
            services.AddApplicationInsightsTelemetry(Configuration);

            services.AddEntityFramework()
                .AddSqlServer()
                .AddDbContext(options =>
                    options.UseSqlServer(Configuration["Data:DefaultConnection:ConnectionString"]));

            services.AddIdentity<ApplicationUser, IdentityRole>()
                .AddEntityFrameworkStores()
                .AddDefaultTokenProviders();

            services.AddMvc();

            // Add application services.
            //Dependency Injection as well
            services.AddTransient<IEmailSender, AuthMessageSender>();
            services.AddTransient<ISmsSender, AuthMessageSender>();
        }
The we normally inject the services into the constructor of the controllers. Is’nt that great!!
appsettings.json: As we know there is no Web.config file in our application, but we need to have a place where we have the settings required by the application at all stages. This is this place. In MVC6, they have had a upper hand over the JSON than the XML.
The connection strings, the other app settings file we used to add inside the Web.config will now be contained here, that to in Json format. An example like below:
"Data": {
    "DefaultConnection": {
      "ConnectionString": "Server=(localdb)\\mssqllocaldb;Database=aspnet5-AzureWebAppDemo-XXXXXXXXXXXXXXXXXXX-XXX;Trusted_Connection=True;MultipleActiveResultSets=true"
    }
}global.json: This is a separate folder named Solution Items. here is the global.json file, which contains the solutions’s project references and their dependencies as well. Loos like below:
{
  "projects": [ "src", "test" ],
  "sdk": {
    "version": "1.0.0-rc1-update1"
  }
}
The appsettings is initialized into the project in the Startup.cs file as below:
var builder = new ConfigurationBuilder()
                .AddJsonFile("appsettings.json")
                .AddJsonFile($"appsettings.{env.EnvironmentName}.json", optional: true);
The App_Start which had the RouteConfig.cs file also goes missing. In MVC is present inside the Startup.cs file as below:
public void Configure(IApplicationBuilder app, IHostingEnvironment env, ILoggerFactory loggerFactory)
        {
               app.UseMvc(routes =>
            {
                routes.MapRoute(
                    name: "default",
                    template: "{controller=Home}/{action=Index}/{id?}");
            });
        }
Thus, lets have a look at the entry point of the application:
// Entry point for the application.
        public static void Main(string[] args) => WebApplication.Run(args);
Another nice feature is the segregation of the Models & View Models. The Model now only will deal with the Db Entities and the context, where as the ViewModel will deal with the model classes which are required in the View binding.
This was just a brief about MVC6, more information and application building will be shown in the upcoming articles on MVC6. Now lets jump start the deployment to azure.
![]()
Head start Deployment
Now lets discuss creating a new MVC6 project from VS 2015 and then deploying to Azure, mostly I will pictorially explain you which will help understand better.
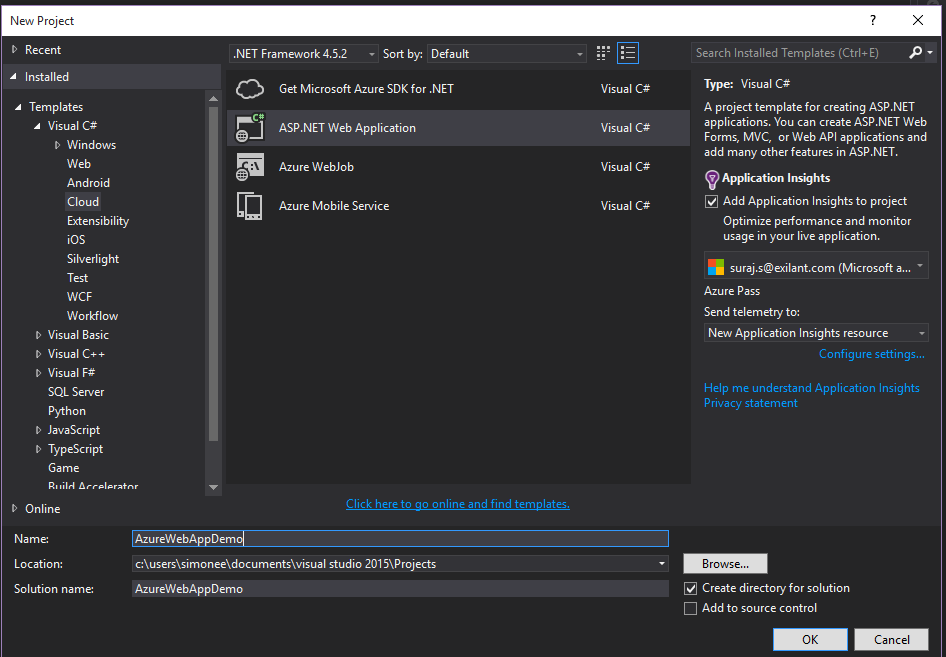
- Step 1: Create a brand new project from the Visual Studio 2015 templates. Select the cloud directly and then the Web project as we will be deploying our application to azure.
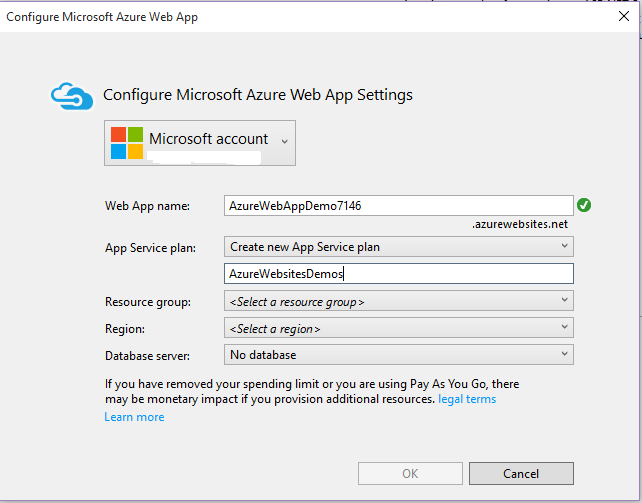
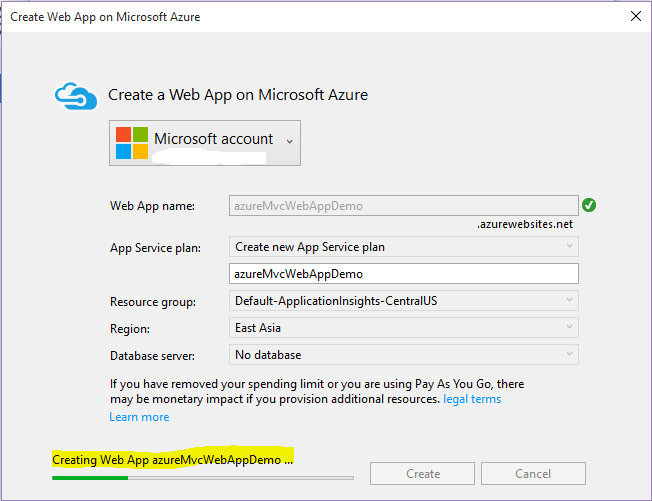
- Step 2: Then after giving name for the project, another window will prompt which will ask for the Microsoft Azure configurations. Web App Name, which will actually be the URL for the application after hosted on cloud.
Then asks for the Application Service under which the application will be registered and deployed.
Region is another important factor which might come handy in the performance of the application. Thus, we select East Asia here.
If asked for the Database server and the application required we add a new database server or use any existing database. We skip for now the database integration.
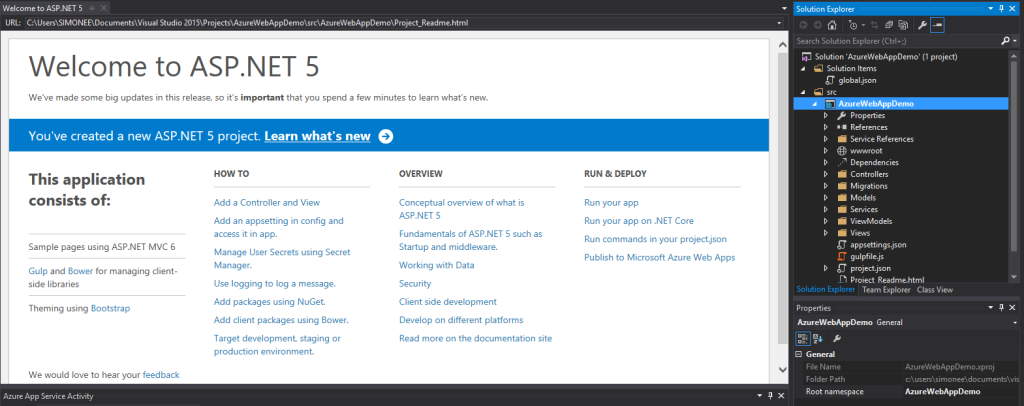
- Step 3: After setting up, we land in creating our first web application and the structure is like below:
- Step 4: Lets have a look at project structure which gets created.

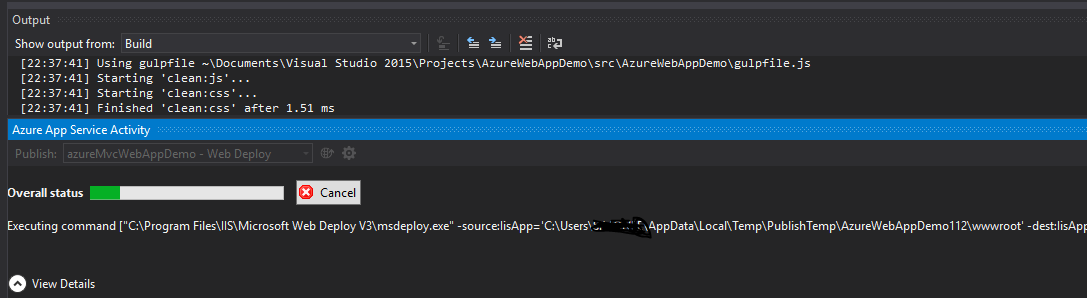
- Step 5: Lets now publish and deploy our web application. Right click on the project and click ‘Publish’. We then see a window pop up like below:
- Step 6: This will now create an Application Service(Webservice) on Azure portal and also deploy our Web Application as a new Website. The status can be seen under Azure Activity :

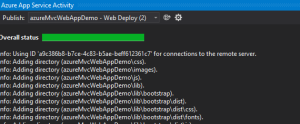
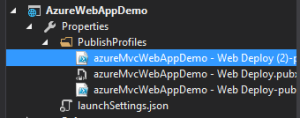
The above images are the over all status and the name of the publish package that got deployed. -
Step 7: Then navigate to the Azure portal, already notifications would be highlighted to let you know that web site is now hosted and you can browse.
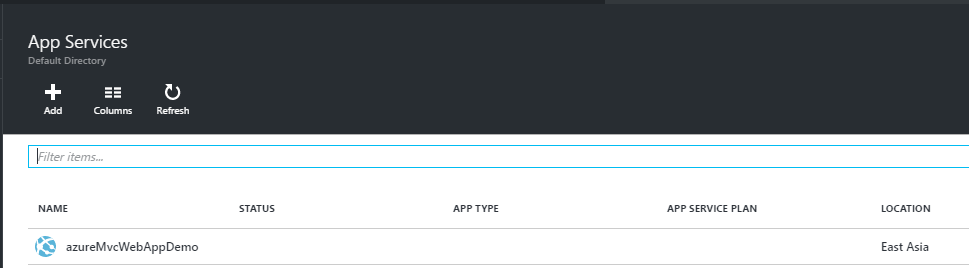
The status app type and the app status will update in a few minutes.


Conclusion
Thus, once the website is hosted on Azure, we can browse and run our application and share with anyone to navigate through our application. We came to know in this article how easy it is to deploy to cloud in the latest builds, making the lives of developers much easier. I will be sharing and covering the Application Insights in the next article which will follow this up. I hope this has helped in learning some facts about MVC6 and please post your feedback. Application Insights– upcoming.
References
]]>JSON Java Script Object Notation , a very familiar and commonly used concept. It is a data interchange medium and is very lightweight. It is one kind of a syntax for storing and passing data. Since it is Java script object notation, it uses the java script style of syntax, but actually is text only. It also is language independent. The format would look like below:
{"Books":[
    {"name":"Asp.Net Mvc", "code":"111"},
    {"name":"Angular Js", "code":"112"},
    {"name":"Javascript", "code":"113"},
    {"name":"CLR", "code":"114"}
]}
Now this, JSON object can be created and used to POST or GET in MVC application. Usually, when we do an ajax call, we get the HTML fragments and send them to the browser or append to any DOM elements. That is acceptable, but sending HTML elements with data is not advisable, so would not that be great to send data in a specific format and the browser assigns the data into the HTML. Here, JSON comes in handy. Lets see how. I will explain in simple terms and snippets for better understanding as this topic is not complex at all.
Peek into Snippets!!
I will proceed with an anticipation that readers are aware of MVC (Model, View & Controller), as I will not be sharing the steps to create an MVC project. So, Lets start.
When we create a controller in an MVC project, we know the default type added is ActionResult, which is generic to other types of method types pre-defined like: ViewResult, JsonResult, etc.. Thus, for returning a JSON data, we can use either ActionResult or JsonResult,but preferably use JsonResult as we already know the type, the method will return. JsonResult, is actually a special ActionResult, which suggests the ViewEngine that an object of JSON type will be returned rather than normal HTML.
Lets see the snippet and then try and understand.
using System;
using System.Collections.Generic;
using System.Linq;
using System.Web;
using System.Web.MVC;
using DemoJsonTest.Models;

namespace DemoJsonTest.Controllers {
    public class EmployeeController : Controller {
        private Employee[] employeeData = {
            new Employee {Name:"Suraj Sahoo",EmpCode:"EMP042"},
            new Employee {Name:"Suraj Sharma",EmpCode:"EMP044"},
            new Employee {Name:"Suraj Ray",EmpCode:"EMP041"}
        };

    public ActionResult Index() {
        return View();
    }

    public JsonResult GetEmployeeDataJson(string empCode) {
        var employee = employeeData.Where(emp => emp.EmpCode == empCode).SingleOrDefault();
        return Json(employee, JsonRequestBehaviour.AllowGet);
    }
Thus,in the above code, we have shown a normal controller, in whose constructor we have explicitly initialized a model named Employee with few dummy data. Then the main part is the JsonReult method using which, we are filtering the data based on the parameter passed, here EmpCode and then returning the Json object. Mark here, we have used JsonRequestBehaviour.AllowGet. Now whats this. This has an interesting concept behind it. Usually, the browsers to avoid malicious sites trying to intercept JSON data returned, in response to a GET request, it does not respond to GET requests by default.
System.InvalidOperationException: This request has been blocked because sensitive information could be disclosed to third party web sites when this is used in a GET request. To allow GET requests, set JsonRequestBehavior to AllowGet.
The above is a part of the error thrown when we miss AllowGet. That is self explanatory actually.
We usually us ajax options, i.e. success method to process the JSON data received from the GET request and append or set to the HTML DOM elements.
<script type="text/javascript">
$.ajax({
    url: "GET REQUEST URL",
    type:"GET",
    success: function(empData) {
            var trgt = $("#tblEmployee");
            target.append("<tr><td>" + empData.Name + "</td><td>" + empData.EmpCode + "</td></tr>");
        },
    error: function() {
      //Do something..
        }

});
// ]]></script>
Thus, in the above snippet, we are fetching the data in JSON format from the GET response and binding to the table html dom.
A point to note here is that, when we assign/cast (actually) a model into JSON object and we explicitly specify few properties of the model and miss out on others, MVC framework is clever enough to first convert the model with each property into JSON and then assign default values to those properties which we have missed. Lets see an example of conversion:
{ "EmployeeId":0, "Name":"Suraj Sahoo", "EmpCode":"042",
     "IsActiveEmployee": false, "DepartmentId": null }
Mark here,that we have only specified the values of Name and the EmpCode, all other values assigned after JSON conversion by the MVC smart framework.
Conclusion
We saw and discussed a very simple and interesting topic regarding the JSON in MVC and how smartly MVC handles the conversion. This helps when we use API and then return JSON,XML to interchange and expose our data. JSON is actually an alternative to XML form of data exchange. For angular JS now a dayswhich is in demand,we use the API controller, return JSON data and take the advantage of Angular two-way binding.
I hope this helps the beginners out there learning MVC. This is a part of it. Enjoy coding. Open to suggestions. Don’t miss to add your feedback.
In this article I will be sharing a quick and an interesting way to send SMS using a simple C# application. I will be using ViaNett API to send messages from my application. I will be creating a simple windows form which will trigger the API and send the SMS.
Sending SMS has become a common objective for almost every site nowadays. Though they keep irritating you with continuous messages regarding their advertisements.
We use a simple REST API which provided by various providers in the market. You can try out some of them using the free trial version and send SMS. The reliable and faster one can be chosen. Also check for the Support the team provides.
I have thrown my hands at ViaNett and Twilio APIs. Here I will be discussing using ViaNett. Let’s start without actually wasting time.

Get Started
To start with, visit the ViaNett website (ViaNett Free demo Account). Sign up and register you with your email address for the free account, which will provide you with 5 free SMS.
After that, you land on a page having contents like below
Click on the Technical Api and that will navigate to different kinds of API it provides. We here would need the HTTP API in order to send the SMS, as we would be using the WebClient in order to use the API. We will be seeing the code below.
After you click on the HTTP API, you will be navigated to another page which will have the API listed under an Example like below:

Create a script to generate a URL like this: https://smsc.vianett.no/v3/send.ashx?src=xxxxx&dst=xxxxx&msg=Hello+world&username=xxxxx&password=xxxxx Retrieve this web page from your script/application, and the SMS will be sent.
This is the API URL which our Web client will be using.
Now to start with our demo application, we will be creating a windows form application. Now, I will not be writing up and lengthing my article with the step by step image for creating a Windows Form application. Those who are really new to windows form, please follow one of the best links below.
Walkthrough To create Windows Form application
After you create a simple windows form application, it would look something like below:
Create as simple as you can , as this is just for learning purpose. The UserName is the user name you had provided during the ViaNett registration i.e. the email address
The password is the password you had given during the registration in the ViaNett.
Then for the button click we have the following code:

private void button1_Click(object sender, EventArgs e)
        {
            using (var web = new System.Net.WebClient())
            {
                try
                {
                    string userName = txtUserName.Text;
                    string userPassword = txtUserPassword.Text;
                    string msgRecepient = txtPhNumber.Text;
                    string msgText = txtMessage.Text;
                    string url = "https://smsc.vianett.no/v3/send.ashx?" +
                        "src="+msgRecepient +
                        "&dst="+msgRecepient +
                        "&msg="+System.Web.HttpUtility.UrlEncode(msgText,System.Text.Encoding.GetEncoding("ISO-8859-1")) +
                        "&username=" + System.Web.HttpUtility.UrlEncode(userName) +
                        "&password="+userPassword;
                    string result = web.DownloadString(url);
                    if(result.Contains("OK")){
                        MessageBox.Show("Sms sent successfully", "Message", MessageBoxButtons.OK, MessageBoxIcon.Information);
                    }
                    else{
                        MessageBox.Show("Some issue delivering","Message",MessageBoxButtons.OK,MessageBoxIcon.Error);
                    }
                }
                catch (Exception ex)
                {

                }
            }
        }
The above code would look simple rather it is.
When you select a Windows Form Application, by default System.Web is not added to the reference list. Thus, you need to add that from the assembly list.
System.Web is required as we add the WebClient to use the API and download the response.
Here in the code, just giving a brief on what this snippet intends:
We retrieve each text input from the user, i.e. the User name, User password, Text Message & the User Phone Number. We use these as the URL params to the Service API of the ViaNett.
Then after that we will check for the response after sending the message and accordingly we update the User.
**Point to note is: The country code needs to be prefixed to the phone number, in order to send the message else it will mail back regarding the failure to the registered email.
Conclusion
Thus, this is a small article on the integration and sending SMS using C# aaplication. I hope this helps beginners!! I will come up with more articles with other APIs and their other SMS features they support.