Asp.Net Core is completely re-written prior to earlier versions works on .Net framework. Asp.Net was developed with main focus to make it cross-platform! Yes Asp.Net core is now cross platform. It has gained popularity in quick time for modern day web development. One go cloud development with configurations made easy, with self hosting process with IIS and many more features added to Asp.Net core which makes it stand tall!
Cross Platform!
Yes! you read it right, Asp.Net core is now cross platform. The Asp.Net core CLR now has now WPF & winforms. It is built to code once and run on any platform. We can now have the .Net framework installed on Linux, Unix or OSX.
.Net Core CLR has joined the open source community and is on github. Anyone can contribute now on github for the .Net Core. Asp.Net Core applications can run both on .Net earlier frameworks and also on .Net core, which puts a great benefit for the developers. .Net Framework 4.6 is the same .Net we have been using and continue to develop the same way. .Net Core gives a platform to generate cross-platform solutions. But .Net 4.6 is stable and .Net core is under progress.

Merged stack MVC & Web API
Now this seems interesting. What? MVC & Web API merged!! Yes it is, in Asp.Net core we will have the merged stack of MVC and API and moreover Webforms is completely gone! Earlier we were required to add more than one Web project, one for MVC and one for Web API. But in Asp.Net core, we need to have only one project.
Multiple inbuilt tools are being used with .Net Core to build web applications with ease like NPM used for tools support, Client side support using Bower, Grunt & Gulp for building automatically, & as usual Nuget for .Net packages.

.Net Core application with Command Prompt & VS Code
Once we have installed .Net core framework in our system, since it is open source the .Net Framework can be accessed and projects can be maintained through command prompt.
Open command prompt, and hit “dotnet”. It will result the entire information of the .Net framework.

To create a new project using the dotnet templates, using scaffolding in VS IDE. The same scaffolding is also possible in the command prompt. With the command, “dotnet new”. This creates the scaffolding and restores the packages required if not exist.
Then the scaffolding templates:
Here we see multiple templates
Choose one of the templates setting the path where the project needs to be added. Lets create a console application as of now in one of our drives. To add a new console application, the command goes like below:
Here a new project is created, a console application for “Hello World”. Then when you run, you get namespaces missing error and navigating into the directory, you find the bin and obj folders go missing. Thus the error shown below:
Thus, restoring the packages solves the issue.
“dotnet restore”
This resolves and restores the required default packages for the console application.
Then build the project in order to ensure the code is errorless.
“dotnet build”
After build succeeds, then run the project to get the out put.
“dotnet run”
Output goes as below:
The same can be achieved in the terminals of Linux OS & Mac OS, just .net Core framework needs to be installed on the OS, which is why .Net core is developed to make it cross platform.
Upcoming articles we will look into the more details of the dotnet core. Creating Web applications using .net core and the MVC6.


In order to run the Azure, we know the web azure portal where we can modify and manage resources as and when needed. But to manage resources on regular basis, logging into the Portal each time is a hectic job. So automation can solve maximum problems for us. For the automation, we write scripts that keep running in order to ensure the valid logic gets executed.
For the Azure to be automated, we need the azure SDKs. Download the SDKs if not added already. To download the SDK, navigate to the Download SDKs.
There are options for various tools and languages supported by Azure up till date like Java, Visual Studio, Node JS, PhP, Python, RUBY, etc.
We are here interested for Powershell command line tools.
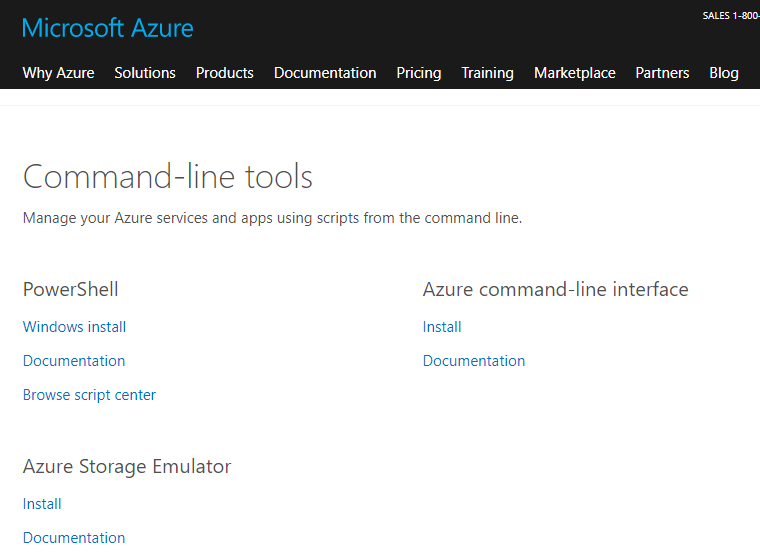
Once downloaded, click and follow the installation rules and then the azure contents would work with Windows Powershell.
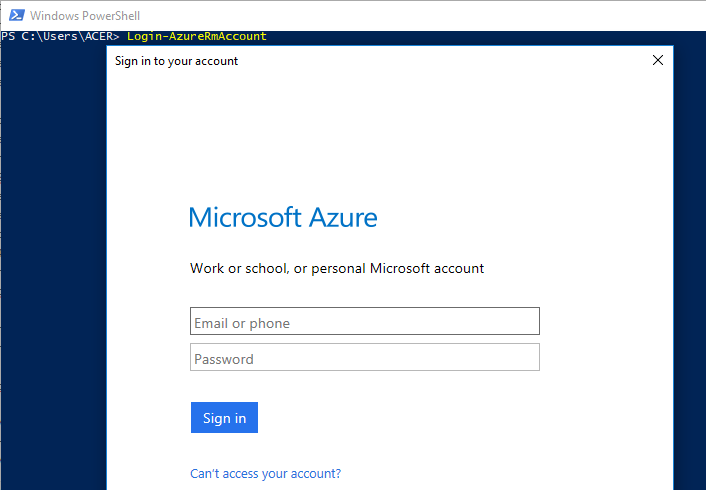
Once the powershell azure sdk is installed, open the Powershell with administrator rights.
Then, the first thing we need to is Login with azure credentials and connect to Azure. The command is
> Login-AzureRmAccount
This opens up the Microsoft Azure Login window. Add the user name and password and login.
After the login, in the powershell window, we can see the details of the subscription.

Now, if suppose you have multiple subscriptions and want to select a particular subscription, then the below command works out:
//To fetch the subscriptions
 > GetAzureRmSubscription
//To select the particular subscription
 > GetAzureRmSubscription -SubscriptionName SubName | Select-AzureRmSubscription
To get the current subscription details for which we are working on, then the shell script goes like:
//To get the current context of the azure subscription being used
 > Get-AzureRmContext
The above few syntax have AzureRm. Now the “Rm” here means ‘Resource Management’
Getting the list of VMs in the Azure resources under the subscription:
> Get-AzureRmVm //Gets the list of VMs under the subscription
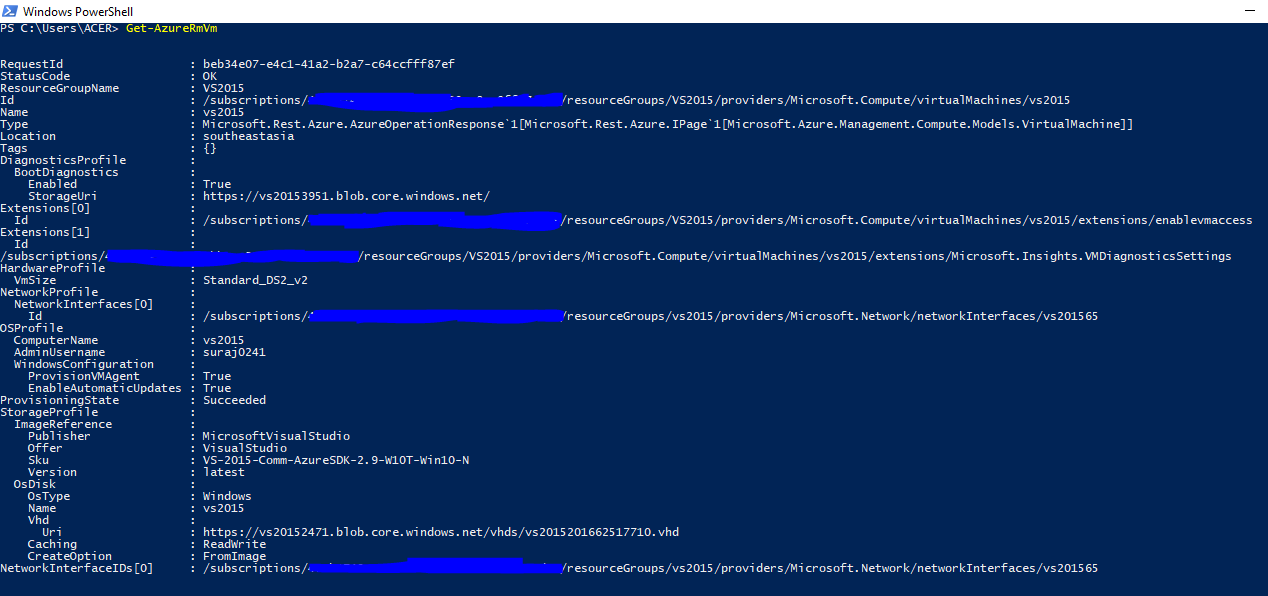
The above image shows, we have a single VM with Resource name “VS2015”. There are other information as well like, disk size, type, OS, etc.
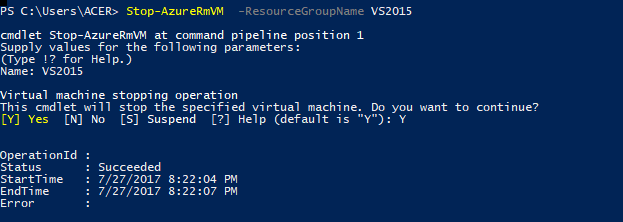
Now to stop the Azure VM, we need to have the below running script:
> Stop-AzureRmVm -ResourceGroupName VS2015 -Name VS2015
This way we can use the powershell script and connect to Azure in order to use and create Azure services without using the portal. In the upcoming articles we will look into creating other services through Powershell.
Cloud computing can be a complex term now a days, as there are already many services that can run on Cloud. Services like Data mining, Machine learning, creating virtual machines, host APIs for mobile applications and many other endless services.
Microsoft Azure is an open and varied platform, which allows you to choose from a variety of Operating Systems, programming languages. When you build an application in Azure, we will be using specific types of services that would be running on one or more servers on the cloud. We can configure and create Paas services like SQL databases, NoSQL databases, Document DB. Creating app services, and automating the azure services using powershell scripts is what triggers developers to use this. Here in this article, we will look into how to create a Virtual Machine and why to create a VM on Azure.
What is and Why use Virtual Machine?

A virtual machine according to wikipedia, is an emulation to computer system, where emulation would mean to enable a computer system to behave like another computer system (a job of an emulator which may be physical or virtual). A virtual machine can be used on Azure platform on OS like Windows and Linux. The VMs on Azure are highly efficient, high-scale, secure and run on a virtual environment on windows server.
Creating a VM on Azure
Once, you are ready with the Azure subscription and up and running Azure portal. Login to the Azure portal and you see the dashboard.
The dashboard on the portal displays all the services added to the Azure like below:

Click on the New (+) tab & you find another tabbed window displaying all the categories of services provided by Azure. The Virtual Machine is under the Compute service. The options would look like below:

The summary also shows about the sub services. Services like Windows Server Datacenter, which is effective, application focused and user friendly. Ubuntu Server 16.04 Transport Layer Security. Sql server 2016 with SQL server installed on the VM. A normal VM instance, a VM scale which can be used to deploy and also manage identical sets of VMs using a single image and many other compute services.
We would be creating here, a Windows Server Datacenter. Clicking on that option will ask user to configure the Virtual Machine.

Once the configuration is added and OK is clicked, it asks the user for selecting the size of the VM. Remember, the pricing will vary based on the high end configured size (if chosen). Here, I am choosing the minimum configuration DS1_V2 Standard with 1 core. Based on the application we can manipulate the configuration. That is the scaleable option provided by Microsoft Azure. We can anytime scale up and scale down based on our requirement.
Once done click Ok, then the tab for optional configuration. This is the 3rd step. We can move on and click OK to finalize the purchase and get the VM. Once, VM is ready, click on Connect and it downloads the RDP. Using the same username and password we connect the VM and start using the VM.

Its up and running. We can go ahead and configure IIS and run on the server. You can manage your resources using the dashboard and stop the resource whenever not in use so as to avoid consumption of your credits.
]]>Hey folks! Another interesting topic to discuss and share! Integrating sensors to an Arduino board seems interesting and feels good when you receive the desired digital output and manipulate it. Now a days hundreds of different kinds of sensors are available in the market, we need to try out and explore how we can better user experiences using these electronics. Temperature monitoring sensors, obstacles detection sensor, soil moisture detection sensors, heart pulse rate sensors and many more. I will try and use as many as sensors as I can and try integrating them with more sophisticated devices. In this article I would be sharing about the IR Obstacle sensor, which as the name suggests detects object or any obstacle coming the sensors way! Lets see how.
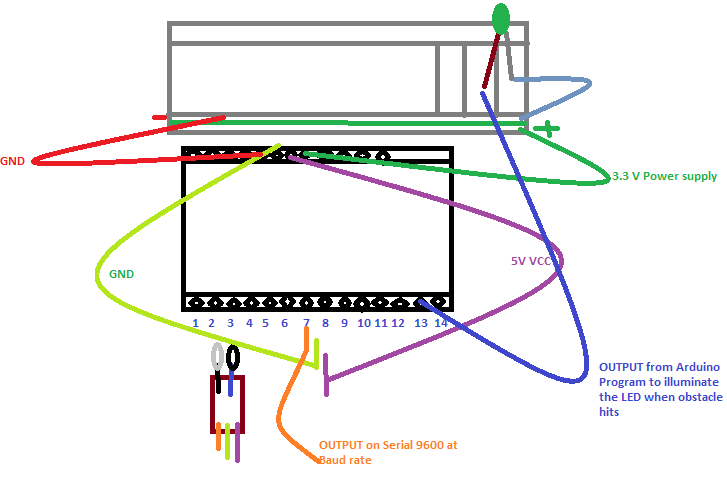
The sensor
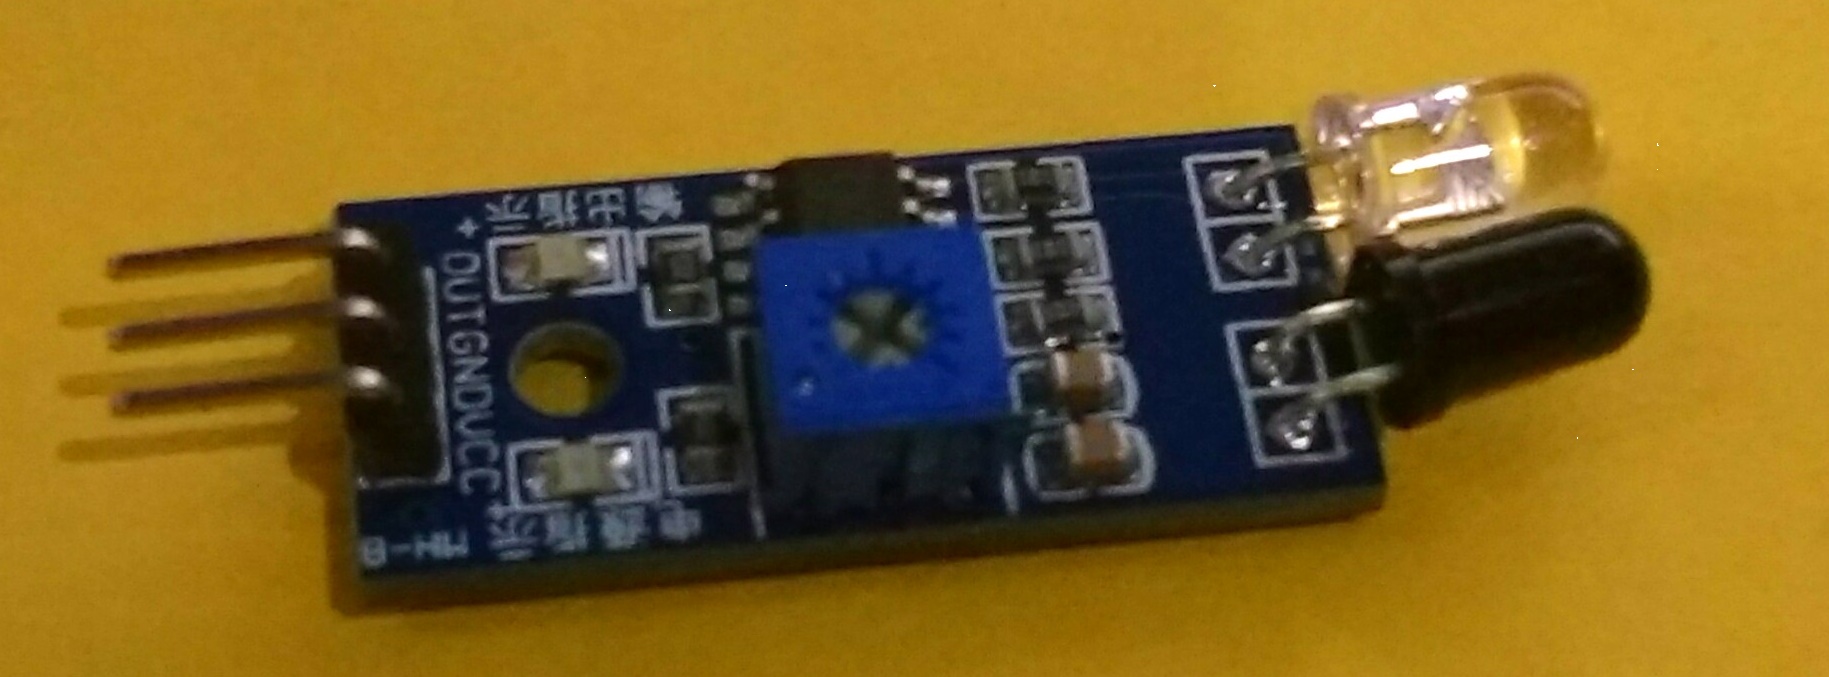
Here is how the sensor looks like. We will see another pictorial representation of the above sensor and discuss about the details of the part.
The pictorial goes like below:
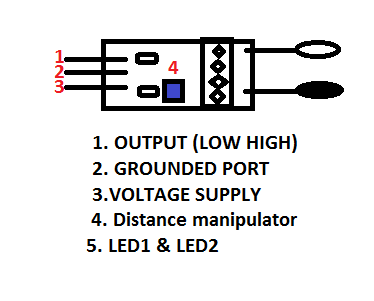
Lets learn and see what the sensor has. As you can see the numbers are mentioned, we will discuss the work around and try understand each and every word. First one goes like:
| Sensor Parts | Functions |
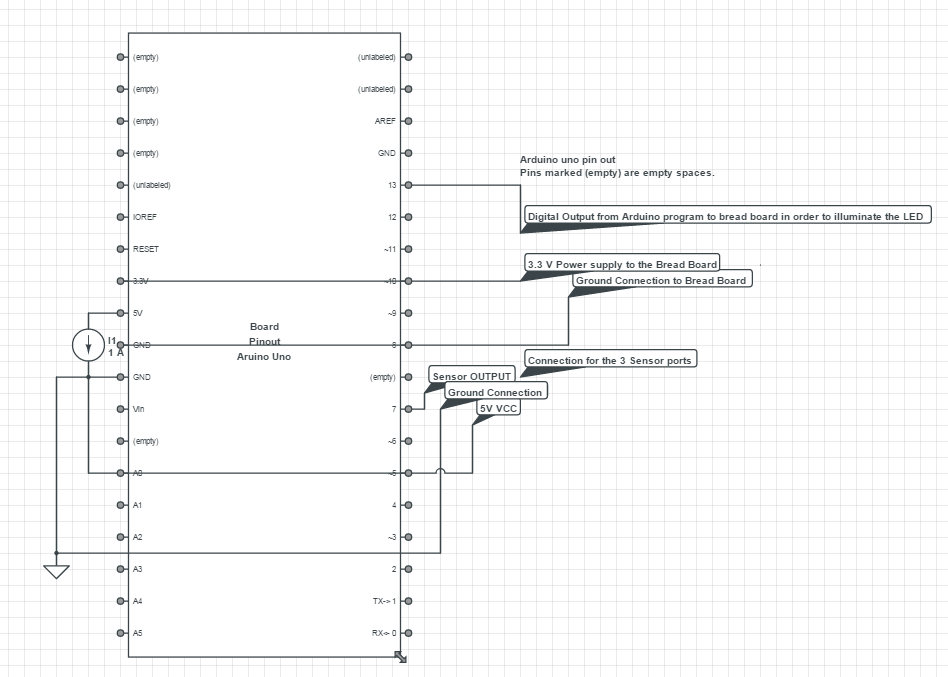
| OUTPUT | This port in the sensor, sends the digital out put to the output unit. Here, we have the sensor output port on board as 7. |
| GND | This port is used to connect to the board’s Grounded port. |
| VCC | The voltage supply port, here we have used the 5 V supply port from the board. |
| Distance Manipulator | The CW (Clock wise) movement increases the distance proximity and the vice-versa decreases. |
| Power and Obstacle LED | Former illuminates when the Power is supplied and the latter when any obstacle comes over. |
The circuit board looks like below:
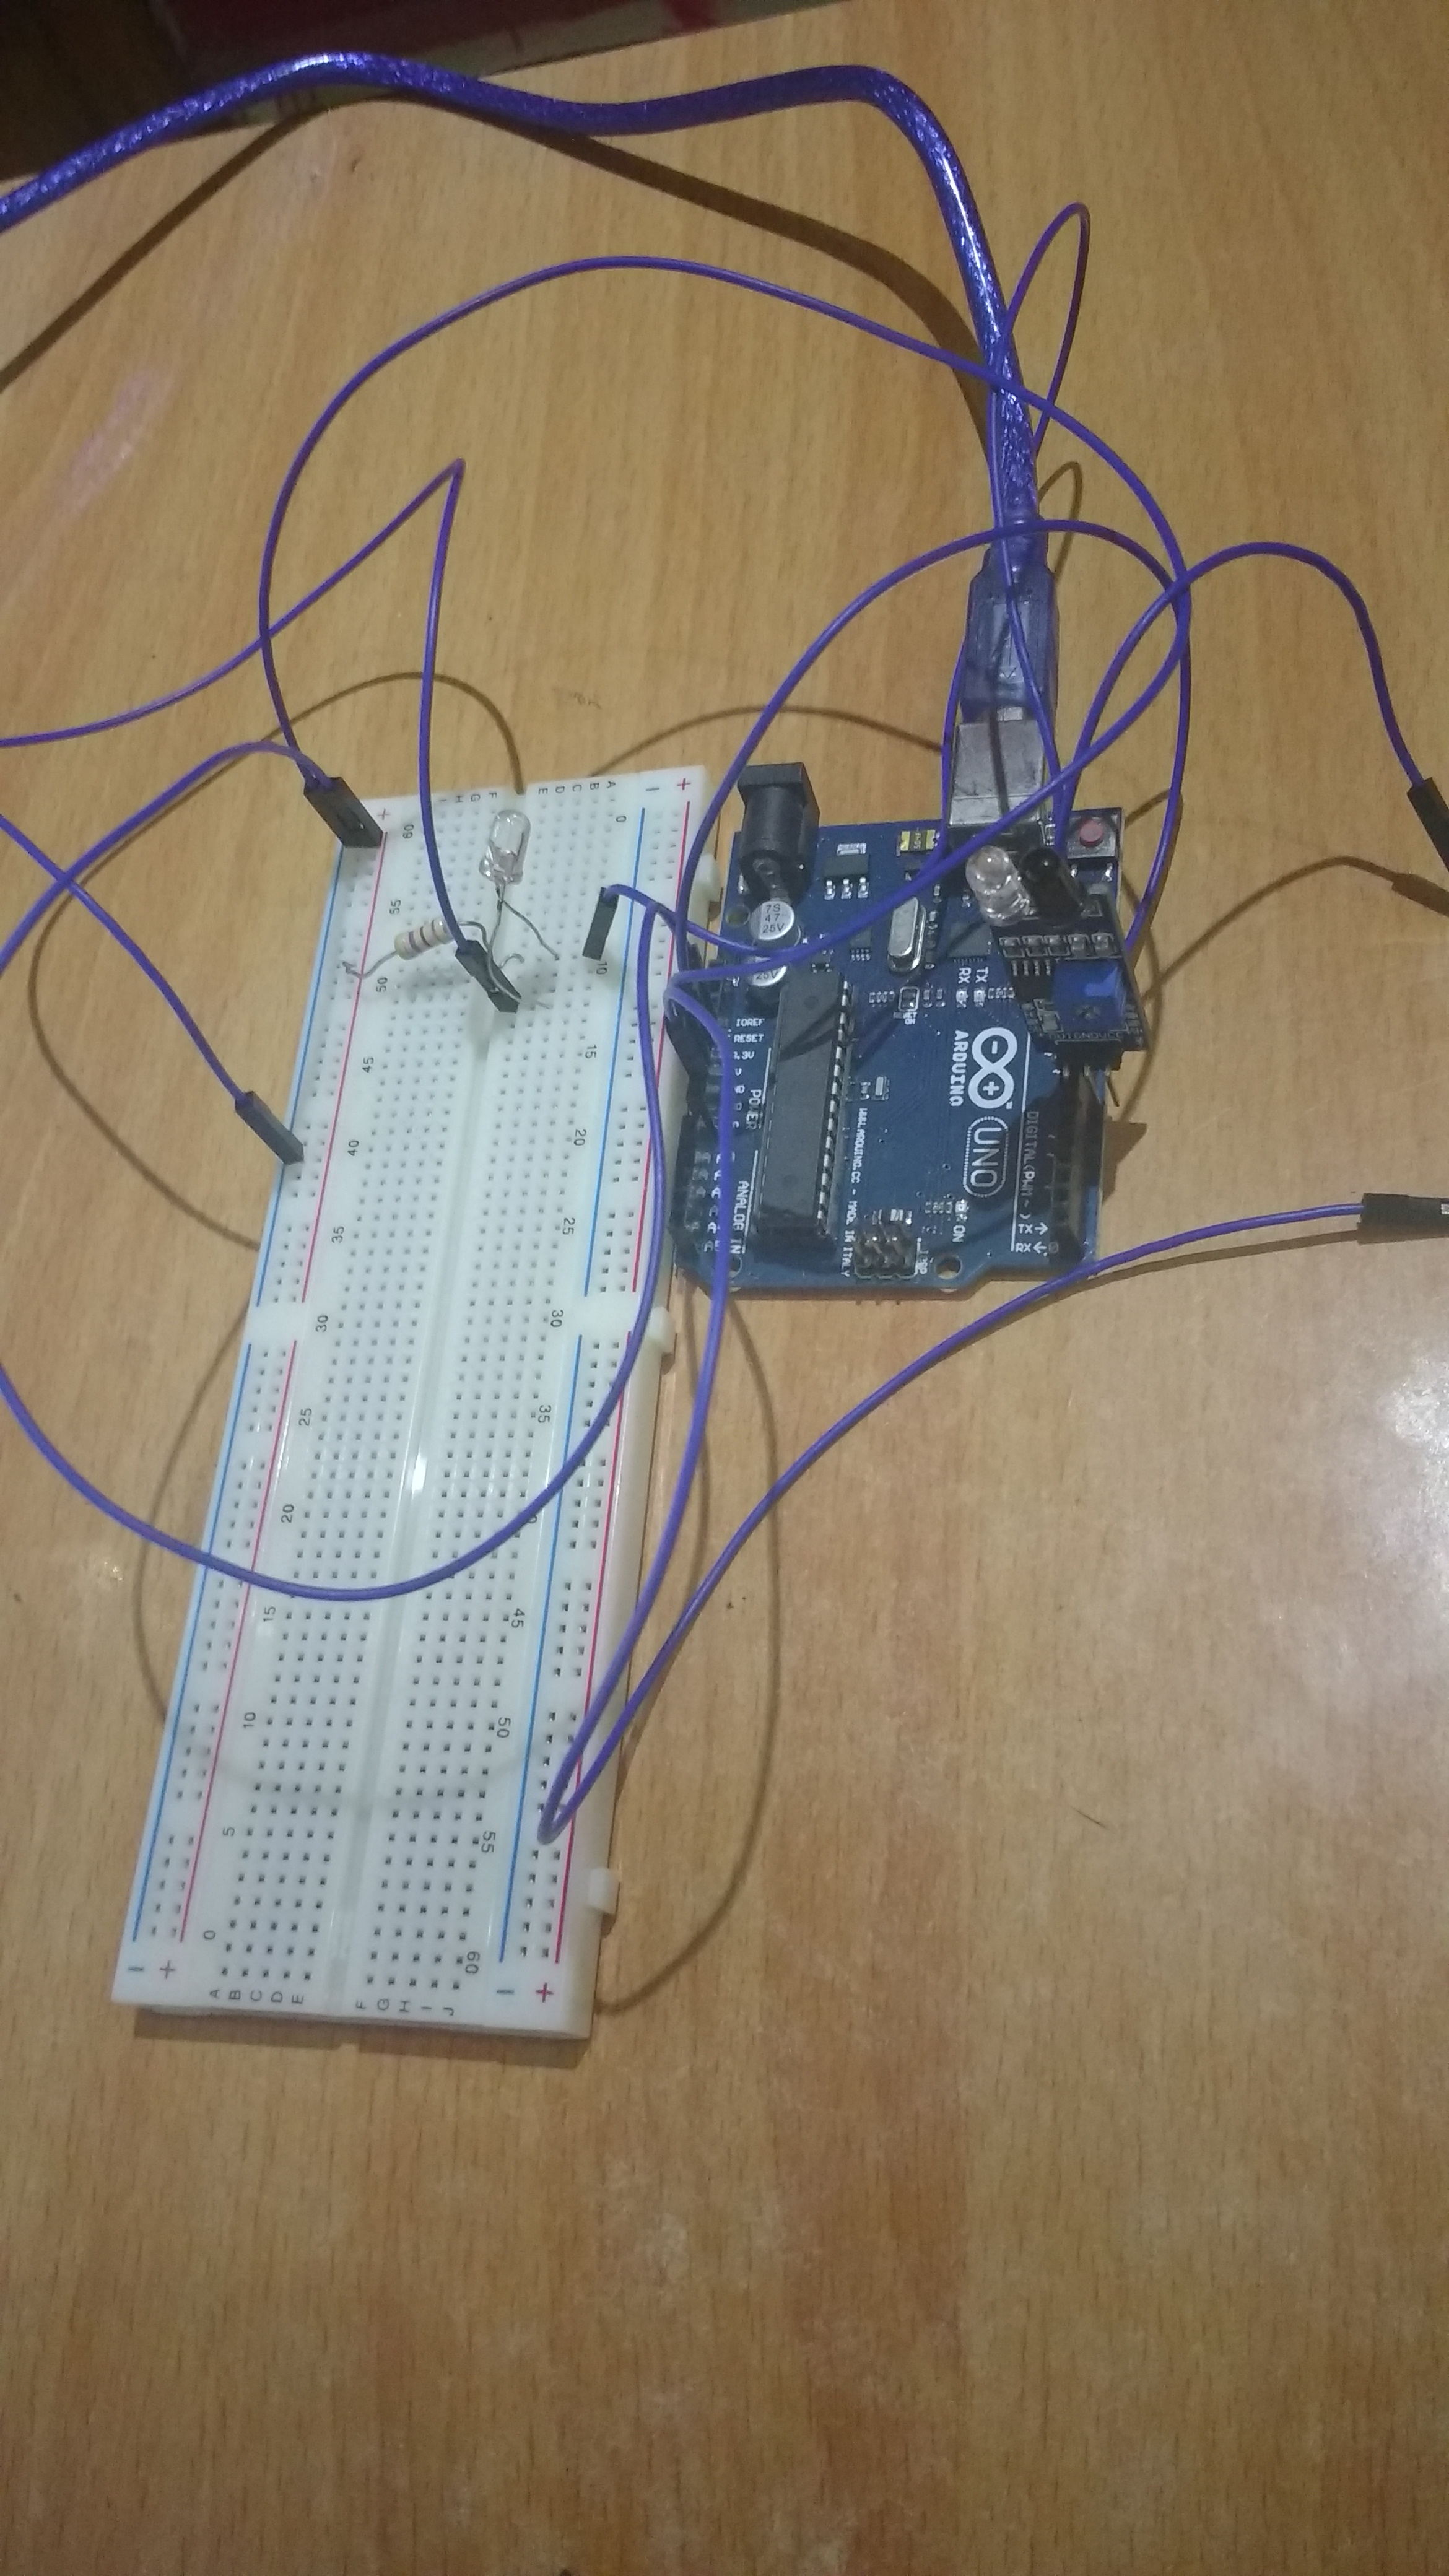
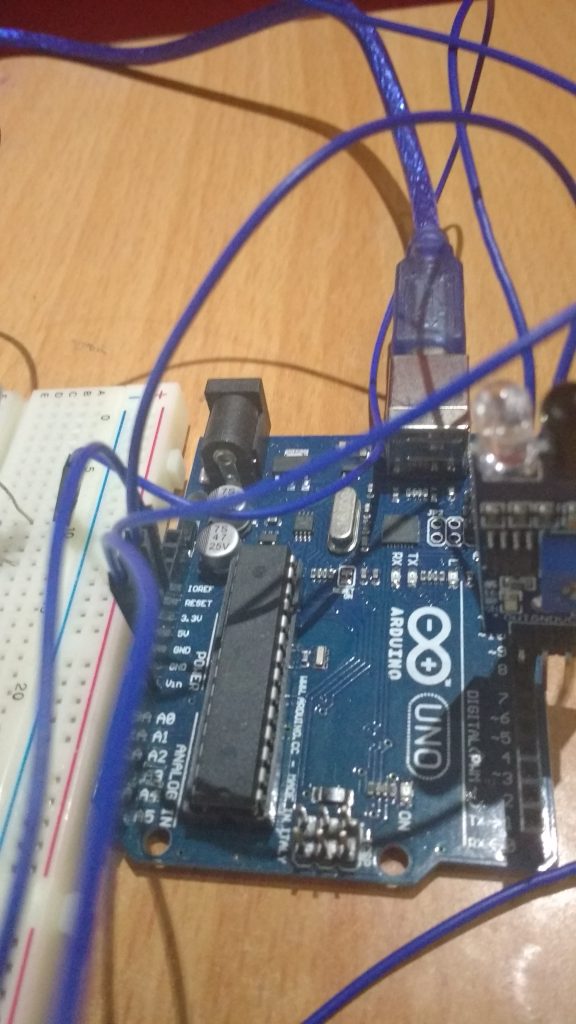
The circuit diagram would look like below:
Thats similar to the previous LED connection of my Arduino series. Series I
If the above is not clear, please share your query in the comments.
Better view of the diagram is below:
Snippet
int LED = 13; // Use the onboard Uno LED
int obstaclePin = 7;  // This is our input pin
int hasObstacle = HIGH;  // HIGH MEANS NO OBSTACLE

void setup() {
  pinMode(LED, OUTPUT);
  pinMode(obstaclePin, INPUT);
  Serial.begin(9600);
}
void loop() {
  hasObstacle = digitalRead(obstaclePin); //Reads the output of the obstacle sensor from the 7th PIN of the Digital section of the arduino
  if (hasObstacle == LOW) //LOW means something is ahead, so illuminates the 13th Port connected LED
  {
    Serial.println("Stop something is ahead!!");
    digitalWrite(LED, HIGH);//Illuminates the 13th Port LED
  }
  else
  {
    Serial.println("Path is clear");
    digitalWrite(LED, LOW);
  }
  delay(200);
}
The Flow
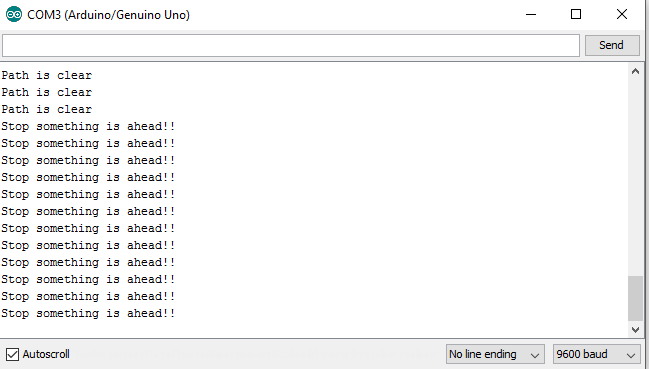
When the full circuit is done and the code set is also done. Now, time to connect the Board to the Computer using the USB jack. Once connected to suppose COM3 port, open the Arduino Set up IDE where the code set up is done, compile the code once and then Upload the code to the Board. Once Upload is done the TX RX leds blinks quick.
Now we are all set to test the sensor. For better and precise testing, we can solder the wires (jumper wires) to the sensors as their connected pins are not portable. The whole set up can be soldered.
Then when we connect, open up the Serial port screen which transmits at 9600 bits per sec and check the message, as per written in the program.
As per the program, the LED also blinks and illuminates based on the Obstacle sensor output.
The serial screen would look like below:
That’s it folks!!
Conclusion
Now this is all about the sensor IR Obstacle sensor which you can purchase at a very cheap rate from ebay or amazon and play with. We can use this set up in our Cars and check out!! In the upcoming series I will be sharing more sensors and blue-tooth module integration with Arduino. Hope they will be more fun! Please share your experiences and suggestions as I am still crawling..:P
]]>In today’s tech world, most of the applications being developed under Logistics, Inventory, Internal Transaction and other domains require day-to-day data in excel files and prefer excel file operations in their applications.
I will be sharing one of the Nuget Package tool, which wil very minimal lines of code will export an excel file for us.
The Tool is Closed XML.

Just write a few lines of code and done! It is developer friendly. If we have used the Open XML, there are a lot of lines of code which are required to export an excel fron data. We can create excel file of 2007/2010 configuration without even Excel application.
To add the closed XML package, we add directly through the user interface, from the Nuget Gallery and also, we can use the Package Manager console to add the package using the below command
PM> Install-Package ClosedXML
Snippet!
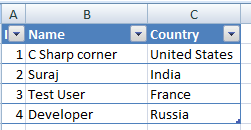
DataTable dt = new DataTable();
            dt.Columns.AddRange(new DataColumn[3] { new DataColumn("Id", typeof(int)),
            new DataColumn("Name", typeof(string)),
            new DataColumn("Country",typeof(string)) });
            dt.Rows.Add(1, "C Sharp corner", "United States");
            dt.Rows.Add(2, "Suraj", "India");
            dt.Rows.Add(3, "Test User", "France");
            dt.Rows.Add(4, "Developer", "Russia");
            //Exporting to Excel
            string folderPath = "C:\\Excel\\";
            if (!Directory.Exists(folderPath))
            {
                Directory.CreateDirectory(folderPath);
            }
            //Codes for the Closed XML
            using (XLWorkbook wb = new XLWorkbook())
            {
                wb.Worksheets.Add(dt, "Customers");

                //wb.SaveAs(folderPath + "DataGridViewExport.xlsx");
                string myName = Server.UrlEncode("Test" + "_" + DateTime.Now.ToShortDateString() +          ".xlsx");
                MemoryStream stream = GetStream(wb);// The method is defined below
                Response.Clear();
                Response.Buffer = true;
                Response.AddHeader("content-disposition", "attachment; filename=" + myName);
                Response.ContentType = "application/vnd.ms-excel";
                Response.BinaryWrite(stream.ToArray());
                Response.End();
            }
The above code, instantiates a data table, with few data initialization.
public MemoryStream GetStream(XLWorkbook excelWorkbook)
        {
            MemoryStream fs = new MemoryStream();
            excelWorkbook.SaveAs(fs);
            fs.Position = 0;
            return fs;
        }
We are using this method, so as to return a stream inorder to download the file in response using the stream. The save as method of the Closed XMl, helps create the stream.
Downloaded file looks like below:
Conclusion
Here, I have shared the code where hard coded values are added, this is not the case everytime. We can always use the records from the database and create them as a datatable and then use the Closed XML. This really reduces a lot of codes which is used in Open XML package. So, developers try it!! I will be sharing another article where I would show, how to Import the same exported excel file using Bulk copy using SQL Bulk copy.
]]>An interesting topic to share again! Recently while I was using GIT, the options in the browser on the GITHUB site, launched the application installed on my system! I wondered if that is possible I can run any exe from my web application and create wonders!
Nice story huh! Actually, that is possible and I will be sharing the process how we can achieve the same from code.
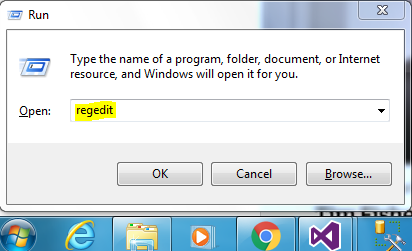
I will be using windows registry to register my exe to be pinged from any web application. Now wondering what is Windows Registry!
The Windows Registry is a hierarchical database that stores low-level settings for the Microsoft Windows operating system and for applications that opt to use the Registry..Wiki
Now yes, windows registry is an important section of the windows operating system having all the low level settings, but very essential for the applications to run on the OS. Windows registry is basically used to store all the important information for the software programs, hardware devices connected. There are basically few root keys pre-defined under the registry belt!
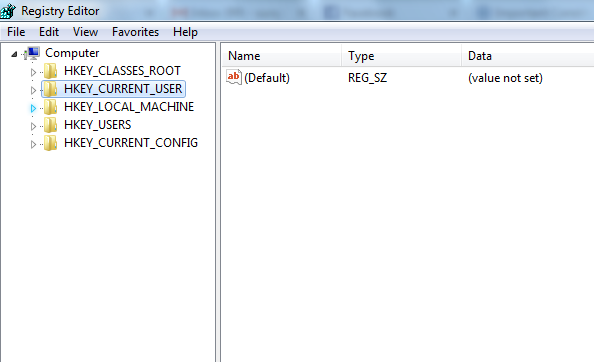
They are:
- HKEY_LOCAL_MACHINE:- Setting are stored which are local or specific to the system.
- HKEY_CURRENT_CONFIG:- All the gathered run time information are contained withing this key. This key is never in the memory, but generated at the boot time process.
- HKEY_CURRENT_USER:- Settings that are valid/applicable to the current logged in user on the system.
- HKEY_USERS:- All sub keys corresponding to the current user are stored.
- HKEY_CLASSES_ROOT:- Information about any registered application on the system is contained.
Each of the above root keys have sub-keys attached to them.
For example: HKEY_CURRENT_USER\Software\Classes\ means ‘Classes’ is the sub key of the ‘Software’ sub key under the ‘HKEY_CURRENT_USER’ root key.
We will be creating a key inside the HKEY_CURRENT_USER in order to ping the exe. We have chosen this root key as that would not require any Admin access to add/edit any key inside this root. So the exe can be pinged by any user.
Diving into the code!
Here, what we would be doing is, we will be creating one console application(.exe), which will act as a medium to add a registry sub key to the “HKEY_CURRENT_USER/Software/Classes”. The same console application will be used to be executed/run from the web application. alert is the key command name which is used for this purpose.
using Microsoft.Win32;
using System;
using System.IO;
using System.Linq;

namespace WMConsole
{
    class Program
    {
        static void Main(string[] args)
        {
            Console.WriteLine("Listening..");

            //Gets the current location where the file is downloaded
            var loc = System.Reflection.Assembly.GetExecutingAssembly().Location;
            if (!Directory.Exists(@"D:\Console\"))
            {
                System.IO.Directory.CreateDirectory(@"D:\Console\");
            }
            //Creates the Downloaded file in the specified folder
            if (!File.Exists(@"D:\Console\" + loc.Split('\\').Last()))
            {
                File.Move(loc, @"D:\Console\" + loc.Split('\\').Last());
            }
            var KeyTest = Registry.CurrentUser.OpenSubKey("Software", true).OpenSubKey("Classes", true);
            RegistryKey key = KeyTest.CreateSubKey("alert");
            key.SetValue("URL Protocol", "wnPing");
            key.CreateSubKey(@"shell\open\command").SetValue("", @"D:\Console\WMConsole.exe %1");
        }

    }
}
Understanding the code!
In the above snippet, we are first creating folder where the same exe will be downloaded from the web application and stored. The path is being dynamically generated and used.
- Then we open the existing root key of the registry, i.e. HKEY_CURRENT_USER through the Registry class field “CurrentUser” and the “OpenSubKey(“Software”, true)”, opens the instance of the sub-key or allows the write access to it. Same with the sub-key “Classes” which lies under the Software key.
- Then, we are creating a new key using the “CreateSubKey(“alert”)” command, with the name “alert”.
- Then we set the value to the sub key “alert”, as “URL protocol” and the name to be used in the anchor tag in web application as “wnPing”.
Subkey alert created, also gets a subkey added to it in the following hierarchy:
shell->open->command
and to this, the value is set as the path to the exe file, which will run.
Once the registry is created, we add the below anchor tag for the exe application to be triggered from any web.
<a href="alert:wmPing">Click to trigger</a>
And done, click to see the magic!
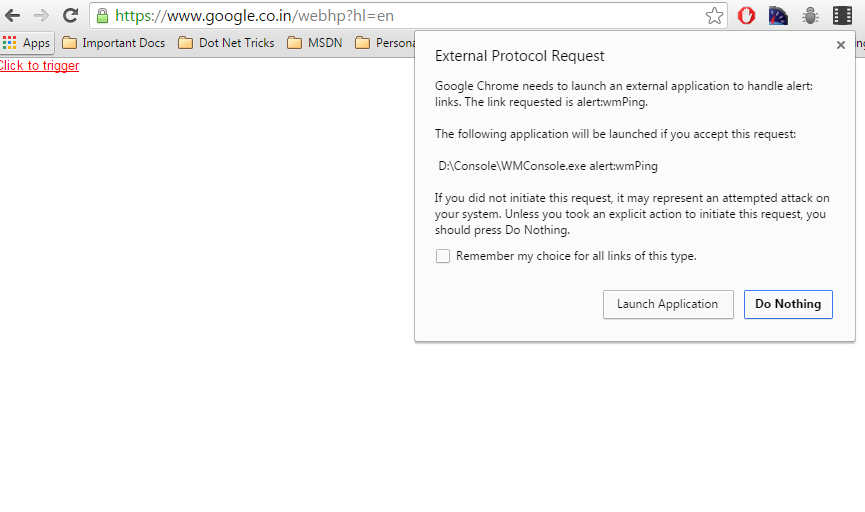
The above window comes up, asking user to Launch the application. Done!!
You can always click the check box to remember the action, if you want the exe to run in the background without prompting.
Conclusion
This is it. I hope you find this topic interesting and try the same. This can be helpful in any web application when you are dealing with any hardware components attached to local client systems and your server needs input from them.
Please share your thoughts and views on any improvement!
Keep learning and keep sharing!
Today, the world has grown so much and has been so friendly for the developers, thousands of tools floating in the market for free, but we need to realize and have them in our bucket whenever required.
I will be discussing few important tools, which are handy and work out for every developer.
Tools!!
FIREBUG 
The best tool for the developer which can be installed on FireFox (add-on). This helps monitor the structure of you HTML, CSS and also javascript. To add the Firebug and get it going add now!
Add FireBug
A web development tool which will help any developer track the issue with the client side and also track the response time for the requests in the network tab.
The tool tab looks like below:

POSTMAN
This is a very important tool, which is a restful api client, which helps developer not waste time debugging and every time running Visual Studio to check the result set and how the api behaves. We now just need to call the url of the API from Postman and it gives us the result, even the status code as well.

Get POSTMAN for Chrome
This will allow developers to request any API, may it be GET, PUT, POST or DELETE.
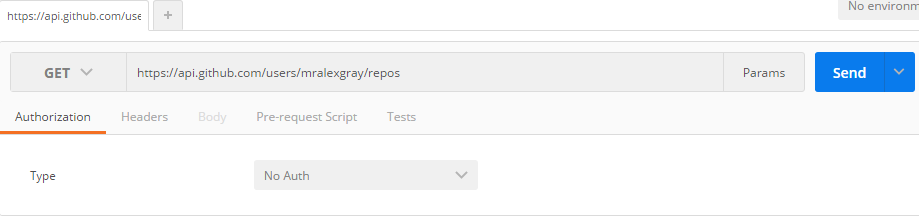
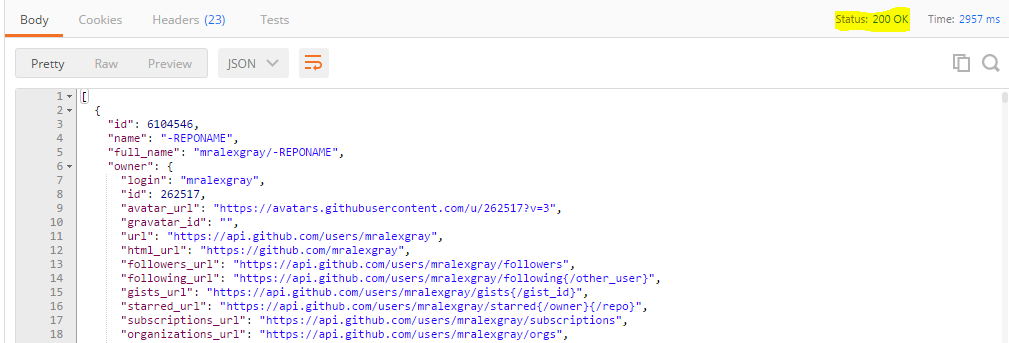
I made a get request to a exposed github API to show how the POSTMAN reacts and shows us the Json result also the response time and the Status(200 Ok, 404 Not found, 403 Forbidden).
Yslow 
This is such a powerful tool for any developer developing any web application, which without any fondness to anyone, ruthlessly shows how good your web app is and how good it will behave? The below image says it all:
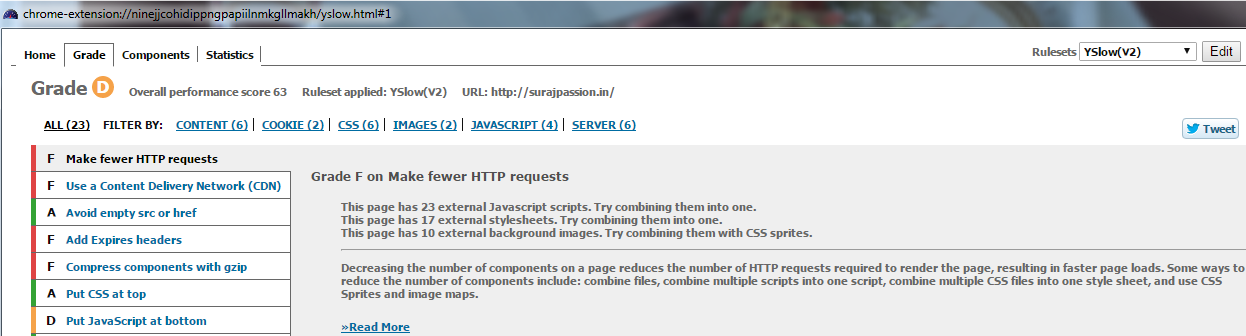
The above web site has been given a Grade ‘D’ by Yslow. This also gives a description of why the grade is low, what can be modified or implemented to improve your grade. Here, it also lets developers know for bundling and minification for the javascript and the style sheets. So use it and improve the performance of your web app.
Install the Yslow now:
Add Yslow
Css Sprite Generator
Sprites is a collection of images put together into a single image. So instead of adding multiple images and heavy-ing the web page, we can prefer sprites with images and using css to generate and display on web page.
Css sprite generator add on tool helps you create Sprites. Sprite Cow also helps you generate sprites and also the css to use on your web page.

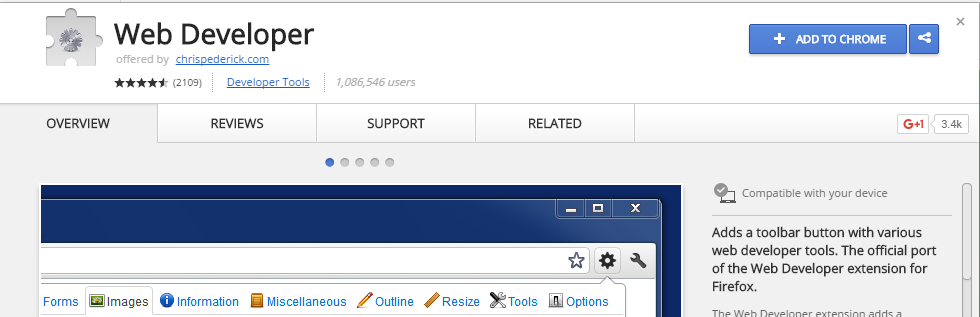
Web developer
This is a very interesting add on for every developer. This has a lot of features added to it and each of them is useful while developing.
Web Developer Add on
Add the web developer add on and play around there are a lot of features out there for you.

There are features for Css, forms, javascript, images, cookies, etc.
Window Resizer
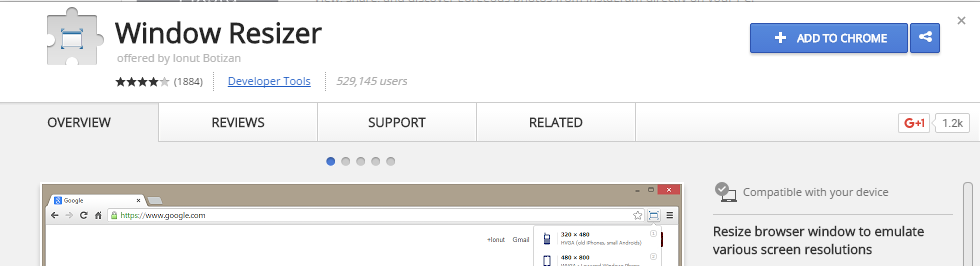
Another helpful tool for every developer, as now a days every web app is being designed to be responsive. Developers add css and html to make it responsive, but it is not possible for developers to test on every possible devices which end users would be using. This helps you resize your web app window and test if the pages are responsive as expected.
Add and play with it.
Window Resizer Add on
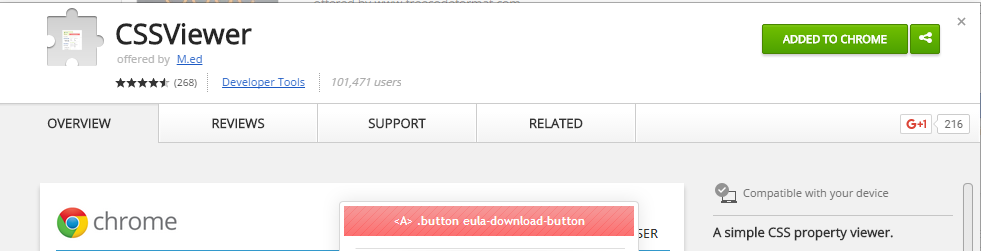
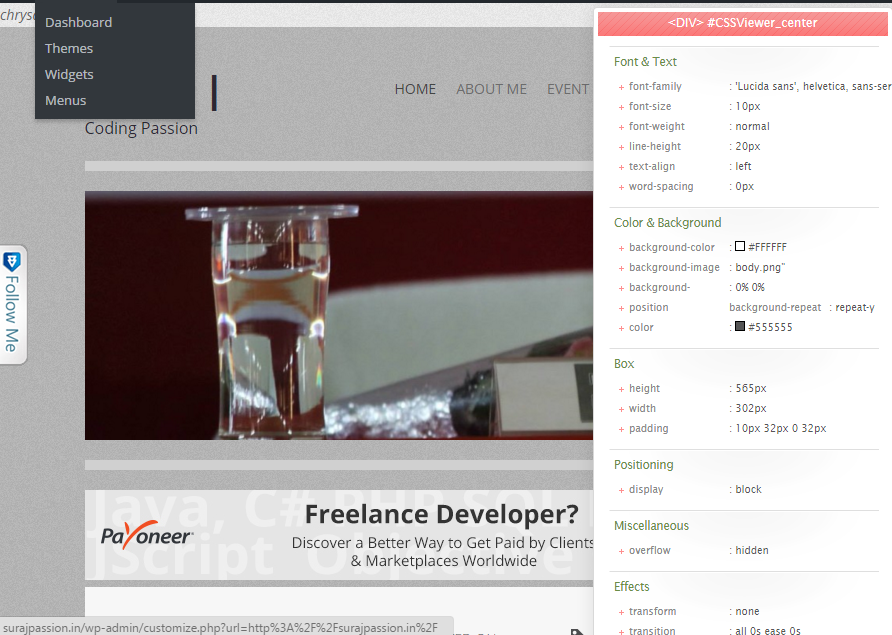
CSS Viewer
An interesting tool to be used, as it lets you view the css being used on the web page. This helps check the css hovering over the web page area.
CSS Viewer Add on
The add after added on web page looks like below:
Cache Clear 

How many times we developer face the wrath from the testing team, that this is not working this is breaking and what not! And we ask them to do just one thing, “Please clear your cache”! and then everything works! Here is an add on which helps you clear cache for the application on click of a tool tip only.
Add and recommend testing to add as well. 
Clear Cache Add on
Angular Batrang 
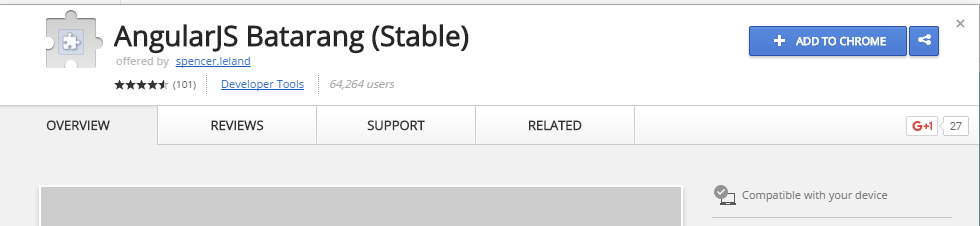
Angular being the king now, every developers starting to learn and use Angular. This is a very nice tool to be used on Angular application, if they wish to track the scopes and angular objects and how they behave!
After adding the extension, in the developer tool, it comes as an add on and you can navigate and play with it on your angular web app.
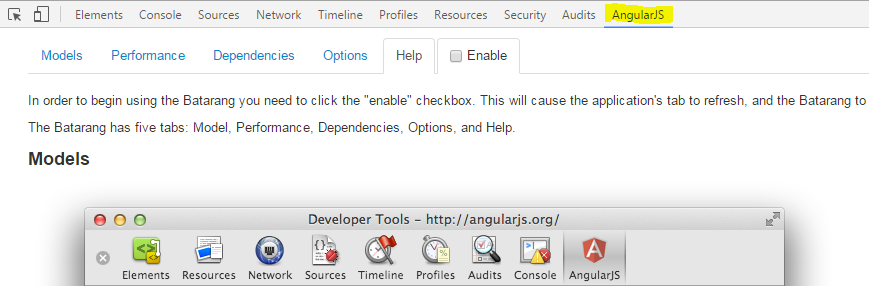
Angular Batrang Add on
Conclusion
These were few important developer tools, which I use in my day to day development and I hope this will help few developers as well as they are very useful once you start using and exploring them. Play around and you will be addicted to them. I hope readers will share their views and share which other important developer tools they recommend.
Come on! Recommend and share your views!
Just out of curiosity, thought of why Build, Rebuild & Clean Solution in Visual Studio IDE. Earlier, thought use any one of them, i.e. Build & Rebuild, they do the same! but still thought of going through few resources and get the differences and I was staggered to find that I was wrong. 
This is a very simple and basic fact, which every developer using VS should be aware of. I wanted to be aware of this before some one questions me the same. I will be discussing their work and describing each as an Agent.
Discuss Facts!
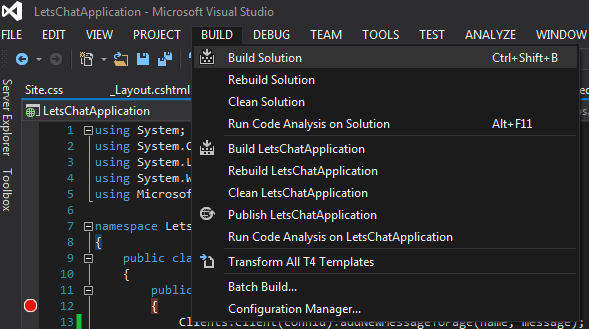
Lets first discuss about Build Solution
Build Solution
:-
‘Ctrl + Shift + B’
The short cut above to build a solution. Now what this Build agent does in the background!
The Build Agent

This agent of the VS IDE does an incremental build. If you build your solution once, with some files changed, then it will build only those files which you have changed, without touching the files that are not even touched by you.
Moreover, if you are building the Solution once and then again doing a build, it will not again build the solution actually, as the agent finds no files that are changed!
We see the build result on the output window in the IDE.
Lets see a pictorial difference.

As you see in the above image, the dll of the project gets re-generated, as a file was modified under that project. Since, my solution has a single project, so it creates the dll of that only.

In the above image as we hit the Build, the Build is succeeded but shows ‘0 succeeded’ i.e. there were no files modified, for which it did not create any dll.

Re-Build Solution

This agent is the master of all. This is the combination of Clean & Build.
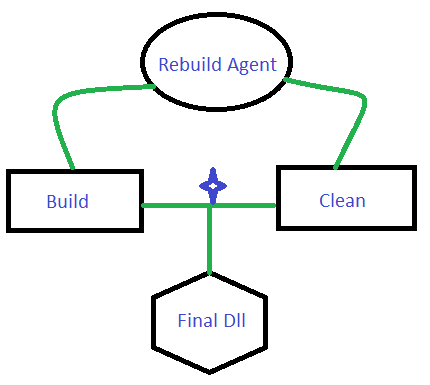
This does not check or bother if there are any changed/modified files, it will always do a clean and build the solution or the specific project. This will recompile and regenerate the dlls inside the bin folder.
Clean Solution

The clean Madam, cleans and removes all the dlls created inside the bin folder. The procedure she follows is simple, just remove the Dlls related to the project or related to the entire solution from the bin folder.
Before Clean the bin folder has all the dlls:
After the clean when the clean succeeds, all the dlls are removed by the clean agent.

When to use what
To be honest, we can use any of them, I prefer a Clean first and then a Build. What do you?
When we
- Rebuild a Solution with 2-3 projects, then the Re-build agent cleans the project 1 and then builds the project 1. Similarly, cleans project 2 and builds project 2 and so on.
- When we clean and then build a solution, then the Clean agent first removes all the dlls for each project and then the build agent generates the project dlls at once.
Thus I have shared a simple tip and know how fact which might be handy and mandate as we are a
Visual Studio developer!
Introduction
Here I would be demonstrating an application to chat and chat private as well, using SignalR.
Before that we need to know first what is SignalR! SignalR is an open and free library which can be used to have real-time functionality integrated to your web applications. There are a hell lot of areas where SignalR can come handy to make your application more handy and more integrated and more responsive to the end user as well. Real-time means having your server respond as quick as possible to the client as and when a request is made.
Now, take for an instance, we have a requirement to show the user uploading a file, the percentage of that file been uploaded on the server. Or I had come across a scenario where, we had to show the end user, who would be uploading a CSV file with ‘n’ number of rows and process each row for some validations. End user would be wondering what would be going on in the back-end. So, would it be great if we could show him how many rows have been processed and how many are left out! Similar to a progress window. Here, comes the SignalR magic!
Most of us think SignalR would be useful in making chat applications, but NO!,it has much more than just chat! I don’t think the makers of SignalR would have a thought in mind to make a chat application out of it!
Much of a story now! Lets get into a bit of theory!
Theory
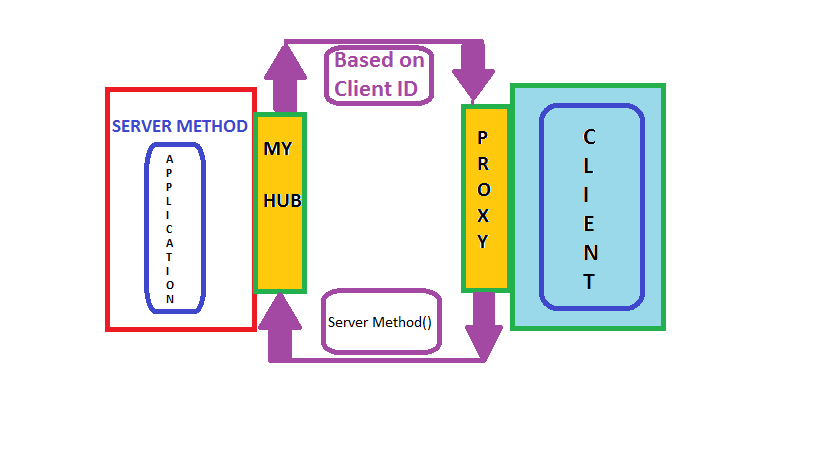
We will look into a simple image below and from that image we will try and gain some knowledge on the flow:
Now a days, every application requires a load of server response in the real time to sustain in the market, as the user expectations have raised high.
Remote Procedure Calls (RPC) is the concept that takes place in the SignalR internally. SignalR provides an API which helps in making the RPC between the server and the client. Actually, from the client side, server side functions are called using JavaScript, once the connection to server is set. The SignalR API also helps creating connections and manage them when required. In simple terms, SignalR provides connection between server and client, letting server to call the funcitons on the client side and from the client side, calling the server side. That somehow is called “Server-Push”.
SignalR starts with HTTP and then to a WebSocket if connection is available. From Wiki,
“WebSocket is a protocol providing full-duplex communication channels over a single TCP connection.”
An advantage of using WebSocket is it can be used by both client and server applications. WebSocket is considered to be the most efficient and consistent medium of communication as, it has the ability to manage server memory in a proper manner and being a full duplex communication, has low latency. These are the considerations made with SignalR which make it more efficient.
The SignalR decides the transport based on the browser, i.e. if the browsers support the kind of transport required by the SignalR. We will discuss the kinds of transports next:
HTML 5 Transports
- WebSockets as we have already discussed. This transport is considered to be true-persistent, creating a two way connection between client and server if the browsers support.
- Server Sent events also called Event Source, which is supported by all browsers except IE.
Comet Transports
Comet usually,is a web application model in which a long-held HTTP request allows server to post data to a client (browser).
- Forever frame This is supported by Internet Explorer only. Creates a hidden frame making a request to endpoint on the server. Server keeps pinging client or sends script to the client, thus providing a one way connection, creating a new connection on every request.
- Ajax Polling This is actually long polling, which is never persistent. This polls the request and waits until and unless the response is received from the server. This introduces latency and the connection resets.
Practical
We will be creating a chat application in order to explain the flow of SignalR. We install the SignalR, create a hub to which the client will interact, calling the server methods and in return the server responds and interact with the client.
You can directly add a new project in VS for the SignalR or create an MVC project and install the SignalR package/libraries from the Nuget.
PM > Install-Package Microsoft.AspNet.SignalR
This is download all the dependencies required for the SignalR.
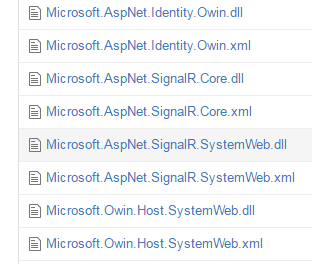
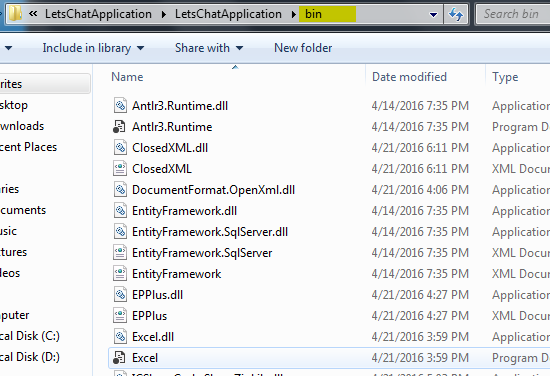
After the successful installation, the above dll’s or packages are installed into your project.
There will be a class file which needs to be added to the root of your project, which would look like:
using Owin;
using Microsoft.Owin;
[assembly: OwinStartup(typeof(SignalRChat.Startup))]
namespace SignalRChat
{
    public class Startup
    {
        public void Configuration(IAppBuilder app)
        {
            // Any connection or hub wire up and configuration should go here
            app.MapSignalR();
        }
    }
}
This is OWIN based applicaiton. Every OWIN application will have a startup.cs class, where the component for the application pipeline are added. The OWIN attribute which specifies the type of property, specifying the project’s start up and the configuration method, sets up the SignalR mapping for the App.
There will be another two script files that would be added as we install the packages for SignalR.
These script files are mandatory to be loaded onto the .cshtml page in order to activate the SignalR.
Lets look into the code straight away:
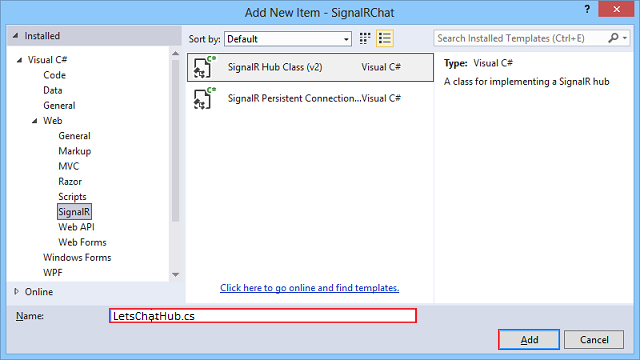
We need to add a new hub class inside a Hub folder. Lets name that LetsChatHub.cs, which would look like:
using System;
using System.Collections.Generic;
using System.Linq;
using System.Web;
using Microsoft.AspNet.SignalR;

namespace LetsChatApplication.Hubs
{
    public class LetsChatHub : Hub
    {
        public void Send(string name, string message,string connId)
        {
            Clients.Client(connId).appendNewMessage(name, message);
        }
    }
}
The above send method accepts the parameters, name (which you would be giving once you navigate onto the url), the message (which the user would be sending from the UI). The other parameter is connId, which would help us have chat private and not send to every user who navigates to the site. If you would like to have every user receive and send the messages who navigates to the URL. To allow every users the access, the code you change as below:
namespace LetsChatApplication.Hubs
{
    public class LetsChatHub : Hub
    {
        public void Send(string name, string message)
        {
            Clients.All.appendNewMessage(name, message);
        }
    }
}
The Send method, is requested from the client with the parameters after the connection is set on the client side and once the server receives the request, it processes and sends back the response to the client, using the appendNewMessage. This appendNewMessage method is added on the client side to receive the response and display on the UI to the client.
You need to add a controller, lets suppose: “LetsChat” with an action “LetsChat”, add a view to that with the below code to it.
The client side code would look like below:
@{
ViewBag.Title = "LetsChat";
}
<h2>Lets Chat</h2>
<link href="~/Content/sweetalert.css" rel="stylesheet" />
<div class="form-group col-xl-12">
<label class="control-label">Your connection Id</label><br />
<input type="text" class="col-lg-12 text-primary" id="frndConnId" placeholder="Paste your friend's connection Id" /><br /><br />
<label class="control-label">Your Message</label><br />
<textarea type="text" class="col-lg-10 text-primary" id="message"></textarea>
<input type="button" class="btn btn-primary" id="sendmessage" value="Send" /><br /><br />
<img src="~/Content/smile.jpg" width="20" height="20" id="smile" style="cursor:pointer"/>
<img src="~/Content/uff.jpg" width="20" height="20" id="ufff" style="cursor:pointer" />
<div class="container chatArea">
<input type="hidden" id="displayname" />
<ul id="discussion"></ul>
</div>
</div>
<br />
<input type="hidden" id="connId" />
<!--Reference the autogenerated SignalR hub script. -->
@section scripts {
<script src="~/Scripts/jquery-1.10.2.min.js"></script>
<script src="~/Content/sweetalert.min.js"></script>
<script src="~/Scripts/jquery.signalR-2.2.0.min.js"></script>
<script src="~/signalr/hubs"></script>
<script>
//var userName = "";
//var sessionVal = '';
$(function () {
// Reference the auto-generated proxy for the hub.
var chat = $.connection.letsChatHub;
debugger;
// Create a function that the hub can call back to display messages.
chat.client.addNewMessageToPage = function (name, message) {
// Add the message to the page.
$('#discussion').append('<li><strong>' + htmlEncode(name)
+ '</strong>: ' + htmlEncode(message) + '</li>');
};
// Get the user name and store it to prepend to messages.
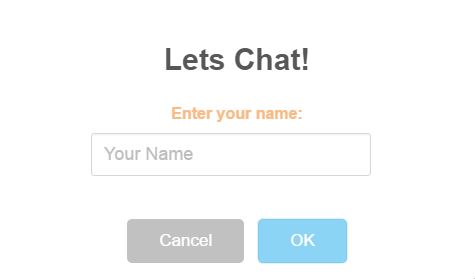
swal({
title: "Lets Chat!",
text: "<span style='color:#f8bb86;font-weight:700;'>Enter your name:</span>",
type: "input",
html: true,
showCancelButton: true,
closeOnConfirm: true,
animation: "slide-from-top",
inputPlaceholder: "Your Name"
},
function (inputValue) {
userName = inputValue;
if (inputValue === false) return false;
if (inputValue === "") {
swal.showInputError("You need to type your name!");
return false;
}
$('#displayname').val(inputValue);
});
// Set initial focus to message input box.
$('#message').focus();
$('#message').keypress(function (e) {
if (e.which == 13) {//Enter key pressed
$('#sendmessage').trigger('click');//Trigger search button click event
}
});
$("#smile").click(function () {
});
// Start the connection.
$.connection.hub.start().done(function () {
$('#sendmessage').click(function () {
// Call the Send method on the hub.
var connId = $("#connId").val();
var frndConnId = $("#frndConnId").val();
var finalConnId = frndConnId == "" ? $.connection.hub.id : frndConnId;
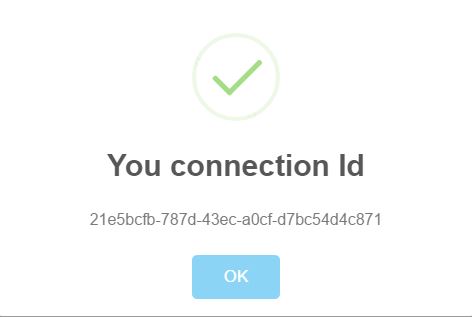
chat.server.send($('#displayname').val(), $('#message').val(), finalConnId);
$("#connId").val($.connection.hub.id);
if (frndConnId == "") {
swal("You connection Id", $.connection.hub.id, "success");
}
// Clear text box and reset focus for next comment.
$('#discussion').append('<li><strong>' + htmlEncode($('#displayname').val())
+ '</strong>: ' + htmlEncode($('#message').val()) + '</li>');
$('#message').val('').focus();
});
});
});
// This optional function html-encodes messages for display in the page.
function htmlEncode(value) {
var encodedValue = $('<div />').text(value).html();
return encodedValue;
}
</script>
}
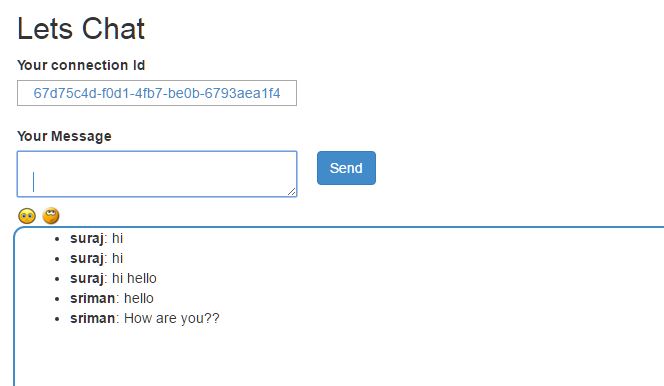
Lets Chat
We have a normal UI in place to add your message and send button to call the server methods.
Lets understand the code above part by part.
var chat = $.connection.letsChatHub;
Here, we set the connection to the Hub class. As you can notice here, letsChatHub, is the same hub class file name which we added to set up the server. The convention as follows, the intial of the methods or the class name starts with lowercase. From here, we use chat to access the Send method.
$.connection.hub.start().done(function () {
                $('#sendmessage').click(function () {
                    // Calls the Send method on the hub.
                    chat.server.send($('#displayname').val(), $('#message').val(), finalConnId);
chat.server.send,is self explanatory, it sets the chat connection to call the server Send method once the connection is set and started.
chat.client.appendNewMessage = function (name, message) {
//
}
This is called, when the Server receives the request and calls back the method on client side.
How the sample would work!
The sample provided for download, will be having few instructions to follow:
- When you navigate to the LetsChat/LetsChat route, an alert would pop up asking you for the name with which you would like to chat. Sweet Alert !!
- Once you enter the name, you see a textbox which asks you for “Your friend’s connection Id”, but since you are starting the chat, you just send a message, and another pop up comes up, with your connection ID, which you need to share with your friends to share your message. Remember, only those who have your ID use it while chatting will be able to see and send through messages to you.
- When you friend navigates, he ought to generate his connection ID and share with you inorder to set up your connection completely. Thus, you need to have the connID to whom you will be sending and vice-versa with your friend as well. Then just chat!!

If you would want to send message to all and make that common, then use the Clients.All code snippet to send all.
Another interesting thing, which was figured out is, the use of @section scripts{}, that lets the Signal R scripts render and active on your page and also using the @section scripts provides your code a good outlook.
Share and Send files using SignalR!!
Ooops!! Nice question right!
It is ideally not advised, rather I would not recommend to send or share files using Signal R. There always is better way to accomplish that. The idea would be using API, you can have an upload area, and use SignalR to show the progress and once upload completes, update the user regarding the completion and generate a download link on the UI for the users to download and view the file.
This is not always the best idea, but is just another idea.
Conclusion
This is just a simple Chat application, which you can use to chat with your friends, if you host on Azure or any other domain. But again,SignalR is not just this much. There is a lot of other effective use of SignalR. Will be sharing more utility of SignalR in few articles more.
References
]]>Recently, a scenario arose in which we had interact to a Web API from either a windows service or windows forms application. The logic and implementation seems easy once you are aware of the proceedings. I would be sharing this article for all those who wonder how! This is what my solution was to resolve this requirement. The implementation and the code is simple, but only a copy paste would not help unless we know what the keywords are and what they are meant for here. So let’s see:
Get Started
Before I start, the basic requirement would be a windows form and a web api project. So, the readers should know how to create a windows form and a web api application as a prerequisite. I will be sharing the Windows Forms application, which will ping the API we set via the url. As we know the medium of interaction or the bridge is HttpClient
According to MSDN:
Provides a base class for sending HTTP requests and receiving HTTP responses from a resource identified by a URI.
As the above definition suggests, the HttpClient class helps send HTTP requests and also get back the responses from the API resource we have provided. (Not only API, this article focuses on API). Thus, HttpClient is our bridge here.
I have created a windows forms application, which will post some values to the API on click of a button and also get back the response from the API. Lets have a look at the code:
private async void button1_Click(object sender, EventArgs e)
        {
            string value = "After Test Post API (Result From API)"; //This value is sent to the API and again returned the same from it
            var text = await DataReceivedHandler(value);
            txtOutput.Text = text.Result;
        }


        private static async Task DataReceivedHandler(string value)
        {
              using (var client = new HttpClient())
            {
                client.DefaultRequestHeaders.Accept.Clear();
                client.DefaultRequestHeaders.Accept.Add(new MediaTypeWithQualityHeaderValue("application/json"));
                var url = new Uri("https://localhost:54640/api/values?value="); //Change the Url to the Host (This is the default Values APi Controller)
                var result = await client.PostAsJsonAsync(url, value);
                if (result.StatusCode == System.Net.HttpStatusCode.NotFound)
                {
                    return await Task.Delay(200)
                                .ContinueWith(t => "Hello");
                }
                string testResult = await result.Content.ReadAsStringAsync();
                return testResult;
            }
        }
I am using async method here, to post the values to the API and also awaiting for the result/response from the API.
Snippet explanation
The default headers, the kind of media types we are sending may it be application/xml, application/xhtml+xml,or text/html. So for each request, we are clearing the headers and then annotating the media type we would be sending through the request.
Then, we are setting and formatting the url to the API, with the query string that needs to be passed.
Then we are posting to the API through the client object, using PostAsJsonAsyc. It is an async method which awaits internally for the response and gets back to the thread once the task is completed.
Then, we check for the response message status code, incase it is a failure (404/any other) or a success(200|OK).
If it is a success, through IsSuccessStatusCode (200|OK), then we are reading again asynchronously the string using ReadAsStringAsync() and finally returning the result from this method block.
This is actually the entire simple flow that flows through in the snippet and how we connect to the API using the bridge.
Conclusion
Here I have shown you how to post values to any API. This can be handy when you are using serial port values to be sent from any machine form client machine to your application hosted on other servers or even cloud. I hope this logic helps!
If any suggestion or better implementation logic, i would love to learn.