In this article I will be sharing a basic stuff which comes handy in MVC applications. The HTML helpers provided by the Razor are smart enough to understand and process the work as required.
We will be discussing in brief about the Ajax.BeginForm, which has few concepts hidden within. When we face the difficulty or the issue, we explore and resolve. Same has happened recently with me. So lets start exploring what the hidden secrets are, which actually are very few.
Adding Unobstrusive- Ajax JS
This can be added from the Nuget package manager directly. I find adding from the Package Manager console easy. The script goes like below:
Install-Package jQuery.Ajax.Unobtrusive
Snippet & Learning
AjaxExtensions.BeginForm is a part of System.Web.Mvc.Ajax namespace under the System.Web.MVC assembly. When used in the response it writes the HTML
Being developers we always face a challenge, to debugand optimize the queries we have written for any request made to the server. Getting the exact time of the queries requested for each page load is next to impossible. Usually we count one two three.. and see the average.. :D. But is this the solution, how often can we do this!! This is not as developers we would want. The network tab in the developers tool gives us the information about the per request made for a page load, but that is not enough for us to know which query is taking more time and which query reuires optimization.
As MiniProfiler suggests
It is capable of profiling calls on raw ADO.NET (SQL Server, Oracle, etc), LINQ-to-SQL, EF (including Code First), Lightspeed and a range of other data access scenarios.
Is’nt that great!! Yes indeed.
Versions
There are different versions available for .NET MVC projects based on the MVC versions. We can get the Install Package with versions from the below provided Links.
- Miniprofiler-The Core needed for profiling
- Miniprofiler for EF 6-The Core needed for profiling EntityFramework version 6+
- Miniprofiler for EF 5-The Core needed for profiling EntityFramework version 5
- Miniprofiler for MVC3-The Core needed for profiling MVC3 applications
- Miniprofiler for MVC4/5-The Core needed for profiling MVC4 & 5 applications
- Miniprofiler for WCF-The Core needed for profiling WCF applications
Get Started
As we all know, for getting the package, we use the Package Managerconsole or Nuget Package. I would be using the PM console for this purpose. I will be installing Miniprofiler for MVC application. Check the image below:

This will add the references to the project. Not ending with this, there comes next the configuration which needs to be done. Check out the configurations below.
Configurations
At first in an MVC application, as we know the heart of the MVC lies in the Global.asax, so we need to configure here first. There is no hard and first rule like, this but I follow this. 
protected void Application_BeginRequest()
        {
         if(request.IsLocal)MiniProfiler.Start();
         //or any number of other checks, up to you, if for all request you need profiling then remove the if condition
        }

        protected void Application_EndRequest()
        {
            MiniProfiler.Stop(); //stop as early as you can, even earlier with Mvc MiniProfiler.MiniProfiler.Stop(discardResults: true);
        }
This is all we need to do to let Miniprofiler get registered to the application. Now comes the question how will the Miniprofiler be displayed to the user(developer). This is simple, we just need to check which page load takes more time and has the maximum number of qeries being called at the same time. Then we just need to place a simple peice of code snippet mentioned below, in the view page, as that needs to be rendered on the view only.
@using StackExchange.Profiling //namespace to be added
<head>
    @MiniProfiler.RenderIncludes()
</head>
Just note the namespace used : using StackExchange.Profiling
Thus when we run the application, the view/layout wherever the RenderIncludes() is there the profiling is done and displays the entire list of queries executed and the time taken. The below is how the profiler looks:
Now you would be wondering where did I mention the profiling to connect to the Entity Framework!! Hold on.. For that we need to install another package through the same PM console and that is Miniprofiler for the EF version based on used in the application.

this will add the package and all the dependencies if not present will be added. Then we need to add a simple code line to the Application_Start method in the Global.asax as below:
MiniProfilerEF.Initialize();
This as it explains itself, will initialize the profiling for the Entityframework operations or the db operations and show the user the entire sql querybeing called/executed during the page load and also the time taken.

The highlighted part in the above image, show the sql query being called and how many times. The red mark indicates that there are duplicate calls being made in the page load, based on which we will be optimizing the queries and reduce the number of db operations to make the page load faster, thus improving performance.
I hope this small peice helps developers beginning their careers. Any modifications, suggestions are mostly welcome.
CP
Still using images for icons!! Now in every other web site/web pages, we find intensive use of icons to help user navigate and understand easily the whole purpose. Making the icons simple and understandable from user point of view is what the motive stands here. But using images for icons!! would that be fine!!Would not that affect the page performance as the image has some size right readers!!Let me introduce here to you a small package upgraded and light-weight and easy to use which makes the GUI so simple to implement. Lets get started..
Getting Started With Font-awesome
As the name itself suggests, this package is awesome. From a github post,
Font Awesome is a full suite of 519 pictographic icons for easy scalable vector graphics on websites, created and maintained by Dave Gandy.
These are simple text, which can easily be manipulated like normal texts using the fonts. You stretch or enlarge an image(.png) icon it gets blurred, it looks bad in simple language. You enlarge any font from the package of fontawesome it would never get blurred or pixalated. Moreover no width no height is required as used in image as attributes, just increase the font-size, it manipulates the icon.
The best thing is this package can be downloaded from the Nuget Package or the Package manager console too. The below image will show how to install the package from the PM Console.
As you can see in the above Image, you need to get to the PM Console window and hit the yellowed Install command.
Install-Package font-awesome -Version 4.1.0
After Installing you may face some error for the assembly package. That is the dependencies on this library and their version may cause some issue here. As for example which I have encountered while adding in my project was the assembly Web.Optimization as this version of this library require varsion 1.1.3. . If any package upgradation/update is required as its dependencies then without any hesitation just update the packages. Infact, the updates for the packages should be checked and updated regularly. After adding the following files/folders get added to the web project.
When added/installed two css files are added for the font-awesome. To a shock,both the files are same, now wonder why then both??Because a small difference between both matters a lot: .min.css is the minified version of the css file that is small light and good for performance. So, while adding the reference in the layout, minified version is preferred/made mandate actually.
The other thing that gets added is shown in the above image.
Lets get some information about the extensions of the files inside the folder. Information are from WIKI:

.eot :- Embedded Open Type fonts are a compact form of OpenType fonts designed by Microsoft for use as embedded fonts on web pages.
.svg :- This is common and known, but still, Scalable Vector Graphics (SVG) is an XML-based vector image format for two-dimensional graphics with support for interactivity and animation.
.ttf :- This is developed by Apple, stands for True Type font. This means the font can be scaled to any font size even without tampering the quality.
.woff :- Stands for Web Open Font Format. This is a font format to be used in the pages rendered on web, that is Webpage.
.otf :- Stands for Open Type Font
This was all about the extensions of the files in the folder.
Usage
To use this as I have already mentioned, we need to have the minified version of the .css file in the layout itself, as the icons would be used intensively. The reference goes as below:
<link href="~/Content/font-awesome.min.css" rel="stylesheet" />
Now to use the class out of the .css defined classes, the use is as below:-
<i class="fa fa-2x fa-fw "></i>
As you can see in the above snippet, this is the way fontawesome classes defined in the <em>.css</em> file.
Class fa is defined as below:-
.fa {
  display: inline-block;
  font-family: FontAwesome;
  font-style: normal;
  font-weight: normal;
  line-height: 1;
  -webkit-font-smoothing: antialiased;
  -moz-osx-font-smoothing: grayscale;
}
fa-fw is defined as below:
.fa-fw {
  width: 1.28571429em;
  text-align: center;
}
These are the definition of the classes defined in the css. You think I have missed fa-2x, ok Guys there are fa-1x, fa-3x and more as they represent the font-size simplified as <em>1em, 2em, 3em & similarly..</em>
Then the actual class for the icon is to be used along with these which define its characteristics. The class name is prefixed with “fa-“. The many icons along with the classes that can be used are given in the link/cheatsheet:-Font Awesome Cheatsheet
You find a lots of icons with their class name to be used. Just specify the name as below and see the icon onscreen. Even another fact is we can even change the color of the icon as we want, using the similar color css property.
<i class="fa fa-2x fa-fw fa-adjust"></i>
Conclusion
This is how this awesome Font Awesome can be used so simply in our projects. Thus reducing the time & size for the page being loaded. So start using this beautiful, light-weight and authentic library for the icons to be used.
References
]]>As discussed in my prvious blog post i.e. ELMAH Part-1.
Now in this article I will be explaining the integration of ELMAH with Sql Server(SSMS). This is now-a-days an essential part in any application, that is error and exceptions that rise in the application are logged into the database tables that are related to ELMAH. These table scripts are providedby ELMAH itself. Dont Believe!! I also did not. But that is the truth. Lets see and discuss now..
ELMAH Configuration
Here I am specifying all the requirements for setting up ELMAH in the web.config settings. As the installationand also the setting have been explained in Part-1. Still I am specifying the blocks required in the Web.Config.
Inside the System.webServer block:
<modules runAllManagedModulesForAllRequests="true">
      <add name="ErrorLog" type="Elmah.ErrorLogModule, Elmah" preCondition="managedHandler" />
      <add name="ErrorMail" type="Elmah.ErrorMailModule, Elmah" preCondition="managedHandler" />
    </modules>Snippet
<handlers> <add name="Elmah" verb="POST,GET,HEAD" path="elmah.axd" type="Elmah.ErrorLogPageFactory, Elmah" /> </handlers>
above are the modules and handlers as well.
Inside system.Web:
<httpModules>
<add name="ErrorLog" type="Elmah.ErrorLogModule, Elmah" />
<add name="ErrorMail" type="Elmah.ErrorMailModule, Elmah" />
</httpModules>
<httpHandlers>
<add verb="POST,GET,HEAD" path="elmah.axd" type="Elmah.ErrorLogPageFactory, Elmah" />
</httpHandlers>The above are the common settings for the ELMAH. Now lets look into the settings required for database settings.
As we all have an access and look at the connection strings. Still lets have a quick look:
<connectionStrings>
<add name="DefaultConnection" connectionString="Data Source=(LocalDb)\v11.0;AttachDbFilename=|DataDirectory|\aspnet-DemoStart-20141014045047.mdf;Initial Catalog=aspnet-DemoStart-20141014045047;Integrated Security=True" providerName="System.Data.SqlClient" />
</connectionStrings>The above is the pattern of the connection strings. Donot use the same one..just kidding.. 
Then the final change for the ELMAH with the Sql :
<elmah>
<security allowRemoteAccess="yes" />
<errorMail from="[email protected]" to="[email protected]" subject="DEMO Error" async="false" useSsl="true" />
<errorLog type="Elmah.SqlErrorLog, Elmah" connectionStringName="DefaultConnection" applicationName="DemoStart"/>
</elmah>This was the final change required for the web.config change to integrate ELMAH with SSMS.
Queries for ELMAH
Now, let me reveal the magic to you as I mentioned earlier. Yes guys, queries we donot have to write , ready-made queries are provided by the ELMAH team. The download link for the ELMAH Queries is :-Queries for ELMAH
Just simply download the “.sql” file and run in the SSMS. After execution the tables get created for the ELMAH as well as the stored procedures shown below:

As you can see above, the tables and stored procedures are added into the database. This is so simple and as simple it can be. Is’nt this great!!
Lets see the number of columns and what columns are being created in the table dbo.ELMAH_Error

I hope this helps developers anyway. This article covers all the setting configurations required.
Thus the setup is as simple as it can be. Thanks to Andy French.
ELMAH, Error Logging Modules & Handlers is a tool for debugging mainly ASP.NET applications suggested by wiki. As we all know there is always a chance of getting exceptions while working on any applications. Handling them is a real challenge for many developers. But if we have a tool, that gives us the details of the exceptions or errors with the stack trace as well. Apart from showing the users the yellow screen of death, we show the users a customized error page, but for the developers if any exceptions occur instead of having a try catch block at every method, ELMAH provides them the details of the exceptions with the entire stack trace and solve the issue based on the error code. For more information on error codes and redirect please follow one of my other articles Custom Errors. Lets get into more details how this beautiful tool works.
What we get?
You would be wondering what this ELMAH gives us after adding this into the application? Straight from the Hanselmen’s blog, ELMAH would give us the following without changing a single peice of code. Since the ELMAH includes Modules and Handlers, it greatly supports HttpModules and Http Handlers.
- All unhandled exceptions(Null reference, Out of bound exception, etc.) are logged in the ELMAH interface
- A webpage can remotely view the logged detailed exceptions
- Since this shows the entire stack trace, the so called yellow screen of death can also be seen but in the ELMAH interface
- ELMAH also gives an opportunity to store the exceptions or log them into tables (SSMS).
<customerrors mode="On" defaultredirect="/Default/Error">
<error statuscode="404" redirect="/Default/NotfoundError">
</error></customerrors>When suppose the above is the case, then the user using the application, lands on the above redirect path url pages, where as the error and exception are managed by ELMAH and mailed or logged into the database for future reference for the developers.
Installation for an existing MVC project
Step 1: Go to references and right click on the Manage Nuget Packages

Step 2: Search online for Elmah.MVC
Step 3: After the succesful installation, you can check the package.config for the version of elmah installed shown below:

Step 4: You need to ensure then the below web.config configurations as shown in the images below:
<sectionGroup name="elmah">
<section name="security" requirePermission="false" type="Elmah.SecuritySectionHandler, Elmah" />
<section name="errorLog" requirePermission="false" type="Elmah.ErrorLogSectionHandler, Elmah" />
<section name="errorMail" requirePermission="false" type="Elmah.ErrorMailSectionHandler, Elmah" />
<section name="errorFilter" requirePermission="false" type="Elmah.ErrorFilterSectionHandler, Elmah" />
</sectionGroup>
<system.web>
<authentication mode="None" />
<compilation debug="true" targetFramework="4.5.1" />
<httpRuntime targetFramework="4.5.1" />
<httpModules>
<add name="ErrorLog" type="Elmah.ErrorLogModule, Elmah" />
</httpModules>
<httpHandlers>
<add verb="POST,GET,HEAD" path="elmah.axd" type="Elmah.ErrorLogPageFactory, Elmah" />
</httpHandlers>
</system.web>
<system.webServer>
<modules>
<add name="ErrorLog" type="Elmah.ErrorLogModule, Elmah" />
</modules>
 <handlers>
      <add name="Elmah" verb="POST,GET,HEAD" path="elmah.axd" type="Elmah.ErrorLogPageFactory, Elmah" />
    </handlers>
</system.webServer>
<elmah>
    <security allowRemoteAccess="yes" />// To allow remote access
  </elmah>
Now everything is set for developers to check for the internal exceptions occured. But how to access the ELMAH interface? It is simple, just use the path url succeding with /elmah.axd then done you see the list of exceptions/errors occured. The interface would look like below image:

Integration of ELMAH to GMAIL
Yes guys you heard h=it right as the heading says, we can integrate email settings into the ELMAH and send the entire stack trace and exception details as mail to multiple users using a subject too.
Below I would be discussing the integration and set up for the mail settings. here I use the Gmail setting. The best part here is the change is only done at the web.config level. Below are the proper configurations.
- First in the system.webServer/modules section add the below peice of line. The final module is below:
<modules runAllManagedModulesForAllRequests="true">
      <add name="ErrorLog" type="Elmah.ErrorLogModule, Elmah" preCondition="managedHandler" />
      <add name="ErrorMail" type="Elmah.ErrorMailModule, Elmah" preCondition="managedHandler" />
    </modules>
- Then after adding this module section, we need a set up for the Gmail in the system.net/mailSettings section as below:
<system.net>
    <mailSettings>
      <smtp from="[email protected]">
        <network host="smtp.gmail.com" port="587" userName="*****" password="***" enableSsl="true" />
      </smtp>
    </mailSettings>
  </system.net>
Just remember you need to set your gmail username and password. Google Mail is very smart and doesnot simply ets the mail come or the application to sign in into the gmail, as that may be from an unauthenticated source. To avoid this, you need to follow the mail which Google will send you and you need to approve that you want that Ip source to use your mail settings to send mail. Thus, you make google happy.
- Then finally we need to set the elmah section with the following block:
<elmah>
    <security allowRemoteAccess="yes" />
    <errorMail from="[email protected]" to="[email protected]" subject="DEMO Error" async="false" useSsl="true" />
  </elmah>
Thus, all set now our application/ELMAH is smart enough to understand the configurations and send mails to the specified users. Remember in the above block “to”, you can specify more than one mail addresses separated by comma. Thus, have a look at the image below to see how the mail looks like: - The above is a part of how the mail looks like.

Thus, we have discussed everything related to ELMAH. In the upcoming article/blog I will be explaining how to store into tables using connection strings. The interaction of Sql server of ELMAH.
References
]]>- Introduction
- Dependency Inversion Principle
- Bob Martin’s Discovery
- Inversion of Control
- Service Locator
- Dependency Injection
- Constructor Injection
- Setter Injection
- Interface Injection
- Demo
Introduction

How is this concept relevant? Let’s have a look at the traditional architecture generally followed in MVC applications.
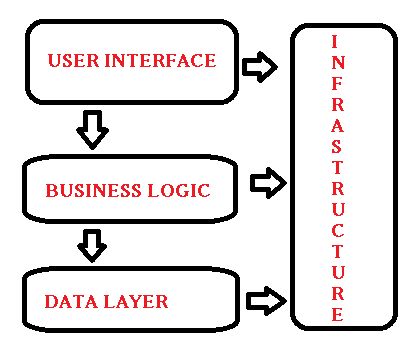
In this architecture, we can see that each of the layers depends on the other layer beneath it. That is why we can say in a technical manner that they are coupled with each other. However, coupling is necessary for every application. Then what is the need for dependency injection, if coupling is necessary? Are we contradicting ourselves? No, we are not. Coupling is necessary, but tight coupling is a big threat to project/application maintainability and performance. Thus, for always having loose coupling or minimal dependency, we require the concept “Dependency Injection”.
In the preceding figure, we see the View layer (UI) has a dependency on the Business Logic Layer that also has a dependency on the Data Layer, thus there is a transitive dependency, but they are still dependencies. Let’s get deeper into what these dependencies mean in real scenarios and how to resolve them.
Dependency Inversion Principle
Quote:
High-Level Modules should not depend upon lower-level modules, rather both should depend upon abstractions.
Now what does that mean? Let me explain this using an example.
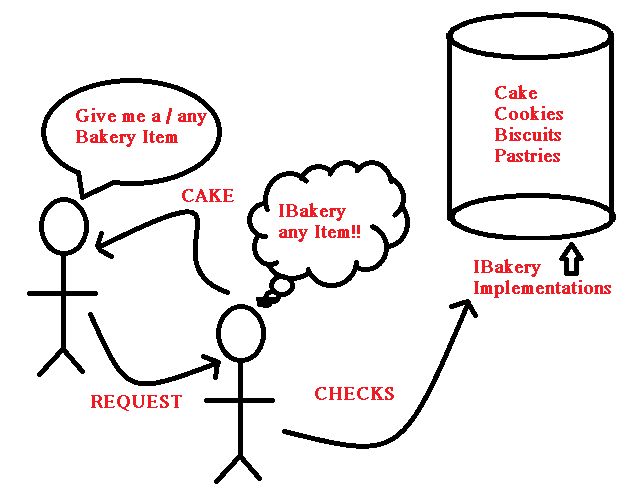
In real life, consider our day-to-day chargeable portable devices that we use, like mobile devices, torches, radios and so on. Do these devices have similar charging ports? No, they do not. We need to plug in various chargers for each device. Now wonder if all the devices had similar charging ports, we could use a single charger for each device. This defines the preceding quote. Still in doubt? Okay, let’s look at the figure below:
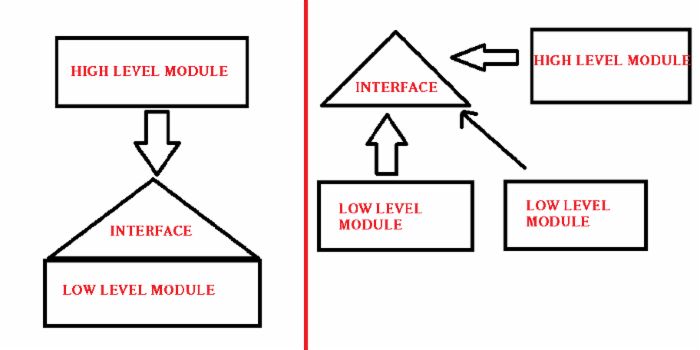
You can see that the figure on the left has a High-Level Module dependent on the interface, also the Low-Level Module is coupled to the interface. Here, only one Low-Level Module exists, so it seems Okay, but in actual applications this is not the case, there may be many Low-Level Modules. Then, if there are so many Low-Level Modules (LLMs) and their associated High-Level Modules (HLM) will have dependency on the interface then it is a threat.
But have a look at the diagram on the right, we can see there is just a single interface and a high-level module and many low-level modules will interact with the interface, here the HLM has the interface and that can be reused and the previous dependency of the HLM on the LLM is avoided. In a more simpler way, instead of a Low-Level Module defining the interface, on which the High-level Module depends on, in the Dependency Inversion Principle, the HLM defines the interface and the LLMs implement the members. This is done using a common interface or an abstract class.
Bob Martin’s Discovery
Bob Martin, commonly known as Uncle Bob, is the founder of the famous SOLID principles, of which Dependency Injection is a part. He explained the concept with a very nice and famous “Copy Read and Write” example.
According to him, a HLM should never depend on the LLM, rather they should have common abstractions. The example that he provided was:
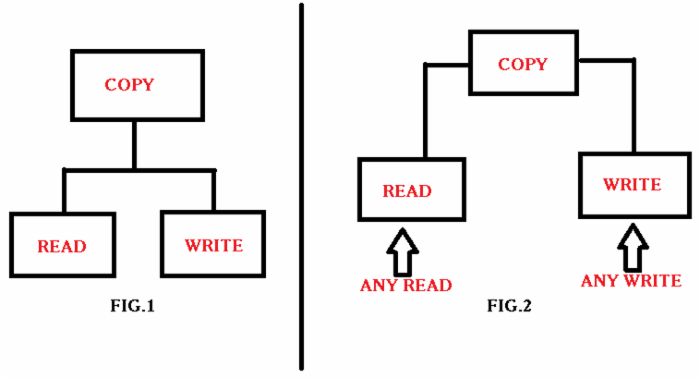
In that figure, suppose there is a copy and there are two methods, Read and Write. Thus the copy module calls the two modules. Now suppose another Write method comes for Write to Disk. Suppose again that we implement the copy method, similarly for the Read method also Read from the keyboard and Read from a TouchPad. This increases the dependency and coupling. So, to avoid that, we can have a common method for Copy that is Read and Write that will be reused by each device from which the read and write would be called respectively.
Here, the Read and Write acts as an abstract classes, since the Copy now does not depend upon whether the future request is a keyboard, a touchpad or a printer or disk.
Thus, the principle of dependency inversion is at the root of many of the benefits claimed for object-oriented technology. Its proper application is necessary for the creation of reusable frameworks. It is also critically important for the construction of code that is resilient to change. And, since the abstractions and details are all isolated from each other, the code is much easier to maintain.
Inversion of Control
Inversion of Control is a style of programming, that has a framework controlling the flow of the application, that is we are trying to change the normal flow or inverse the flow to avoid tight coupling. It works on the Dependency Inversion Principle. This IOC is not only associated with the DIP but is also associated with the Dependency Injection and Service Locator.
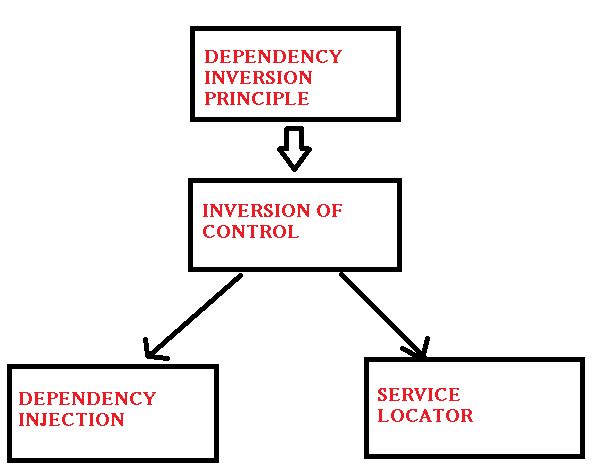
IoC is a way to provide abstraction. A way to change the control. IoC gives some ways to implement DIP. If you want to make a higher-level module independent from the lower-level module then you need to invert the control so that the Low-Level Module is not controlling the interface and the creation of the object. Finally IoC gives some way to invert the control.
Service Locator
Service Locator also implements the DIP principle and indeed provides us with loosely coupled code. This introduces a locator object, that is used to resolve dependencies within a class. Client uses the locator to find and access the services implemented using the interface. Let’s see that with a code example.
Dependency Injection
Dependency Injection is a type of Inversion of Control, where we move the creation and binding of a dependency to outside of the class, that uses the dependency to access the implemented members of the common interface. This means it is done without any interference of any object, generally by a component that passes constructor parameters and the properties. As without any DI resolves like Ninject, Unity and so on, if we try to invoke the contractor of a class with a parameter, we are thrown an error as:
Quote: No parameter less constructor defined for this object.
Some of the advantages of using Dependency Injection are:
- Reduces Class Coupling.
- Increases Reusability.
- Improves the maintainability for future purposes.
- Improves and catalyses the Unit testing process.
Constructor Injection
Constructor Injection is the most commonly used form of Dependency Injection. As the name suggests, it uses injection into the class level using its constructor. Let’s see a sample code snippet for better understanding:
The preceding code snippet explains the flow. First, we create the dependency by creating the department object for the CheckDepartment() member whose implementation would be used by the class using dependency, that is when we are creating the new instance of the class and passing the dependency. The drawback here may be we cannot create the class and use it without/before passing in the dependency, since we had only the constructor, that would need the dependency.
Setter Injection
Here, we create a setter on the dependent class and use the same setter as a property to set the dependency. In this there is a flexibility to change/set the dependency, since we are the one setting it and in setter injection. Unlike constructor injection we can instantiate the class without passing the dependency. We could set that after instantiating the class also. The code snippet for the setter injection goes as follows in the simplest manner:
Interface Injection
This is also used less in real applications. It is the same as the Setter injection but here, the Dependent class implements the interface. The injector then uses the interface to set the dependency. Interface then defines a method that would be called to do the dependency. Let’s look into the code snippet:
This is similar to a Setter but the difference is that in a Setter we do not get to understand what goes on in the background since we just set the dependency using the setter, but here we know the dependency is coming from the interface after implementing it in the dependent class. Here, after typecasting the employee to the IDepartmentForInject type we are invoking the Inject method.
Demo For Manual Injection
The following is a small demo console application to show dependency injection. You can find the code for download also.
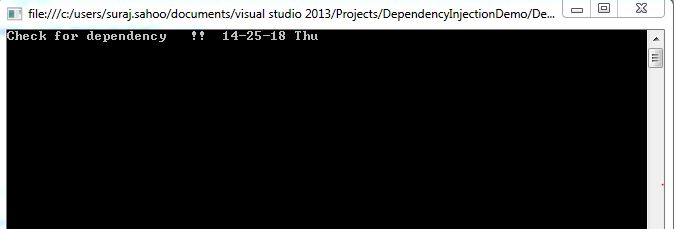
The values in the Autos window in Visual Studio shows how the _department, dependency set in the constructor, has the value from the CheckDepartment that implements IDepartment.
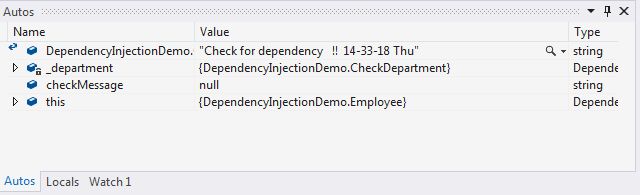
The result that comes is the string returned:
Points of Interest
There are many dependencies resolvers available in Nuget as DLL packages like, Ninject, Unity, StructureMap3, Castle Windsor. But understanding the details of how the background works would be fruitful for using the tools. This is now commonly used and is a confusing topic. I hope this helps anyway.
References:
CP Article
DotNet Tricks
MSDN
In this article, we will be covering the details of why Glimpse is used, what Glimpse has in store for developers.

We have been using MiniProfiler in MVC projects to detect the performance of the Queries called in the server. The number of requests made by the browser to the server, the response time and many other options a developer would get using these extensions.
Glimpse is a new platform for developers to judge their applications. It is an open-source & free diagnostics platform for the web. This is used to get the information about the Asp.Net Web Forms & Asp.Net MVC applications. In simple words:
Quote:If you want to know what exactly is happening on your server, Glimpse will show you.

In this article, we will be using Asp.Net MVC for demonstrating the Glimpse usage. Glimpse is just like Chrome developer tool/Firebug for our server. Glimpse dictionarily** means momentary or partial view, thus it gives us a glimpse of inner workings of Asp.Net applications. It does this by gathering detailed diagnostics information about the behaviour and execution of the application and sending back the data along with the page with separate javascript overlay. Glimpse shows us what data was sent to the server & what data the server sent back, detailed information regarding what code eactly got executed on the server and how long it took.
Why Glimpse is different??

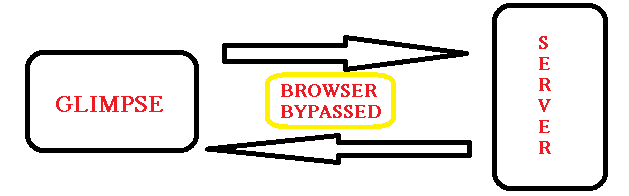
We might now think it is almost same as the Chrome developers/firebug tools, but Glimpse is quite much different than these tools. Even though, it looks the same as the developer tools but still serves a completely different purpose. Glimpse is more focussed on the server. Lets understand the diffenrence more through a small diagram:

Here in the above diagram the dev tool take into consideration the viewpoint of the browser not the server, All the data we get in chrome developer tool is the data that came from the browser not the server. We can get to know the time taken for the request from the time the browser sent the request to the time it gets back response from the server. Here is where the Glimpse come into action, it gives the actual time taken by the exact or particular code executed for the request on the server, that is Glimpse bypasses the Browser in between. See the below diagram:
Glimpse shows us all kinds of information of an MVC application like what routes are registered, what connection strings are used, what flow was through the MVC pipeline, even the configuration present in the Web.config and what Models are bound.
Getting Glimpse
Considering the readers of this article have worked on Asp.Net MVC application and used Nuget package to install plugins and extensions, the easiest way to download and install Glimpse is Nuget Manager or can also be installed through Package manager console. Look at the diagrams below to get both the approaches: 
As you can see in the above image, I have already Installed Glimpse for MVC5, as we install Glimpse MVC4/5/3, the dependencies like Glimpse Core, Glimpse ASP.Net also getinstalled and the references gets added. The above approach is through Nuget package. Below diagram is the approach through Package Manager Console:
 Both the approaches install the Glimpse with the latest version and also add references for the dependencies. This makes changes to the Web.config adding configuration settings for the Glimpse which is shown below:
Configurations
Custom Section :
The diagram below represents the creation of a section inside the Web.config for Glimpse

HttpHandler & HttpModules
The diagram below represents the HttpModules and HttpHandlers created for the Glimpse. Glimpse needs a custom HTTP module and HTTP handler with ASP.NET, in the section if you have IIS 6 or earlier, or in the section for later versions of IIS.
There are two types as mentioned above system.Web & system.webServer
For system.Web
<system.web>
    <httpmodules>
        <add name="Glimpse" type="Glimpse.AspNet.HttpModule, Glimpse.AspNet">
    </add></httpmodules>
    <httphandlers>
       <add path="glimpse.axd" type="Glimpse.AspNet.HttpHandler, Glimpse.AspNet" verb="GET">
    </add></httphandlers>
</system.web>
For system.webServer
<system.webserver>
    <modules>
        <add name="Glimpse" precondition="integratedMode" type="Glimpse.AspNet.HttpModule, Glimpse.AspNet">
    </add></modules>
    <handlers>
        <add name="Glimpse" path="glimpse.axd" precondition="integratedMode" type="Glimpse.AspNet.HttpHandler, Glimpse.AspNet" verb="GET">
    </add></handlers>
</system.webserver>
Main Configuration
I mentioned main configuration as all the manipulations to be done lie changing the configuration for ignoring or adding new tabs to the Glimpse overlay is done here. The configuration looks as below:  Lets look at how the changes are done:
Change Configuration
Configuring the Tabs shown for the Glimpse:
There are mant tabs shown by default to the user. Here I will show you how to disable any tab, to avoid readability issues. Lets see what tabs are shown. Below is the list:
The default Glimpse tabs are:
- Diagnostics:
- Timeline – Glimpse.Core.Tab.Timeline
- Trace – Glimpse.Core.Tab.Trace
- ASP.NET:
- Configuration – Glimpse.AspNet.Tab.Configuration
- Environment – Glimpse.AspNet.Tab.Environment
- Request – Glimpse.AspNet.Tab.Request
- Routes – Glimpse.AspNet.Tab.Routes
- Server – Glimpse.AspNet.Tab.Server
- Session – Glimpse.AspNet.Tab.Session
- ASP.NET MVC:
- Execution – Glimpse.Mvc.Tab.Execution
- Metadata – Glimpse.Mvc.Tab.Metadata
- Model Binding – Glimpse.Mvc.Tab.ModelBinding
- Views – Glimpse.Mvc.Tab.Views
- ADO.NET:
- SQL – Glimpse.ADO.Tab.SQL
These are the default Tabs shown. We will consider only the Diagnostics and the Asp.Net MVC types and how to disable them. The configuration change for disabling is very simple and small. Remember this ignore types are to be added to the Main cofiguration.
<glimpse defaultruntimepolicy="On" endpointbaseuri="~/Glimpse.axd">
    <tabs>
        <ignoredtypes>
            <add type="{Namespace.Type, AssemblyName}">
        </add></ignoredtypes>
    </tabs>
</glimpse>
Configuring the Runtime policy:
Policies control what Glimpse is allowed to do at any given request from the browser. Ploicy by default is Local Policy, which can be disabled and added some other policies.
For example, When we want the Glimpse to run remotely, wechange the following configuration
<glimpse defaultruntimepolicy="On" endpointbaseuri="~/Glimpse.axd">
    <runtimepolicies>
        <ignoredtypes>
            <add type="Glimpse.AspNet.Policy.LocalPolicy, Glimpse.AspNet">
        </add></ignoredtypes>
    </runtimepolicies>
</glimpse>
Start your Glimpse
Now we have discussed uptill now how to and from where to add Glimpse to your application and the changes in the Web.config the installation does. As well as the configuration changes we can do. To start the Glimpse we need to run the application and browse through the same host adding: “host/glimpse.axd” First lets see a diagram that shows the latest Glimpse UI overay. After getting into the browsed link the page shown is as below, that is a part of the page:
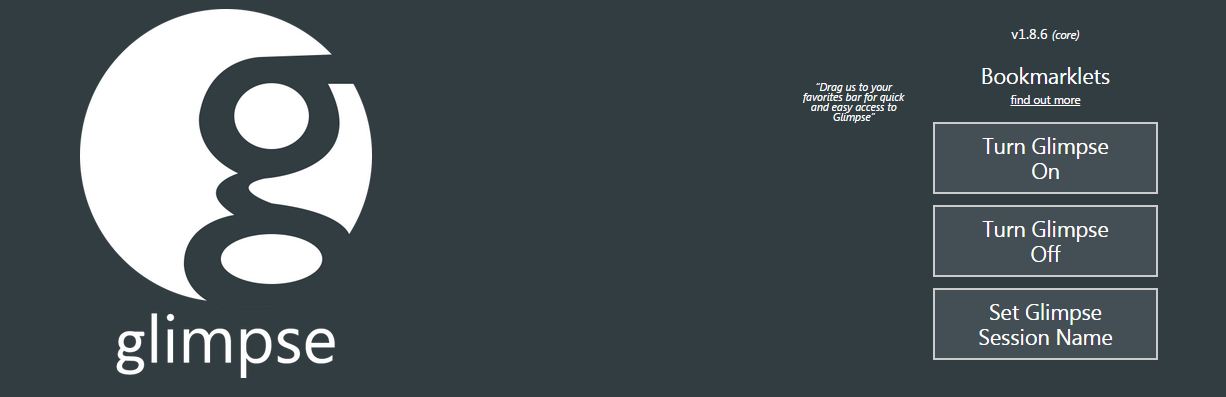
After this, we need to click on the Turn Glimpse On. This turns on the Glimpse, then in the application or “/Home/Index” shows a small glimpse “g” icon towards the right bottom. Click on that to see the Glimpse overlay Magic..

The above figure shows the jist or a brief view of the request made & time taken, or the Magic Glimpse has. The below figure shows the detailed window for the Glimpse, this has a part of the window but all the default and MVC tabs are enabled and shown to the end user.

A brief on some important Tabs
Lets discuss briefly on the tabs used by Glimpse or that is displayed to the end user. The tabs let the users know in details about their application and even the machine the application is running on…Strange!! Lets have a look:
Configuration Tab
This tab gives very useful information about the Machine configurations & Web configurations. It gives the details about the application settings, the connection strings used, Web Authentication modes, the custom errors mode and Defaut redirect page, the Http handlers and Http Modules. To literally say, this gives the overview of theconfiguration settings used in Web.config. Have a look at the below image:
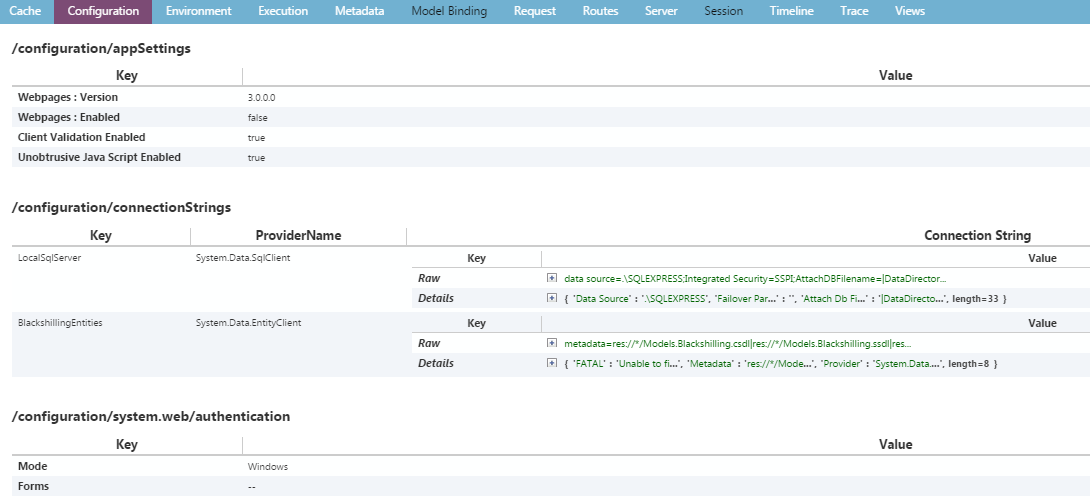
One can mark in the Image or when used in the configuration tab there is Connenction strings, that shows both the default connection present in the Web.config as well as the default connection strings present in the Machine.config. The XML format that is,/configuration/appSettings, makes easier to find it in the Web.config.
Environment Tab
This tab gives information about the Server that handles the request. Shows information like name of theMachine, which dotnet framework application is running. Even the assemblies that are loaded. Lets have a look at the image below showing the Environment tab:
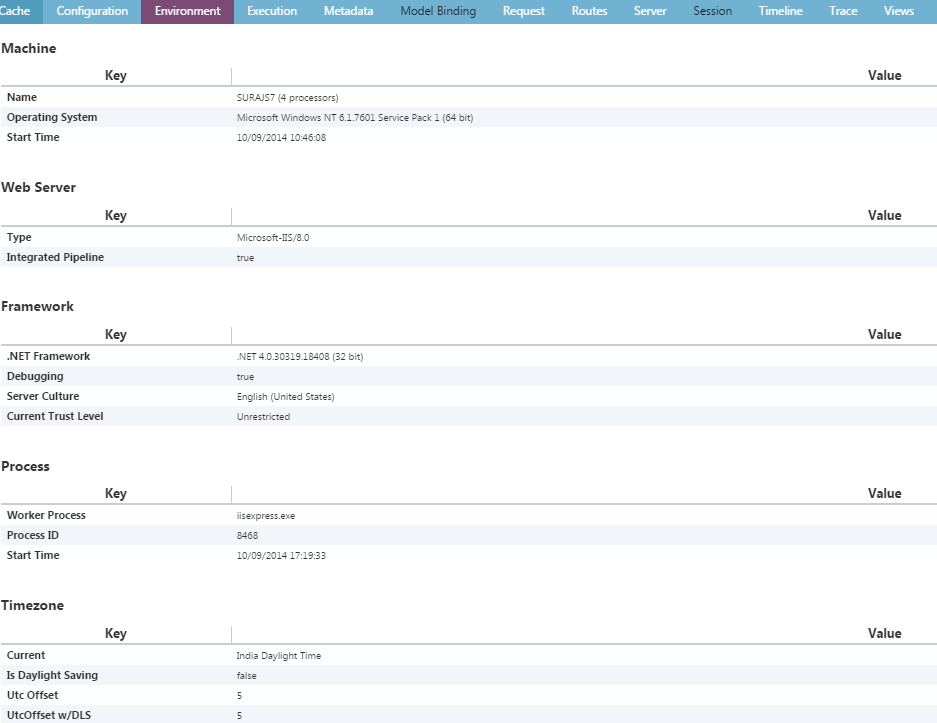
The above image shows the Environment tab and the data it gives. It gives information regarding the Processes running like iisexpress along with its ProcessID, gives information regarding the TimeZone, that would anyhow help developers with the timezone related issues at some point of time. This shows the information about theweb Server also like Microsoft-IIS/8.0 running on my machine. Also the Application assemblies and the system assemblies are produced in this tab.
Request Tab
This tab would seem to have reduntant data that is also present on the developer tools, but that is not the case. It has the exact data that the server received. This tab solves the problem of the developers trying to troubleshoot a tricky issue where the request is being modified or intercepted using fiddler or some other tools before reaching the server or Asp.Net can handle that. Lets have a quick look at the tab image:

As you can see I have highlighted the Query string parameters to show as it is displayed in key value pairs and also in the actual Url. This gives information about the User Host address and User Agent. The Host address is “::1” as i was running the application on my local system.
Routes Tab
This gives the information about all the routes that are registered and which routes are called for a specific page. This also gives information about the Areas if any used, also the Api controllers used & the normal controllers registered in the route.config. Lets have a quick look at the Route tab:

Here, in the Image we see the Constraints & Data tokens highlighted. The greyish background shows the actual route being used for this page. We rarely have constraints and Data tokens defined in our routes,but this information also proves useful. Lets go ahead and look into the code for adding the Constraints and Data token:
using System.Web;
using System.Web.Mvc;
using System.Web.Routing;

namespace KendoMvcDemo
{
    public class RouteConfig
    {
        public static void RegisterRoutes(RouteCollection routes)
        {
            routes.IgnoreRoute("{resource}.axd/{*pathInfo}");
            routes.MapRoute(
                name: "Default",
                url: "{controller}/{action}/{id}",
                defaults: new { controller = "Home", action = "Index", id = UrlParameter.Optional },
                constraints: new RouteValueDictionary { { "id", @"\d" } }
               ).DataTokens = new RouteValueDictionary { { "data", "value" } };
        }
    }
}
This is the Code for adding the constraints, here in the constraints we have added a regular expression to mandate the field id (parameter) to be a single digit value only. We have given some random values to the data tokens.
We can see these data in the Route tab image provided. Now, when we run the application after adding these constraints, we would get IIS forbidden error as the default route now expects an id that to be a single digit.
Session Tab
You might observe in the above images everywhere, the Session is disabled/blackened. This is because we donot have any session defined for this page. Once we define the session for a specific page, then we can view the session to be active with the key value pairs. See the image below that shows the Session defined and the value.

Here, I have defined a session like
public ActionResult Index()
        {
            Session["Test"] = 1;
            var blackshilling = new BlackshillingEntities();
            ViewBag.Properties = blackshilling.Properties;
            ViewBag.Message = "Welcome to ASP.NET MVC!";

            return View();
        }
You can see the value of Session Test as 1 in the image.
Points of Interest
We have discussed much on the Glimpse use and the Important Tabs. Hope this package comes handy for the developers in enhancing and knowing their application better. This would help out during the optimization phase, where it would be required to judge the Sql operations their execution time and many. I will be writing a tip/article on this in upcoming days.
]]>