In this era of the diversity in latest technology and the ability to learn and be equipped in languages is the most challenging and interesting thing for a developer or a geek you can say. Me being a .Net developer found it interesting personally to get started with the Python, an open source programming language using the Microsoft IDE, the latest one i.e. Visual Studio Code. There are many reasons to choose & learn Python as my choice out of the box , now since Machine learning is the new latest!!  Python is the best programming language and light weight to be used. I again say it is my personal choice to choose Python.
  Much of talks now, lets get started with what Python is actually and some facts about Python.
Python??
An interpreted language which obviously follows object oriented principles. Now much of technicality to be discussed when technical terms are being used. Now as of now, I knew C# (Programming Language) is interpreted into byte code and then is compiled by the Common Language Runtime where as Python is completely interpreted language, which means it is executed directly at the run time unlike the compiled language, which first gets compiled into the assembly language which any CPU can understand.
Python is considered as one of the best Rapid Application Development programming language. It is easy so far for me to learn Python though it is just the beginning. It’s semantics are diversified, that is it makes easy as well as strict for the developers to follow coding convention. The indentation is a part of its syntax and the semantics are modular which makes it rather more convenient for the developers to maintain the code.
Setting up Python
Here, I would be sharing the process to set up Python on Windows. First of all check if Python is pre installed on your system. To check that, open Command Prompt and type python. If the output is not desirable i.e. ‘python’ is not recognized, then it is not installed in that path. To download and install python, click on the below link and download:
Download Python for windows
Now once downloaded, install the Python file in .msi extension in a path and navigate to the same path in command prompt and type python then. This output would be python with the version installed and we are ready to write our first Hello World program and follow the tradition .
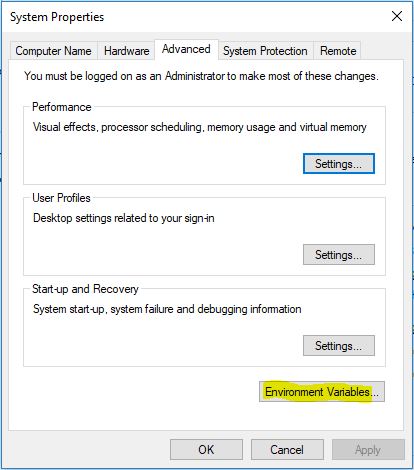
But before that one of the important things to be done is setting up the environment variables or the system path. This is mainly required in UNIX and Windows because the OS searches for the executable in the specified path in the environment variables set. In Macintosh, the path is handled by the installer. Thus, below the images would guide to set the variables.
Now all set for the python to run on Windows Command Prompt with the first Hello World program.
To develop applications using python we would surely need python IDE. There would be many in the market, but yes after being obsessed with the Microsoft products, I prefer to use the open source IDE by MS, Visual Studio Code
Get started with Visual Studio Code
To start with after setting up Python on windows, we need to install the Python extension for Visual Studio Code.
Once installed the extension of Python for the Visual Studio code, open Visual Studio Code and Go to Files->Preferences->Settings. Once navigated, user settings window pops up. Once you see this window,

Search for the “python.pythonPath”
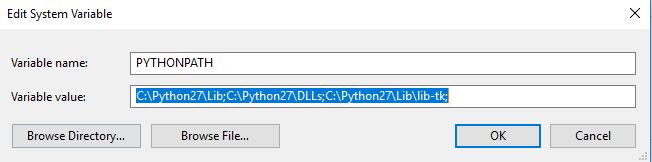
There would be Default Settings for the variable, now change the path to the installed folder path on your system.
//Default settings
           // Path to Python, you can use a custom version of Python by modifying this setting to include the
           full path.
          "python.pythonPath": "python"
Path changed under User settings to:
//User Settings
        {
    "python.pythonPath": "C:\\Python27\\python.exe"
        }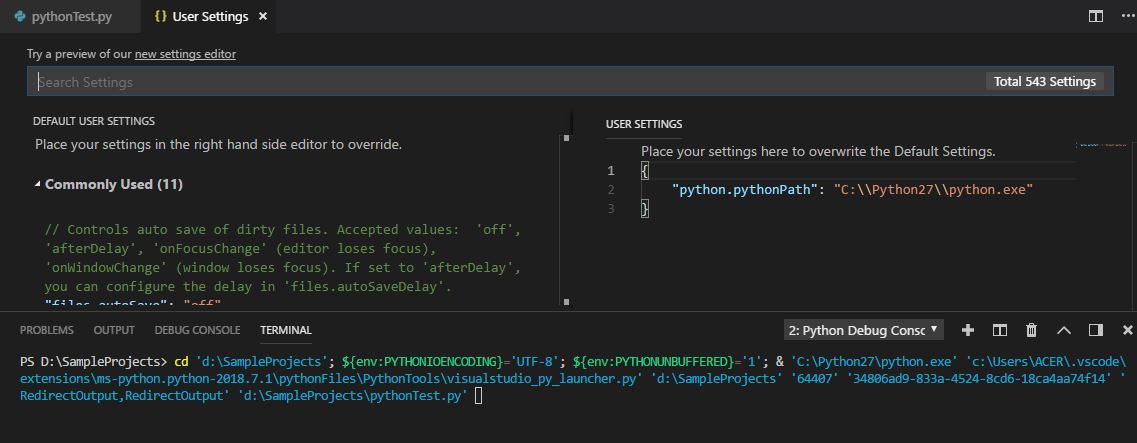
Now all set to run the any application on the Visual Studio Code in Python. In the IDE terminal below, type python, output is as below:

When we navigate to the Extensions, we can see Python is enabled, with the Linting, Debugging extension. These are used for Intellisense, for which I love Visual Studio.
Also there are few modules/packages which are kind of third party but can be used as these are all open source. Just like in .Net we have Nuget Package Manager. So in the terminal itself of the IDE we can install any modules of python like with the below command:
> python -m pip install httppie
The above was one of the examples. The detailed discussion is out of this article’s scope. We will discuss in upcoming articles of this series.
Now lets without wasting much time, create a small program in Python and execute to see the output.
class Car(object):
	"""
		blueprint for car
	"""
	def __init__(self, model, color, company, speed_limit):
		self.color = color
		self.company = company
		self.speed_limit = speed_limit
		self.model = model

	def start(self):
		print("started")
maruti = Car("Ertiga","White","Maruti Suzuki",140)
maruti.start()
This is a simple program where we have a class named Car with a method as start that prints “started”. More about the properties and constructor in the next article.
maruti is the object instantiated and then the method start() is invoked through it.
Thus, debugging this will give the output “started”.
Conclusion
Next we will discuss the details and basics of Python in the upcoming articles of this series.
]]>Have you ever encountered a scenario when you have to download few files zipped and compressed! Few development involving the manipulation of documents and its management would require this. There are a lot of packages out in the market. Here in this article, I would be sharing the use of DotNetZip package used to zip, unzip & compress files using C#, VB.Net & any .NET language.
Practicality
Download the DotNetzip package from Nuget package.
Download
Once downloaded, its all set to use the dotnetzip package to start zipping the files and compressing them. For the files to be zipped, here I will be using the file path and select each file to be zipped. Here also we will see how a file being created on the fly (a pdf using rotativa) is saved in same folder and zipped.
File created on the fly using Rotativa
var pdfResult = new Rotativa.PartialViewAsPdf("~/Template.cshtml", model) //This is HTML that would be generated as PDF
                    {
                        FileName = "Template.pdf"
                    };
                    var resultSet = pdfResult.BuildPdf(ControllerContext);
                    if (resultSet != null)
                    {
                        string path = Path.Combine(Server.MapPath(subPath));
                        FileStream fs = new FileStream(path+".pdf", FileMode.Create, FileAccess.ReadWrite);
                        BinaryWriter bw = new BinaryWriter(fs);
                        bw.Write(resultSet);
                        bw.Close();
                    }
The above code snippet is generating a PDF using a cshtml Razor view page using Rotativa Using Rotativa Best to follow the mentioned article for more information to generate PDF using Rotativa using MVC.
Lets look at the code snippet for the Zipping.
using (ZipFile zipFile = new ZipFile())
                {

                    //Get all filepath from folder
                    String[] files = Directory.GetFiles(Server.MapPath("/"));
string fileUniqueName = "Template"
                    memoRefCode = memoRefCode.Replace('/', '_');
                    foreach (string file in files)
                    {
                        if (file.Contains(memoID.ToString()))
                        {
                            zipFile.AddFile(file, @"MemoDocs_"+ memoRefCode); //Adding files from filepath into Zip

                        }
                    }

                    Response.ClearContent();
                    Response.ClearHeaders();

                    //Set zip file name
                    Response.AppendHeader("content-disposition", "attachment; filename=MemoDocuments.zip");
                    zipFile.CompressionMethod = CompressionMethod.BZip2;
                    zipFile.CompressionLevel = Ionic.Zlib.CompressionLevel.BestCompression;
                    //Save the zip content in output stream
                    zipFile.Save(outputStream);
                }

                //Set the cursor to start position
                outputStream.Position = 0;
                String[] filesToDelete = Directory.GetFiles(Server.MapPath("/"));
                foreach (string file in filesToDelete)
                {
                    if (file.Contains(memoID.ToString()))
                    {
                        FileInfo fi = new FileInfo(file);
                        fi.Delete();
                    }
                }
                //Dispance the stream
                return new FileStreamResult(outputStream, fileType);
The above are the three algorithms used. I personally have used only BZip2 based on few good reviews.
Once compressed and all files inserted into the folder, the zipped folder is ready to be downloaded using the FileStreamResult in MVC action.
Conclusion
This is the simple explanation and the code snippet for the Zip file concept. This is simple and really handy to be used and it also provides the compression algorithms which are good to go with.
]]>With 20% faster performance than .Net Core 1.X, core 2.0 is in the lime light. Optimizing to the core the .Net core 2.0 is the next big thing for the Microsoft Developers.
A modular framework uniting the MVC and Web API into a single programming Model running on .Net framework or .Net core run-time but can run on any platform. Highly flexible in deploying to cloud and since cross platform, the demand among the developers increases.
Asp.Net Vs Asp.Net Core

Asp.Net Core is runtime and executes applications built for it. Asp.Net core application is also .Net Framework application because of the .Net core libraries are used for both the core and .Net framework applications. Here the thing to notice is Asp.Net core is built on top of both .Net framework & .Net Core where as the Asp.Net is now being termed as .Net Framework. Check the image below (from Blogs )
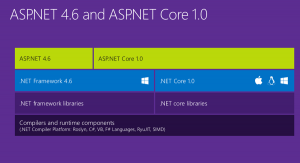
Asp.net Core libraries/dependencies are self-contained, most of the packages are downloaded from Nuget but can run on windows, linux & Mac where as in Asp.Net the packages are self contained but can only run on windows.
Based on the .Net Core CLI (Command Line Interface) on which the IDE (Integrated Development Environment) relies on. It is the cross platform tool chain for developing .Net applications irrespective of the platform.
Visual Studio as IDE has support for running on Windows and MacOS. Visual studio code can be used as IDE on windows, MAC and Linux systems as well.
Directly .Net Core CLI can be used on the Command window to execute the .Net applications.
dotnet new console
dotnet build --output /build_output
dotnet /build_output/my_app.dll
More about .Net Core 2.0
The latest of the Core versions now in the market. With the command line interface it is just few command away from creating a .Net Core 2.0 application. .Net core 2.0 now comes with the Entity framework 2.0. To start with the .Net Core 2.0, one just needs to download and install the .Net core 2.0 SDK
Creating a small and simple application using CLI

.Net Core 2.0 has a lot of performance improvements. One of the best improvements in .Net Core 2.0 is Razor Pages. Razor pages in .Net core 2.0 MVC projects are enabled by default using the services.AddMvc();
Now whats new in the integration of Razor Pages! In the Razor Pages now there is no direct coupling with the hard bound Controller we used to create and adding views to them and then routing through the controllers and Actions.
Now, we can directly create a folder and add a .cshtml page. For example,
We add a cshtml file named- “CoreTest.cshtml”
@page
Hello Core 2.0!
Here the routing would be “/CoreTest”. Simple and Crisp! Interesting thing is the precious page route was /CoreTest, now it can be customized and rerouted to the customized route to suppose “/core-test”.
services.AddMvc()
    .AddRazorPagesOptions((opts) =>
    {
        opts.Conventions.AddPageRoute("/CoreTest", "core-test");
    });
Razor compilation is easier and is automatically compiled during the publishing of the package or the application.
MvcRazorCompileOnPublish is the property that is set to true by default. We can set it to false to avoid this auto compilation.
netcoreapp2.0
  false
The .Net core 2.0 simplified the Program.cs class file as compared to the .Net Core 1.x.
For .Net Core 1.X
public class Program
{
    public static void Main(string[] args)
    {
        var host = new WebHostBuilder()
            .UseKestrel()
            .UseContentRoot(Directory.GetCurrentDirectory())
            .UseIISIntegration()
            .UseStartup()
            .UseApplicationInsights()
            .Build();

        host.Run();
    }
}
For .Net Core 2.0
public class Program
{
    public static void Main(string[] args)
    {
        BuildWebHost(args).Run();
    }

    public static IWebHost BuildWebHost(string[] args) =>
        WebHost.CreateDefaultBuilder(args)
            .UseStartup()
            .Build();
}
Now migrating a .Net Core 1.X project/application to .Net Core 2.0 is easy as well. We will cover the Migration Steps in the upcoming articles without letting down the scope of this article.
Lets create a MVC Web Application from Command Line
Using the command line interface we can create different types of dotnet applications without using the GUI. The commands to be used are:
- dotnet new -type:- There are different types of dotnet application that can be created using the command new and specifying the type. Like earlier we created a console application, so the command was “dotnet new console”. Similarly for a normal web project, the command would be “dotnet new web”. For MVC application, the command is “dotnet new mvc”.
- dotnet restore:- Restores the packages and assemblies while compiling the project. This is auto run during the new project creation process as well.
- dotnet build:- This is the build command which runs before running the application required to compile the application.
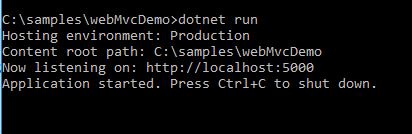
- dotnet run:- This command actually runs the appliction, hosting using the IIS and localhost port.
The entire commands on CMD looks like below:
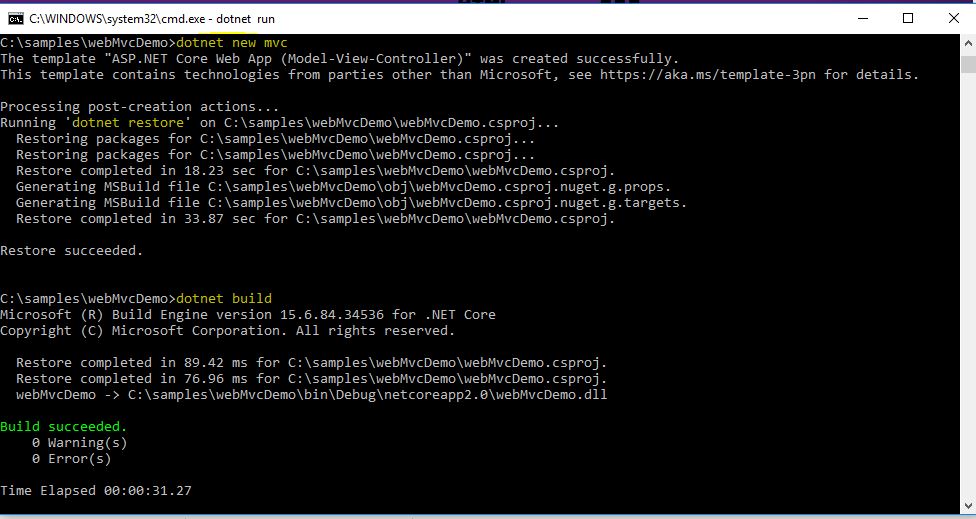
The project after creation looks like:

The run command on CMD looks like:
There are many more interesting features introduced in .Net Core 2.0. We will be covering the features in detail in the upcoming articles.
]]>Asp.Net Core is completely re-written prior to earlier versions works on .Net framework. Asp.Net was developed with main focus to make it cross-platform! Yes Asp.Net core is now cross platform. It has gained popularity in quick time for modern day web development. One go cloud development with configurations made easy, with self hosting process with IIS and many more features added to Asp.Net core which makes it stand tall!
Cross Platform!
Yes! you read it right, Asp.Net core is now cross platform. The Asp.Net core CLR now has now WPF & winforms. It is built to code once and run on any platform. We can now have the .Net framework installed on Linux, Unix or OSX.
.Net Core CLR has joined the open source community and is on github. Anyone can contribute now on github for the .Net Core. Asp.Net Core applications can run both on .Net earlier frameworks and also on .Net core, which puts a great benefit for the developers. .Net Framework 4.6 is the same .Net we have been using and continue to develop the same way. .Net Core gives a platform to generate cross-platform solutions. But .Net 4.6 is stable and .Net core is under progress.
Merged stack MVC & Web API
Now this seems interesting. What? MVC & Web API merged!! Yes it is, in Asp.Net core we will have the merged stack of MVC and API and moreover Webforms is completely gone! Earlier we were required to add more than one Web project, one for MVC and one for Web API. But in Asp.Net core, we need to have only one project.
Multiple inbuilt tools are being used with .Net Core to build web applications with ease like NPM used for tools support, Client side support using Bower, Grunt & Gulp for building automatically, & as usual Nuget for .Net packages.

.Net Core application with Command Prompt & VS Code
Once we have installed .Net core framework in our system, since it is open source the .Net Framework can be accessed and projects can be maintained through command prompt.
Open command prompt, and hit “dotnet”. It will result the entire information of the .Net framework.

To create a new project using the dotnet templates, using scaffolding in VS IDE. The same scaffolding is also possible in the command prompt. With the command, “dotnet new”. This creates the scaffolding and restores the packages required if not exist.
Then the scaffolding templates:
Here we see multiple templates
Choose one of the templates setting the path where the project needs to be added. Lets create a console application as of now in one of our drives. To add a new console application, the command goes like below:
Here a new project is created, a console application for “Hello World”. Then when you run, you get namespaces missing error and navigating into the directory, you find the bin and obj folders go missing. Thus the error shown below:
Thus, restoring the packages solves the issue.
“dotnet restore”
This resolves and restores the required default packages for the console application.
Then build the project in order to ensure the code is errorless.
“dotnet build”
After build succeeds, then run the project to get the out put.
“dotnet run”
Output goes as below:
The same can be achieved in the terminals of Linux OS & Mac OS, just .net Core framework needs to be installed on the OS, which is why .Net core is developed to make it cross platform.
Upcoming articles we will look into the more details of the dotnet core. Creating Web applications using .net core and the MVC6.


In order to run the Azure, we know the web azure portal where we can modify and manage resources as and when needed. But to manage resources on regular basis, logging into the Portal each time is a hectic job. So automation can solve maximum problems for us. For the automation, we write scripts that keep running in order to ensure the valid logic gets executed.
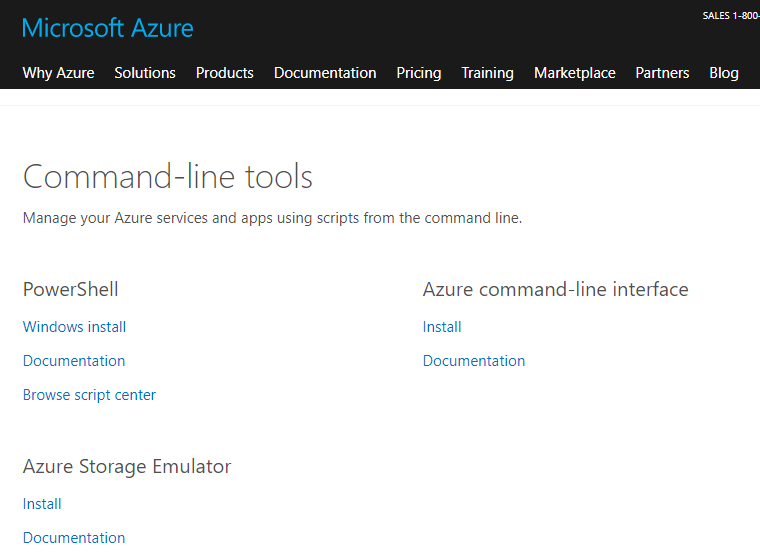
For the Azure to be automated, we need the azure SDKs. Download the SDKs if not added already. To download the SDK, navigate to the Download SDKs.
There are options for various tools and languages supported by Azure up till date like Java, Visual Studio, Node JS, PhP, Python, RUBY, etc.
We are here interested for Powershell command line tools.
Once downloaded, click and follow the installation rules and then the azure contents would work with Windows Powershell.
Once the powershell azure sdk is installed, open the Powershell with administrator rights.
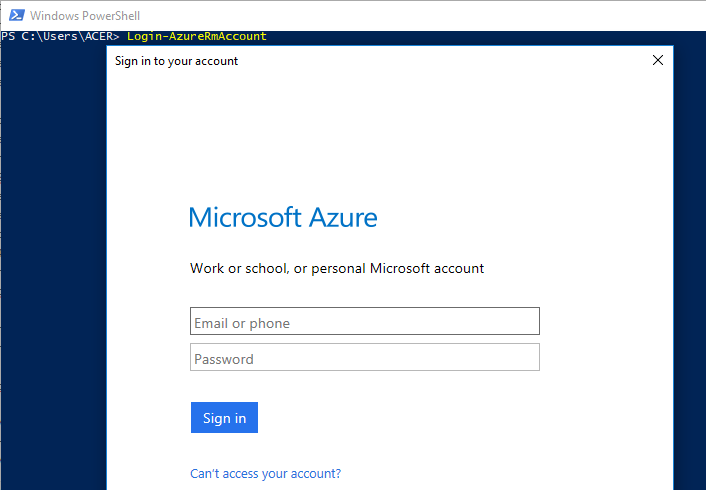
Then, the first thing we need to is Login with azure credentials and connect to Azure. The command is
> Login-AzureRmAccount
This opens up the Microsoft Azure Login window. Add the user name and password and login.
After the login, in the powershell window, we can see the details of the subscription.

Now, if suppose you have multiple subscriptions and want to select a particular subscription, then the below command works out:
//To fetch the subscriptions
 > GetAzureRmSubscription
//To select the particular subscription
 > GetAzureRmSubscription -SubscriptionName SubName | Select-AzureRmSubscription
To get the current subscription details for which we are working on, then the shell script goes like:
//To get the current context of the azure subscription being used
 > Get-AzureRmContext
The above few syntax have AzureRm. Now the “Rm” here means ‘Resource Management’
Getting the list of VMs in the Azure resources under the subscription:
> Get-AzureRmVm //Gets the list of VMs under the subscription
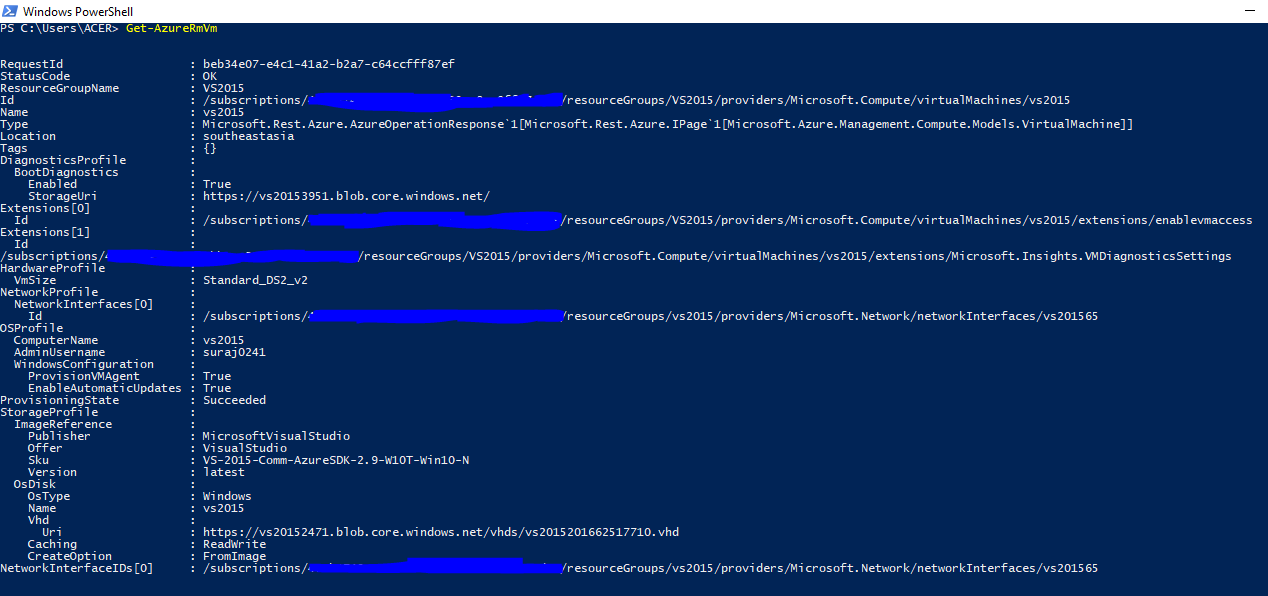
The above image shows, we have a single VM with Resource name “VS2015”. There are other information as well like, disk size, type, OS, etc.
Now to stop the Azure VM, we need to have the below running script:
> Stop-AzureRmVm -ResourceGroupName VS2015 -Name VS2015
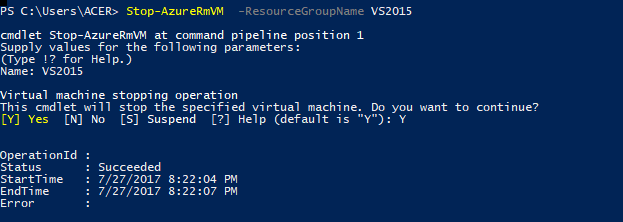
This way we can use the powershell script and connect to Azure in order to use and create Azure services without using the portal. In the upcoming articles we will look into creating other services through Powershell.
Cloud computing can be a complex term now a days, as there are already many services that can run on Cloud. Services like Data mining, Machine learning, creating virtual machines, host APIs for mobile applications and many other endless services.
Microsoft Azure is an open and varied platform, which allows you to choose from a variety of Operating Systems, programming languages. When you build an application in Azure, we will be using specific types of services that would be running on one or more servers on the cloud. We can configure and create Paas services like SQL databases, NoSQL databases, Document DB. Creating app services, and automating the azure services using powershell scripts is what triggers developers to use this. Here in this article, we will look into how to create a Virtual Machine and why to create a VM on Azure.
What is and Why use Virtual Machine?

A virtual machine according to wikipedia, is an emulation to computer system, where emulation would mean to enable a computer system to behave like another computer system (a job of an emulator which may be physical or virtual). A virtual machine can be used on Azure platform on OS like Windows and Linux. The VMs on Azure are highly efficient, high-scale, secure and run on a virtual environment on windows server.
Creating a VM on Azure
Once, you are ready with the Azure subscription and up and running Azure portal. Login to the Azure portal and you see the dashboard.
The dashboard on the portal displays all the services added to the Azure like below:

Click on the New (+) tab & you find another tabbed window displaying all the categories of services provided by Azure. The Virtual Machine is under the Compute service. The options would look like below:

The summary also shows about the sub services. Services like Windows Server Datacenter, which is effective, application focused and user friendly. Ubuntu Server 16.04 Transport Layer Security. Sql server 2016 with SQL server installed on the VM. A normal VM instance, a VM scale which can be used to deploy and also manage identical sets of VMs using a single image and many other compute services.
We would be creating here, a Windows Server Datacenter. Clicking on that option will ask user to configure the Virtual Machine.

Once the configuration is added and OK is clicked, it asks the user for selecting the size of the VM. Remember, the pricing will vary based on the high end configured size (if chosen). Here, I am choosing the minimum configuration DS1_V2 Standard with 1 core. Based on the application we can manipulate the configuration. That is the scaleable option provided by Microsoft Azure. We can anytime scale up and scale down based on our requirement.
Once done click Ok, then the tab for optional configuration. This is the 3rd step. We can move on and click OK to finalize the purchase and get the VM. Once, VM is ready, click on Connect and it downloads the RDP. Using the same username and password we connect the VM and start using the VM.

Its up and running. We can go ahead and configure IIS and run on the server. You can manage your resources using the dashboard and stop the resource whenever not in use so as to avoid consumption of your credits.
]]>I start with saying, we are all IT professionals struggling and working diligently, burning midnight oil everyday ! We are living in a space where the number is increasing prodigiously. To shine out has become a tough job and a challenge to be gracefully accepted. Our lives cannot be limited to a 6 by 6 cube! We have to come out of it and see the world expanding. We have to match it up and marathon along. Everyday while returning, give a thought what am I doing! who else other than my office space know me! Where do I stand in this mammoth head count!
I started over thinking these when I saw few people around me adding logos to their laptops, to their desks and they were kind of addicted and so proud! The first guy I faced was Mr. Tadit Dash, one of the three Microsoft MVPs from Odisha.. He was my inspiration and his achievements became my desires. I used to read articles and refer the different forums and was unaware of the fact that someday, I will see my articles being read and my answers being referred.
I started writing articles on C-sharp corner, the most friendly and one of the best forums today! The amount of motivation and the support the team provides, will automatically boost you and push you to contribute your learning experiences and share with the world.
The first time I was awarded by C-sharp corner in 2014 as MVP and I was like, wow! I can’t explain the feeling, the one who has experienced knows! The journey continued and again in 2015 I was awarded by C-sharp corner 2nd time MVP. I realized people have started knowing me and acknowledging my work. This meant a lot to me. I then realized the certificates and logo were not only to showcase, it was more satisfaction when people started liking your efforts and appreciating.
As rightly said,
When you desire something & you know not where you are heading, any road will get you there!
The next dream was to become Microsoft Most Valuable Professional.
It was July 1st, I had nominated myself in May and was curious to get the results, if my efforts were good enough to let me this recognition. When the mail got triggered into my mail box, I was on the top of this world. Yes, I can now proudly say I have achieved something in this 2.6 years span of my IT career. Now I can be distinguished and at least recognized among the mass.
People now who wonder, if they can, I would say yes you can! Just Go for it!
Ideology & Effort
Now comes the best part, the path to be chosen. Just one word would be enough SHARING . Share what you learn with the world. There are people who would be struggling to resolve something as you have undergone! Thus, Be selfless!
Sharing is not enough, sharing with dedication and with sincerity is utmost important. We cannot go ahead and share anything. Share valid content and worthy to read contents in a readable format is very essential! This will come with time and with writing. Thus Be patient!
Before sharing another important factor that plays a role is LEARNING. Start the learning phase and push yourself to the deadliest possible level while learning and expansion of your knowledge. Our IT field requires the knowledge to be updated and extensive as well! Thus Be a ruthless learner!
Guru play a very important role in guiding you through life. In my phase, I had Gurus. You follow them, they guide you, their success becomes your happiness and your aim! They are the happiest people when they see you supersede them. Chose your Guru in order to excel. Thus Be a smart chooser!
Not everyone is confident and comfortable enough to speak and share in conferences. The days have gone friends! Be open, be an extrovert now! The world has grown, burn your fear and stand out and face the crowd. I thank my community MSDC Odisha through which I could get the platform to face my fear and speak out to the world. Thus, Be a fearless speaker!
A final verdict, without boring much! Whatever you do, do without much self motive and interests. We are humans, we cannot avoid having selfish interest. But that should not be at the cost of choosing a shortcut or hurting someone. Whatever you do, do for the world, the world will then remember you, the world will then praise you, the world will then stand by you.
Someday all our labor will turn to dust!
Yes someday this will happen. People will remember you on your deeds not your codes preserved with a file header in SCM tools..  Keep sharing and keep learning!
Hey folks! Another interesting topic to discuss and share! Integrating sensors to an Arduino board seems interesting and feels good when you receive the desired digital output and manipulate it. Now a days hundreds of different kinds of sensors are available in the market, we need to try out and explore how we can better user experiences using these electronics. Temperature monitoring sensors, obstacles detection sensor, soil moisture detection sensors, heart pulse rate sensors and many more. I will try and use as many as sensors as I can and try integrating them with more sophisticated devices. In this article I would be sharing about the IR Obstacle sensor, which as the name suggests detects object or any obstacle coming the sensors way! Lets see how.
The sensor
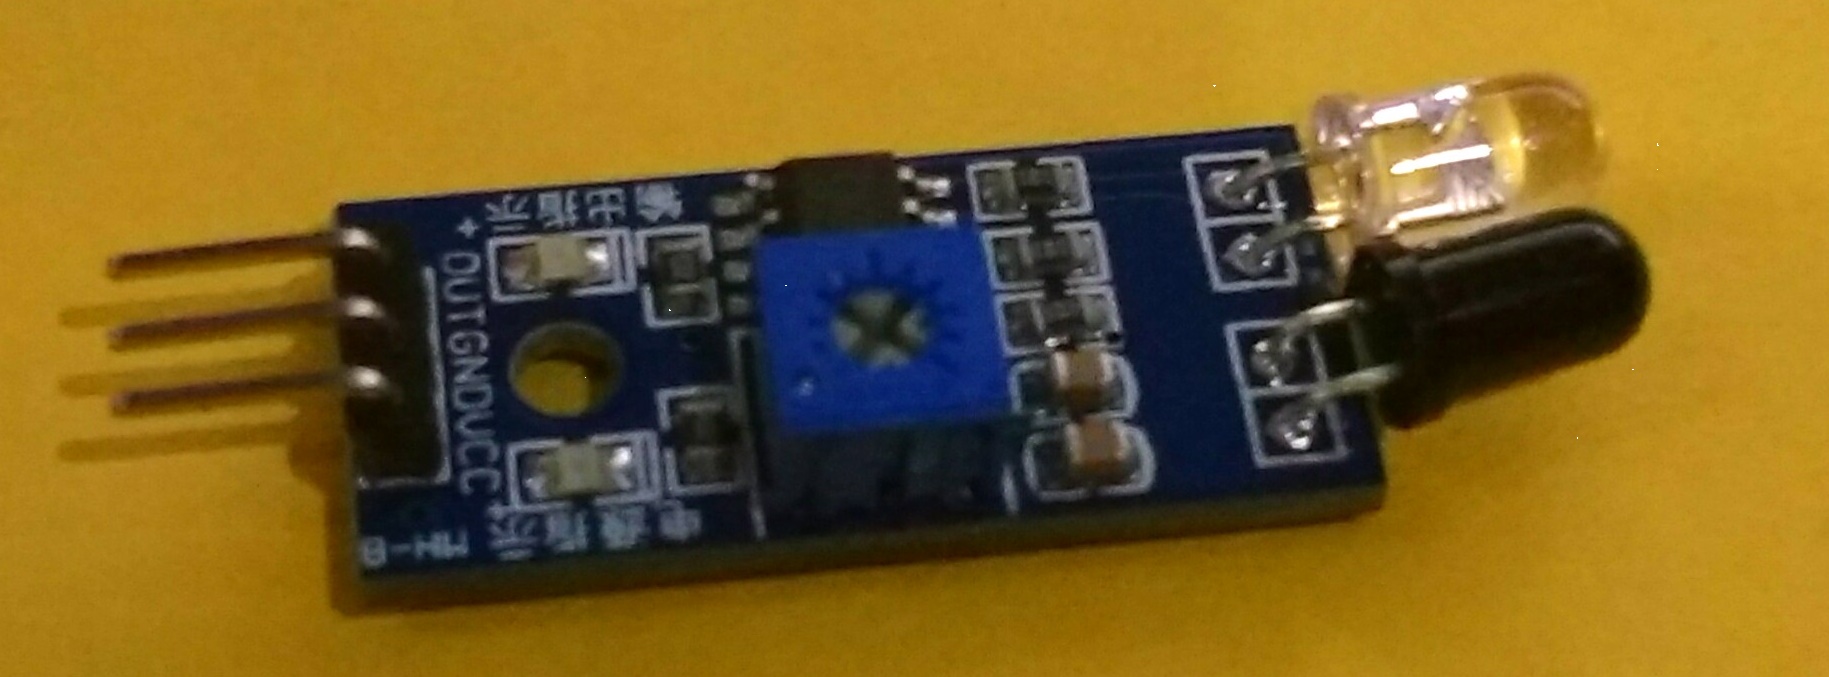
Here is how the sensor looks like. We will see another pictorial representation of the above sensor and discuss about the details of the part.
The pictorial goes like below:
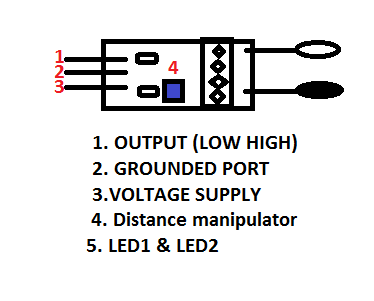
Lets learn and see what the sensor has. As you can see the numbers are mentioned, we will discuss the work around and try understand each and every word. First one goes like:
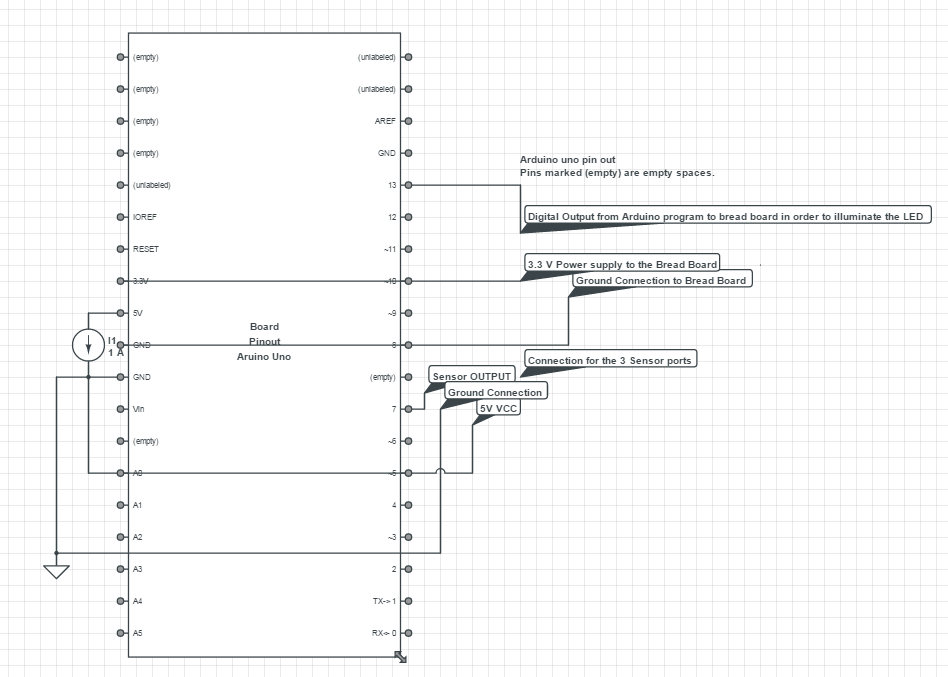
| Sensor Parts | Functions |
| OUTPUT | This port in the sensor, sends the digital out put to the output unit. Here, we have the sensor output port on board as 7. |
| GND | This port is used to connect to the board’s Grounded port. |
| VCC | The voltage supply port, here we have used the 5 V supply port from the board. |
| Distance Manipulator | The CW (Clock wise) movement increases the distance proximity and the vice-versa decreases. |
| Power and Obstacle LED | Former illuminates when the Power is supplied and the latter when any obstacle comes over. |
The circuit board looks like below:
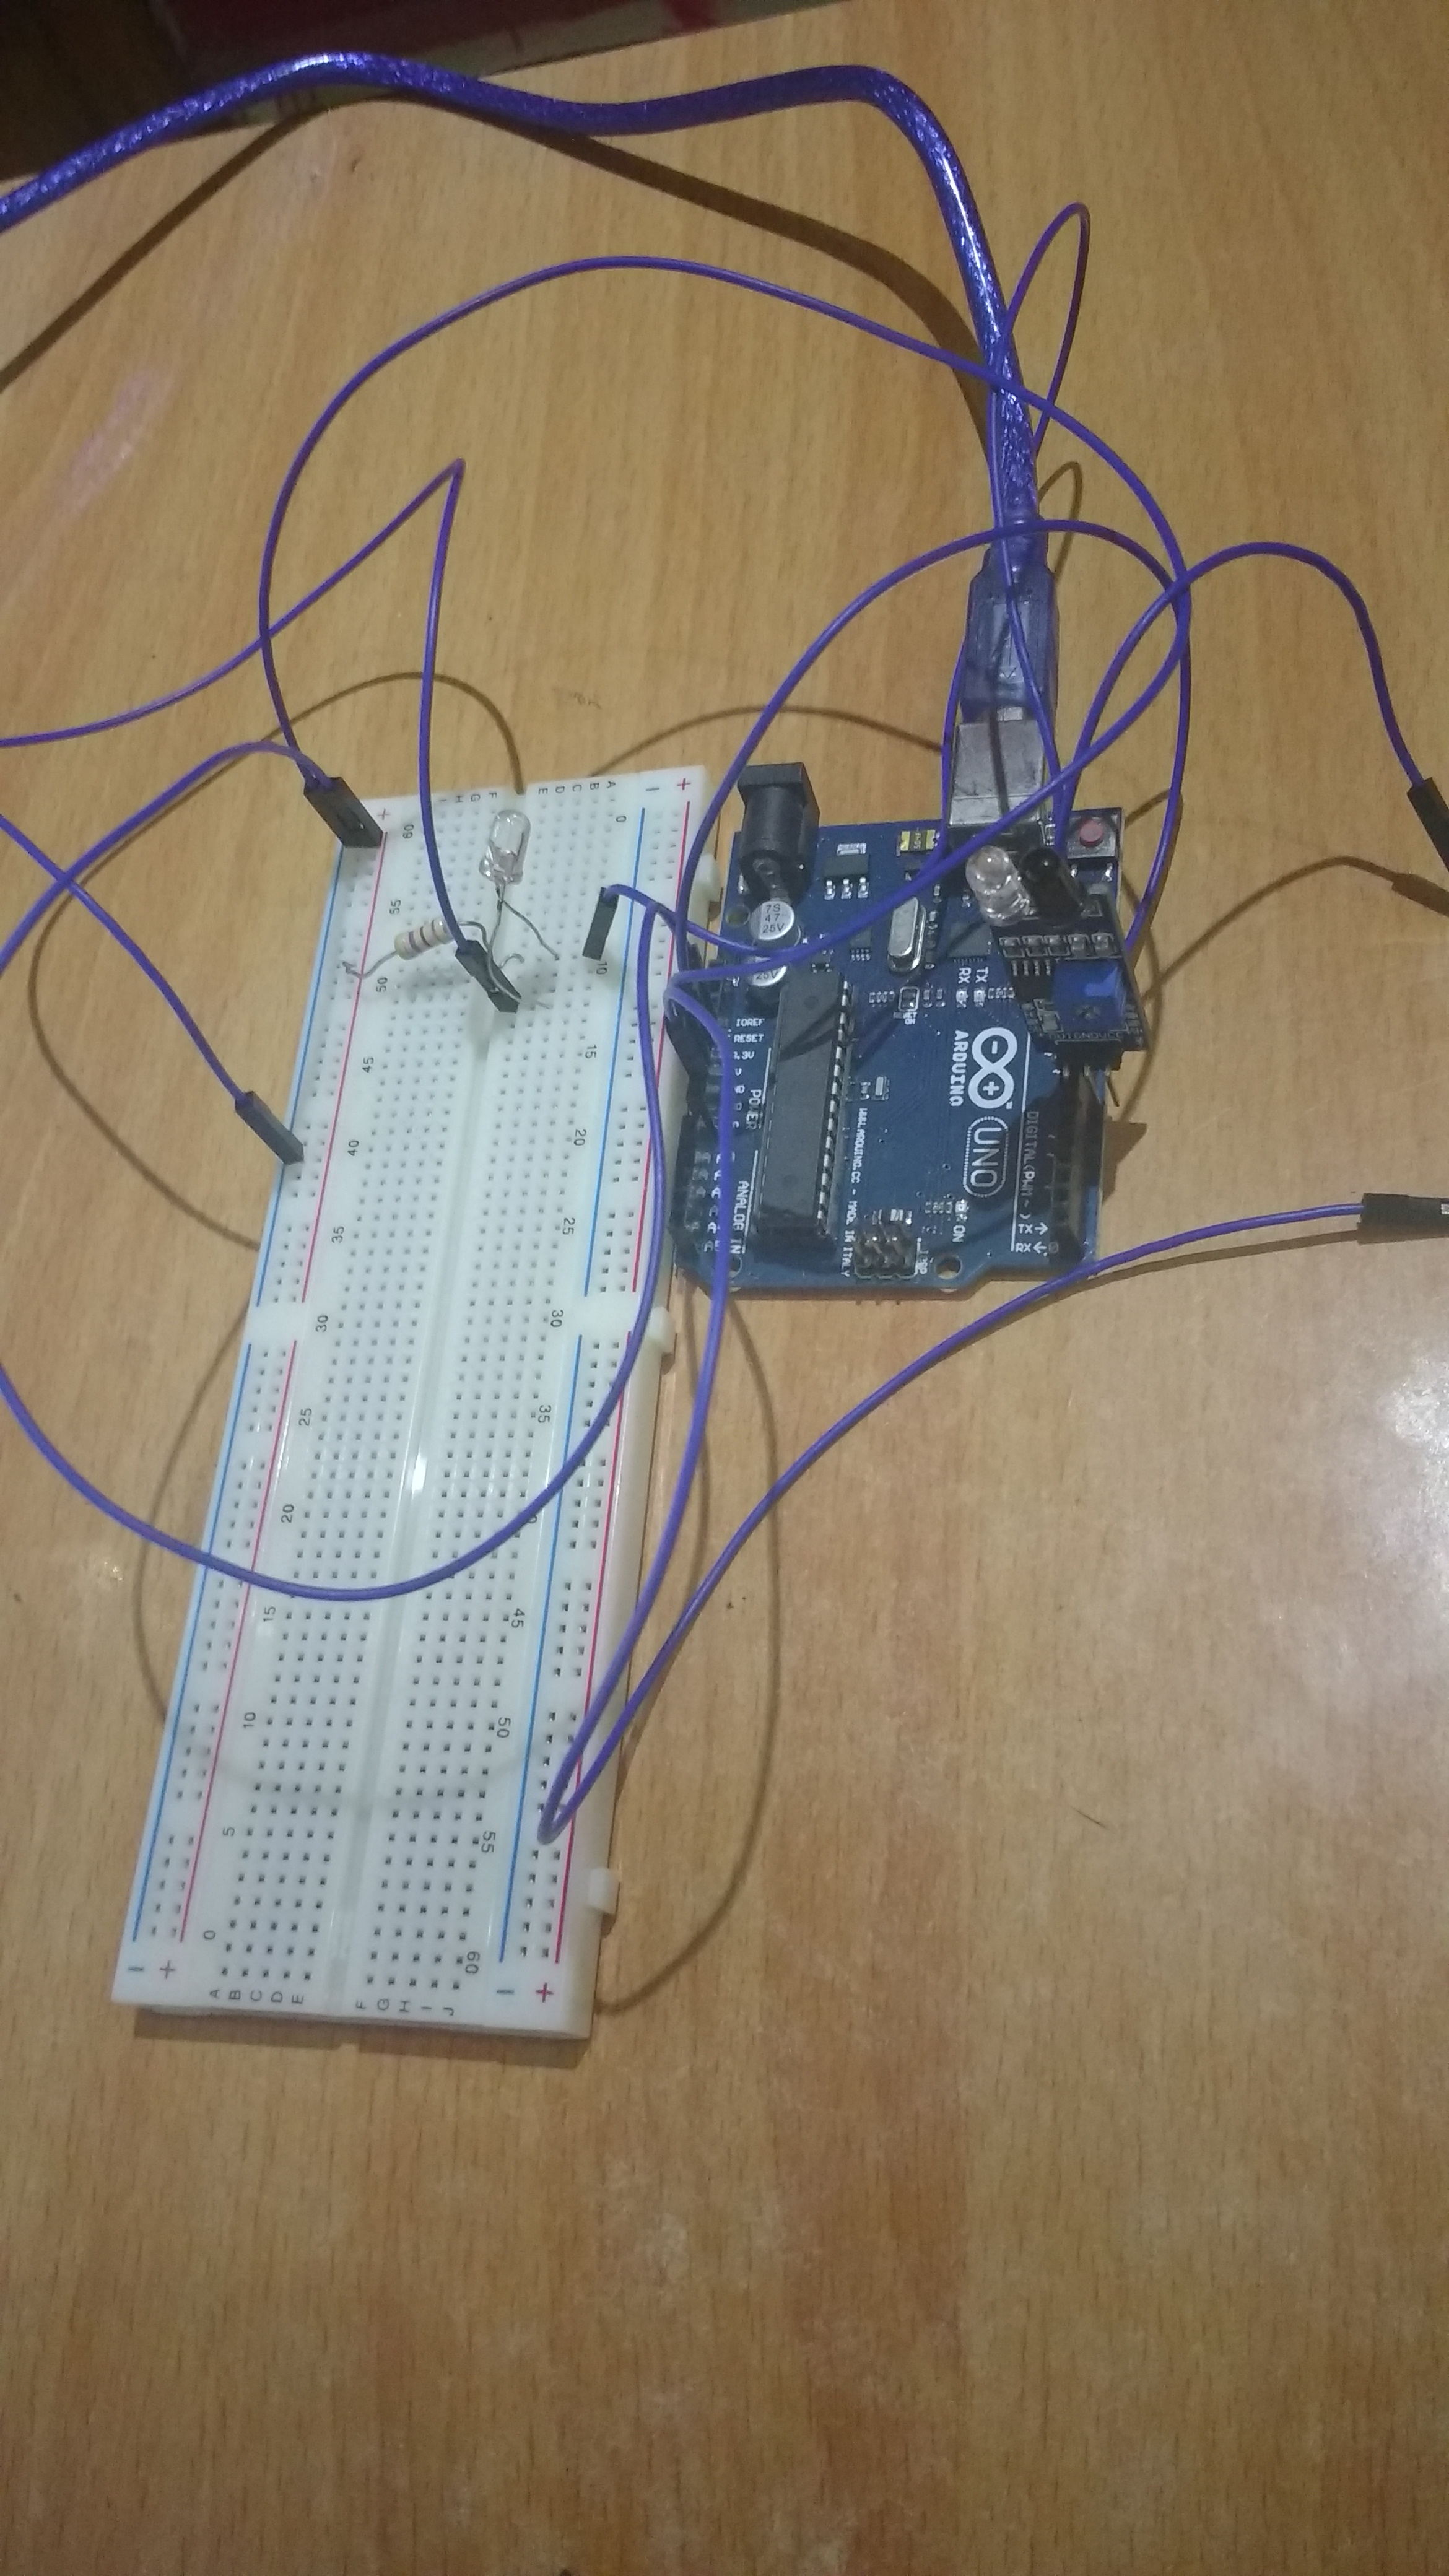
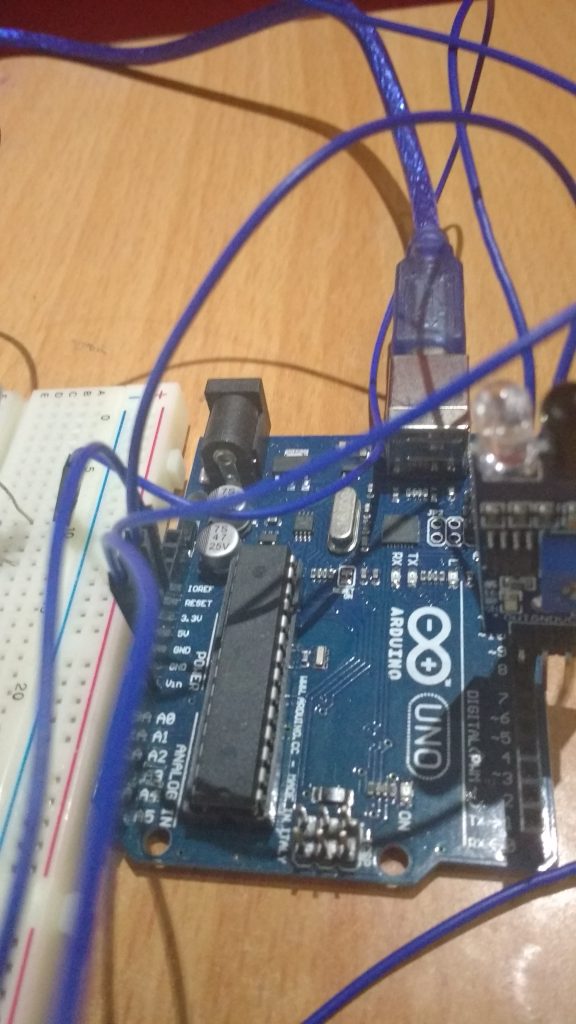
The circuit diagram would look like below:
Thats similar to the previous LED connection of my Arduino series. Series I
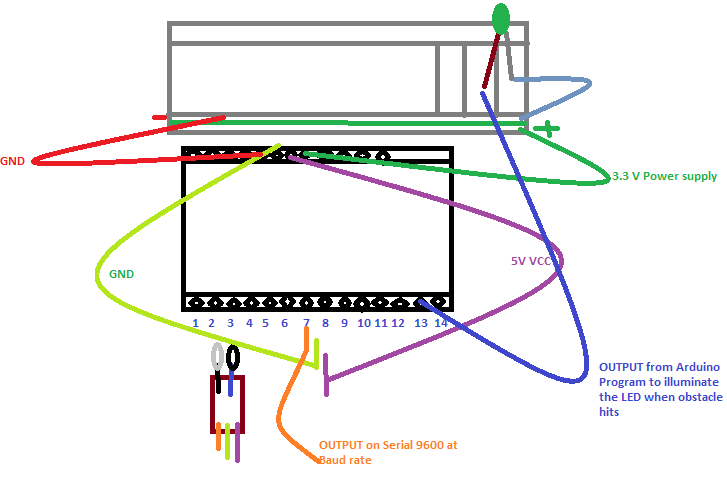
If the above is not clear, please share your query in the comments.
Better view of the diagram is below:
Snippet
int LED = 13; // Use the onboard Uno LED
int obstaclePin = 7; // This is our input pin
int hasObstacle = HIGH; // HIGH MEANS NO OBSTACLE
void setup() {
pinMode(LED, OUTPUT);
pinMode(obstaclePin, INPUT);
Serial.begin(9600);
}
void loop() {
hasObstacle = digitalRead(obstaclePin); //Reads the output of the obstacle sensor from the 7th PIN of the Digital section of the arduino
if (hasObstacle == LOW) //LOW means something is ahead, so illuminates the 13th Port connected LED
{
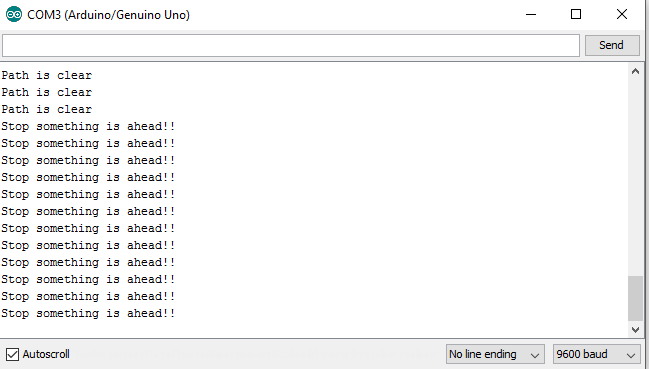
Serial.println("Stop something is ahead!!");
digitalWrite(LED, HIGH);//Illuminates the 13th Port LED
}
else
{
Serial.println("Path is clear");
digitalWrite(LED, LOW);
}
delay(200);
}
The Flow
When the full circuit is done and the code set is also done. Now, time to connect the Board to the Computer using the USB jack. Once connected to suppose COM3 port, open the Arduino Set up IDE where the code set up is done, compile the code once and then Upload the code to the Board. Once Upload is done the TX RX leds blinks quick.
Now we are all set to test the sensor. For better and precise testing, we can solder the wires (jumper wires) to the sensors as their connected pins are not portable. The whole set up can be soldered.
Then when we connect, open up the Serial port screen which transmits at 9600 bits per sec and check the message, as per written in the program.
As per the program, the LED also blinks and illuminates based on the Obstacle sensor output.
The serial screen would look like below:
That’s it folks!!
Conclusion
Now this is all about the sensor IR Obstacle sensor which you can purchase at a very cheap rate from ebay or amazon and play with. We can use this set up in our Cars and check out!! In the upcoming series I will be sharing more sensors and blue-tooth module integration with Arduino. Hope they will be more fun! Please share your experiences and suggestions as I am still crawling..:P
]]>Being a Web application developer and with the huzz buzz going on around about IOT, I felt left out way behind in the crowd. So, I decided to start my journey on learning the IOT. Since I am a baby in this arena, I would keep sharing my crawling experience as I believe there would be many who would be waiting to crawl.
I have decided to use ARDUINO board in order to start my learning experience. Why!! Because it is economical, easy & has its own IDE to let us write the code and upload to the board. Lets learn something about Arduino first.
ARDUINO
Arduino is a simple micro-controller which is based on input output receiving unit. We can have it attached to any sensors, leds , switches etc. The best part is it is open source and easy to understand use. You can also contribute to the arduino community, creating your own prototype programming. For beginners, Arduino is the best option, I would say!
To get started with, you would need an Arduino Board first. So get it online at a very minimal rate, for around Rs.500 (Indian currency!). I would be using Arduino UNO board.
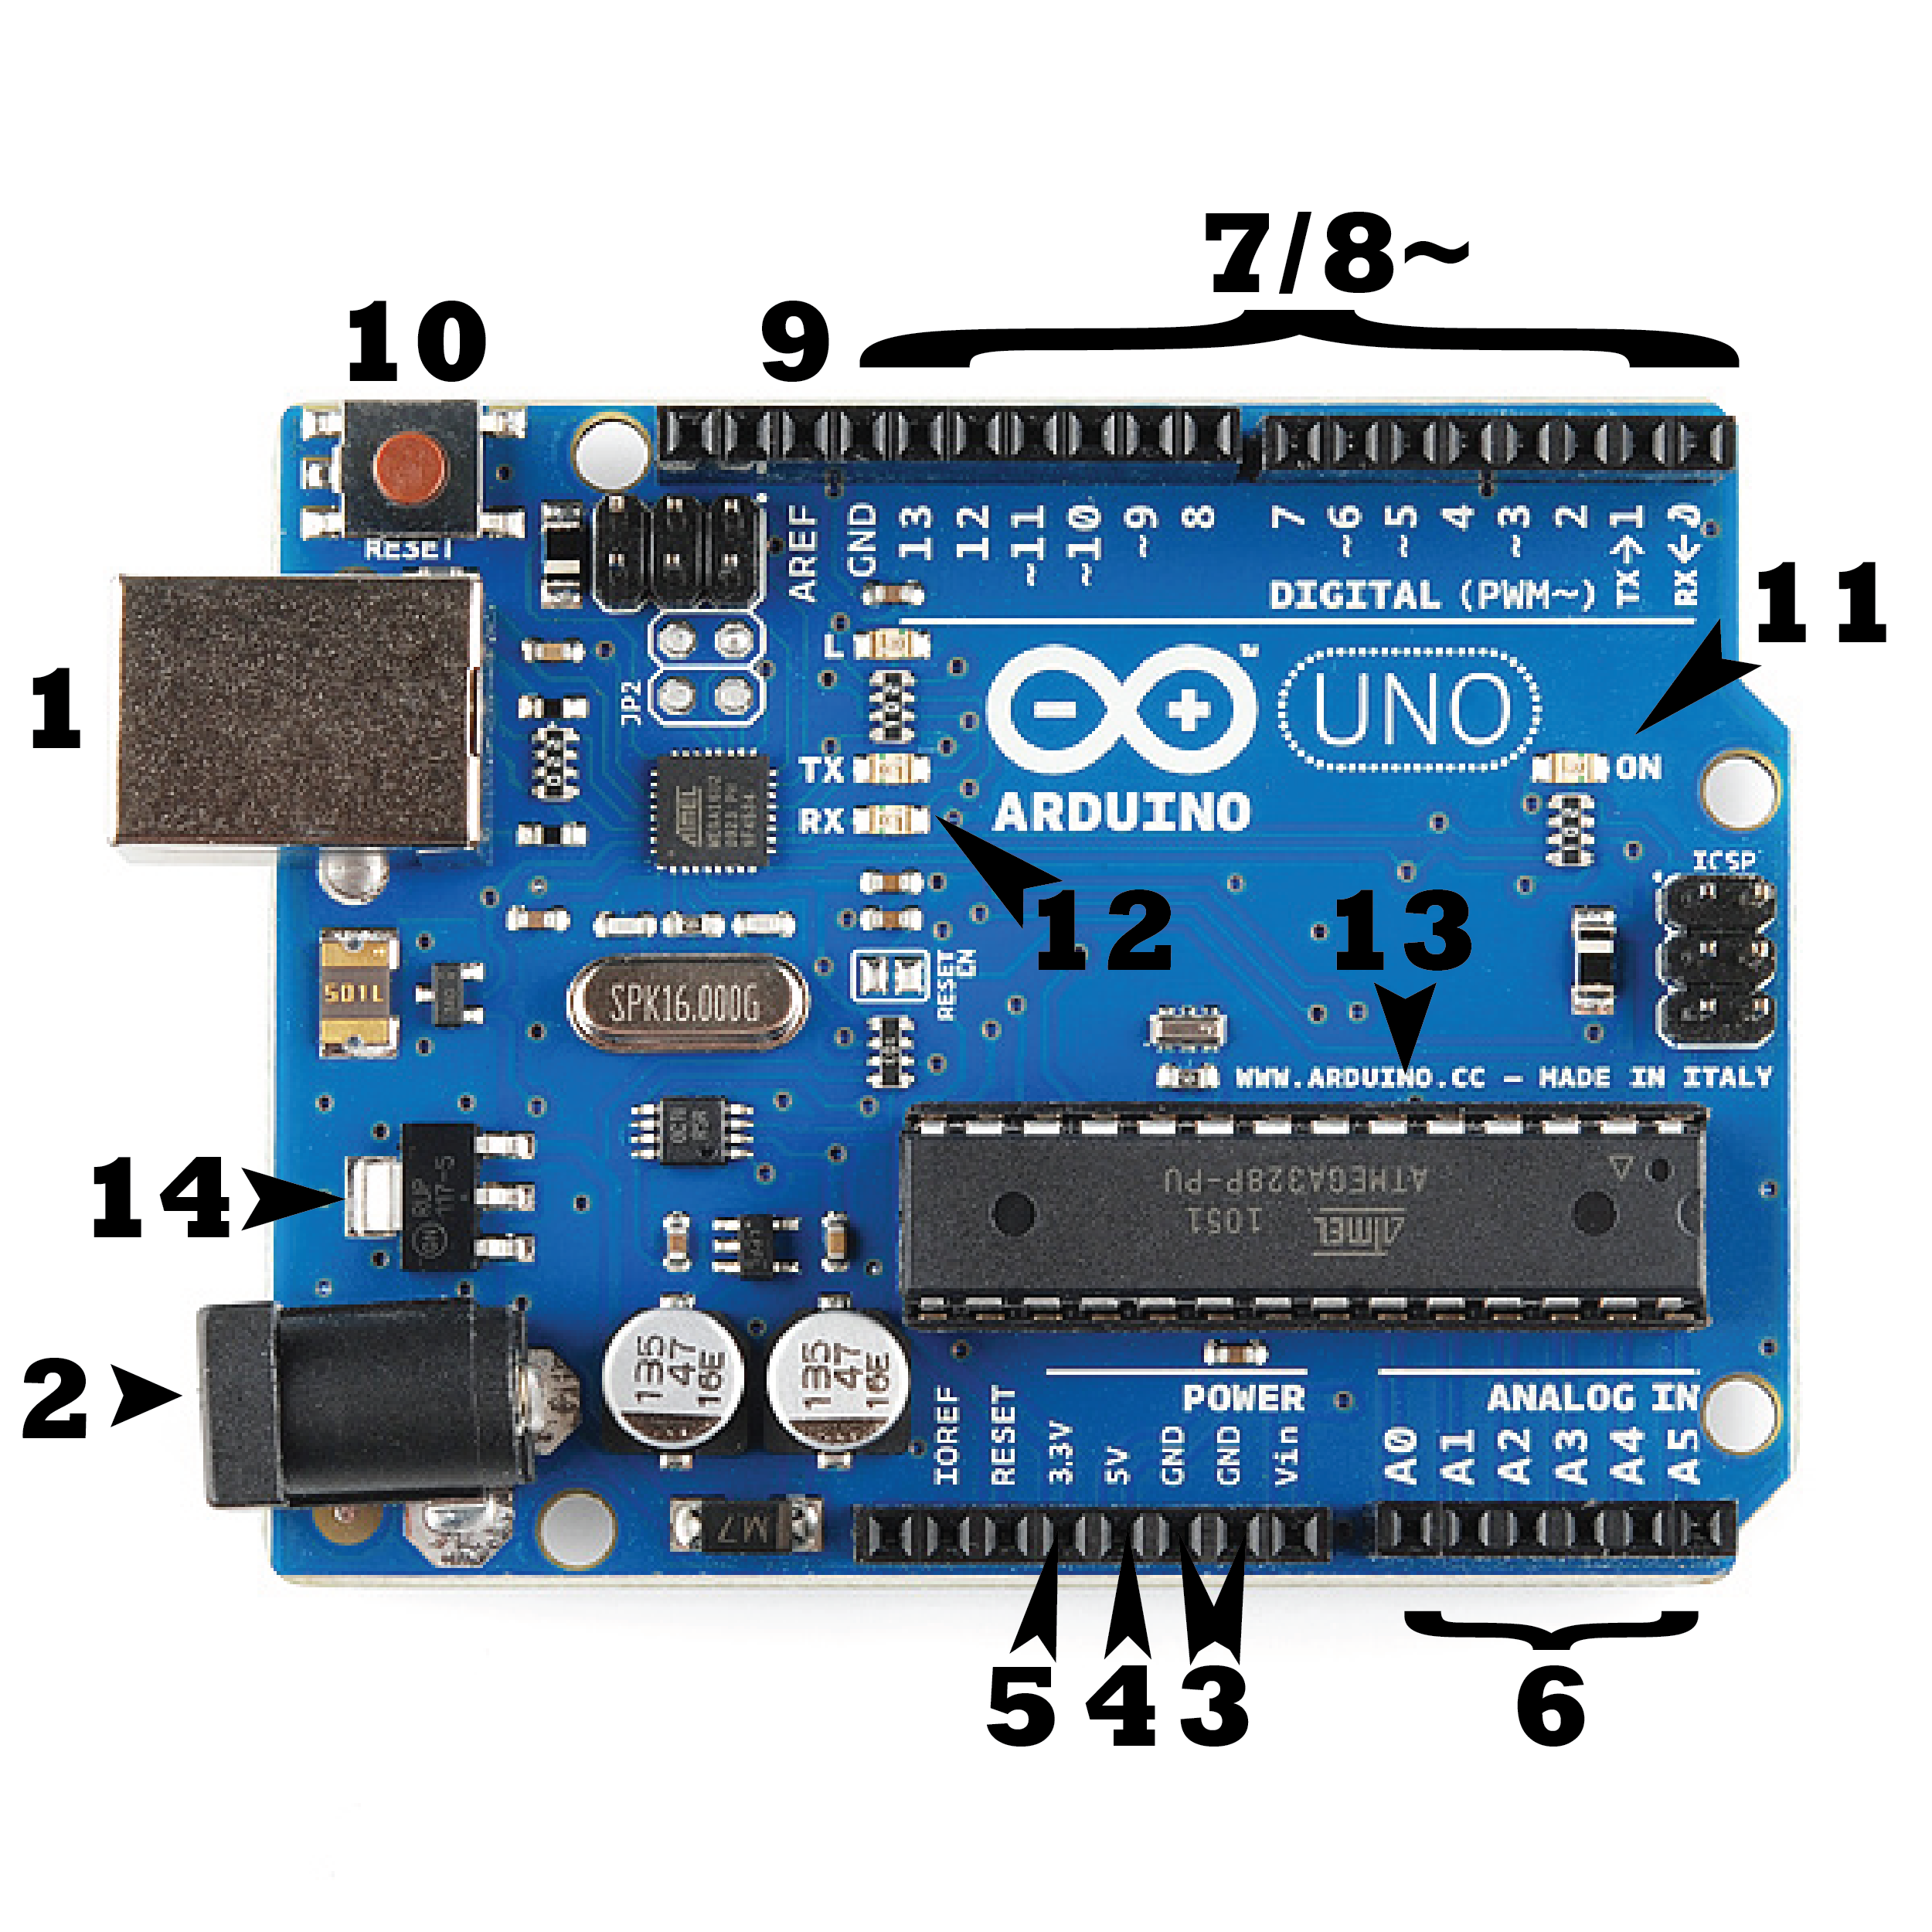
The above is the simple Arduino Board which does miracles. Lets understand the points mentioned in the diagram and their usage!
- 1- USB Jack:- This is the connecting female port, where the cable gets inserted in order to set a connection to the computer to have the IDE accessible and upload the programs.
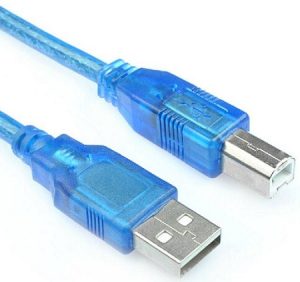 .Usually it is 2.0 USB port. The input and the output passage happens through this, we can consider this to be the starting point of the Board. usually the voltage acceptable is
Input Voltage (acceptable)- 7-12V
Input Voltage (limit)- 6-20V - 2- Power Jack:- As the name suggests, it is the external power supply. But be careful while using this, use a multi meter to check for the acceptable limit of power to be transferred to the board in order to avoid short circuit.
- 3- GND Pins:- The grounded pins used to connect the jumper wires to have a grounded circuit. Usually, when we see the connection we will realize that gnd pins are considered as the negative supply.
- 4- 5V Supply:- This is the point used to have the bread board 5V supply in order to power the circuit, which we will check out in a few moment.
- 5- 3.3 V supply:-This is the point used to have the bread board 3.3V supply in order to power the circuit. Same as the 5V but based on our circuit requirement we can also use this in case we are missing resistors.
- IOREF:-Though not numbered in the diagram, this is an interesting port in the board, which provides the voltage ref. with which the microcontroller or the arduino board operates.
- Vin:-As discussed above about the external supply to the board, to pass the voltage to the circuit (external), we can use this port.
- 6- Analog Input Pins:-These are the analog points in the board, which would help convert analog inputs to digital. usually used to read analog signals.
- 7,8,9- Digital Pins:- The digital pins which provide the circuit the uploaded code to connect(layman terms). Used for digital I/O
- 10- Reset Button:- It is self explanatory, used to reset the microcontroller or the board.
- 11- ON:- When connected to the USB, this green led lids up to let us know the board is powered.
- 14- Voltage Regulator:- The voltage regulator supplied to the Arduino board.
- 12- RX-TX LEDs:- These are the LEDs that lid up when the code or the program is successfully uploaded to the micro controller. This is the practical implication I have come across so far!

For more info on the pins please refer Arduino Pins
So this is it about the Arduino board, a brief summary I would say1 There is much more to this. Please refer here
Some Pre-requisites
Here are some pre-requisites required to learn and start on the work with the Arduino. After you get the Arduino board from market, next job is to install the Arduino IDE on your system in order to interact with the microcontroller.
To install the IDE visit the link:- Arduino IDE Download. Here, you get a list of OS where you can install, this proves it is cross platform1 :O Wow!! another great feature!
After the installation, you need to connected the USB jack to the computer via the jack cord and get the Arduino connected.
The IDE some what looks like :
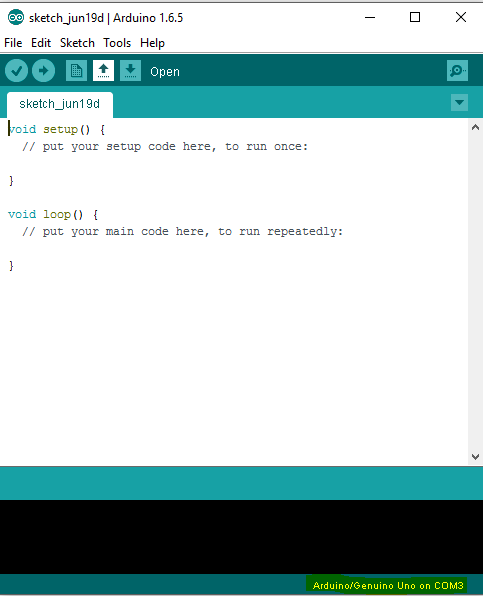
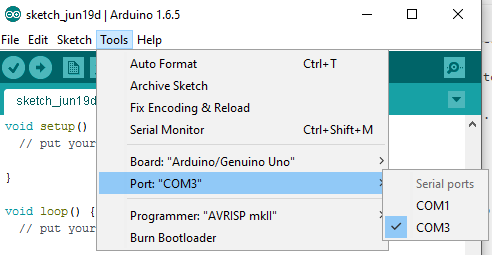
Mark the highlighted portion below, it says Arduino UNO on COM3. COM3 is a serial port id, which suggests we select the Board connection on COM3 port.
For getting on with MAC, please follow the link here
The selection is to be done under
Tools-> Port-> “Select”
The default code as you see goes like:
void setup() {
  // put your setup code here, to run once:

}

void loop() {
  // put your main code here, to run repeatedly:

}
Pretty simple to understand. It first does the set up and then the loop code gets executed in order to perform the main task you have configured. There are many sample programs inbuilt with the code, which we can find under
Files->Examples->Basic->Blink.
Run the Blink program and try to understand what has been done. It is very simple.
// the setup function runs once when you press reset or power the board
void setup() {
  // initialize digital pin 13 as an output.
  pinMode(13, OUTPUT);
    Serial.begin(9600);
}

// the loop function runs over and over again forever
void loop() {
  digitalWrite(13, LOW);   // turn the LED on (HIGH is the voltage level)
  delay(1000);              // wait for a second
  digitalWrite(13, HIGH);    // turn the LED off by making the voltage LOW
  delay(1000);              // wait for a second
}
Here, the pinMode function activates the pin which you specify as input or output. Here it is Pin 13 and is Output. Pin 13 is as we all know the default LED. Here it sets the pin and then in loop method, we find the method with digital-Write prefix, which says that the connection is on the Digital pins. The method, which we see has the Pin port number and the other parameter as LOW/HIGH which can be considered as 1/0 in order to light up and light off the LED 13. Delay has been given, to mention the Led light up with the specified delay time.
Before, checking build up which we will be making in the due course, lets have look at the other components to be used.
1. Bread Board:- The board which is familiar to all electrical or engineering students also.
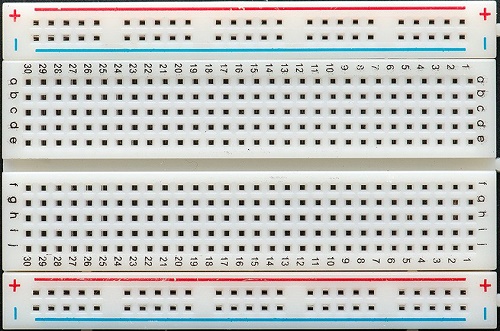
Still lets have a brief of this. As we see in the image, + symbol, meaning the voltage connection to be done to this port. The entire line, column wise is connected. Every whole in the plus column is connected internally. You can use a multimeter to check and verify the bread board.
Same applies for the – symbol column. But, this is usually used for the grounded pins connection from the Arduino. The a,b,c,d.. columns are used to connect the Leds and the resistors, which we will see in a while. Unlike the +/- these are connected internally ROW-WISE.
2. Jumper Wires:- These are the connecting wires to be used in order to connect the arduino and the bread board ports. They are cheap and reliable as well. They look like:
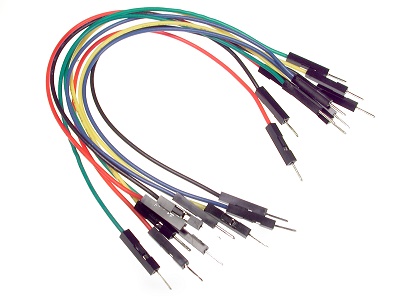
3. Few LEDs and resistors.
Next is to design our circuit, which looks like:
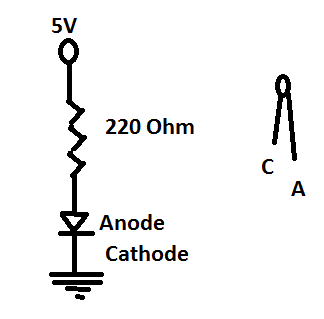
The above is the basic bread board connection circuit. I will give a pictorial image of the entire circuit connection. In this article I will be sharing how to take user inputs through the Serial port and use it to Lid on and off the LED. The circuit connection looks like below:-
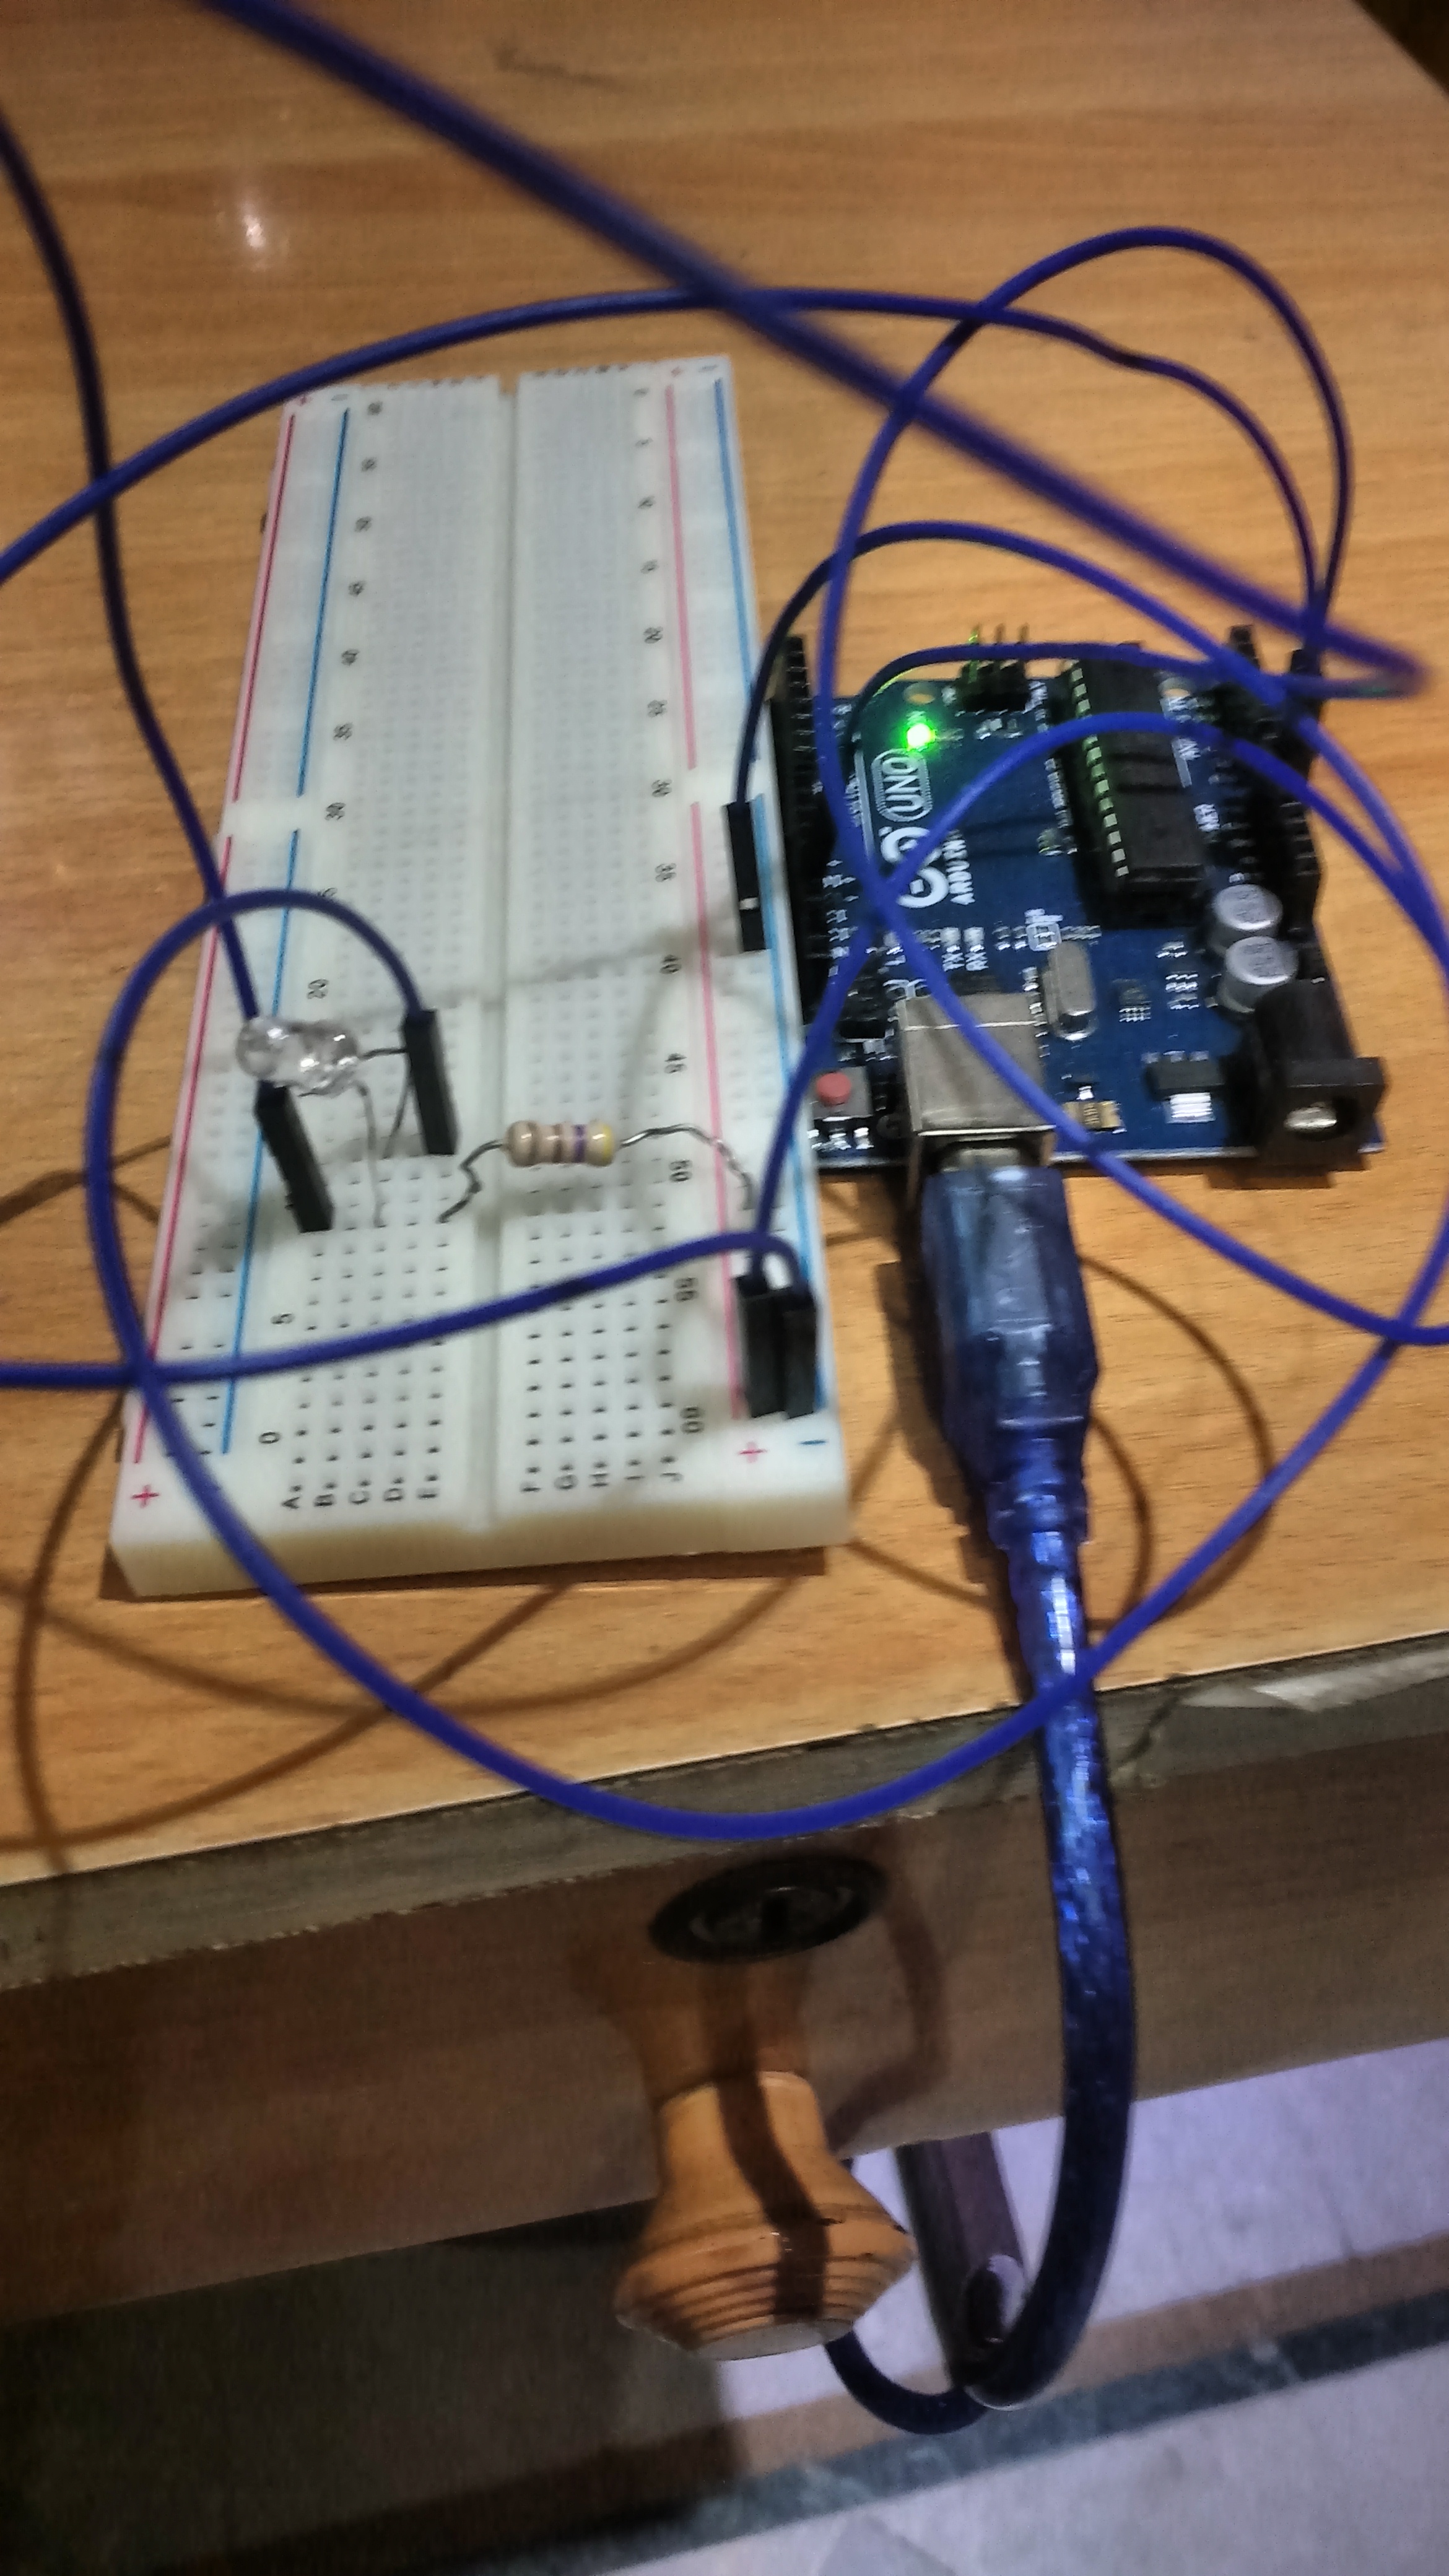

The connection diagram goes below:
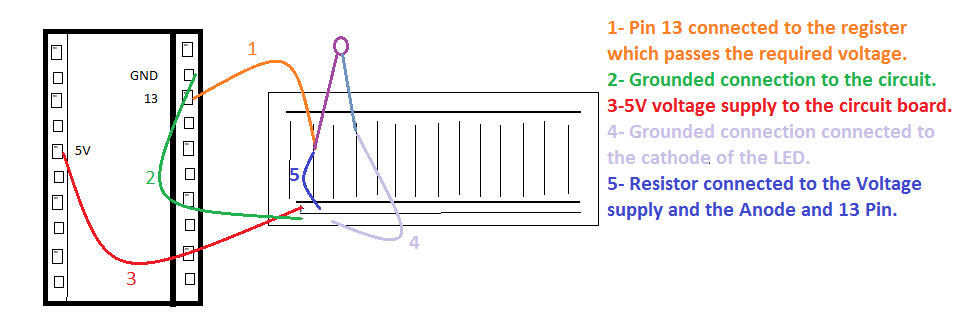
The above diagram is a reference. For any doubt you can add your queries related to the connections.
As you have seen, I have used Pin 13 to connect the Arduino program to the Bread board. That is the programming uploaded will be used to manipulate the LED on/off via Pin 13. Lets have a look at the code involved:
int userInput = 0;
// the setup function runs once when you press reset or power the board
void setup() {
  // initialize digital pin 13 as an output.
  pinMode(13, OUTPUT);
    Serial.begin(9600);
}

// the loop function runs over and over again forever
void loop() {
   if (Serial.available() > 0) {
                // read the incoming byte:
                userInput = Serial.read();

                // say what you got:
                Serial.print("Received Input: ");
                Serial.println(userInput, DEC);
        }
        if(userInput==49){ //As checked through, if 1 is pressed, the result comes to be 49 based on the ASCII code
         digitalWrite(13, HIGH);   // turn the LED on (HIGH is the voltage level)
         delay(1000);  // wait for a second
        }else{
            digitalWrite(13, LOW);    // turn the LED off by making the voltage LOW
            delay(1000);   // wait for a second
        }
}
Thus the above code is simple to understand. We have used the Serial port to track the user input, which is a part of the Arduino IDE.
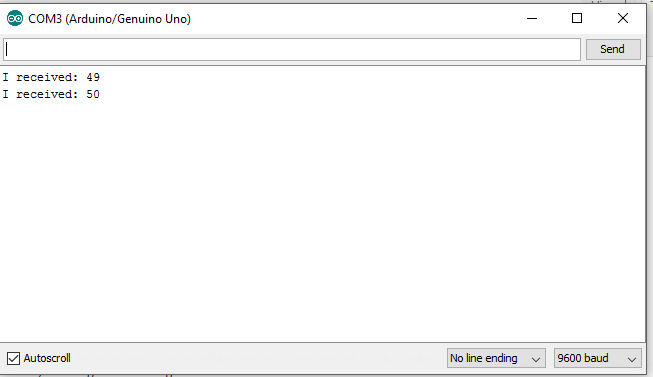
Here, the user adds the input and our code checks, if 1 with ASCII code 49, is hit then the LED lids ON and any other key pressed the LED goes OFF.
Conclusion
We have covered brief introduction about Arduino board and the circuits involved and basic programming uploaded to the Arduino board via Arduino IDE. This same concept can be integrated to
This is it all folks! I really found this interesting and this is surely the future! IOT is the future. I wish to come up with more sensors attached and programming done! I will do my homework! It would be great if all developers start throwing their hands on this and create miracles!! Share your experience and also please rectify me if I am wrong! I am still in the womb.
In today’s tech world, most of the applications being developed under Logistics, Inventory, Internal Transaction and other domains require day-to-day data in excel files and prefer excel file operations in their applications.
I will be sharing one of the Nuget Package tool, which wil very minimal lines of code will export an excel file for us.
The Tool is Closed XML.

Just write a few lines of code and done! It is developer friendly. If we have used the Open XML, there are a lot of lines of code which are required to export an excel fron data. We can create excel file of 2007/2010 configuration without even Excel application.
To add the closed XML package, we add directly through the user interface, from the Nuget Gallery and also, we can use the Package Manager console to add the package using the below command
PM> Install-Package ClosedXML
Snippet!
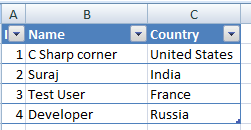
DataTable dt = new DataTable();
            dt.Columns.AddRange(new DataColumn[3] { new DataColumn("Id", typeof(int)),
            new DataColumn("Name", typeof(string)),
            new DataColumn("Country",typeof(string)) });
            dt.Rows.Add(1, "C Sharp corner", "United States");
            dt.Rows.Add(2, "Suraj", "India");
            dt.Rows.Add(3, "Test User", "France");
            dt.Rows.Add(4, "Developer", "Russia");
            //Exporting to Excel
            string folderPath = "C:\\Excel\\";
            if (!Directory.Exists(folderPath))
            {
                Directory.CreateDirectory(folderPath);
            }
            //Codes for the Closed XML
            using (XLWorkbook wb = new XLWorkbook())
            {
                wb.Worksheets.Add(dt, "Customers");

                //wb.SaveAs(folderPath + "DataGridViewExport.xlsx");
                string myName = Server.UrlEncode("Test" + "_" + DateTime.Now.ToShortDateString() +          ".xlsx");
                MemoryStream stream = GetStream(wb);// The method is defined below
                Response.Clear();
                Response.Buffer = true;
                Response.AddHeader("content-disposition", "attachment; filename=" + myName);
                Response.ContentType = "application/vnd.ms-excel";
                Response.BinaryWrite(stream.ToArray());
                Response.End();
            }
The above code, instantiates a data table, with few data initialization.
public MemoryStream GetStream(XLWorkbook excelWorkbook)
        {
            MemoryStream fs = new MemoryStream();
            excelWorkbook.SaveAs(fs);
            fs.Position = 0;
            return fs;
        }
We are using this method, so as to return a stream inorder to download the file in response using the stream. The save as method of the Closed XMl, helps create the stream.
Downloaded file looks like below:
Conclusion
Here, I have shared the code where hard coded values are added, this is not the case everytime. We can always use the records from the database and create them as a datatable and then use the Closed XML. This really reduces a lot of codes which is used in Open XML package. So, developers try it!! I will be sharing another article where I would show, how to Import the same exported excel file using Bulk copy using SQL Bulk copy.
]]>