- Introduction
- Dependency Inversion Principle
- Bob Martin’s Discovery
- Inversion of Control
- Service Locator
- Dependency Injection
- Constructor Injection
- Setter Injection
- Interface Injection
- Demo
Introduction

How is this concept relevant? Let’s have a look at the traditional architecture generally followed in MVC applications.
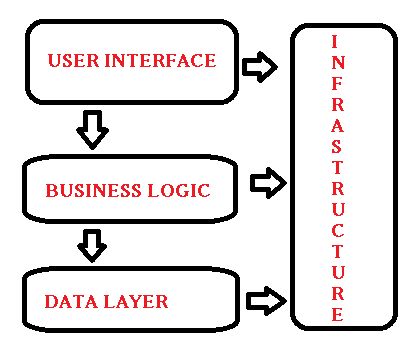
In this architecture, we can see that each of the layers depends on the other layer beneath it. That is why we can say in a technical manner that they are coupled with each other. However, coupling is necessary for every application. Then what is the need for dependency injection, if coupling is necessary? Are we contradicting ourselves? No, we are not. Coupling is necessary, but tight coupling is a big threat to project/application maintainability and performance. Thus, for always having loose coupling or minimal dependency, we require the concept “Dependency Injection”.
In the preceding figure, we see the View layer (UI) has a dependency on the Business Logic Layer that also has a dependency on the Data Layer, thus there is a transitive dependency, but they are still dependencies. Let’s get deeper into what these dependencies mean in real scenarios and how to resolve them.
Dependency Inversion Principle
Quote:
High-Level Modules should not depend upon lower-level modules, rather both should depend upon abstractions.
Now what does that mean? Let me explain this using an example.
In real life, consider our day-to-day chargeable portable devices that we use, like mobile devices, torches, radios and so on. Do these devices have similar charging ports? No, they do not. We need to plug in various chargers for each device. Now wonder if all the devices had similar charging ports, we could use a single charger for each device. This defines the preceding quote. Still in doubt? Okay, let’s look at the figure below:
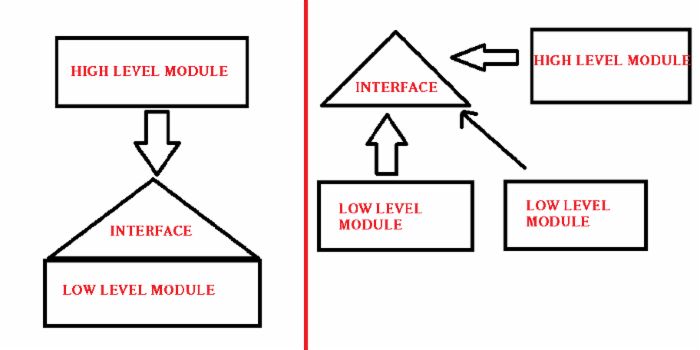
You can see that the figure on the left has a High-Level Module dependent on the interface, also the Low-Level Module is coupled to the interface. Here, only one Low-Level Module exists, so it seems Okay, but in actual applications this is not the case, there may be many Low-Level Modules. Then, if there are so many Low-Level Modules (LLMs) and their associated High-Level Modules (HLM) will have dependency on the interface then it is a threat.
But have a look at the diagram on the right, we can see there is just a single interface and a high-level module and many low-level modules will interact with the interface, here the HLM has the interface and that can be reused and the previous dependency of the HLM on the LLM is avoided. In a more simpler way, instead of a Low-Level Module defining the interface, on which the High-level Module depends on, in the Dependency Inversion Principle, the HLM defines the interface and the LLMs implement the members. This is done using a common interface or an abstract class.
Bob Martin’s Discovery
Bob Martin, commonly known as Uncle Bob, is the founder of the famous SOLID principles, of which Dependency Injection is a part. He explained the concept with a very nice and famous “Copy Read and Write” example.
According to him, a HLM should never depend on the LLM, rather they should have common abstractions. The example that he provided was:
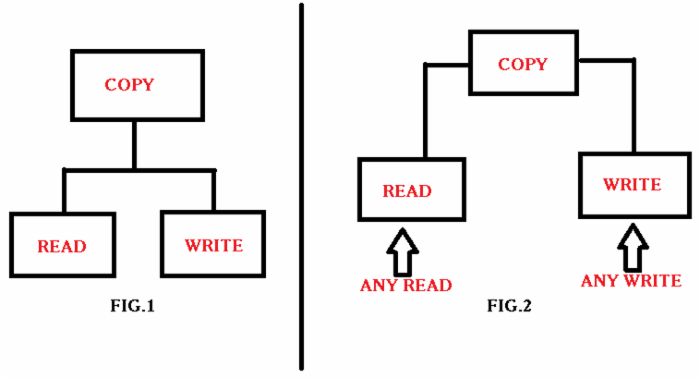
In that figure, suppose there is a copy and there are two methods, Read and Write. Thus the copy module calls the two modules. Now suppose another Write method comes for Write to Disk. Suppose again that we implement the copy method, similarly for the Read method also Read from the keyboard and Read from a TouchPad. This increases the dependency and coupling. So, to avoid that, we can have a common method for Copy that is Read and Write that will be reused by each device from which the read and write would be called respectively.
Here, the Read and Write acts as an abstract classes, since the Copy now does not depend upon whether the future request is a keyboard, a touchpad or a printer or disk.
Thus, the principle of dependency inversion is at the root of many of the benefits claimed for object-oriented technology. Its proper application is necessary for the creation of reusable frameworks. It is also critically important for the construction of code that is resilient to change. And, since the abstractions and details are all isolated from each other, the code is much easier to maintain.
Inversion of Control
Inversion of Control is a style of programming, that has a framework controlling the flow of the application, that is we are trying to change the normal flow or inverse the flow to avoid tight coupling. It works on the Dependency Inversion Principle. This IOC is not only associated with the DIP but is also associated with the Dependency Injection and Service Locator.
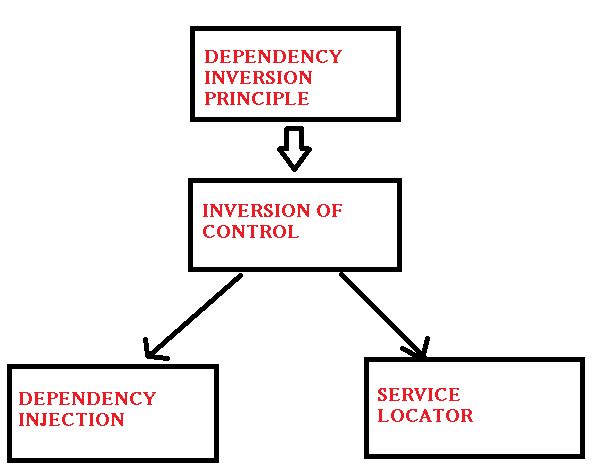
IoC is a way to provide abstraction. A way to change the control. IoC gives some ways to implement DIP. If you want to make a higher-level module independent from the lower-level module then you need to invert the control so that the Low-Level Module is not controlling the interface and the creation of the object. Finally IoC gives some way to invert the control.
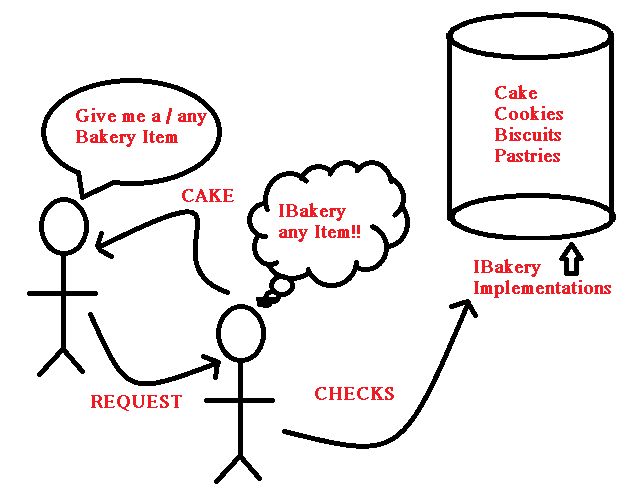
Service Locator
Service Locator also implements the DIP principle and indeed provides us with loosely coupled code. This introduces a locator object, that is used to resolve dependencies within a class. Client uses the locator to find and access the services implemented using the interface. Let’s see that with a code example.
Dependency Injection
Dependency Injection is a type of Inversion of Control, where we move the creation and binding of a dependency to outside of the class, that uses the dependency to access the implemented members of the common interface. This means it is done without any interference of any object, generally by a component that passes constructor parameters and the properties. As without any DI resolves like Ninject, Unity and so on, if we try to invoke the contractor of a class with a parameter, we are thrown an error as:
Quote: No parameter less constructor defined for this object.
Some of the advantages of using Dependency Injection are:
- Reduces Class Coupling.
- Increases Reusability.
- Improves the maintainability for future purposes.
- Improves and catalyses the Unit testing process.
Constructor Injection
Constructor Injection is the most commonly used form of Dependency Injection. As the name suggests, it uses injection into the class level using its constructor. Let’s see a sample code snippet for better understanding:
The preceding code snippet explains the flow. First, we create the dependency by creating the department object for the CheckDepartment() member whose implementation would be used by the class using dependency, that is when we are creating the new instance of the class and passing the dependency. The drawback here may be we cannot create the class and use it without/before passing in the dependency, since we had only the constructor, that would need the dependency.
Setter Injection
Here, we create a setter on the dependent class and use the same setter as a property to set the dependency. In this there is a flexibility to change/set the dependency, since we are the one setting it and in setter injection. Unlike constructor injection we can instantiate the class without passing the dependency. We could set that after instantiating the class also. The code snippet for the setter injection goes as follows in the simplest manner:
Interface Injection
This is also used less in real applications. It is the same as the Setter injection but here, the Dependent class implements the interface. The injector then uses the interface to set the dependency. Interface then defines a method that would be called to do the dependency. Let’s look into the code snippet:
This is similar to a Setter but the difference is that in a Setter we do not get to understand what goes on in the background since we just set the dependency using the setter, but here we know the dependency is coming from the interface after implementing it in the dependent class. Here, after typecasting the employee to the IDepartmentForInject type we are invoking the Inject method.
Demo For Manual Injection
The following is a small demo console application to show dependency injection. You can find the code for download also.
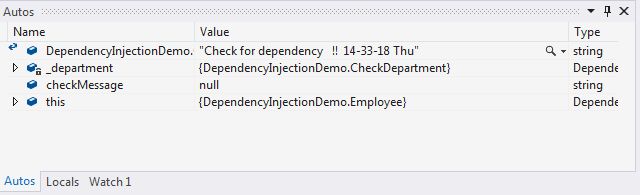
The values in the Autos window in Visual Studio shows how the _department, dependency set in the constructor, has the value from the CheckDepartment that implements IDepartment.
The result that comes is the string returned:
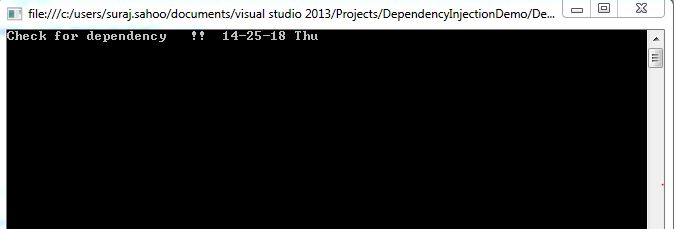
Points of Interest
There are many dependencies resolvers available in Nuget as DLL packages like, Ninject, Unity, StructureMap3, Castle Windsor. But understanding the details of how the background works would be fruitful for using the tools. This is now commonly used and is a confusing topic. I hope this helps anyway. 
References:
CP Article
DotNet Tricks
MSDN
Introduction
Pre-Requisites
This article is meant for my fellow mates who have knowledge on ASP.NET MVC and wondering for an architecture to choose. I am trying to pen this article to be as simple and easy to understand and implement.
Lets Start..
Onion Architecture, the concept introduced by the Jeffery Palermo in 2008 with a aim to make the application loosely coupled and with proper separation between the folders and the different areas of concern in the application. This makes the development easier, the testing of the application easier, the maintainance becomes easier. During the initial stage of development, the SRS(Software Requirement Specifications) is made and proper planning is done regarding what should be the approach, what technologies to be used & after that is done, the most difficult part is choosing the proper architecture so that the maintainance becomes easier. Here, the points that are kept in mind are:-
- All code depends on layers closer or the center
- Domain Models will be at the Center or the Core
- The Inner layer define the Interfaces where as the outer layer implements these interfaces members
- Layered Behaviour around the Domain
- Infrastructure, that would contain Data and the service implementation should be pushed to the edge. Along with the Infrastructure, the UI concerns are also pushed to the edge.
Background
There are a lot of architectures used in web applications, but being decisive and choosing the architecture that would help achieve loose coupling, which is most essential. Loose Coupling, depends on separation of concern, which means each layer would be independent of each other. What is tightly coupled and Loosely coupled?

Yes, exactly as you are thinking my dear readers. But still let me discuss the difference quickly.
A tightly coupling, means where the one object/entity needs to have knowledge of other objects or we can say they depend largely on the interfaces where the service methods are declared. This can be avoided in small applications, but in large applications, these terms are required to be kept in mind else, it may lead to chaos.
A loose coupling, yes the opposite, where there is very less dependency amongst the objects and the interfaces for which there is a chance of clean separation of concern and proper flexibility in the applications as it makes the framework more stable and lets proper maintainability. And it makes the developers happy.

Onion Architecture at glance
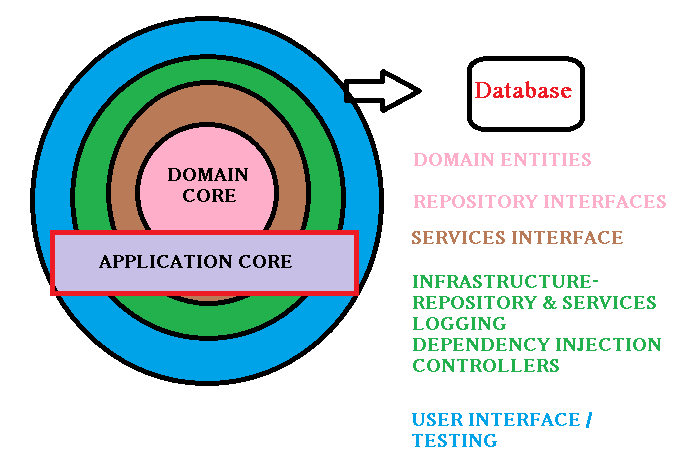
In the above image as we can see, the Core is the Domain model. This layer contains the POCO entities.
Domain objects are:-
- encapsulates application business logic and rules
- maintains any state that is required
- does not depend on external infrastructure concerns
In this article and demo I have added the Repository interfaces in the Core.
The Layers above in brown has the Service Interfaces. The Layer in green is the implementation layer, or the Infrastructure layer, where the Repositories and the Services methods are implemented. The Error Logging(specially NLog) is used. Also the Dependency Injection is implemented here. To inject the dependencies into the controllers
In the layer in blue or the outer layer, has the testing and the User Interfaces.
Thus, this was a simple descriptions of the Architecture, but the below diagram explains better:-
Here we can see there is no transitive dependency betweern the Test, UI and the Data Access which seems better for the Unit testing in MVC applications. This is the layered onion arcitecture that proves to make an application loosely coupled.
The application service implementation as we can see is in a separate laye & the dependency finally is on the Core Domain. The green arrows in the diagram represents the dependencies. Now letslook at a sample code/ The demo is provided in the article for download.
Using the code
In this demo we will see how simple the folder structure of the solution is. Lets see the structure:-
This is how simple the solution of the project would look like if we ollow Onion architecture. Now lets look at an expanded project:-
Lets Discuss on each of the folders one by one
The Core
This is how the core looks like. The core folder contains a class library project, that has Interfaces both for Repositories & Services and Model with the .tt(T4 template)file that is autogenerated containing the POCO entities as I have used Database first approach here. An important thing to note here is, the .edmx file that is generated on using the Database first approach that contains the .tt file. To move that to the Core folder from the .edmx, cut the .tt file and paste that in the folder you want to, here Core->Models->. Only doing this doesnot end the topic, we need to specify the physical path of that file as shown in the diagram below:-
As, you can see in the image, there is a folder called Interface, as the name suggests, this contains the Repositories and Service Interfaces.
Infrastructure
This folder contains more than one project & contains the Integral part of an application. The first project in this project is a class library project, with the first folder Data containing the .edmx file. An .edmx file according to MSDN is a conceptual model and a storage model and the relationships between them. This also contains the Context classes and the .tt file, but regarding .tt file we have already discussed in the core, as we have moved this file to the core project. The first projectalso containes the Repository & Service implementations as mentioned in the interface.
The main and the best part is the second project in the Infrastructure i.e. the Dependency Injection an integral part when we want the Separation of Concern/Loose coupling in an application. In the above figure, we have two classes one for Repository Module and the Service Module. In the demo project, I have used Ninject. On adding Ninject for MVC from Nuget Package, it adds NinjectWebCommon.cs in the App_Start folder which looks like below snippet:
using System.Collections.Generic;
using DemoStart.Core.Interfaces;
using DemoStart.Infrastructure.DependencyInjection;
using DemoStart.Infrastructure.Logging;
using DemoStart.Infrastructure.Services;
using Ninject.Modules;
[assembly: WebActivatorEx.PreApplicationStartMethod(typeof(DemoStart.App_Start.NinjectWebCommon), "Start")]
[assembly: WebActivatorEx.ApplicationShutdownMethodAttribute(typeof(DemoStart.App_Start.NinjectWebCommon), "Stop")]

namespace DemoStart.App_Start
{
    using System;
    using System.Web;

    using Microsoft.Web.Infrastructure.DynamicModuleHelper;

    using Ninject;
    using Ninject.Web.Common;

    public static class NinjectWebCommon
    {
        private static readonly Bootstrapper bootstrapper = new Bootstrapper();

        ///
        <summary> /// Starts the application /// </summary>

        public static void Start()
        {
            DynamicModuleUtility.RegisterModule(typeof(OnePerRequestHttpModule));
            DynamicModuleUtility.RegisterModule(typeof(NinjectHttpModule));
            bootstrapper.Initialize(CreateKernel);
        }

        <summary> /// Stops the application. /// </summary>

        public static void Stop()
        {
            bootstrapper.ShutDown();
        } ///

        <summary> /// Creates the kernel that will manage your application. /// </summary>

        /// <returns>The created kernel.</returns>

        private static IKernel CreateKernel()
        {
            var kernel = new StandardKernel();
            try
            {
                kernel.Bind<func<ikernel>>().ToMethod(ctx => () => new Bootstrapper().Kernel);
                kernel.Bind<ihttpmodule>().To<httpapplicationinitializationhttpmodule>();
                RegisterServices(kernel);
                return kernel;
            }
            catch
            {
                kernel.Dispose();
                throw;
            }
        }

        <summary> /// Load your modules or register your services here! /// </summary>

        ///The kernel.

        private static void RegisterServices(IKernel kernel)
        {
            var modules = new List<ininjectmodule>
            {
                new RepositoryModule(), new ServiceModule()
            };

            kernel.Load(modules);
            kernel.Bind<iloggingservice>().To<loggingservice>();
        }
    }
}
Once we have added the Ninject for the MVC in our project, the next big thing to do is to bind the Interfaces of the repositories and services to the Implementations like as below snippet:
For RepositoryModule.cs
public class RepositoryModule :NinjectModule
    {
        public override void Load()
        {
            // BINDINGS..
            Bind<idemointerfacerepository>().To<demointerfaceimplementationrepository>();
        }
    }
For ServiceModule.cs
public class ServiceModule : NinjectModule
    {
       public override void Load()
       {
           // BINDINGS..
           Bind<idemointerfaceservice>().To<demointerfaceimplementationservice>();

       }
    }
Now, you would be wondering why Repository and Service?? The Service methods are the Bridge/Flyover between the Controller/Business Logic and the Repository implementation, for making it more loosely couple as there would be another layer between the Business logic and the Data access layer.
The next project is the Logging project that is the error logging that helps in logging the errors/exceptions to the database. Here in this demo project, I have used NLog.
Dependencies
In this architecture, the Web project has its dependencies on the other two projects i.e. the Core & the Infrastructure.
The Infrastructure project depends on the Core & the Core is independent for every other. As per the diagram for the Onion Architecture we have proved that the Core remains in the Core/Center and there is no transitive dependency amongst the UI , the Test with the data Access Layer. Check the images below:-
You can see check the dependencies among the projects and the Core which is independent.
Points of Interest
Finally, straight from the words of Jeffery Palermo, the father of this concept:-
- The application is built around an independent object model.
- The layers inside define the Interfaces(the core) and the Outer layers implement
- The coupling direction is towards the center as the name suggests ONION
Thus, the Onion Architecture helps decouple the Infrastructure and the Business(Controller) & the User Interface(Views) without getting into the OOPS concept or has no new concepts with regards to the domain-driven approach.
This is thus a very simple and general, but very effective architecture, I hope readers would love this.
References
Download the source code from dropbox and get set goo…:)
]]>