MVC Framework
MVC (Model View Controller), is simply a framework used to design web applications, as simple its definition could be.
- Model : This layer represents the core of an application. It is responsible for maintaining the data of the application or can be termed to be the Business layer.
- View : As the name says about itself, this layer displays the data fetched or the designs. This can be termed simply as Display layer.
- Controller : This handles the input to the database or fetches the data from the database records. This can be simply termed as Input layer.
The three layers are interconnected and are dependant on each other. The below figure will explain better:-
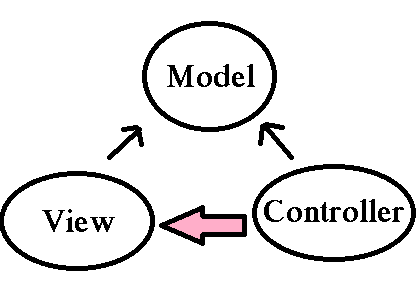 As we can see above, the Data layer or the Model that deals with the data is accessed both by the View and Controller. Here, in MVC there is separation between every laye, that helps in loose coupling the items and also in application development process. Now, one might wonder what exactly Separation of Concern means! This can be framed as there should not be or there should be minimal overlapping/dependancy of functions in an application. For example, take the scenario of the View and the Controller. Can they be separately done!! That is can their be no dependancy between them!! View is the presentation layer and the Controller is the action layer. We can have in real scenario a controller without a View, but a view without a controller sounds a bit radical. This is not necessarily true always. So, we can conclude here that Separation of Concern can be minimal but still lies a grey line. NOTE: Thus always have separate UI layer, Data access layer & Logic Layer in order to achieve clean separation.
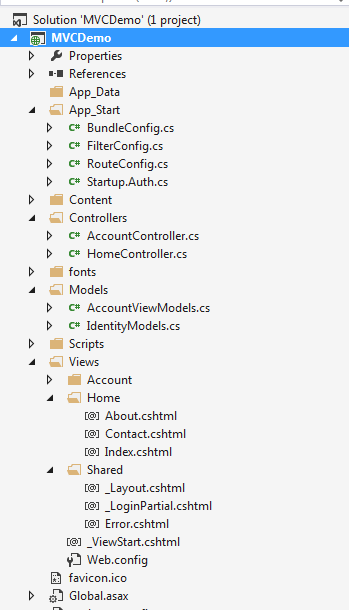
The above image displays the simple MVC folder structure. The Models having the Entities, Controllers as well as the Views for each controller, the shared folder having the master pages.
 Lets get into more details…..
Models
Models(in a bit more depth) : Contains all the application logic i.e.
- Business logic
- Validation Logic
- Data access logic
This holds as well as manipulates the data in the database. This folder contains the classes/entities that are required and present in the application.
Views
Views(in a bit more depth) : The View generally stores the Html files may it be .cshtml or .vbhtml (C# and VB) respectively. These may have extensions as html, asp, aspx. The interesting thing is every controller there is a view folder and for every action a view. There is always a Shared folder inside View, that is used to have the Layout or the Master pages.
Controllers
Controllers(in a bit more depth) : This contains the controller classes responsible for input and responses. The name of the Controller ends with Controller to distinguish. For example, “HomeController.cs”. Every controller implements the Icontroller interface from the System.Web.Mvc namespace.
public interface Icontroller {
void Execute(RequestContext requestContext);
}
The single method Execute is invoked when a request is targeted at the controller class. What happens to the request that comes to the application? The request that comes to the web application first goes through the UrlRoutingModule object (System.Web.Routing.UrlRoutingModule). The request gets parsed and then the route selection is done. When the application starts up, it runs the Application_Start() method present in the Global.asax that marks the application initialization.
- HttpHandlers and HttpModules:- Module or the HttpModules is an assembly, that is called on every request that is made to our application. Where as the HttpHandlers is the solution/answer or running in response to the request made.
Pipeline In MVC
- ROUTING:- This is the first step in the MVC pipeline, it is a pattern to match the incoming url request to the application. These URL are matched to the URLs registered to the Route Table. The route table has its set up done in the Global.asax. The routes are registered to the RouteConfig class that has the route URLs to be mapped and ignored in the application. Lets have a look at it:-
protected void Application_Start()
{
RouteConfig.RegisterRoutes(RouteTables.Routes);
}
public class RouteConfig
{
public static void RegisterRoutes(RouteCollection routes)
{
routes.Ignore(“{resource}.axd/{*pathinfo}”);
routes.MapRoute(
name:"",
url:"{controller}/{action}/{id}",
defaults: new {controller = "Home",action="Index",id=UrlParameter.optional}
);
}
}
Then the UrlRoutingModule discussed above finds a matching route for the incoming URL from the Route Table. When it matches, it retreives the IRouteHandler instance for that route (MvcRoutehandler). Then the IRouteHandler’s GetHttpHandler() is called and finally the ProcessRequest() method is invoked. Then MvcRoutehandler instantiates and executes controller.
Here as you can see, the URL has the {controller}/{action}/{id}, the id is optional which is defined in the defaults. URL may also be only {controller}/{action}. As the routes would be specified or registered in the Route Table, so will the navigation will be.

public class TenantController : Controller  //Derived from Base controller
    {
      public ActionResult Index() //Default Action method-URL: /Home/Index
        {
           return View();
        }
      public ActionResult Index(int id) //Action Method with an Id as parameter
                                        // -URL: /Home/Index/3
        {
          return View();
        }
     }
This is how the routing works on incoming request from the browser. Similarly we can use custom routes also as not always we will be using Home/Index .. 
public class RouteConfig
{
public static void RegisterRoutes(RouteCollection routes)
{
routes.Ignore(“{resource}.axd/{*pathinfo}”);
routes.MapRoute(
name:"Employee",
url:"{controller}/{action}/{id}",
defaults: new{controller = "Employee",action="Add",id=UrlParameter.optional}//Adds a new employee action
);
}
}
If the Url matches any of the routing registered in the Table, the user lands on the View else 404 errornot found page.

- Initialization of Controller :- The real processing starts by the use of ProcessRequest(), that uses the IcontrollerFactory instance to create the corresponding controller for the URL request. The IcontrollerFactory returns the appropriate controller for the request and instantiates that. Then the Execute() method mentioned above is invoked.
- Invoking Controller Action :- The Execute() method refers the RouteData to get the appropriate action for the controller in the Url request. The controller then invokes its own InvokeAction() method.
public virtual bool InvokeAction(ControllerContext controllerContext, string actionName)
After getting the appropriate action, then comes the work of the model binders, default being System.Web.Mvc.DefaultModelBinder, receives the Http request, validates and does the conversions requiqred and also mapping the input values from the user.
- Render View :- The user now would be expecting the beauty of the application to be shown. The View follows the same pattern as the Route. That is, the controller factory has a property known as ViewFactory(), which is a type of IviewFactory. This IviewFactory defines a method called CreateView(), that gets a name and instantiates and return IView, that has a property/method called RenderView() that has the necessary context information from the HttpResponse and returns the Html data as response.

Conclusion
This was the basic and foremost things to knowabout MVC. These are all done on the background. Being Developers, not bothering about the flow is now worthy enough. Thus, Just adding a Controller an action to it and oviously a View to it, does not mean we have done something great!! You would always prefer a pot full with water rather than the one that is almost empty!!

. We are done with the first part. We will be covering interesting topics for learning MVC in part-2
Hope this helps any way. Any suggestions, queries and comments are most welcome.
Dotnet Tricks
Adam Freeman Pro Asp.Net MVC4
Windows Azure provides various cloud enabled storage services and Blob storage is one of them. BLOB stands for “Binary Large Object” which means unstructured data that typically includes images, documents, audio, video or other multimedia objects. The main purpose for using BLOB cloud services is it has a many advantages over storing files in local file systems.
As the msdn suggests the advantages are :-
- It is highly Scalable : that is a single storage account(will be discussed ahead) can store hundreds of terabytes of data and one can have multiple storage accounts.
- It is Durable : that is every file(images, documents, audio, video or other) stored, automatically has a backup.
And many more, for the time these are of more focus.
This article mainly focuses on use of cloud services as here is Azure, checking for containers in our development storage and creating blobs dynamically into it and uploading files to it, as its being used in almost every sites.
In order to develop Azure Cloud enabled applications, we need to install SDK(Software Development Kit-A software development tool required to create application for specific software) first. The best way to develop SDK is :
- https://azure.microsoft.com/en-us/downloads/ go to this site and download the Azure SDK for Visual Studio 2013/12.
- Else go to Visual Studio->Select new project->Select Cloud->
It will then redirect you to download the SDK if its not installed.
- After selecting the cloud, select your project as “Windows Azure Cloud Services”. Then add another project to your solution as MVC Web Role from the popup you get after choosing the Azure Cloud Services. Now you have your solution with two projects a Cloud Service and an MVC . **One thing to keep in mind here is the WebRole.cs has an On Start() method that executes before Global.asax.
- Then in the Cloud Service Project (for this blog I have given the name as UploadTrial1), we can find a Roles Folder. In that folder select the MVCWebRole, it redirects you to the configurations of it. Select the settings and Add Settings, with any name and then select Windows Azure Storage Emulator. There are other options like Manually Entered Credentials and Your Subscriptions. These are required during Deployment and selecting Windows Azures Storage Emulator sets UseDevelopmentStorage=true, that means our local storage.
Now lets start our play with MVC, Add a class to it that would create and check for the containers(I have named as BlobStorageServices.cs) and the code goes as mentioned below:-
//namespaces used
using Microsoft.WindowsAzure.ServiceRuntime;
using Microsoft.WindowsAzure.Storage;
using Microsoft.WindowsAzure.Storage.Blob;
using System;
using System.Collections.Generic;
using System.Linq;
using System.Web;
namespace MvcWebRole1
{
//Container information
public class BlobStorageServices
{
public CloudBlobContainer GetCloudBlobContainer()
{
CloudStorageAccount storageAccount = CloudStorageAccount.Parse(RoleEnvironment.GetConfigurationSettingValue("ImageUploadSetting"));//gets settings value
CloudBlobClient blobClient = storageAccount.CreateCloudBlobClient();//activates the storage account on local
CloudBlobContainer blobContainer = blobClient.GetContainerReference("imagesupload");
if(blobContainer.CreateIfNotExists())
{
blobContainer.SetPermissions(new BlobContainerPermissions { PublicAccess = BlobContainerPublicAccessType.Blob });//Allowing public Access

}

return blobContainer;

}

}

}
Now add a action method to your HomeController. I have named the action as Upload[HttpGet]/[HttpPost]. The code goes below:-
BlobStorageServices blobStorageServices = new BlobStorageServices();//Instantiate object of the class we just created for containers.
/// <summary>
/// Uploads this Image.
/// </summary>
/// <returns>Views of blobs</returns>
[HttpGet]
public ActionResult Upload()
{
CloudBlobContainer blobContainer = blobStorageServices.GetCloudBlobContainer();
List<string> blobs=new List<string>();
foreach(var blobItem in blobContainer.ListBlobs())
{
blobs.Add(blobItem.Uri.ToString());//Returns all the blobs Uri in the container.
}
return View(blobs);//Returns to view to display all blobs.

}
/// <summary>
/// Uploads the specified image.
/// </summary>
/// <param name="image">The image.</param>
/// <returns>Redirected to Upload Action</returns>
[HttpPost]
public ActionResult Upload(HttpPostedFileBase image) //Accept the posted file
{
try
{
if (image.ContentLength > 0)
{
CloudBlobContainer blobContainer = blobStorageServices.GetCloudBlobContainer();
CloudBlockBlob blob = blobContainer.GetBlockBlobReference(image.FileName);   //First Blob

// Upload content to the blob, which will create the blob if it does not already exist.
blob.UploadFromStream(image.InputStream);
}
}
catch(Exception ex)  //Catches Null Exception here and stores it to blob
{
CloudBlobContainer blobContainer = blobStorageServices.GetCloudBlobContainer();
CloudBlockBlob blob2 = blobContainer.GetBlockBlobReference("myfile.txt");  //Second Blob
blob2.UploadText(ex.ToString());
}
return RedirectToAction("Upload");
}
Here I have gone for an exception handling and a better way is I am uploading the exception content creating another blob (myfile.txt). Here we upload image and a text file that includes exception, incase it occurs.
Now lets work on the UI part. I am coding a simple UI design and the code goes here:-I have used Razor in MVC4.
@{
ViewBag.Title = "Upload";
}
<h2>Upload Image</h2>
<p>
@using (Html.BeginForm("Upload", "Home", FormMethod.Post, new { enctype = "multipart/form-data" }))
{
<input type="file" name="image" />
<input type="submit" value="Upload" />
}

</p>
<ul>

@foreach (var item in Model)
{
<li>
<img src="@item" alt="Images uploaded"width="150"height="150" />
</li>
}
</ul>
Lets just overview about the WebRole, WorkerRole and Queue in Azure:-
Web Role in Windows Azure are special purpose services and provide a dedicated IIS used for hosting web application, we can easily add and deploy application to webrole and scale as per our compatibility as per requirement.It is basically front-end that appears to the users.
Worker Role are processes that can do some work as the name suggests. For example, compressing an uploaded image automatically or on the fly, any changes in the database, best is notifications that are recieved.
Queue contain set of messages and those messages should be queue. The main thing is that Web Role, Worker Role and Queues are Virtual Machines running on cloud.
]]>A Favicon (“favorites icon”), is an icon associated with a particular website or webpage that is displayed in the browser address bar next to a site’s URL. Favicon is a little icon, but plays a subtle and important role. It acts as a brand.
What Is It Exactly?
 The WordPress Favicon
This Favicon is very familiar, which can be seen next to the Title of any WordPress WebPage and some other places as described below.
Where this Favicon is Displayed?
It is displayed at three places.
- The URL in the address bar
- The websites name in the list of bookmarks
- In the browsers that support a new feature Tabbed Browsing (Tabbed browsing is a function of some Web Browsers that allow uses to surf and view multiple pages by loading the Websites into “tabbed” sections of one page, rather than multiple pages. This allows the user to view a selection of favorite sites in one window, view multiple search results at the same time, and would allow you to set several pages as your home page, rather than just one)
Using the Code
It is very simple and easy. Follow the steps described below.
Step 1: Go to some online Favicon Generator Website
I recommend Favicon Generator.
Step 2: Browse/Create Favicon for your Website
That would become your Website’s brand image.
Step 3: Generate the Favicon and Download
Add it in your root directory and remember to rename it as sometimes it does not refresh itself if Internet Template is used.
Step 4: Add the Following Code inside head Section of Web Page
<span class="code-keyword" style="color: blue;"><</span><span class="code-leadattribute" style="color: maroon;">link</span> <span class="code-attribute" style="color: red;">rel</span><span class="code-keyword" style="color: blue;">="</span><span class="code-keyword" style="color: blue;">shortcut icon"</span> <span class="code-attribute" style="color: red;">href</span><span class="code-keyword" style="color: blue;">="</span><span class="code-keyword" style="color: blue;">https://www.codeproject.com/NAME of your FAVICON.ico"</span> <span class="code-attribute" style="color: red;">type</span><span class="code-keyword" style="color: blue;">="</span><span class="code-keyword" style="color: blue;">image/x-icon"</span><span class="code-keyword" style="color: blue;">></span>
Put the above code in the <head>.......</head> section of your webpages if Empty Template is used, else in theLayout Page for Internet template.
Points of Interest
While working on a demo, I saw a Favicon in my root directory and got curious to know what is the use. I saw this when I used an Internet Template in ASP.NET MVC4 not an Empty Template. Hope beginners like me get to know about this and use this with their Websites.
Give your Website a brand with these steps and enjoy. 
This is trivial and my very first Tip and Post too, wanted to start with this.
Happy Coding
]]>