Hey folks! Another interesting topic to discuss and share! Integrating sensors to an Arduino board seems interesting and feels good when you receive the desired digital output and manipulate it. Now a days hundreds of different kinds of sensors are available in the market, we need to try out and explore how we can better user experiences using these electronics. Temperature monitoring sensors, obstacles detection sensor, soil moisture detection sensors, heart pulse rate sensors and many more. I will try and use as many as sensors as I can and try integrating them with more sophisticated devices. In this article I would be sharing about the IR Obstacle sensor, which as the name suggests detects object or any obstacle coming the sensors way! Lets see how.
The sensor

Here is how the sensor looks like. We will see another pictorial representation of the above sensor and discuss about the details of the part.
The pictorial goes like below:
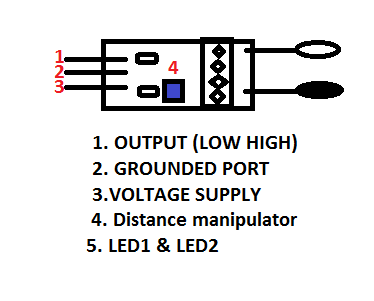
Lets learn and see what the sensor has. As you can see the numbers are mentioned, we will discuss the work around and try understand each and every word. First one goes like:
| Sensor Parts | Functions |
| OUTPUT | This port in the sensor, sends the digital out put to the output unit. Here, we have the sensor output port on board as 7. |
| GND | This port is used to connect to the board’s Grounded port. |
| VCC | The voltage supply port, here we have used the 5 V supply port from the board. |
| Distance Manipulator | The CW (Clock wise) movement increases the distance proximity and the vice-versa decreases. |
| Power and Obstacle LED | Former illuminates when the Power is supplied and the latter when any obstacle comes over. |
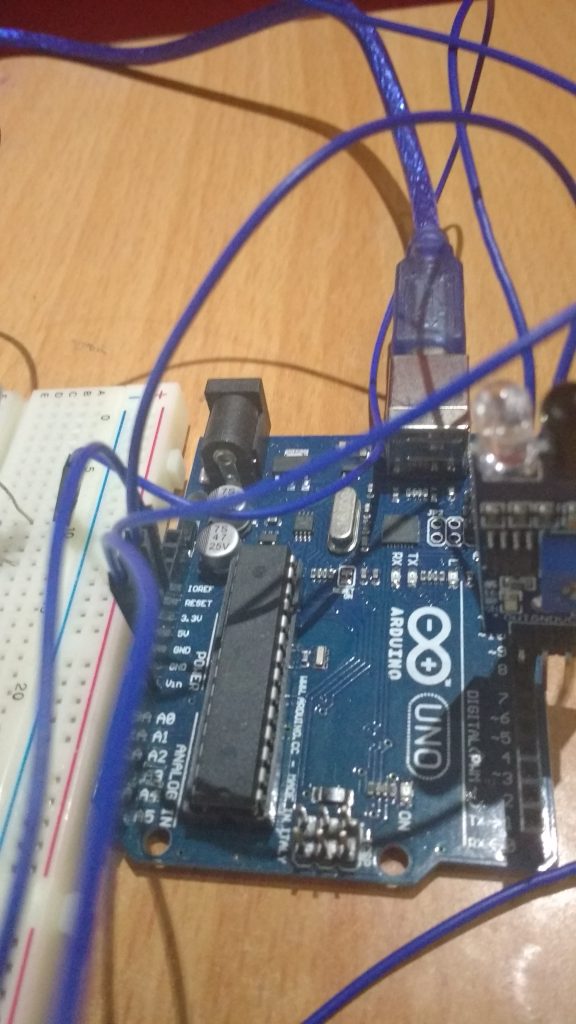
The circuit board looks like below:

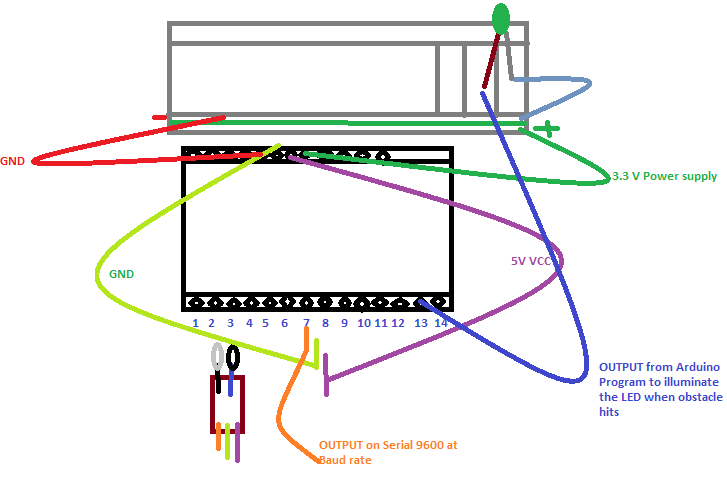
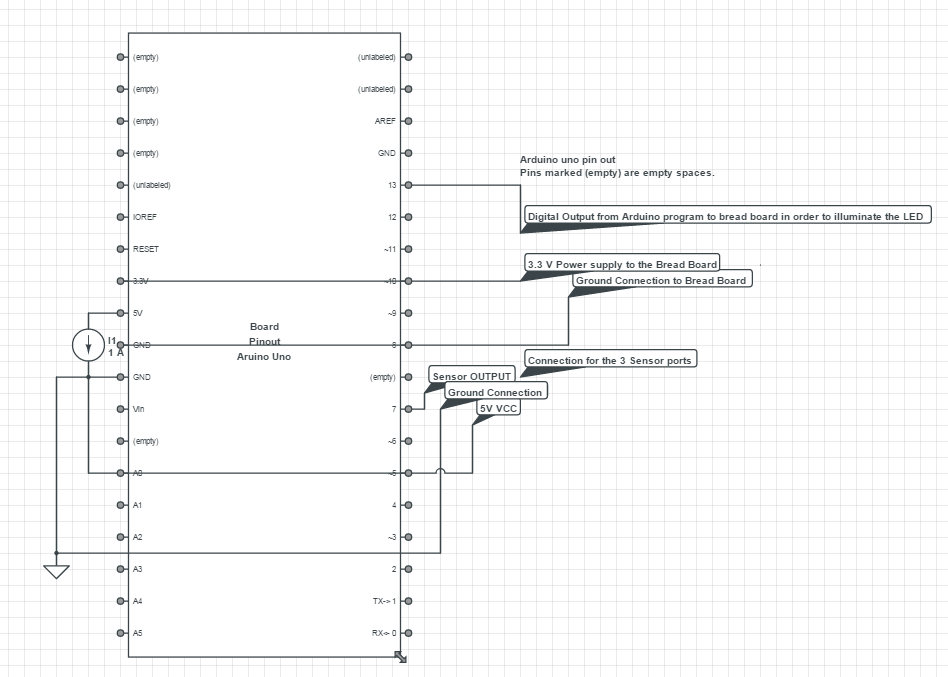
The circuit diagram would look like below:
Thats similar to the previous LED connection of my Arduino series. Series I
If the above is not clear, please share your query in the comments.
Better view of the diagram is below:
Snippet
int LED = 13; // Use the onboard Uno LED
int obstaclePin = 7;  // This is our input pin
int hasObstacle = HIGH;  // HIGH MEANS NO OBSTACLE

void setup() {
  pinMode(LED, OUTPUT);
  pinMode(obstaclePin, INPUT);
  Serial.begin(9600);
}
void loop() {
  hasObstacle = digitalRead(obstaclePin); //Reads the output of the obstacle sensor from the 7th PIN of the Digital section of the arduino
  if (hasObstacle == LOW) //LOW means something is ahead, so illuminates the 13th Port connected LED
  {
    Serial.println("Stop something is ahead!!");
    digitalWrite(LED, HIGH);//Illuminates the 13th Port LED
  }
  else
  {
    Serial.println("Path is clear");
    digitalWrite(LED, LOW);
  }
  delay(200);
}
The Flow
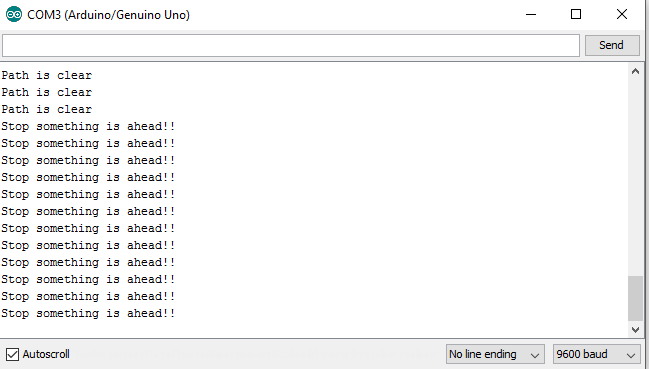
When the full circuit is done and the code set is also done. Now, time to connect the Board to the Computer using the USB jack. Once connected to suppose COM3 port, open the Arduino Set up IDE where the code set up is done, compile the code once and then Upload the code to the Board. Once Upload is done the TX RX leds blinks quick.
Now we are all set to test the sensor. For better and precise testing, we can solder the wires (jumper wires) to the sensors as their connected pins are not portable. The whole set up can be soldered.
Then when we connect, open up the Serial port screen which transmits at 9600 bits per sec and check the message, as per written in the program.
As per the program, the LED also blinks and illuminates based on the Obstacle sensor output.
The serial screen would look like below:
That’s it folks!!
Conclusion
Now this is all about the sensor IR Obstacle sensor which you can purchase at a very cheap rate from ebay or amazon and play with. We can use this set up in our Cars and check out!! In the upcoming series I will be sharing more sensors and blue-tooth module integration with Arduino. Hope they will be more fun! Please share your experiences and suggestions as I am still crawling..:P
]]>Hello folks!! Lets continue our journey of learning Angular JS. We have seen & discussed few topics already!
In this article we will discuss few concepts that are very essential to build an MVC project with Angular.
 Lets see the topics we will be covering in this article:
- Angular Model
- Angular Scopes
- Angular Services
- Angular Http
- Angular Dependency Injection
Angular Model
This as the name suggests binds the values to the model associated to an element. This shows a two-way binding, i.e. when the value suppose in the textbox changes, the value for the model also binds and changes. The attribute used is ng-model, the code would be like:
<script src="https://ajax.googleapis.com/ajax/libs/angularjs/1.4.8/angular.min.js"></script>
<div>Name : <input type="text" />
<h1>Welcome {{name}}</h1>
</div>
This will update the value of text entered inside the text box and gets displayed in real time.
Interesting fact about the ng-model directive is that, the directive watches the model by reference not by value. It also provides validation to the particular field.
Angular Scopes
Angular scopes are the execution-context generated during the creation of a controller. We pass the scope object to the controller function. The scope is generally denoted as $scope. This is actually an object to which we add the properties to be accessed in the HTML page using the controller reference.
As the angular doc rightly says, it is actually the glue between the controller and the view. It comes with two referring API i.e. $watch (used to observe the model mutations) and $apply (used to propagate the changes done to the scope object property) Lets have a glance at the snippet:
angular.module('scopeTest', []).controller('TestController', function($scope) {
  $scope.username = Suraj;
 });
This is how the scope object is passed and initialized and assigned properties to be used inside the view.
Interesting Facts:
Controller function in Angular is a constructor function. Now what is a constructor function?
A constructor function in simple terms is when the new keyword is used before a function.
var constructorFunction = new Funciton(Parameters..);
Thus everytime a controller is instantiated it gets associated with a new Scope.
Angular Services
There are many in-built services provided by the Angular and also we can explicitly create our own services to have a loose coupling while using the Http Get Post services. These are actually singleton functions that are required to perform certain specified tasks. What singleton means is restricting the instantiation to a single object only.
As in MVC we follow Separation of concern, here also these services can be used to follow the loose coupling and binding.
As we can see here the reuse of the services can also be followed here. This is done using the injection of dependency into the controller function. We will look into the dependency in the next points.
Lets see how we declare a service in Angular.
var module = angular.module('TestApp', []);
module.service('TestService', function(){
    this.users = ['Suraj', 'CsharpCorner', 'Angular'];
});
Here comes another concept known as Factory, which also behaves as a service function only.
var module = angular.module('TestApp', []);
module.factory('TestFactory', function(){
    var testFactory = {};
    testFactory.users = ['Suraj', 'CsharpCorner', 'Angular'];
    return testFactory;
});
The behavior is the same for both service and factory, but the difference is interesting. For the difference, take a closer look at the snippets mentioned above. In the first snippet where we have declared the service and we have added the ‘users’ to the reference of the service i.e. this keyword. Whereas, in the .factory declaration, we have used the testFactory object and assigned property users to it. While using the Services in the injection, we will have the object instance of the service becomes the reference to the methods and can be used in the injection for other controllers or services, while in case of factory, when that is injected, the value is directly provided which is returned by the function within.
The above discussed are explicit or user-defined services, now lets see the in-built services provided by the Angular. (Some of them)
- $http:- This is the Http server requesting service, which is one of the most commonly used and important service.
var app = angular.module('TestApp', []);
app.controller('TestCtrl', function($scope, $http) {
    $http.get("url").then(function (response) {
        $scope.testData= response.data;
    });
});
As we see in the above snippet, the $http service used to make a get request to the URL specified and then the data retrieved is assigned to the scope. As we see the $http is passed into the controller function as an argument. It is recommended to use the $http, server request inside the service as we are in a way interacting with the data. Then the service is injected into the Controller. - $interval:- This as the name suggests, is an angular type for window.setInterval
var app = angular.module('TestApp', []); app.controller('TestCtrl', function($scope, $interval) { $scope.theTime = new Date().toLocaleTimeString(); $interval(function () { $scope.theTime = new Date().toLocaleTimeString(); }, 1000); }); //reference for use from https://www.w3schools.com/angular/tryit.asp?filename=try_ng_services_interval - $location:- Same as above, angular version of window.location.
- $timeOut:- Same as above, angular version of window.setTimeOut.
Dependency Injection
This is an interesting and most debated topic and angular provides this out of the box concept.
Out of the box..

Dependency is required when we are looking for the loosely coupled codes, i.e. without directly exposing our services. The separation of concern is the major concern when DI comes into picture. Once our service is ready, we can inject to any other service or controller in Angular. The best example would be a Bakery shop.
Lets chalk out the plan with a simple snippet:
var app = angular.module('BakeryApp', []);

app.service('BakeryService', function() {
    //Declare or pass the prices as arg
    this.Pizza = function(quantity) { return quantity * pizzaPrice };
    this.Pastries =function(quantity) { return quantity * pastriesPrice };
    this.Cakes= function(quantity) { return quantity * cakePrice};
});

//Injected Bakery Service to the 'BakeryCalculateService'
app.service('BakeryCalculateService', function(BakeryService){
    this.PizzaPrice = function(qty) { return BakeryService.Pizza(qty); };
    this.CakePrice= function(qty) { return BakeryService.Cakes(qty); };

});

//Injected BakeryCalculateService.
app.controller('BakeryPriceController', function($scope, BakeryCalculateService) {
    $scope.CalcPizzaRate= function() {
        $scope.PizzaRate = BakeryCalculateService.PizzaPrice ($scope.quantity);
    }
    $scope.CalcCakeRate= function() {
        $scope.answer = BakeryCalculateService.CakePrice($scope.quantity);
    }
});
We can very well in the above example see the Dependency Injection and the separation of the main service, the layering that is set between the controller and the actual operations. This is very handy during maintenance as well. This is by law which every developer should abide by 
Do’s & Dont’s
Another interesting fact when we use the injection is the minification breakage. The angular code breaks when the injection is not done properly when the script files are usually bundled and minified.
The above Dependency Injection snippet we discussed, will break when the script is minified, bundled & deployed. The reason being, when minification takes place, it re-frames the variable names as ‘a’,’b’,’c’.., thus the parameters injected as $scope,$http will be now treated as a, b. Thus this will break as there is no meaning injecting a b, may it be a controller or a service.
To avoid that, we usually modify the snippet and use the Angular attribute $inject, wherever Dependency is injected.
var testController= function(myCtrlScope, $http) {
  //We included $scope and the $http service into our controller.
  }
testController.$inject = ['$scope', '$http']
Since we are using $inject attribute on our controller,it would not be an issue using any name of the parameters to it.
Conclusion
Thus, we have discussed few interesting concepts this time and work around with live snippets. Still we have not discussed the integration of angular with an MVC app using API. We will discuss in the upcoming articles of the series, before that we will be clear on the basic stuffs that needs to be covered. 
I hope this article helps. I am always open for corrections and suggestions.
Lets learn and share together.
Scheduled jobs are a part of development, may it be any application. Inventory applications require them the most when they automate almost everything. SQL Jobs can prove to be handy when a query needs to run and update or insert or anything of that sort at regular intervals as per requirement. These are similar to schedulers to track your reminders and updates.
According to MSDN
SQL Server Agent is a Microsoft Windows service that executes scheduled administrative tasks, which are called jobs in SQL Server 2016.
SQL Jobs are run by the SQL Server Agents. It can be a single operation running in the background or a series of operations.The SQL Jobs can be added using the GUI provided by the SQL Server. But in this article, we will see and understand the Query that helps create SQL Jobs. These jobs can be scheduled to run daily, weekly or on monthly basis.
Straight to the point
We will straight away check and see the snippet and then try understand the parts of it.
BEGIN TRANSACTION;
DECLARE @ReturnCode INT;
SELECT @ReturnCode = 0;
DECLARE @owner_Login_Id NVARCHAR(30),
        @actual_database_name NVARCHAR(30);
SET @owner_Login_Id = N''; -- ADD THE LOGIN NAME TO THE SERVER
SET @actual_database_name = N'DB NAME'; -- ADD THE DATABASE NAME AS REQUIRED

IF NOT EXISTS( SELECT name
               FROM msdb.dbo.syscategories
               WHERE name = N'[Uncategorized (Local)]'
                 AND category_class = 1 )
    BEGIN
        EXEC @ReturnCode = msdb.dbo.sp_add_category
             @class = N'JOB',
             @type = N'LOCAL',
             @name = N'[Uncategorized (Local)]';
        IF( @@ERROR <> 0
         OR @ReturnCode <> 0
          )
        GOTO QuitWithRollback;
    END;
DECLARE @jobId BINARY(16);
EXEC @ReturnCode = msdb.dbo.sp_add_job
     @job_name = N'JOB_NAME',
     @enabled = 1,
     @notify_level_eventlog = 0,
     @notify_level_email = 0,
     @notify_level_netsend = 0,
     @notify_level_page = 0,
     @delete_level = 0,
     @description = N'JOB_DESCRIPTION',
     @category_name = N'[Uncategorized (Local)]',
     @owner_login_name = @owner_Login_Id,
     @job_id = @jobId OUTPUT;
IF( @@ERROR <> 0
 OR @ReturnCode <> 0
  )
GOTO QuitWithRollback;

EXEC @ReturnCode = msdb.dbo.sp_add_jobstep
     @job_id = @jobId,//-- ID of the Job created
     @step_name = N'STEP_NAME', //--Step Name for the JOB
     @step_id = 1,
     @cmdexec_success_code = 0,
     @on_success_action = 1,
     @on_success_step_id = 0,
     @on_fail_action = 2,
     @on_fail_step_id = 0,
     @retry_attempts = 0,
     @retry_interval = 0,
     @os_run_priority = 0,
     @subsystem = N'TSQL',
     @command = N'YOUR QUERY GOES HERE',
     @database_name = @actual_database_name, //--Database name is generic and defined above at the start
     @flags = 0;
IF( @@ERROR <> 0
 OR @ReturnCode <> 0
  )
GOTO QuitWithRollback;
EXEC @ReturnCode = msdb.dbo.sp_update_job
     @job_id = @jobId,
     @start_step_id = 1;
IF( @@ERROR <> 0
 OR @ReturnCode <> 0
  )
GOTO QuitWithRollback;
EXEC @ReturnCode = msdb.dbo.sp_add_jobschedule
     @job_id = @jobId,
     @name = N'JOB_SCHEDULE_NAME',
     @enabled = 1,
     @freq_type = 4,
     @freq_interval = 1,
     @freq_subday_type = 1,
     @freq_subday_interval = 0,
     @freq_relative_interval = 0,
     @freq_recurrence_factor = 0,
     @active_start_date = 20150615,
     @active_end_date = 99991231,
     @active_start_time = 0,
     @active_end_time = 235959,
     @schedule_uid = N'af82656c-e151-4ebb-9fe1-009495e1415d';
IF( @@ERROR <> 0
 OR @ReturnCode <> 0
  )
GOTO QuitWithRollback;
EXEC @ReturnCode = msdb.dbo.sp_add_jobserver
     @job_id = @jobId,
     @server_name = N'(local)';
IF( @@ERROR <> 0
 OR @ReturnCode <> 0
  )
GOTO QuitWithRollback;
COMMIT TRANSACTION;
GOTO EndSave;
QuitWithRollback:
IF( @@TRANCOUNT > 0 )
ROLLBACK TRANSACTION;
EndSave:
GO
The snippet part Line No. 9-12 results the existance of the Local categories. What this does is simple.
From MSDN
Contains the categories used by SQL Server Management Studio to organize jobs
Now, after the check, if the category exists that governs the organization job, it then executes the pre-defined Stored procedure that adds a new category sp_add_category
sp_add_category
     [ [ @class = ] 'class', ]
     [ [ @type = ] 'type', ]
     { [ @name = ] 'name' }
- @class:Class governs the class i.e. may be JOB|ALERT|OPERATOR
- @type: This specifies the type or location of the Job i.e. LOCAL|MULTI-SERVER|NONE
- @name: Category Name that will be added
After this the Job Addition SP is executed. The parameters for the SP needs to be known and why are they added. For more information MSDN can be followed.
This SP sp_add_job simply and only adds the JOB with the specified name. For the execution of JOB and to let it execute the required process, we need to add a JOB STEP, which is created next.
sp_add_jobstep does the job for us. This SP adds the specific Step to be executed or run under that JOB. The parameters here can also be referred from MSDN.
@command is the most important parameter here, as the query that will actually be executeed at intervals and fulfil your requirement will run.
@database_name is also important as this would specify on which database the query would be executed by the JOB.
We are then adding the schedule for the created job using SP sp_add_jobschedule . This Sp adds the required schedule for the JOB and sets the JOB to run based on the schedule. Please refer the MSDN for more info and the parameters definition.
Conclusion
Thats it folks. We have seen the simple query that once run, creates a SQL job for us that can actually execute any query on the background and make life easy.
Points of Interest
We have followed TRANSACTION in the queries in order to track the errors and if any caused, then we could roll back the changes to avoid ambiguity.
Instead of now following steps to create Jobs using the SQL Server Object Explorer, run the above query, understand the parameters once and then that’s easy.
Hope this helps.
References
]]>
As we discuss in the previous part of Hands on Agular Js-I about the basic and the architecture of the Angular Js and few directives. Here in this part we will check out the other important directives and how Angular interaction with Controller and model is being done on the go. The directives we will discuss in this part of series are very important in order to start and feel the magic of Angular. Here, actually, we get into the depth and controls of Angular. Let’s watch out.
Angular directives
Here we start with the other important directives that would come handy while working on the Angular.
ng-module
Angular modules are the most important directive, they define an angular application. They are the parent set for the other directives or functions of the application, like controllers. Controllers are always contained withing the modules, along with other dependencies. This is the modular approach in Angular. Creating modules for separate section segregates it and create partition/module wise applications.
The modules are defined syntactically as below:
var app = angular.module("app-Services", []);As per the above snippet, we have created an angular module and assigned it to the variable named app. The module name is app-Services. The module is actually defined in the document function of a separate Module script file and reference added to the file wherever required. The definition provided by the Angular Doc is that Module is required to configure the $injector and it contains the services, directives, controllers and other dependencies.
$injectors are the service used to retrieve the pre-defined object instances, invoke methods and load the required modules.
ng-controller
This is another set of directives that defines the controller of the application, which controls the data of the application. They are simple objects defined under the scope of the module. There can be any number of controllers for a specific module. Controllers are defined syntactically as:
var app = angular.module('app-Services', []);
app.controller('myFirstController', function($scope) {
    $scope.firstName = "Suraj";
    $scope.lastName = "Sahoo";
});
The above snippet is a simple controller defined under the module app-Services. The name of the controller is myFirstController and under its scope, two members are initialized, that is firstName & lastName. Thus, when an object of controller is created in the html, which we will see below:
<html>
<body>
<div ng-app="app-Services" ng-controller="myFistController as ctrlFirst">
<span>{{ctrlFirst.firstName}} {{ctrlFirst.lastName}}</span>
</div>
</body>
</html>
Thus, as we see above, the html tag div has the scope for the Module we defined above and the controller defined for the module with the members firstName & lastName. When the controller is instantiated inside the scopr of the div and Module, we have th right to access the data defined inside the controller function. $scope defined within the controller function is is the context via which the model execution is implemented inside the controller. It actually acts as a watch on the model values while binding to the DOM element in the HTML. The $scope can also be used using the this object. The controller also accepts the $http to execute the http services in order to call the api’s to get post and delete any data through the services. Lets see how the controller function can be separated from the declaration and defined as a function.
var app = angular.module('app-Services', []);
app.controller('myFirstController', myFirstController);
function myFirstController($http, $scope) {
    $scope.firstProperty = 'XYZ';
    $http.get('your url').then(function (){
                          //do whatever..
                  }).catch(function (){
                         //do whatever..
              }).finally(function (){
                       //do whatever..
          });
}
});
Now the above, $http is the http module which is used to call the get and post methods or to interact with the server to fetch the records. Call the url, like in ajax we have success and error methods, here we have, then() block, which after fetching successful response, has the logic what to do next. Actually, the $http returns a promise, so we catch that in the then block and attach the response to the scope. The different $hhtp methods are:
- $http.get:- To retrieve information from server for a url requested by the user
- $http.head:- Transfers only the header and the status line only, but is same as GET
- $http.post:- As self explanatory it is, it is used to send the information entered by user to the server.
- $http.put:- This is same as the POSt but is used to create the current reprsentation of the target resource or overwrite it for the same URL
- $http.delete:- This ensures that the current resource for the requested URL is deleted by the server.
The catch finally is same as the try.. catch.. blocks, where inside the catch we can also have the ‘then’ block in order to perform tasks after catch and similarly the ‘finally’ block to ensure what finally the code block will execute.
Filters in Angular JS
These are very interesting features provided by the Angular, which can be frequently used and with ease. We will discuss below the pre-defined filters provided by the framework. We will see the use syntactically after the line by line explanation.
- currency:- This is used as the name suggests, convert a simple number into the format of a currency.
- date:- This is used to format dates in different formats.
- filter:- An interesting filter which actually filters few data from a set of result set data.
- json:- formats an normal object into JSON format
- limitTo:- limits an set of array to specified number of elements or objects.
- lowercase:- converts/formats an string to lower case character.
- number:- formats a simple number into a string.
- orderby:- Orders an array based on an expression.
- uppercase:- Formats the string into a upper case character.
Lets see the work around using the snippets:
var app = angular.module('app-Services', []);
app.controller('myFirstController', function($scope) {
    $scope.firstName = "Suraj";
    $scope.lastName = "Sahoo";
});
<html>
<body>
<div ng-app="app-Services" ng-controller="myFistController as ctrlFirst">
<span>{{ctrlFirst.firstName | uppercase}} {{ctrlFirst.lastName \ lowercase}}</span> //Displays firstName is UPPERCASE and lastName in lowercase
<ul>
  <li ng-repeat="name in names | orderBy:'age'">
    {{ x.name + ', ' + x.age}}
  </li>
</ul>
<span>{{price | currency}}</span>
<li ng-repeat="name in names | filter : 'S'">
    {{ name }} //Filters names based on names containing 'S'
  </li>
</div>
</body>
</html>
In the above snippets, we have used another directive i.e. ng-repeat, that is used to loop through the list of records just like foreach loop.
Another thing here to note is that the filter used in the above snippet, if we use the object containing the data or list of records/names suppose like:
<p><input type="text" ng-model="nameFilter"></p>
<ul>
  <li ng-repeat="name in names | filter:nameFilter">
    {{ name }}
  </li>
</ul>
What the above snippet does is, it loops through the names and based on the entry in the textbox or the user input, Like suppose user enters ‘S’, then the data listed are filtered on the object with the names that Starts With ‘S’.
Thus, we saw how these filters become handy and really useful.
Conclusion
Thus, here in this part we discussed about most of the great features of Angular and saw a few snippets to be used in progress. As I said earlier, in the succeeding modules we will gradually come across more interesting features and overall use of Angular.
Whats Next??
We will next come across how to build applications using Asp.NET MVC, EF Code First, Angular JS. That I assure would be interesting.
References
W3 schools
docs.angularjs.org
Introduction
The stand out hero in the market now. AngularJs it is from Google, intensifying the effectiveness of the plain HTML. There has been a constant and roaring buzz in the market on this. We have heard of MVC (Model-View-Controller), MVVM (Model-View-ViewModel) and many more framework. This is simple Javascript framework based on MVW framework.
MVW??
Ok now what is MVW!! It stands for Model-View-Whatever . Like Salman Khan says, Whatever you want to do man!! Just Do! So Angular says, Add Whatever you want man!!
The reason being is, it is actually close to MVC, MVVM and MVP as well. Earlier it had concepts related to MVC, but after the modification and enhancements and addition of the $scope, it came closer to MVVM framework as well. Thus, the framework became MVW.
Before we start hand on Angular, we need to have the resources required by it and start experimenting in a normal text editor like Notepad++ or Sublime Text. So is it time taking hectic!! Not at all, just navigate now to Angular JS Resources Download add the resources and just start. Even better way!! Just add the below CDN resources and just start.
<script src="https://ajax.googleapis.com/ajax/libs/angularjs/1.3.15/angular.min.js"></script>
Some concepts
Now we have seen a lot of resources explaining the concepts thats new and interesting in Angular JS. Lets get a brief over view on each of the important concepts.
Angular Expressions
This is actually how Angular binds data onto the HTML and makes it dynamic in seconds. The syntax is {{ exp }}. Whatever is written in the braces, that data is bound to the HTML element.
<div ng-app="">
My age is: {{ 15 + 10 }}
</div>
My age is: {{ 15 + 10 }} //Actual angular is used here.
This will display My age is 25 in normal HTML as well.
But one thing, please read further, only this will not let you display the evaluated value.
Angular directives
These are kinds of attributes added to the HTML elements, thus extending a new range of attributes to the HTML. ng- is the attribute syntax, just like data- attributes. There are flexibility in the directives as well. There are few in-build directives and there are directives we can create explicitly. Few of them are listed below along with a detailed example of their usage. Lets follow:
- First and foremost directive is ng-app: This is utmost important directive as it starts/initiates the Angular application inside the HTML. If we remove the ng-app directive then the evaluation will fail as the Angular will not initiate.
- ng-model: This is another important directive which actually makes our HTML dynamic as it stores the data/handles the data for the form or HTML controls which we add n the web pages.
- ng-init: This is responsible to initiate the data for the model properties, in order to have some values pre-populated.
Let’s have a look at a simple code snippet:
<div ng-app="">
<input type="text" ng-model="firstName">
<input type="text" ng-model="lastName">
<span>{{firstName}} {{lastName}}</span>
</div>
Here the ng-model binds the firstName and the lastName as you type in the text box to give a dynamic feel.
To make the default names appear on the screen on the page load, we can use the ng-init to initiate the data for the model, just like below:
<div ng-app="" ng-init="firstName='Suraj';lastName='Sahoo'">
<input type="text" ng-model="firstName">
<input type="text" ng-model="lastName">
<span>{{firstName}} {{lastName}}</span>
</div>
Angular JS – MVC
Angular JS, as we mentioned above follows MVC architecture in the background. In the above simple snippets as we saw, how the data is bound to the view from the model values and presented on the UI.
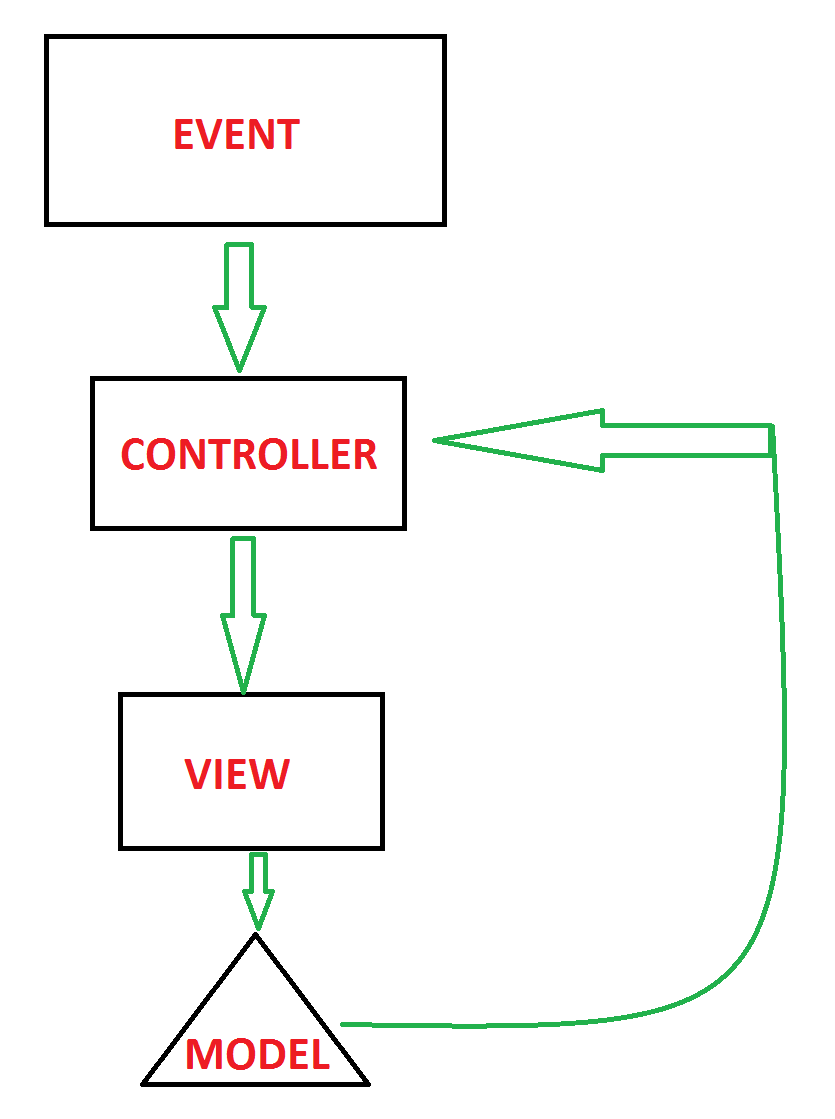
Thus when the event is fired the Angular Controller is reponsible to fetch the data from http services using the $http.get(url) which in turn then binds data to the model using the ng-model and then data is dynamically bound to the view/html element. The concept here is similar and we will learn more on this once we follow up with the controllers and modules in Angular.
Conclusion
This was all about the start and simple directives to get your hands on Angular JS. In the succeeding modules and blogs, we will discuss more in details.
Hand on Snippet
<!DOCTYPE html>
<html>
<head>
<script src="https://ajax.googleapis.com/ajax/libs/angularjs/1.4.8/angular.min.js"></script>
</head>
<body>
<h2>Welcome To Angular World</h2>
<div ng-app="" class="form-group">
<label>First Name</label><br>
<input type="text" ng-model="firstName" class="form-control"><br>
<label>Last Name</label><br>
<input type="text" ng-model="lastName"><br>
<br>
<span> Your Name is: {{firstName}} {{lastName}}</span>
</div>
</body>
</html>
What’s Next
- Modular approach: Creating Modules in Angular ng-module
- Controllers in Angular ng-controller
- Scope in Angular $scope
- Server interaction and binding data from APIs in MVC & Http Services $http
Generating PDF from your web applications is easy, simple and reliable. There are many tools/packages available in the Nuget. Here, in this article we would learn how to use Rotativa in the MVC applications. Rotativa makes it very easy to generate pdf from an HTML. It is actually derived version of wkhtmltopdf which converts html to pdf. The browsers as they use the webkit engine to render the HTML. According to wiki, WebKit is a layout engine software component for rendering webpages in web browsers. Making custom changes to the pdf document generated is quite simple too. Using this we can directly download the pdf document for the user or else we can also prompt the document inside an i-frame. Lets see how to implement this wonderful tool.
Implementation
Ofcourse, we need to install the package before starting the implementation. To install the package from the package manager console, the command goes like:
Install-Package Rotativa
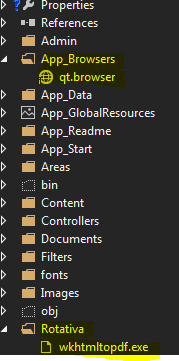
Then, we can find the rotativa reference under the reference, with a separate folder named ‘Rotativa’ with the following contents.
Another folder named App_Browsers which has the contents required by the package Rotativa.
Now we are ready to implement the Rotativa using the codes we will discuss below to generate pdf to directly download it as well as show it in another window. Thus, lets have a look.
To implement the pdf using rotativa, we just need to specify the codes below in a separate action method.
public ActionResult Test()
        {
            var students = new List<xx>
            {
                new xx() {action = "ABC", email = "[email protected]", firstName = "test", lastName = "test"},
                new xx() {action = "ABC", email = "[email protected]", firstName = "test", lastName = "test"},
                new xx() {action = "ABC", email = "[email protected]", firstName = "test", lastName = "test"},
                new xx() {action = "ABC", email = "[email protected]", firstName = "test", lastName = "test"}
            };

            return new Rotativa.ViewAsPdf("TestView", students);
        }
The above code is a simple action method, where we have created a new model and then as we can see, the return statement here, new Rotativa.ViewAsPdf(“TestView”,students). This states that a new rotativa type is created which is used to view the pdf. To this method as you can see, we have passed the first parameter as the View Name and the second parameter as the View Model set for the view. Only the view name can also be used/passed to the overloaded parameter of that method.
- ViewAsPdf:- This method just displays the view as pdf in the same window and to display the same pdf in another window, we can manipulate in the javascript as
window.open(url)
- ViewAsPdf-To Download:-This is not property method of the Rotativa class, but can be used differently to download directly the pdf file. Lets see the code below:
public ActionResult Test()
        {

            var pdfResult = new ViewAsPdf("TestView")
            {
                FileName = "ExamReport.pdf",
                CustomSwitches =
                    "--footer-center \"Name: " + "XYZ" + "  DOS: " +
                    DateTime.Now.Date.ToString("MM/dd/yyyy") + "  Page: [page]/[toPage]\"" +
                    " --footer-line --footer-font-size \"9\" --footer-spacing 6 --footer-font-name \"calibri light\""
            };

           return pdfResult;

        }
Just user to declare a new type as ViewAsPdf and just return to the action. This will directly download the file for you. - ActionAsPdf:- This would return the specified action which returns a view with a viewmodel as pdf. The code would go as below:
public ActionResult Test(int testID)
{
     var students = new List<xx>
            {
                new xx() {action = "ABC", email = "[email protected]", firstName = "test", lastName = "test"},
                new xx() {action = "ABC", email = "[email protected]", firstName = "test", lastName = "test"},
                new xx() {action = "ABC", email = "[email protected]", firstName = "test", lastName = "test"},
                new xx() {action = "ABC", email = "[email protected]", firstName = "test", lastName = "test"}
            };
    // code to retrieve data from a database
    return View(students);
}
These are the common methods being used usually.
Now, There is another beautiful thing to mark here. The customization which can be done to the pdf files. The use of Custom Switches.
var pdfResult = new ViewAsPdf("TestView")
            {
                FileName = "ExamReport.pdf",
                CustomSwitches =
                    "--footer-center \"Name: " + "XYZ" + "  DOS: " +
                    DateTime.Now.Date.ToString("MM/dd/yyyy") + "  Page: [page]/[toPage]\"" +
                    " --footer-line --footer-font-size \"9\" --footer-spacing 6 --footer-font-name \"calibri light\""
            };
The FileName property is used to set the file name for the pdf being downloaded. The Custom Switches is the best property. As we can mark the structure is bit messy, but is not cumbersome. Based on the wkhtmltopdf there are a list of options which can be used to customize the PDF file. Here in the above code snippet, we have a footer customized.
- –footer-center:- This aligns the footer at the center foot of the page.
- Page:[page]/[toPage]:- The [page] to [toPage] marks the current page and the total number of pages in the file.
- –footer-line:-Displays line above the footer
- –footer-font-size:-Sets the font size of the footer elements
- –footer-spacing:-Sets the spacing between the footer-line and the text
- –footer-font-name:-Sets the font family/style of text
For more options and details please visit the url –wkhtmltopdf
Conclusion & References
Thus, we saw how easy it is to implement the Rotativa in MVC applications and generate a pdf in minutes. Implement and enjoy
References:
wkhtmltopdf
Nuget Rotativa
Github Rotativa
]]>- SQL Basics
- Introduction
- What is a database?
- What does Relational mean?
- A small example
- SQL Statement
- Naming Things
- Creating Things
- Everything about SELECT Statement
- Introduction
- FROM Clause
- Limiting Result Set
- WHERE Clause
- WHERE Clause
- AND OR
- MORE Operators
- BETWEEN
- LIKE
- IN
- IS and ISNOT
SQL Basics
Introduction
Before I begin, this article is intended to each and every beginner may it be a Software Developer or a Quality Analyst, this is a must know for every software engineer. Some might say we have Database administrator, then why should we, but I feel being developer one should know all round knowledge of whats going on and handle everything.
Here in this article I will be explaining each and every concept in details to get started with SQL (Structured Query Language).
First of all, the question ![]() going on your mind now would be what is SQL?
going on your mind now would be what is SQL?
As mentioned above, SQL stands for Structured Query Language. It is a special-purpose programming language. Its purpose is to manipulate relational databases. Relational databases are one which have detailed information about all the tables in a formally organized manner. The best part here is it contains both the data-definition syntax as well as data-manipulation syntax.
What is a Database?
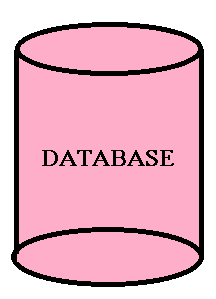
Now the diagram describes what it is. Database is simple a container that helps organize data in a format or constructive manner. In a database data is stored in a rational way. Now, lets take an example that would make help understand better. For instance our contact list in cell phones. If we think a bit into it, then we realize the contact list is a database with data in it in an organized manner. Then we sort by the letters search the names from the list. Thus we perform query execution on the list to retrieve the records we want. This is the flexibility a simple database provides us. It makes it easier to:
- Query Data
- Update Data
- Insert New Data
- Delete Data
There are basically three types of Databases available:
- Relational Database
- Object-Oriented:-Link to refer
- Document Based:-Link to refer
We will be discussing only on the Relational Database as that is commonly used. I have provided the links to the other types of databases for reference.
What is Relational?
The dictionary meaning to this is “Things that relate each other in a way”. Here the meaning does keeps it consistency. Relational model is the database model on which SQL is based. It is thus a way to describe data and the relationship between those data entities.
In a relational database, data is stored in a construct called Table. Now what is a Table?
- A table is a collection of columns that define the table properties with specific datatype associated, with specific size, thus restricting the size of each record to be inserted into the table.
- Every column can be made required or not required(using the check box available for Null values).
- Rows can be retrieved by asking questions about the data. Like “You would need all the rows of data that have a column(surname) value as having value ‘Ray'”
- An essential part of a table is “Key”. Every table must have a key associated with any column to uniquely identify a table. Usually a table is associated with a key called Primary Key.(We will be discussing about keys in the upcomin modules).
- If more than one table uses the same primary key (one table-Primary key and other named foreign key), then the tables can be merged or joined to give different set of records set.
A small Example
Before starting with the, I hope the readers have a view of the SSMS (SQL Server Management Studio). Here is how the SSMS looks like:
Now lets ask questions to ourself. Why do we at all need database with multiple tables, why not a single table! lets check with an example why?
Suppose we have a User table which would have columns named UserID, FName, LName, Email & PhNo. Now suppose we have only this table and there is a requirement in the future that a user may have more than one Phone number or more than one Email. Just think how would we approch to this, as we cannot store multiple values into a column. Thus, does not this give us an indication to have another table! Just see the difference below:-
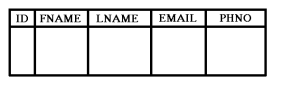
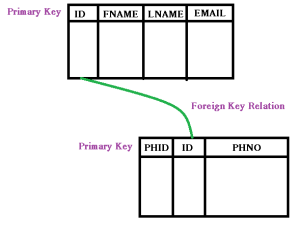
In the above figures, you can see the difference clearly, using the first table will cause real problem and a lot of redundant data/records in the table which anyway violates the Normalization rules (Normalization Rules). Thus creating the secod table which would be having a foreign key relationship with the User table, can now store as many phone numbers as a user can have.
SQL Statement
- A SQL statement is framed from the combination of actionable set of vali words out of which some are SSMS defined and others are user defined.
- A valid SQL statement would be if a statement/query ends with a semicolon (;), it is not like that its mandatory to add semicolon at the end. But it is a part of the ANSI standard, so itisadvisable to use the semicolon at the end of the statement.
- SQL is not case-sensitive. Usually the queries/statements are written in Caps(Capitals). Sometimes the user-defined functions are in the lower case. But oviously the standard needs to be followed for better maintenance and maintain consistency.
- In SQL statement, we can put comments. For single line comments, “–” is used as predecessor for the query as single line comment where as “/**/”, is used for the query as multiple line comments.
- SQL statements start with commands. Comparing with the english language, the commands here are similar to the verbs. For example, SELECT(Command/keyword in SQL)
In generic terms, SELECT would go like below:SELECT VALUES FROM TABLE NAME;
After the command comes the part that is highly dependent on the commands that is to define the set of result/records we would expect from the query like a list of all values of the columns (genrally the wildcard symbol “*” asterix is used to select all columns in table). Then is the FROM clause which is used to fetch records/ column values from which table(as it explains itself).
Naming Things
This might be a bit controversial, as there is nothing called best way to do. So we follow what is followed the most, or follow the conventions already been used. This would differ from person to person. But the most important factor to keep in mind is to have consistency through out. So, that when we see the database the names of the tables define themselves. Some of the rules I am listing below:
- Table name should be singular. A table name describes what the values would be in a row. It is not a hard bound rule, but a rule.
- Column names in a table should not repeat themselves and also same applies at the database level. The repeatation is only allowed when there is a relationship between tables.
- Names are “scoped” in SQL. What this means is a database would have a name. Tables inside database should have a name. Thus while accessing the table, it should be accessed with its “full” name wj=hich would include the database name, separated by periods.
Like TableName:- DatabaseName.Table
ColumnName:- Table.Column
Creating Things
There is a whole set of SQL commands which are required to create and modify the structures/records in the database.
CREATE DATABASE DemoDatabase;
USE DemoDatabase;
CREATE Table DemoDatabase.DemoTable(…);
Here I have only shown the structures, we will be discussing more that ahead.
Datatypes are very vital when we will be creating the tables in a database. Each column in a database has restriction on the datatype of the data that can be stored in the table.
Lets have a look at the datatypes:-
| Data Type | Value/Space |
|---|---|
| CHARACTER | Can hold ‘N’ number of characters which are specified implicitly, to be exact statically that is the number of characters to be accepted in the vallue is set at the time of column creation |
| VARYING CHARACTER | Can hold ‘N’ characters which is set dynamically, that is if MAX is set then it would accept any number of characters sent from the server into the column. |
| BINARY | Stores Hexadecimal data, fixed length with a length of n bytes, where n varies from 1 through 8,000. Used for images and other sort of blobs. |
| VAR BINARY | As the name suggests, it accepts value of varying length. When size is not specified, then default value is taken as 1. |
| SMALLINT | Its length is 2 bytes and ranges from -2^15 (-32,768) to 2^15-1 (32,767) |
| INT | Its length is 4 bytes and ranges from -2^31 (-2,147,483,648) to 2^31-1 (2,147,483,647) |
| BIGINT | Its length is 8 bytes and ranges from -2^63 (-9,223,372,036,854,775,808) to 2^63-1 (9,223,372,036,854,775,807) |
| TINYINT | Its length is 1 byte and ranges from 0-255. Can be used for values with Yes/No or the enumeration types which are limited to fewer values |
| BOOLEAN | Stores TRUE FALSE values. When NOT NULLABLE, then default value is False, else it also accept NULL values. |
| DATE | Stores only Date values, only YEAR MONTH & DAY values in the format YYYY–MM–DD |
| TIME | Stores only time values, only HOUR MINUTE & SECONDS values of a day in the format HH–MM–SS |
| TIMESTAMP | Stores both date & time. This is when date is combined with time of a day with the seconds. Format is just concating both date format and time format |
These are some of the datatypes, I have listed out. The important thing here to keep in mind is, while creating the table, we never actually keep in mind. Thus the datatype play a very important role if we consider the future. Suppose we use the number of user or the userid in a table datatype as smallint or only int even, then sometimes in future may be the number of users increases to a large extent and overlaps the range of the datatypes. Then here the problem arises. You might have heard about the youtube crash for the Gangnam song. The reason behind it was this the issue with the datatype for the number of views..It increased to such extent that it crashed.
Relational Database Management System is based on the relational model. In simple terms, it is a type of database management which stores data in realated tables.
Everything about SELECT statement
Introduction
As we have already discussed about the SSMS where we will be demonstrating our queries. After you read through this part of the article, you would be able to understand the details of using the SELECT statement, asking different types of questions to the select query.
First of all, we store the data in a database to reuse it at some later point of time. Querying data is all about asking questions while retrieving data. Understanding the combination of english and the SQL helps us postulate the queries very easily.
Lets create a database first. Look below at the query.
CREATE DATABASE QUERY:
CREATE DATABASE DemoDatabase;
The above query using the master creates the database named “DemoDatabase”.You can also directly create database using the SSMS UI. See the below images.
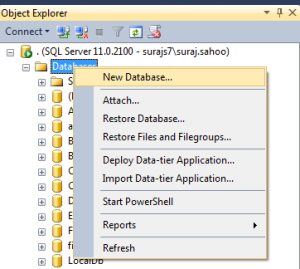
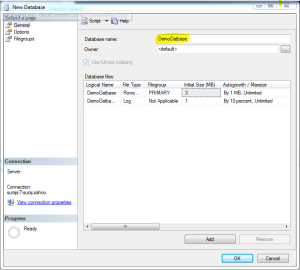
When in the first image as you see, the New Database is clicked, another window pops upas shown in the second image. Add the database name and there and it creates the database for you with a maxsize of unlimited.
Then we create a Table for the storage of records.
CREATING A TABLE:
USE DemoDatabase
CREATE TABLE [dbo].[User](
	[UserId] [int] IDENTITY(1,1) NOT NULL,
	[UserName] [nvarchar](50) NULL,
	[Password] [nvarchar](50) NULL,
	[UserEmail] [nvarchar](50) NULL,
 CONSTRAINT [PK_User] PRIMARY KEY CLUSTERED
(
	[UserId]
)WITH (PAD_INDEX = OFF, STATISTICS_NORECOMPUTE = OFF, IGNORE_DUP_KEY = OFF, ALLOW_ROW_LOCKS = ON, ALLOW_PAGE_LOCKS = ON) ON [PRIMARY]
) ON [PRIMARY]
Now the above query creates a table for you, but we need to understand the commands used in the query as some seem understandable where as some are not.
PAD_INDEX:- Specifies the index padding. The default is OFF. More info.
STATISTICS_NORECOMPUTE:- Creation & Recreation of index & auto update of the columns statistics. More info.
ALLOW_ROW_LOCKS:- Enhances performances by locking the entire table rather than locking individual row. By default SQL sets to ON More info.
ALLOW_PAGE_LOCKS:- Set to TRUE/ON when there are chances of high concurrency in order to improve performance. By default SQL sets to ON More info.
Thus, we have created a database which now has a table named User. Now for your information, we can also create table using the SSMS UI as we have done for the database.
We open up the database tree structure and find Tables as a chile tree under it.
We right click on that and select New Table, we get a different UI in the query window now asking for the column names and the datatypes also to set the Nullable/NonNullable with a check box, then lets view the images:
Add the Primary key column and set it as Primary Key like below:
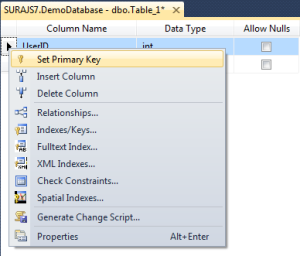 Then we need to set the column as an identity column which will be auto-incremented by 1 everytime a new row is added. The developer need not bother abput incrementing or setting the primary key. Set it as below:

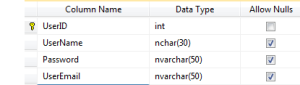
Then we add all the columns with the datatypes mentioned above and save the table with a proper table name. Now here the checkbox for the Nullable column plays a vital role. Think and specify the value here. Finally the UI looks like below:
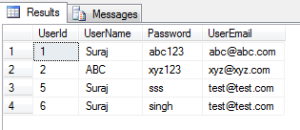
Thus, now we have created a table also. Now it is time to add records/rows into it. We willbe writing queries to insert the values into the table. Lets see how:
INSERT ROWS INTO TABLE:
INSERT INTO dbo.[User] (UserName,Password,UserEmail)
VALUES ('Suraj','abc123','[email protected]');
Here as you can see we have added only the three column values as the primary key userId is auto-incremented i.e. an Identity column. Thus, this adds the values. For a faster approach, usually developers use the SSMS UI here also to add the records.
We right click on the specific table into which we will be adding records, then click on Edit Top 200(default value) items.
Then we see in a new query window the table columns with the rows of records already added and a default empty row where we will be adding the values like below:
 here we add the values in the row containing NULL values. The Primary key column is non editable as it will increment itself. The other columns are populated with the values to set the table records.
Now lets get back to our topic of discussion Select:
1. Select all records from the table:
SELECT * FROM dbo.[User]
This query is very simple and easy to understand. Here the FROM clause is used which is easy when we retrieve data from a single table. As mentioned above ‘*’ relates to all columns in a table. Thus, the above query returns all the records of all the columns.
Another, point here is if we select some columns out of all columns then we should/must qualify the column names in the Select list of the query.we can bring in the concept of ‘aliasing’ in our next query which selects some columns in the table.
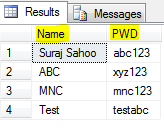
2. Select fewer columns from the table:
SELECT users.UserName as Name, users.Password as PWD FROM dbo.[User] as users
The above query returns only the User name column as Name and the Password column as PWD in the result set. This is the power of alias, it changes the column head names. Below is the sample result set:
 Similarly you can use shorter Table alias names and use it through out your query for convinence and select as many and the specific columns you need from the table.
There are various ways for limiting the result sets we get. By default all the rows that match the From clause query are retrieved in the result set. There are two different ways to limit the result set of the Select statement.
One is to add conditions to the Query after From clause.
Anoother is to add the DISTINCT qualifier to the Select statement. Distinct is a result set qualifier. Also TOP (number) can be used to limit the result set.
We will see the second type here and move to the condition type consequently.
3. Select Distinct Rows :
SELECT DISTINCT users.UserName as Name FROM dbo.[User] as users;
This query returns all the rows that are distinct based on the names values.
4. Select some rows from TOP:
SELECT TOP 500 users.UserName as Name FROM dbo.[User] as users;
This would return only the top 500 rows no matter how many in total we get as result set.
Next we discuss about the conditions type:
WHERE Clause
This is used after the FROM clause and can be thought of a search from the records using the conditions based on which we would be doing the result search. Searching with lot more precision. The body of the where clause will be one or more expressions with return value as True/False. If the response is true based on the conditions for a specific row coming under the check, then the row gets added to the result set which is retrieved finally from the query.
A simple example here would be Get the list of records/users whose name is ‘Suraj’
5. Select users with UserName as ‘Suraj’:
SELECT * FROM dbo.[User] as users
WHERE users.UserName = 'Suraj' ;
This selects all the users with the username as Suraj, usually this is made as Firstname as Suraj. Thus the result set would look like below:
To master the WHERE clause in SQL we need to master how all the operators available behave. Lets have a look at the operators available with the WHERE clause in SQL and how would they behave:
| Datatype | Behaviour |
|---|---|
| Eqals ‘=’ | Returns true if both the conditions on left and right hand side matches |
| Not Equals to ‘<>’ | Returns true if both the conditions on left and right hand side do not match |
| Greater than ‘>’ | Returns true is the value on the left hand side is larger than the right hand side value |
| Less than ‘<‘ | Returns true is the value on the left hand side is smaller than the right hand side value |
| Greater than or equal to ‘>=’ | Returns true is the value on the left hand side is larger than or same as the right hand side value |
| Less than or equal to ‘<=’ | Returns true is the value on the left hand side is smaller than or same as the right hand side value |
Now lets have a look at the queries and how the behave when operators are applied. Here I will be applying operators on the string values.
6. Select the users with UserName greater than ‘Suraj’:
SELECT * FROM dbo.[User] as users
WHERE users.UserName > 'Suraj' ;
The result set here would return the name starting with alphabets more than ‘S’, but remember the check is for each letter until the greater than matches. Result set:
 Thus the name starting with ‘T’is displayed in the result.
Similarly less than and the other operators would work out.
7. Select the users with UserName less than ‘Suraj’:
SELECT * FROM dbo.[User] as users
WHERE users.UserName < 'Suraj' ;
8. Select the users with UserName not equal to ‘Suraj’ :
SELECT * FROM dbo.[User] as users
WHERE users.UserName <> 'Suraj' ;

Then lets peep into the AND OR operators. As we all know each boolean expression can be combined with other boolean expressions. These are combined by using the AND OR operator.
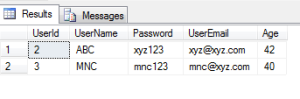
AND means that both the boolean expressions combined by using AND, both must evaluate to True for the row to satisfy to be a part of the result set. Like for example list out the users who have first name as Suraj and email as a specific value. Here as per the simple english language and is to be used here to evaluate and produce the result set.
9. Select the users with UserName as ‘Suraj’ & UserEmail as ‘[email protected]’:
SELECT * FROM dbo.[User] as users
WHERE users.UserName ='Suraj' AND users.UserEmail = '[email protected]';
The result set goes as below:
 Thus here in the result set, we can check that both the expressions on the sides of the AND operator turm out to be true for both the rows in the result set.
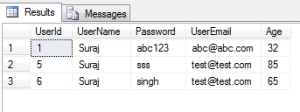
OR keyword means that any of the expressions on the either side of OR operator can be true, then the row becomes a part of the result set. That is when any of the expression satisfies then the row is a part. Just keep in mind if the first expression turns out to be true then the second expression is not evaluated. If first expression turns to be false, then the second expression is evaluated to be checked.
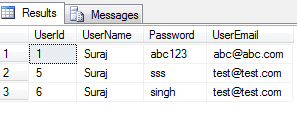
10. Select the users with UserName as ‘Suraj’ or UserEmail as ‘[email protected]’:
SELECT * FROM dbo.[User] as users
WHERE users.UserName ='Suraj' OR users.UserEmail = '[email protected]';
The result set is as below:
 As we see first when the first expression i.e. UserName is Suraj is a part of the result set and also the rows with UserEmail as ‘[email protected]’ .
BETWEEN operator acts on any column and taking two values checking the range. If a row value lies in the range specified in the BETWEEN condition, then the expression evaluates to True.
11. Select the users with age lying between specific value:
SELECT * FROM dbo.[User] as users
WHERE users.Age BETWEEN 25 AND 50 ;
The result set is as below:
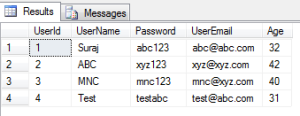 Thus the result set include only those rows where the Age lies between 25 and 50, others are neglected. Between in inclusive of the values being checked.
LIKE operator is a special one which is used with strings. When we give LIKE operator to the strings then it looks and search for those values of the string which match the pattern specified in the LIKE condition. For LIKE ‘%’ is used which is otherwise called wild card symbol. The % can be used anywhere in the string. Like for example, who all are the users whose names start with ‘S’.
12. Select the users with the UserName starting with letter ‘S’:
SELECT * FROM dbo.[User] as users
WHERE users.UserName LIKE 'S%' ;
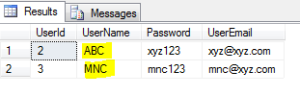
This gives the result with all the username starting with S. Thus we write Like ‘S%’ wild card symbol specified after the letter means starting with. Specifying wild card symbol at the beginning like ‘%S’ means all usernames ending with S.
SELECT * FROM dbo.[User] as users
WHERE users.UserName LIKE '%C' ;
 Thus this is the result set with the records where the column value UserName contains ‘C’.
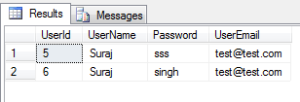
IN operator is another special operator which requires column and a list of specified/valued values. Values can be of any datatype. If a row column value matches any of the specified values in the list used for the IN operator, then the row is added to the result set.
SELECT * FROM dbo.[User] as users
WHERE users.UserName IN ('Suraj' , 'test') ;
This gives the result set having all Users with user name Suraj and test. Thus the IN operator seems to overlap with the BETWEEN operator, but they are different in some scenarios.
IS operator is less used and a special keyword, which is usedto check for NULL values. An interesting thing to keep in mind is that the NULL values are not assignable to the ‘=’ operator & its complement is ISNOT.
Conclusion
Thus here I have tried to specify the basics in SQL. As I have mentioned I have tried here, so if any queries, suggestions & concerns are most welcome. Please raise lets discuss and clear out and keep sharing.
References
MSDN
Introduction to SQL by John Flanders.
SQL authority by Pinal Dave
W3 schools
ELMAH, Error Logging Modules & Handlers is a tool for debugging mainly ASP.NET applications suggested by wiki. As we all know there is always a chance of getting exceptions while working on any applications. Handling them is a real challenge for many developers. But if we have a tool, that gives us the details of the exceptions or errors with the stack trace as well. Apart from showing the users the yellow screen of death, we show the users a customized error page, but for the developers if any exceptions occur instead of having a try catch block at every method, ELMAH provides them the details of the exceptions with the entire stack trace and solve the issue based on the error code. For more information on error codes and redirect please follow one of my other articles Custom Errors. Lets get into more details how this beautiful tool works.
What we get?
You would be wondering what this ELMAH gives us after adding this into the application? Straight from the Hanselmen’s blog, ELMAH would give us the following without changing a single peice of code. Since the ELMAH includes Modules and Handlers, it greatly supports HttpModules and Http Handlers.
- All unhandled exceptions(Null reference, Out of bound exception, etc.) are logged in the ELMAH interface
- A webpage can remotely view the logged detailed exceptions
- Since this shows the entire stack trace, the so called yellow screen of death can also be seen but in the ELMAH interface
- ELMAH also gives an opportunity to store the exceptions or log them into tables (SSMS).
<customerrors mode="On" defaultredirect="/Default/Error">
    <error statuscode="404" redirect="/Default/NotfoundError">
</error></customerrors>
When suppose the above is the case, then the user using the application, lands on the above redirect path url pages, where as the error and exception are managed by ELMAH and mailed or logged into the database for future reference for the developers.
Installation for an existing MVC project
Step 1: Go to references and right click on the Manage Nuget Packages

Step 2: Search online for Elmah.MVC
Step 3: After the succesful installation, you can check the package.config for the version of elmah installed shown below:

Step 4: You need to ensure then the below web.config configurations as shown in the images below:
<sectionGroup name="elmah">
      <section name="security" requirePermission="false" type="Elmah.SecuritySectionHandler, Elmah" />
      <section name="errorLog" requirePermission="false" type="Elmah.ErrorLogSectionHandler, Elmah" />
      <section name="errorMail" requirePermission="false" type="Elmah.ErrorMailSectionHandler, Elmah" />
      <section name="errorFilter" requirePermission="false" type="Elmah.ErrorFilterSectionHandler, Elmah" />
    </sectionGroup>
<system.web>
    <authentication mode="None" />
    <compilation debug="true" targetFramework="4.5.1" />
    <httpRuntime targetFramework="4.5.1" />
    <httpModules>
      <add name="ErrorLog" type="Elmah.ErrorLogModule, Elmah" />
    </httpModules>
    <httpHandlers>
      <add verb="POST,GET,HEAD" path="elmah.axd" type="Elmah.ErrorLogPageFactory, Elmah" />
    </httpHandlers>
  </system.web>
<system.webServer>
    <modules>
      <add name="ErrorLog" type="Elmah.ErrorLogModule, Elmah" />
    </modules>
    <handlers>
      <add name="Elmah" verb="POST,GET,HEAD" path="elmah.axd" type="Elmah.ErrorLogPageFactory, Elmah" />
    </handlers>
</system.webServer>
<elmah>
    <security allowRemoteAccess="yes" />// To allow remote access
  </elmah>
Now everything is set for developers to check for the internal exceptions occured. But how to access the ELMAH interface? It is simple, just use the path url succeding with /elmah.axd then done you see the list of exceptions/errors occured. The interface would look like below image:

Integration of ELMAH to GMAIL
Yes guys you heard h=it right as the heading says, we can integrate email settings into the ELMAH and send the entire stack trace and exception details as mail to multiple users using a subject too.
Below I would be discussing the integration and set up for the mail settings. here I use the Gmail setting. The best part here is the change is only done at the web.config level. Below are the proper configurations.
- First in the system.webServer/modules section add the below peice of line. The final module is below:
<modules runAllManagedModulesForAllRequests="true">
      <add name="ErrorLog" type="Elmah.ErrorLogModule, Elmah" preCondition="managedHandler" />
      <add name="ErrorMail" type="Elmah.ErrorMailModule, Elmah" preCondition="managedHandler" />
    </modules>
- Then after adding this module section, we need a set up for the Gmail in the system.net/mailSettings section as below:
<system.net>
    <mailSettings>
      <smtp from="[email protected]">
        <network host="smtp.gmail.com" port="587" userName="*****" password="***" enableSsl="true" />
      </smtp>
    </mailSettings>
  </system.net>
Just remember you need to set your gmail username and password. Google Mail is very smart and doesnot simply ets the mail come or the application to sign in into the gmail, as that may be from an unauthenticated source. To avoid this, you need to follow the mail which Google will send you and you need to approve that you want that Ip source to use your mail settings to send mail. Thus, you make google happy. - Then finally we need to set the elmah section with the following block:
<elmah>
    <security allowRemoteAccess="yes" />
    <errorMail from="[email protected]" to="[email protected]" subject="DEMO Error" async="false" useSsl="true" />
  </elmah>
Thus, all set now our application/ELMAH is smart enough to understand the configurations and send mails to the specified users. Remember in the above block “to”, you can specify more than one mail addresses separated by comma. Thus, have a look at the image below to see how the mail looks like: - The above is a part of how the mail looks like.

Thus, we have discussed everything related to ELMAH. In the upcoming article/blog I will be explaining how to store into tables using connection strings. The interaction of Sql server of ELMAH.