In today’s tech world, most of the applications being developed under Logistics, Inventory, Internal Transaction and other domains require day-to-day data in excel files and prefer excel file operations in their applications.
I will be sharing one of the Nuget Package tool, which wil very minimal lines of code will export an excel file for us.
The Tool is Closed XML.

Just write a few lines of code and done! It is developer friendly. If we have used the Open XML, there are a lot of lines of code which are required to export an excel fron data. We can create excel file of 2007/2010 configuration without even Excel application.
To add the closed XML package, we add directly through the user interface, from the Nuget Gallery and also, we can use the Package Manager console to add the package using the below command
PM> Install-Package ClosedXML
Snippet!
DataTable dt = new DataTable();
dt.Columns.AddRange(new DataColumn[3] { new DataColumn("Id", typeof(int)),
new DataColumn("Name", typeof(string)),
new DataColumn("Country",typeof(string)) });
dt.Rows.Add(1, "C Sharp corner", "United States");
dt.Rows.Add(2, "Suraj", "India");
dt.Rows.Add(3, "Test User", "France");
dt.Rows.Add(4, "Developer", "Russia");
//Exporting to Excel
string folderPath = "C:\\Excel\\";
if (!Directory.Exists(folderPath))
{
Directory.CreateDirectory(folderPath);
}
//Codes for the Closed XML
using (XLWorkbook wb = new XLWorkbook())
{
wb.Worksheets.Add(dt, "Customers");
//wb.SaveAs(folderPath + "DataGridViewExport.xlsx");
string myName = Server.UrlEncode("Test" + "_" + DateTime.Now.ToShortDateString() + ".xlsx");
MemoryStream stream = GetStream(wb);// The method is defined below
Response.Clear();
Response.Buffer = true;
Response.AddHeader("content-disposition", "attachment; filename=" + myName);
Response.ContentType = "application/vnd.ms-excel";
Response.BinaryWrite(stream.ToArray());
Response.End();
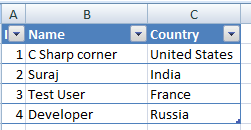
}The above code, instantiates a data table, with few data initialization.
public MemoryStream GetStream(XLWorkbook excelWorkbook)
        {
            MemoryStream fs = new MemoryStream();
            excelWorkbook.SaveAs(fs);
            fs.Position = 0;
            return fs;
        }
We are using this method, so as to return a stream inorder to download the file in response using the stream. The save as method of the Closed XMl, helps create the stream.
Downloaded file looks like below:
Conclusion
Here, I have shared the code where hard coded values are added, this is not the case everytime. We can always use the records from the database and create them as a datatable and then use the Closed XML. This really reduces a lot of codes which is used in Open XML package. So, developers try it!! I will be sharing another article where I would show, how to Import the same exported excel file using Bulk copy using SQL Bulk copy.
]]>Generating PDF from your web applications is easy, simple and reliable. There are many tools/packages available in the Nuget. Here, in this article we would learn how to use Rotativa in the MVC applications. Rotativa makes it very easy to generate pdf from an HTML. It is actually derived version of wkhtmltopdf which converts html to pdf. The browsers as they use the webkit engine to render the HTML. According to wiki, WebKit is a layout engine software component for rendering webpages in web browsers. Making custom changes to the pdf document generated is quite simple too. Using this we can directly download the pdf document for the user or else we can also prompt the document inside an i-frame. Lets see how to implement this wonderful tool.
Implementation
Ofcourse, we need to install the package before starting the implementation. To install the package from the package manager console, the command goes like:
Install-Package Rotativa
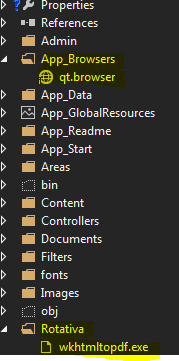
Then, we can find the rotativa reference under the reference, with a separate folder named ‘Rotativa’ with the following contents.
Another folder named App_Browsers which has the contents required by the package Rotativa.
Now we are ready to implement the Rotativa using the codes we will discuss below to generate pdf to directly download it as well as show it in another window. Thus, lets have a look.
To implement the pdf using rotativa, we just need to specify the codes below in a separate action method.
public ActionResult Test()
        {
            var students = new List<xx>
            {
                new xx() {action = "ABC", email = "[email protected]", firstName = "test", lastName = "test"},
                new xx() {action = "ABC", email = "[email protected]", firstName = "test", lastName = "test"},
                new xx() {action = "ABC", email = "[email protected]", firstName = "test", lastName = "test"},
                new xx() {action = "ABC", email = "[email protected]", firstName = "test", lastName = "test"}
            };

            return new Rotativa.ViewAsPdf("TestView", students);
        }
The above code is a simple action method, where we have created a new model and then as we can see, the return statement here, new Rotativa.ViewAsPdf(“TestView”,students). This states that a new rotativa type is created which is used to view the pdf. To this method as you can see, we have passed the first parameter as the View Name and the second parameter as the View Model set for the view. Only the view name can also be used/passed to the overloaded parameter of that method.
- ViewAsPdf:- This method just displays the view as pdf in the same window and to display the same pdf in another window, we can manipulate in the javascript as
window.open(url)
- ViewAsPdf-To Download:-This is not property method of the Rotativa class, but can be used differently to download directly the pdf file. Lets see the code below:
public ActionResult Test()
        {

            var pdfResult = new ViewAsPdf("TestView")
            {
                FileName = "ExamReport.pdf",
                CustomSwitches =
                    "--footer-center \"Name: " + "XYZ" + "  DOS: " +
                    DateTime.Now.Date.ToString("MM/dd/yyyy") + "  Page: [page]/[toPage]\"" +
                    " --footer-line --footer-font-size \"9\" --footer-spacing 6 --footer-font-name \"calibri light\""
            };

           return pdfResult;

        }
Just user to declare a new type as ViewAsPdf and just return to the action. This will directly download the file for you. - ActionAsPdf:- This would return the specified action which returns a view with a viewmodel as pdf. The code would go as below:
public ActionResult Test(int testID)
{
     var students = new List<xx>
            {
                new xx() {action = "ABC", email = "[email protected]", firstName = "test", lastName = "test"},
                new xx() {action = "ABC", email = "[email protected]", firstName = "test", lastName = "test"},
                new xx() {action = "ABC", email = "[email protected]", firstName = "test", lastName = "test"},
                new xx() {action = "ABC", email = "[email protected]", firstName = "test", lastName = "test"}
            };
    // code to retrieve data from a database
    return View(students);
}
These are the common methods being used usually.
Now, There is another beautiful thing to mark here. The customization which can be done to the pdf files. The use of Custom Switches.
var pdfResult = new ViewAsPdf("TestView")
            {
                FileName = "ExamReport.pdf",
                CustomSwitches =
                    "--footer-center \"Name: " + "XYZ" + "  DOS: " +
                    DateTime.Now.Date.ToString("MM/dd/yyyy") + "  Page: [page]/[toPage]\"" +
                    " --footer-line --footer-font-size \"9\" --footer-spacing 6 --footer-font-name \"calibri light\""
            };
The FileName property is used to set the file name for the pdf being downloaded. The Custom Switches is the best property. As we can mark the structure is bit messy, but is not cumbersome. Based on the wkhtmltopdf there are a list of options which can be used to customize the PDF file. Here in the above code snippet, we have a footer customized.
- –footer-center:- This aligns the footer at the center foot of the page.
- Page:[page]/[toPage]:- The [page] to [toPage] marks the current page and the total number of pages in the file.
- –footer-line:-Displays line above the footer
- –footer-font-size:-Sets the font size of the footer elements
- –footer-spacing:-Sets the spacing between the footer-line and the text
- –footer-font-name:-Sets the font family/style of text
For more options and details please visit the url –wkhtmltopdf
Conclusion & References
Thus, we saw how easy it is to implement the Rotativa in MVC applications and generate a pdf in minutes. Implement and enjoy
References:
wkhtmltopdf
Nuget Rotativa
Github Rotativa
]]>MVC Framework
MVC (Model View Controller), is simply a framework used to design web applications, as simple its definition could be.
- Model : This layer represents the core of an application. It is responsible for maintaining the data of the application or can be termed to be the Business layer.
- View : As the name says about itself, this layer displays the data fetched or the designs. This can be termed simply as Display layer.
- Controller : This handles the input to the database or fetches the data from the database records. This can be simply termed as Input layer.
The three layers are interconnected and are dependant on each other. The below figure will explain better:-
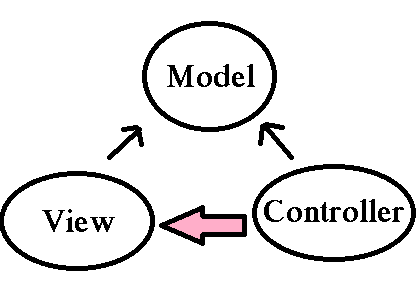 As we can see above, the Data layer or the Model that deals with the data is accessed both by the View and Controller. Here, in MVC there is separation between every laye, that helps in loose coupling the items and also in application development process. Now, one might wonder what exactly Separation of Concern means! This can be framed as there should not be or there should be minimal overlapping/dependancy of functions in an application. For example, take the scenario of the View and the Controller. Can they be separately done!! That is can their be no dependancy between them!! View is the presentation layer and the Controller is the action layer. We can have in real scenario a controller without a View, but a view without a controller sounds a bit radical. This is not necessarily true always. So, we can conclude here that Separation of Concern can be minimal but still lies a grey line. NOTE: Thus always have separate UI layer, Data access layer & Logic Layer in order to achieve clean separation.
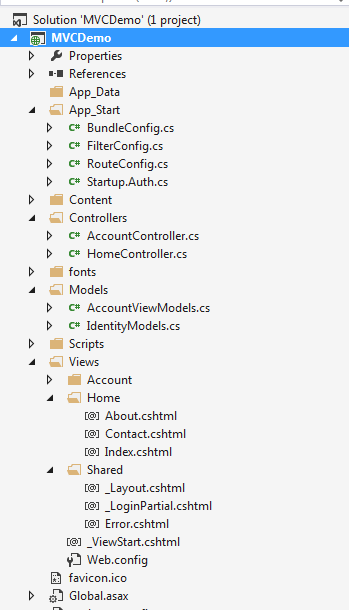
The above image displays the simple MVC folder structure. The Models having the Entities, Controllers as well as the Views for each controller, the shared folder having the master pages.
 Lets get into more details…..
Models
Models(in a bit more depth) : Contains all the application logic i.e.
- Business logic
- Validation Logic
- Data access logic
This holds as well as manipulates the data in the database. This folder contains the classes/entities that are required and present in the application.
Views
Views(in a bit more depth) : The View generally stores the Html files may it be .cshtml or .vbhtml (C# and VB) respectively. These may have extensions as html, asp, aspx. The interesting thing is every controller there is a view folder and for every action a view. There is always a Shared folder inside View, that is used to have the Layout or the Master pages.
Controllers
Controllers(in a bit more depth) : This contains the controller classes responsible for input and responses. The name of the Controller ends with Controller to distinguish. For example, “HomeController.cs”. Every controller implements the Icontroller interface from the System.Web.Mvc namespace.
public interface Icontroller {
void Execute(RequestContext requestContext);
}
The single method Execute is invoked when a request is targeted at the controller class. What happens to the request that comes to the application? The request that comes to the web application first goes through the UrlRoutingModule object (System.Web.Routing.UrlRoutingModule). The request gets parsed and then the route selection is done. When the application starts up, it runs the Application_Start() method present in the Global.asax that marks the application initialization.
- HttpHandlers and HttpModules:- Module or the HttpModules is an assembly, that is called on every request that is made to our application. Where as the HttpHandlers is the solution/answer or running in response to the request made.
Pipeline In MVC
- ROUTING:- This is the first step in the MVC pipeline, it is a pattern to match the incoming url request to the application. These URL are matched to the URLs registered to the Route Table. The route table has its set up done in the Global.asax. The routes are registered to the RouteConfig class that has the route URLs to be mapped and ignored in the application. Lets have a look at it:-
protected void Application_Start()
{
RouteConfig.RegisterRoutes(RouteTables.Routes);
}
public class RouteConfig
{
public static void RegisterRoutes(RouteCollection routes)
{
routes.Ignore(“{resource}.axd/{*pathinfo}”);
routes.MapRoute(
name:"",
url:"{controller}/{action}/{id}",
defaults: new {controller = "Home",action="Index",id=UrlParameter.optional}
);
}
}
Then the UrlRoutingModule discussed above finds a matching route for the incoming URL from the Route Table. When it matches, it retreives the IRouteHandler instance for that route (MvcRoutehandler). Then the IRouteHandler’s GetHttpHandler() is called and finally the ProcessRequest() method is invoked. Then MvcRoutehandler instantiates and executes controller.
Here as you can see, the URL has the {controller}/{action}/{id}, the id is optional which is defined in the defaults. URL may also be only {controller}/{action}. As the routes would be specified or registered in the Route Table, so will the navigation will be.

public class TenantController : Controller  //Derived from Base controller
    {
      public ActionResult Index() //Default Action method-URL: /Home/Index
        {
           return View();
        }
      public ActionResult Index(int id) //Action Method with an Id as parameter
                                        // -URL: /Home/Index/3
        {
          return View();
        }
     }
This is how the routing works on incoming request from the browser. Similarly we can use custom routes also as not always we will be using Home/Index .. 
public class RouteConfig
{
public static void RegisterRoutes(RouteCollection routes)
{
routes.Ignore(“{resource}.axd/{*pathinfo}”);
routes.MapRoute(
name:"Employee",
url:"{controller}/{action}/{id}",
defaults: new{controller = "Employee",action="Add",id=UrlParameter.optional}//Adds a new employee action
);
}
}
If the Url matches any of the routing registered in the Table, the user lands on the View else 404 errornot found page.

- Initialization of Controller :- The real processing starts by the use of ProcessRequest(), that uses the IcontrollerFactory instance to create the corresponding controller for the URL request. The IcontrollerFactory returns the appropriate controller for the request and instantiates that. Then the Execute() method mentioned above is invoked.
- Invoking Controller Action :- The Execute() method refers the RouteData to get the appropriate action for the controller in the Url request. The controller then invokes its own InvokeAction() method.
public virtual bool InvokeAction(ControllerContext controllerContext, string actionName)
After getting the appropriate action, then comes the work of the model binders, default being System.Web.Mvc.DefaultModelBinder, receives the Http request, validates and does the conversions requiqred and also mapping the input values from the user.
- Render View :- The user now would be expecting the beauty of the application to be shown. The View follows the same pattern as the Route. That is, the controller factory has a property known as ViewFactory(), which is a type of IviewFactory. This IviewFactory defines a method called CreateView(), that gets a name and instantiates and return IView, that has a property/method called RenderView() that has the necessary context information from the HttpResponse and returns the Html data as response.

Conclusion
This was the basic and foremost things to knowabout MVC. These are all done on the background. Being Developers, not bothering about the flow is now worthy enough. Thus, Just adding a Controller an action to it and oviously a View to it, does not mean we have done something great!! You would always prefer a pot full with water rather than the one that is almost empty!!

. We are done with the first part. We will be covering interesting topics for learning MVC in part-2
Hope this helps any way. Any suggestions, queries and comments are most welcome.
Dotnet Tricks
Adam Freeman Pro Asp.Net MVC4
A Favicon (“favorites icon”), is an icon associated with a particular website or webpage that is displayed in the browser address bar next to a site’s URL. Favicon is a little icon, but plays a subtle and important role. It acts as a brand.
What Is It Exactly?
 The WordPress Favicon
This Favicon is very familiar, which can be seen next to the Title of any WordPress WebPage and some other places as described below.
Where this Favicon is Displayed?
It is displayed at three places.
- The URL in the address bar
- The websites name in the list of bookmarks
- In the browsers that support a new feature Tabbed Browsing (Tabbed browsing is a function of some Web Browsers that allow uses to surf and view multiple pages by loading the Websites into “tabbed” sections of one page, rather than multiple pages. This allows the user to view a selection of favorite sites in one window, view multiple search results at the same time, and would allow you to set several pages as your home page, rather than just one)
Using the Code
It is very simple and easy. Follow the steps described below.
Step 1: Go to some online Favicon Generator Website
I recommend Favicon Generator.
Step 2: Browse/Create Favicon for your Website
That would become your Website’s brand image.
Step 3: Generate the Favicon and Download
Add it in your root directory and remember to rename it as sometimes it does not refresh itself if Internet Template is used.
Step 4: Add the Following Code inside head Section of Web Page
<span class="code-keyword" style="color: blue;"><</span><span class="code-leadattribute" style="color: maroon;">link</span> <span class="code-attribute" style="color: red;">rel</span><span class="code-keyword" style="color: blue;">="</span><span class="code-keyword" style="color: blue;">shortcut icon"</span> <span class="code-attribute" style="color: red;">href</span><span class="code-keyword" style="color: blue;">="</span><span class="code-keyword" style="color: blue;">https://www.codeproject.com/NAME of your FAVICON.ico"</span> <span class="code-attribute" style="color: red;">type</span><span class="code-keyword" style="color: blue;">="</span><span class="code-keyword" style="color: blue;">image/x-icon"</span><span class="code-keyword" style="color: blue;">></span>
Put the above code in the <head>.......</head> section of your webpages if Empty Template is used, else in theLayout Page for Internet template.
Points of Interest
While working on a demo, I saw a Favicon in my root directory and got curious to know what is the use. I saw this when I used an Internet Template in ASP.NET MVC4 not an Empty Template. Hope beginners like me get to know about this and use this with their Websites.
Give your Website a brand with these steps and enjoy. 
This is trivial and my very first Tip and Post too, wanted to start with this.
Happy Coding
]]>