Hey folks! Another interesting topic to discuss and share! Integrating sensors to an Arduino board seems interesting and feels good when you receive the desired digital output and manipulate it. Now a days hundreds of different kinds of sensors are available in the market, we need to try out and explore how we can better user experiences using these electronics. Temperature monitoring sensors, obstacles detection sensor, soil moisture detection sensors, heart pulse rate sensors and many more. I will try and use as many as sensors as I can and try integrating them with more sophisticated devices. In this article I would be sharing about the IR Obstacle sensor, which as the name suggests detects object or any obstacle coming the sensors way! Lets see how.
The sensor

Here is how the sensor looks like. We will see another pictorial representation of the above sensor and discuss about the details of the part.
The pictorial goes like below:
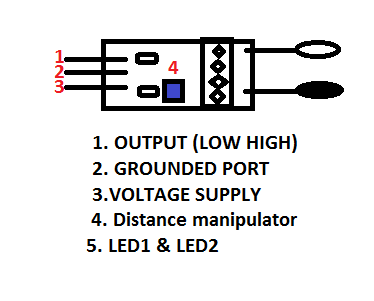
Lets learn and see what the sensor has. As you can see the numbers are mentioned, we will discuss the work around and try understand each and every word. First one goes like:
| Sensor Parts | Functions |
| OUTPUT | This port in the sensor, sends the digital out put to the output unit. Here, we have the sensor output port on board as 7. |
| GND | This port is used to connect to the board’s Grounded port. |
| VCC | The voltage supply port, here we have used the 5 V supply port from the board. |
| Distance Manipulator | The CW (Clock wise) movement increases the distance proximity and the vice-versa decreases. |
| Power and Obstacle LED | Former illuminates when the Power is supplied and the latter when any obstacle comes over. |
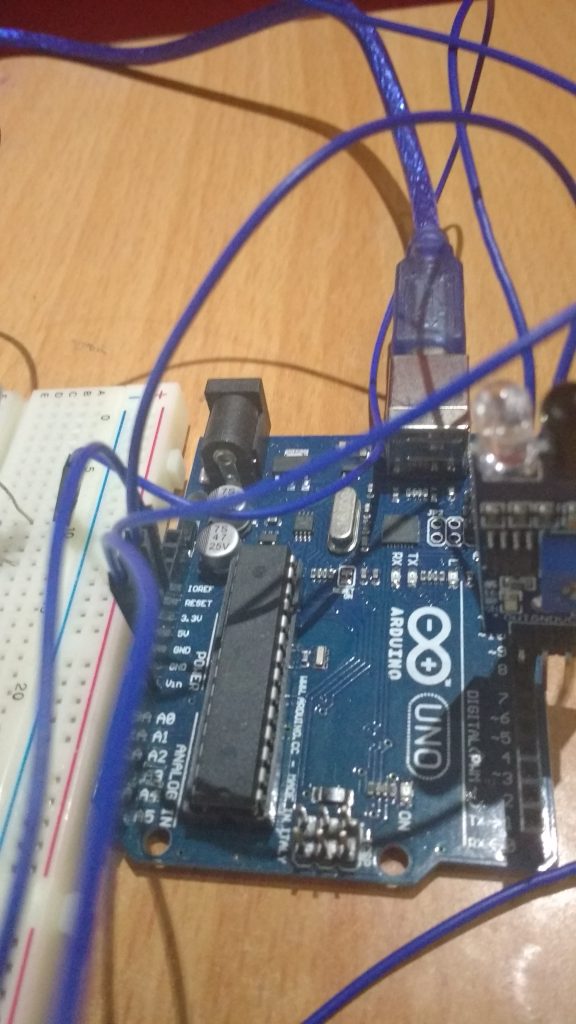
The circuit board looks like below:

The circuit diagram would look like below:
Thats similar to the previous LED connection of my Arduino series. Series I
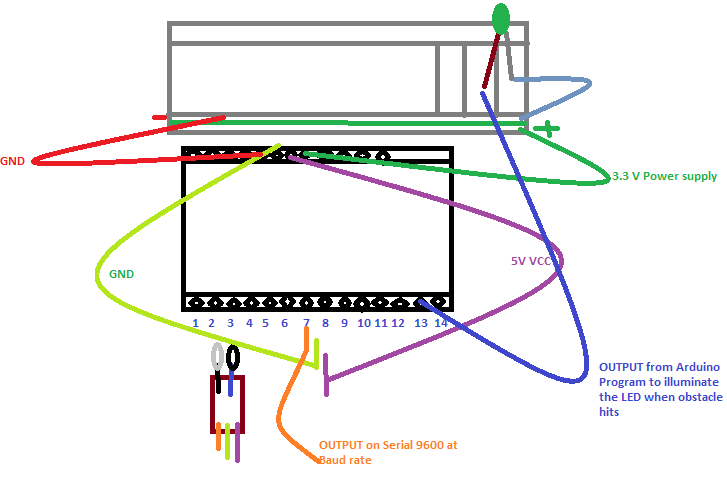
If the above is not clear, please share your query in the comments.
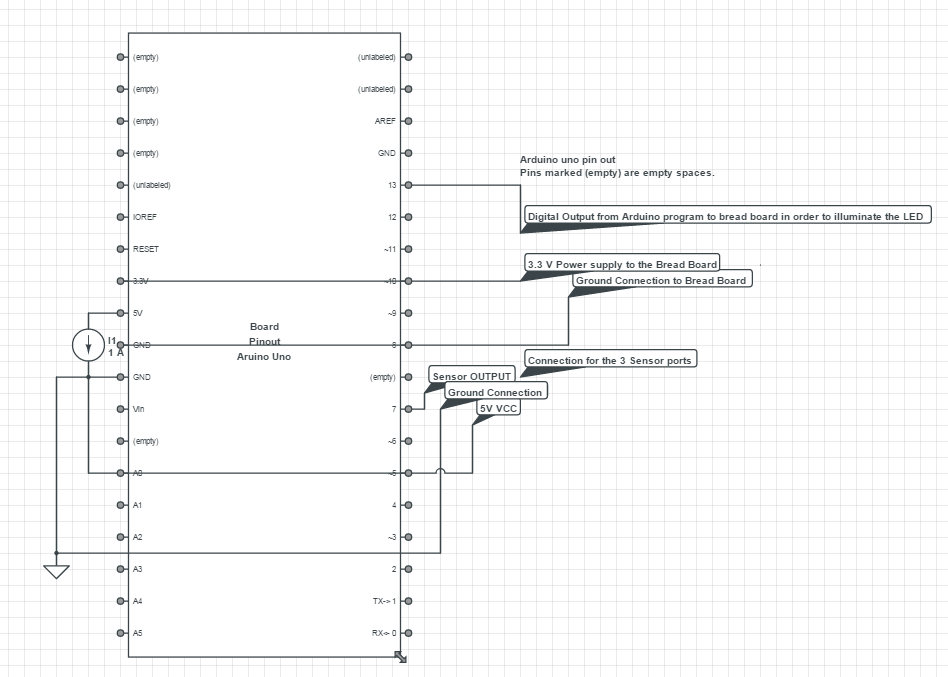
Better view of the diagram is below:
Snippet
int LED = 13; // Use the onboard Uno LED
int obstaclePin = 7;  // This is our input pin
int hasObstacle = HIGH;  // HIGH MEANS NO OBSTACLE

void setup() {
  pinMode(LED, OUTPUT);
  pinMode(obstaclePin, INPUT);
  Serial.begin(9600);
}
void loop() {
  hasObstacle = digitalRead(obstaclePin); //Reads the output of the obstacle sensor from the 7th PIN of the Digital section of the arduino
  if (hasObstacle == LOW) //LOW means something is ahead, so illuminates the 13th Port connected LED
  {
    Serial.println("Stop something is ahead!!");
    digitalWrite(LED, HIGH);//Illuminates the 13th Port LED
  }
  else
  {
    Serial.println("Path is clear");
    digitalWrite(LED, LOW);
  }
  delay(200);
}
The Flow
When the full circuit is done and the code set is also done. Now, time to connect the Board to the Computer using the USB jack. Once connected to suppose COM3 port, open the Arduino Set up IDE where the code set up is done, compile the code once and then Upload the code to the Board. Once Upload is done the TX RX leds blinks quick.
Now we are all set to test the sensor. For better and precise testing, we can solder the wires (jumper wires) to the sensors as their connected pins are not portable. The whole set up can be soldered.
Then when we connect, open up the Serial port screen which transmits at 9600 bits per sec and check the message, as per written in the program.
As per the program, the LED also blinks and illuminates based on the Obstacle sensor output.
The serial screen would look like below:
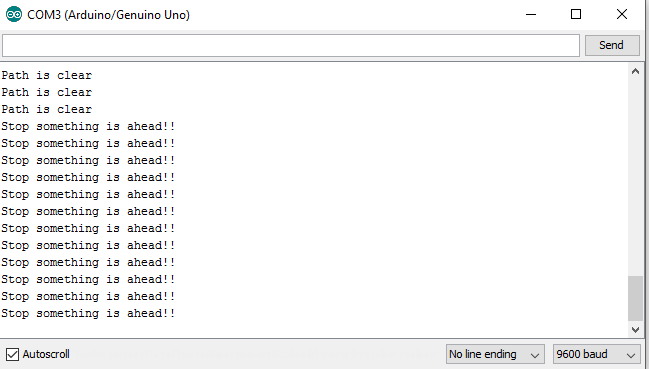
That’s it folks!!
Conclusion
Now this is all about the sensor IR Obstacle sensor which you can purchase at a very cheap rate from ebay or amazon and play with. We can use this set up in our Cars and check out!! In the upcoming series I will be sharing more sensors and blue-tooth module integration with Arduino. Hope they will be more fun! Please share your experiences and suggestions as I am still crawling..:P
]]>In this article I will be sharing a basic stuff which comes handy in MVC applications. The HTML helpers provided by the Razor are smart enough to understand and process the work as required.
We will be discussing in brief about the Ajax.BeginForm, which has few concepts hidden within. When we face the difficulty or the issue, we explore and resolve. Same has happened recently with me. So lets start exploring what the hidden secrets are, which actually are very few.
Adding Unobstrusive- Ajax JS
This can be added from the Nuget package manager directly. I find adding from the Package Manager console easy. The script goes like below:
Install-Package jQuery.Ajax.Unobtrusive
Snippet & Learning
AjaxExtensions.BeginForm is a part of System.Web.Mvc.Ajax namespace under the System.Web.MVC assembly. When used in the response it writes the HTML
In this article I will be sharing a quick and an interesting way to send SMS using a simple C# application. I will be using ViaNett API to send messages from my application. I will be creating a simple windows form which will trigger the API and send the SMS.
Sending SMS has become a common objective for almost every site nowadays. Though they keep irritating you with continuous messages regarding their advertisements.
We use a simple REST API which provided by various providers in the market. You can try out some of them using the free trial version and send SMS. The reliable and faster one can be chosen. Also check for the Support the team provides.
I have thrown my hands at ViaNett and Twilio APIs. Here I will be discussing using ViaNett. Let’s start without actually wasting time.

Get Started
To start with, visit the ViaNett website (ViaNett Free demo Account). Sign up and register you with your email address for the free account, which will provide you with 5 free SMS.
After that, you land on a page having contents like below
Click on the Technical Api and that will navigate to different kinds of API it provides. We here would need the HTTP API in order to send the SMS, as we would be using the WebClient in order to use the API. We will be seeing the code below.
After you click on the HTTP API, you will be navigated to another page which will have the API listed under an Example like below:

Create a script to generate a URL like this: https://smsc.vianett.no/v3/send.ashx?src=xxxxx&dst=xxxxx&msg=Hello+world&username=xxxxx&password=xxxxx Retrieve this web page from your script/application, and the SMS will be sent.
This is the API URL which our Web client will be using.
Now to start with our demo application, we will be creating a windows form application. Now, I will not be writing up and lengthing my article with the step by step image for creating a Windows Form application. Those who are really new to windows form, please follow one of the best links below.
Walkthrough To create Windows Form application
After you create a simple windows form application, it would look something like below:
Create as simple as you can , as this is just for learning purpose. The UserName is the user name you had provided during the ViaNett registration i.e. the email address
The password is the password you had given during the registration in the ViaNett.
Then for the button click we have the following code:

private void button1_Click(object sender, EventArgs e)
        {
            using (var web = new System.Net.WebClient())
            {
                try
                {
                    string userName = txtUserName.Text;
                    string userPassword = txtUserPassword.Text;
                    string msgRecepient = txtPhNumber.Text;
                    string msgText = txtMessage.Text;
                    string url = "https://smsc.vianett.no/v3/send.ashx?" +
                        "src="+msgRecepient +
                        "&dst="+msgRecepient +
                        "&msg="+System.Web.HttpUtility.UrlEncode(msgText,System.Text.Encoding.GetEncoding("ISO-8859-1")) +
                        "&username=" + System.Web.HttpUtility.UrlEncode(userName) +
                        "&password="+userPassword;
                    string result = web.DownloadString(url);
                    if(result.Contains("OK")){
                        MessageBox.Show("Sms sent successfully", "Message", MessageBoxButtons.OK, MessageBoxIcon.Information);
                    }
                    else{
                        MessageBox.Show("Some issue delivering","Message",MessageBoxButtons.OK,MessageBoxIcon.Error);
                    }
                }
                catch (Exception ex)
                {

                }
            }
        }
The above code would look simple rather it is. 
When you select a Windows Form Application, by default System.Web is not added to the reference list. Thus, you need to add that from the assembly list.
System.Web is required as we add the WebClient to use the API and download the response.
Here in the code, just giving a brief on what this snippet intends:
We retrieve each text input from the user, i.e. the User name, User password, Text Message & the User Phone Number. We use these as the URL params to the Service API of the ViaNett.
Then after that we will check for the response after sending the message and accordingly we update the User.
**Point to note is: The country code needs to be prefixed to the phone number, in order to send the message else it will mail back regarding the failure to the registered email.
Conclusion
Thus, this is a small article on the integration and sending SMS using C# aaplication. I hope this helps beginners!! I will come up with more articles with other APIs and their other SMS features they support.
References
]]>Hello folks!! Lets continue our journey of learning Angular JS. We have seen & discussed few topics already!
In this article we will discuss few concepts that are very essential to build an MVC project with Angular.
 Lets see the topics we will be covering in this article:
- Angular Model
- Angular Scopes
- Angular Services
- Angular Http
- Angular Dependency Injection
Angular Model
This as the name suggests binds the values to the model associated to an element. This shows a two-way binding, i.e. when the value suppose in the textbox changes, the value for the model also binds and changes. The attribute used is ng-model, the code would be like:
<script src="https://ajax.googleapis.com/ajax/libs/angularjs/1.4.8/angular.min.js"></script>
<div>Name : <input type="text" />
<h1>Welcome {{name}}</h1>
</div>
This will update the value of text entered inside the text box and gets displayed in real time.
Interesting fact about the ng-model directive is that, the directive watches the model by reference not by value. It also provides validation to the particular field.
Angular Scopes
Angular scopes are the execution-context generated during the creation of a controller. We pass the scope object to the controller function. The scope is generally denoted as $scope. This is actually an object to which we add the properties to be accessed in the HTML page using the controller reference.
As the angular doc rightly says, it is actually the glue between the controller and the view. It comes with two referring API i.e. $watch (used to observe the model mutations) and $apply (used to propagate the changes done to the scope object property) Lets have a glance at the snippet:
angular.module('scopeTest', []).controller('TestController', function($scope) {
  $scope.username = Suraj;
 });
This is how the scope object is passed and initialized and assigned properties to be used inside the view.
Interesting Facts:
Controller function in Angular is a constructor function. Now what is a constructor function?
A constructor function in simple terms is when the new keyword is used before a function.
var constructorFunction = new Funciton(Parameters..);
Thus everytime a controller is instantiated it gets associated with a new Scope.
Angular Services
There are many in-built services provided by the Angular and also we can explicitly create our own services to have a loose coupling while using the Http Get Post services. These are actually singleton functions that are required to perform certain specified tasks. What singleton means is restricting the instantiation to a single object only.
As in MVC we follow Separation of concern, here also these services can be used to follow the loose coupling and binding.
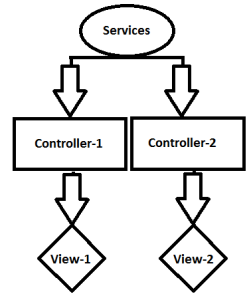
As we can see here the reuse of the services can also be followed here. This is done using the injection of dependency into the controller function. We will look into the dependency in the next points.
Lets see how we declare a service in Angular.
var module = angular.module('TestApp', []);
module.service('TestService', function(){
    this.users = ['Suraj', 'CsharpCorner', 'Angular'];
});
Here comes another concept known as Factory, which also behaves as a service function only.
var module = angular.module('TestApp', []);
module.factory('TestFactory', function(){
    var testFactory = {};
    testFactory.users = ['Suraj', 'CsharpCorner', 'Angular'];
    return testFactory;
});
The behavior is the same for both service and factory, but the difference is interesting. For the difference, take a closer look at the snippets mentioned above. In the first snippet where we have declared the service and we have added the ‘users’ to the reference of the service i.e. this keyword. Whereas, in the .factory declaration, we have used the testFactory object and assigned property users to it. While using the Services in the injection, we will have the object instance of the service becomes the reference to the methods and can be used in the injection for other controllers or services, while in case of factory, when that is injected, the value is directly provided which is returned by the function within.
The above discussed are explicit or user-defined services, now lets see the in-built services provided by the Angular. (Some of them)
- $http:- This is the Http server requesting service, which is one of the most commonly used and important service.
var app = angular.module('TestApp', []);
app.controller('TestCtrl', function($scope, $http) {
    $http.get("url").then(function (response) {
        $scope.testData= response.data;
    });
});
As we see in the above snippet, the $http service used to make a get request to the URL specified and then the data retrieved is assigned to the scope. As we see the $http is passed into the controller function as an argument. It is recommended to use the $http, server request inside the service as we are in a way interacting with the data. Then the service is injected into the Controller. - $interval:- This as the name suggests, is an angular type for window.setInterval
var app = angular.module('TestApp', []); app.controller('TestCtrl', function($scope, $interval) { $scope.theTime = new Date().toLocaleTimeString(); $interval(function () { $scope.theTime = new Date().toLocaleTimeString(); }, 1000); }); //reference for use from https://www.w3schools.com/angular/tryit.asp?filename=try_ng_services_interval - $location:- Same as above, angular version of window.location.
- $timeOut:- Same as above, angular version of window.setTimeOut.
Dependency Injection
This is an interesting and most debated topic and angular provides this out of the box concept.
Out of the box..

Dependency is required when we are looking for the loosely coupled codes, i.e. without directly exposing our services. The separation of concern is the major concern when DI comes into picture. Once our service is ready, we can inject to any other service or controller in Angular. The best example would be a Bakery shop.
Lets chalk out the plan with a simple snippet:
var app = angular.module('BakeryApp', []);

app.service('BakeryService', function() {
    //Declare or pass the prices as arg
    this.Pizza = function(quantity) { return quantity * pizzaPrice };
    this.Pastries =function(quantity) { return quantity * pastriesPrice };
    this.Cakes= function(quantity) { return quantity * cakePrice};
});

//Injected Bakery Service to the 'BakeryCalculateService'
app.service('BakeryCalculateService', function(BakeryService){
    this.PizzaPrice = function(qty) { return BakeryService.Pizza(qty); };
    this.CakePrice= function(qty) { return BakeryService.Cakes(qty); };

});

//Injected BakeryCalculateService.
app.controller('BakeryPriceController', function($scope, BakeryCalculateService) {
    $scope.CalcPizzaRate= function() {
        $scope.PizzaRate = BakeryCalculateService.PizzaPrice ($scope.quantity);
    }
    $scope.CalcCakeRate= function() {
        $scope.answer = BakeryCalculateService.CakePrice($scope.quantity);
    }
});
We can very well in the above example see the Dependency Injection and the separation of the main service, the layering that is set between the controller and the actual operations. This is very handy during maintenance as well. This is by law which every developer should abide by
Do’s & Dont’s
Another interesting fact when we use the injection is the minification breakage. The angular code breaks when the injection is not done properly when the script files are usually bundled and minified.
The above Dependency Injection snippet we discussed, will break when the script is minified, bundled & deployed. The reason being, when minification takes place, it re-frames the variable names as ‘a’,’b’,’c’.., thus the parameters injected as $scope,$http will be now treated as a, b. Thus this will break as there is no meaning injecting a b, may it be a controller or a service.
To avoid that, we usually modify the snippet and use the Angular attribute $inject, wherever Dependency is injected.
var testController= function(myCtrlScope, $http) {
  //We included $scope and the $http service into our controller.
  }
testController.$inject = ['$scope', '$http']
Since we are using $inject attribute on our controller,it would not be an issue using any name of the parameters to it.
Conclusion
Thus, we have discussed few interesting concepts this time and work around with live snippets. Still we have not discussed the integration of angular with an MVC app using API. We will discuss in the upcoming articles of the series, before that we will be clear on the basic stuffs that needs to be covered. 
I hope this article helps. I am always open for corrections and suggestions.
Lets learn and share together.
Scheduled jobs are a part of development, may it be any application. Inventory applications require them the most when they automate almost everything. SQL Jobs can prove to be handy when a query needs to run and update or insert or anything of that sort at regular intervals as per requirement. These are similar to schedulers to track your reminders and updates.
According to MSDN
SQL Server Agent is a Microsoft Windows service that executes scheduled administrative tasks, which are called jobs in SQL Server 2016.
SQL Jobs are run by the SQL Server Agents. It can be a single operation running in the background or a series of operations.The SQL Jobs can be added using the GUI provided by the SQL Server. But in this article, we will see and understand the Query that helps create SQL Jobs. These jobs can be scheduled to run daily, weekly or on monthly basis.
Straight to the point
We will straight away check and see the snippet and then try understand the parts of it.
BEGIN TRANSACTION;
DECLARE @ReturnCode INT;
SELECT @ReturnCode = 0;
DECLARE @owner_Login_Id NVARCHAR(30),
        @actual_database_name NVARCHAR(30);
SET @owner_Login_Id = N''; -- ADD THE LOGIN NAME TO THE SERVER
SET @actual_database_name = N'DB NAME'; -- ADD THE DATABASE NAME AS REQUIRED

IF NOT EXISTS( SELECT name
               FROM msdb.dbo.syscategories
               WHERE name = N'[Uncategorized (Local)]'
                 AND category_class = 1 )
    BEGIN
        EXEC @ReturnCode = msdb.dbo.sp_add_category
             @class = N'JOB',
             @type = N'LOCAL',
             @name = N'[Uncategorized (Local)]';
        IF( @@ERROR <> 0
         OR @ReturnCode <> 0
          )
        GOTO QuitWithRollback;
    END;
DECLARE @jobId BINARY(16);
EXEC @ReturnCode = msdb.dbo.sp_add_job
     @job_name = N'JOB_NAME',
     @enabled = 1,
     @notify_level_eventlog = 0,
     @notify_level_email = 0,
     @notify_level_netsend = 0,
     @notify_level_page = 0,
     @delete_level = 0,
     @description = N'JOB_DESCRIPTION',
     @category_name = N'[Uncategorized (Local)]',
     @owner_login_name = @owner_Login_Id,
     @job_id = @jobId OUTPUT;
IF( @@ERROR <> 0
 OR @ReturnCode <> 0
  )
GOTO QuitWithRollback;

EXEC @ReturnCode = msdb.dbo.sp_add_jobstep
     @job_id = @jobId,//-- ID of the Job created
     @step_name = N'STEP_NAME', //--Step Name for the JOB
     @step_id = 1,
     @cmdexec_success_code = 0,
     @on_success_action = 1,
     @on_success_step_id = 0,
     @on_fail_action = 2,
     @on_fail_step_id = 0,
     @retry_attempts = 0,
     @retry_interval = 0,
     @os_run_priority = 0,
     @subsystem = N'TSQL',
     @command = N'YOUR QUERY GOES HERE',
     @database_name = @actual_database_name, //--Database name is generic and defined above at the start
     @flags = 0;
IF( @@ERROR <> 0
 OR @ReturnCode <> 0
  )
GOTO QuitWithRollback;
EXEC @ReturnCode = msdb.dbo.sp_update_job
     @job_id = @jobId,
     @start_step_id = 1;
IF( @@ERROR <> 0
 OR @ReturnCode <> 0
  )
GOTO QuitWithRollback;
EXEC @ReturnCode = msdb.dbo.sp_add_jobschedule
     @job_id = @jobId,
     @name = N'JOB_SCHEDULE_NAME',
     @enabled = 1,
     @freq_type = 4,
     @freq_interval = 1,
     @freq_subday_type = 1,
     @freq_subday_interval = 0,
     @freq_relative_interval = 0,
     @freq_recurrence_factor = 0,
     @active_start_date = 20150615,
     @active_end_date = 99991231,
     @active_start_time = 0,
     @active_end_time = 235959,
     @schedule_uid = N'af82656c-e151-4ebb-9fe1-009495e1415d';
IF( @@ERROR <> 0
 OR @ReturnCode <> 0
  )
GOTO QuitWithRollback;
EXEC @ReturnCode = msdb.dbo.sp_add_jobserver
     @job_id = @jobId,
     @server_name = N'(local)';
IF( @@ERROR <> 0
 OR @ReturnCode <> 0
  )
GOTO QuitWithRollback;
COMMIT TRANSACTION;
GOTO EndSave;
QuitWithRollback:
IF( @@TRANCOUNT > 0 )
ROLLBACK TRANSACTION;
EndSave:
GO
The snippet part Line No. 9-12 results the existance of the Local categories. What this does is simple.
From MSDN
Contains the categories used by SQL Server Management Studio to organize jobs
Now, after the check, if the category exists that governs the organization job, it then executes the pre-defined Stored procedure that adds a new category sp_add_category
sp_add_category
     [ [ @class = ] 'class', ]
     [ [ @type = ] 'type', ]
     { [ @name = ] 'name' }
- @class:Class governs the class i.e. may be JOB|ALERT|OPERATOR
- @type: This specifies the type or location of the Job i.e. LOCAL|MULTI-SERVER|NONE
- @name: Category Name that will be added
After this the Job Addition SP is executed. The parameters for the SP needs to be known and why are they added. For more information MSDN can be followed.
This SP sp_add_job simply and only adds the JOB with the specified name. For the execution of JOB and to let it execute the required process, we need to add a JOB STEP, which is created next.
sp_add_jobstep does the job for us. This SP adds the specific Step to be executed or run under that JOB. The parameters here can also be referred from MSDN.
@command is the most important parameter here, as the query that will actually be executeed at intervals and fulfil your requirement will run.
@database_name is also important as this would specify on which database the query would be executed by the JOB.
We are then adding the schedule for the created job using SP sp_add_jobschedule . This Sp adds the required schedule for the JOB and sets the JOB to run based on the schedule. Please refer the MSDN for more info and the parameters definition.
Conclusion
Thats it folks. We have seen the simple query that once run, creates a SQL job for us that can actually execute any query on the background and make life easy.
Points of Interest
We have followed TRANSACTION in the queries in order to track the errors and if any caused, then we could roll back the changes to avoid ambiguity.
Instead of now following steps to create Jobs using the SQL Server Object Explorer, run the above query, understand the parameters once and then that’s easy.
Hope this helps.
References
]]>
As we discuss in the previous part of Hands on Agular Js-I about the basic and the architecture of the Angular Js and few directives. Here in this part we will check out the other important directives and how Angular interaction with Controller and model is being done on the go. The directives we will discuss in this part of series are very important in order to start and feel the magic of Angular. Here, actually, we get into the depth and controls of Angular. Let’s watch out.
Angular directives
Here we start with the other important directives that would come handy while working on the Angular.
ng-module
Angular modules are the most important directive, they define an angular application. They are the parent set for the other directives or functions of the application, like controllers. Controllers are always contained withing the modules, along with other dependencies. This is the modular approach in Angular. Creating modules for separate section segregates it and create partition/module wise applications.
The modules are defined syntactically as below:
var app = angular.module("app-Services", []);As per the above snippet, we have created an angular module and assigned it to the variable named app. The module name is app-Services. The module is actually defined in the document function of a separate Module script file and reference added to the file wherever required. The definition provided by the Angular Doc is that Module is required to configure the $injector and it contains the services, directives, controllers and other dependencies.
$injectors are the service used to retrieve the pre-defined object instances, invoke methods and load the required modules.
ng-controller
This is another set of directives that defines the controller of the application, which controls the data of the application. They are simple objects defined under the scope of the module. There can be any number of controllers for a specific module. Controllers are defined syntactically as:
var app = angular.module('app-Services', []);
app.controller('myFirstController', function($scope) {
    $scope.firstName = "Suraj";
    $scope.lastName = "Sahoo";
});
The above snippet is a simple controller defined under the module app-Services. The name of the controller is myFirstController and under its scope, two members are initialized, that is firstName & lastName. Thus, when an object of controller is created in the html, which we will see below:
<html>
<body>
<div ng-app="app-Services" ng-controller="myFistController as ctrlFirst">
<span>{{ctrlFirst.firstName}} {{ctrlFirst.lastName}}</span>
</div>
</body>
</html>
Thus, as we see above, the html tag div has the scope for the Module we defined above and the controller defined for the module with the members firstName & lastName. When the controller is instantiated inside the scopr of the div and Module, we have th right to access the data defined inside the controller function. $scope defined within the controller function is is the context via which the model execution is implemented inside the controller. It actually acts as a watch on the model values while binding to the DOM element in the HTML. The $scope can also be used using the this object. The controller also accepts the $http to execute the http services in order to call the api’s to get post and delete any data through the services. Lets see how the controller function can be separated from the declaration and defined as a function.
var app = angular.module('app-Services', []);
app.controller('myFirstController', myFirstController);
function myFirstController($http, $scope) {
    $scope.firstProperty = 'XYZ';
    $http.get('your url').then(function (){
                          //do whatever..
                  }).catch(function (){
                         //do whatever..
              }).finally(function (){
                       //do whatever..
          });
}
});
Now the above, $http is the http module which is used to call the get and post methods or to interact with the server to fetch the records. Call the url, like in ajax we have success and error methods, here we have, then() block, which after fetching successful response, has the logic what to do next. Actually, the $http returns a promise, so we catch that in the then block and attach the response to the scope. The different $hhtp methods are:
- $http.get:- To retrieve information from server for a url requested by the user
- $http.head:- Transfers only the header and the status line only, but is same as GET
- $http.post:- As self explanatory it is, it is used to send the information entered by user to the server.
- $http.put:- This is same as the POSt but is used to create the current reprsentation of the target resource or overwrite it for the same URL
- $http.delete:- This ensures that the current resource for the requested URL is deleted by the server.
The catch finally is same as the try.. catch.. blocks, where inside the catch we can also have the ‘then’ block in order to perform tasks after catch and similarly the ‘finally’ block to ensure what finally the code block will execute.
Filters in Angular JS
These are very interesting features provided by the Angular, which can be frequently used and with ease. We will discuss below the pre-defined filters provided by the framework. We will see the use syntactically after the line by line explanation.
- currency:- This is used as the name suggests, convert a simple number into the format of a currency.
- date:- This is used to format dates in different formats.
- filter:- An interesting filter which actually filters few data from a set of result set data.
- json:- formats an normal object into JSON format
- limitTo:- limits an set of array to specified number of elements or objects.
- lowercase:- converts/formats an string to lower case character.
- number:- formats a simple number into a string.
- orderby:- Orders an array based on an expression.
- uppercase:- Formats the string into a upper case character.
Lets see the work around using the snippets:
var app = angular.module('app-Services', []);
app.controller('myFirstController', function($scope) {
    $scope.firstName = "Suraj";
    $scope.lastName = "Sahoo";
});
<html>
<body>
<div ng-app="app-Services" ng-controller="myFistController as ctrlFirst">
<span>{{ctrlFirst.firstName | uppercase}} {{ctrlFirst.lastName \ lowercase}}</span> //Displays firstName is UPPERCASE and lastName in lowercase
<ul>
  <li ng-repeat="name in names | orderBy:'age'">
    {{ x.name + ', ' + x.age}}
  </li>
</ul>
<span>{{price | currency}}</span>
<li ng-repeat="name in names | filter : 'S'">
    {{ name }} //Filters names based on names containing 'S'
  </li>
</div>
</body>
</html>
In the above snippets, we have used another directive i.e. ng-repeat, that is used to loop through the list of records just like foreach loop.
Another thing here to note is that the filter used in the above snippet, if we use the object containing the data or list of records/names suppose like:
<p><input type="text" ng-model="nameFilter"></p>
<ul>
  <li ng-repeat="name in names | filter:nameFilter">
    {{ name }}
  </li>
</ul>
What the above snippet does is, it loops through the names and based on the entry in the textbox or the user input, Like suppose user enters ‘S’, then the data listed are filtered on the object with the names that Starts With ‘S’.
Thus, we saw how these filters become handy and really useful.
Conclusion
Thus, here in this part we discussed about most of the great features of Angular and saw a few snippets to be used in progress. As I said earlier, in the succeeding modules we will gradually come across more interesting features and overall use of Angular.
Whats Next??
We will next come across how to build applications using Asp.NET MVC, EF Code First, Angular JS. That I assure would be interesting.
References
W3 schools
docs.angularjs.org
There exists an assumption that there is a direct relationship between the requested URLs and the files stored on the server. But does this make sense in an MVC application, where requests are processed by action methods and controllers and there is no relation to files on the server (disk).
MVC applications use routing system in order to track the request and give response to the users. The routing system helps create patterns of URLs, that to pattern of our wish. The routing system does the following job, Incoming URL examination- It checks the url requested and it intends the controller and action and based on the url, it redirects the controller based on the client request. This is a very interesting and an important subject of discussion. Once we create an MVC application, it is already configured to use Asp.Net routing system. There are four sections that are any way required relevantly for the routing system in the application. They are:
- system.web httpModules:- These are required to configure the modules within an application. Http Modules are assemblies that are called on every request made to the application.
- system.web.httpHandlers:- This runs in response to the request made to the application.
The above mentioned are required for the routing system and should be present in the configuration of the application. We need to make sure the above configurations exist in our application.
Lets start with snippets
public class RouteConfig {
    public static void Registerroutes (RouteCollection routes) {
         routes.IgnoreRoute("{resource}.axd/{*pathInfo}");
         routes.MapRoute (
            name : "Default",
            url: "{controller}/{action}/{id}",
            defaults: new { controller = "Home", action = "Index", id = UrlParameter.Optional }
    );
}
Now, this RouteConfig.cs resides inside the App.Config folder. The RegisterRoutes method inside the RouteConfig.cs gets called from the heart of the MVC application i.e. Global.asax.cs, which sets the core MVC features when the application is started. The called RegisterRoutes method gets called inside Global.asax.cs as follows:
RouteConfig.RegisterRoutes(RouteTables.Routes);
To the method as we can see the parameter is passed i.e. RouteTables.Routes which is a collection routes or the instance of the RouteCollection.cs. To register adding a new route, we need to register inside the RegisterRoutes method as below:
Route demoRoute = new Route("{controller}/{action}", new MvcRouteHandler());
routes.Add("DemoRoute", demoRoute);
Lets understand the above snippet, Here a new route named demoRoute is being created. MvcRouteHandler() is also passed to the constructor. This extends the IHttpHandler and passes the request. routes , the object above is an instance of the RouteCollection class which is passed from the Global.asax.cs. There is another easy way of registering routes, i.e. by using MapRoute method defined by RouteCollection class like below:
routes.MapRoute("RouteName", "{controller}/{action})One thing to note here is, if the route incase donot match any of the routes in the RouteCollection, then the error is thrown to the user. generally, default route is set to Index as action. Then, the url with https://demosite/home will also get the user to the Index action method. If both the controller and action are provided to the routes, then routes match url with no segments (if default is defined in the RouteConfig). Generally, the controller if only used in the url, then the Controller’s action Index method is called i.e.
https://demosite.com/Admin
This would call the Admin Index method. If any other action method is called, then similarly based on the segments in the url requested, the action in the specified controller is called.
Static URL Segments
There is this concept of static url segments. This is rarely used but the concept is quite interesting. Here, the route is registered inside RouteConfig like below:
routes.MapRoute(""), "X{controller}/{action}");Here, what happens is whatever is present after X or suffixed to X, that controller and action gets called. For example, https://demosite.com/XAdmin/Index, here what happens is the controller Admin and the Action Index is called.
There is a concept of Route Ordering as well, in which in the order the routes are defined in the RouteCollection, the same order the route mapping is done. I.E. when a URL requests is made to the application, the route config maps the route defined until a match is found in the same order routes are defined.
Another interesting fact to notice here, Suppose we have a controller named “Admin” and sometime in the future we require to modify the name of that controller. Now if we donot modify our RouteConfig, we would get a 404 NOT FOUND error. To avoid this we do the following modification in the Route.Config.cs:
public static void RegisterRoutes (RouteCollection routes) {
   routes.MapRoute ("Admin","Admin/{action}",
      new {controller="Home"});
  }
Thus, when a request as /Admin/Index comes to the server, the controller called is /Home/Index, avoiding the 404 error page. Since, there is no segment variable supplied, so default provided is used. The same can be done in case of an Action as well, i.e. if an action is removed from the controller, we can have a default route check for that action as well and redirect to the specified and default route URL if not found. Like as below:
routes.MapRoute("Admin","Admin/department",
    new {controller = "Admin",action = "Index"});
Defining Custom Segment Variables
Controller and Action are common part of any url request to the MVC application and these would be considered as the in-built segment variables. But there are other segment variables that can be customized for the service requests. Lets take a look at a snippet:
public static void RegisterRoutes(RouteCollection routes) {
    routes.MapRoute("RouteDemo", "{controller}/{action}/<b>{id}</b>")
        new {controller = "Admin" , action="GetDept", id = "DefaultID"});
}
Here we can see we have declared a custom varialble “id” with a default value. Thus any url request with two or three segment variables would work out. If the id is not specified explicitly in the URL, then it takes the default id value.
Usually,the third segment variable is used to fetch the parameter to be utilized in the service methods.
public ActionResult GetDepartment(int id) {
  //Used id to get the particular department.
}
Here if id is not provided in the URL, then it searches using default id specified and may return null. Thus, to avoid, we can also defined the third segment variable to be optional, so that we have action to also return result if no id is specified in the URL.
routes.MapRoute("OptionalRoute", "{controller}/{action}/{id}",
     new {controller = "Admin", action = "GetDept", id = <b>UrlParameter.Optional</b> });
Thus the UrlParameter.Optional makes the third segment variable optional and rund through without any default variables as well.
Prioritizing Controllers with same name using name spaces
This is a very interesting and strong concept which can be really handy, when working on a huge MVC application. Lets take a scenario to understand this, suppose we have a controller name “Home “inside the controllers folder and another controller with same name “Home” inside another folder say “AddonControllers”. So when we run the project and hit the URL /Home/Index, then the routing and mapping that searches the URL requested, will be in ambiguity as it fetches two controllers with same names. Thus this will throw an error with the exception message as :
Multiple types were found that match the controller named “Home”. This can happen if the route that services this request (‘{controller}/{action}/{id}’) does not specify the namespace to search for a controller that matches the request..
Thus, from the error message itself we can get that this error can be resolved easily by specifying the name space for which you want to prioritize the search when URL request is made to the server. Lets see how:
routes.MapRoute("DemoRoute", "{controller}/{action}/{id}",
      new {controller = "Home", action = "Index", id = <b>UrlParameter.Optional</b> },
       <b> new []{"URLsAndRoutes.AddonControllers"}</b>);
Here, specifying the new array of strings and saying the MVC routing to search for the controller everytime in the AddonControllers or the specified namespace first and if not found then move into the controllers folder to search for the match of the URL request. This really would of high use when the requirement is as such.
Conclusion & Points of Interests
Thus here we discussed about one of the critical concepts of MVC. Routing and pipelining is a mandatory concept to know to start with learning MVC. using MVC application and not using Routing is not wise. There are opportunities to manipulate and customize the Routing system, so it is always advisable to use Routing whenever MVC application is in picture. The URL segment variables Controllers, Actions and parameters are required to customize the URLs to th convinience of the end users. The routing can narrow down the search of the routes if the maximum hit URL requests are ordered highly in the Route Collection.
References
Asp.NET MVC Professional by Adam Freeman.
CodeProject
A very interesting topic of discussion. We have mail integrated to every application now a days. We integrate email using SMTP settings in the Web.Config in .NET and use the Send method to send mails. Recently, I came across an interesting challenge, where we were to send emails from our SQL Server. Suppose we have to track the successful scheduled sql query execution. We cannot look into the tables it modified every time in order to check if it actually ran through successfully. It would be so nice, if we could get some kind of notification which can help us know about the status of execution. Yes, it is possible to send mails from our sql server using few stored procedures which are actually pre-defined.
Lets learn how:-
Get Started
Remember we will be using pre defined Stored procedure to send the mails. First of all we need to set up an account with the credentials required by the server to send the mails. Usually the mail is sent through SMTP, Simple Mail Transfer Protocol. The settings would depend on the server your aplication demands. Remember the configuration needs to be valid.
Create a Database Account:-
EXEC msdb.dbo.sysmail_add_account_sp
    @account_name = 'SendEmailSqlDemoAccount'
  , @description = 'Sending SMTP mails to users'
  , @email_address = '[email protected]'
  , @display_name = 'Suraj Sahoo'
  , @replyto_address = '[email protected]'
  , @mailserver_name = 'smtp.gmail.com'
  , @port = 587
  , @username = 'XXXXXX'
  , @password = 'XXXXXX'
Go
Please use proper credentials and server settings in order to successfully deliver the mails, else they will fail and be queued.
Nextstep is to create a profile which would be used to tconfigure the database mail. The sp would look like below:
EXEC msdb.dbo.sysmail_add_profile_sp
    @profile_name = 'SendEmailSqlDemoProfile'
  , @description = 'Mail Profile description'
Go
This profile would be used in order to set the mail configuration and the emails and sent.
Next step is to map the account to the profile. This will let the profile know, which account credentials it need to work for sending successfully.
That would look like:
-- Add the account to the profile
EXEC msdb.dbo.sysmail_add_profileaccount_sp
    @profile_name = 'SendEmailSqlDemo'
  , @account_name = 'SendEmailSql'
  , @sequence_number = 1
GO
Thus, we are all set to send the successly emails. The mail sending look up snippet would look like below:
EXEC msdb.dbo.sp_send_dbmail
    @profile_name = 'SendEmailSqlDemo2'
  , @recipients = '[email protected]'
  , @subject = 'Automated Test Results (Successful)'
  , @body = 'The stored procedure finished successfully.'
  , @importance ='HIGH'
GO
The stored procedured being used are sometimes vulnerable to not getting executed. So Try catch block and Begin and End Transaction are mandatory in few Stored Procedures.
Lets take an example here,
Suppose we have a SELECT INSERT query using Stored Procedure, so what happens is we are selecting and inserting from 4 tables, lets say
Users | UserLogin | UserEmployment | Departments
For each new screen creation we are manipulating and selecting the users based on their PK and inserting again into the same tables with a different FK, representing the particular screen. The query would look like below:-
BEGIN TRY
  BEGIN TRAN
 INSERT INTO
   dbo.[User]
 SELECT
    us.UserName,
	us.UserAddress,
	us.UserPhone,
    @fkScreenID
 FROM
   dbo.[User] as us
 WHERE
   UserID= @userID
 COMMIT TRAN
    END TRY
   BEGIN CATCH
  ROLLBACK TRAN
  END
  END CATCH  //Similarly for other tables as well we continue. Its is better to add the Try Catch to whole SP Executing Block
Here, when the transaction in case fails, it would move into the Catch block and there we can have the email sending procedure so as to get a notification regarding the success or failure and reason and where it failed. This would be so helpful for any developer.
Troubleshooting Mails
There are also stored procedure to let us know if the mails are successful, failed or remained in the queue. This is fascinating feature. :).
To check for the mails which were successfully sent and delivered, we run the below query:
select * from msdb.dbo.sysmail_sentitems
Some of the columns it returns are

![]()
In the second image you can see we have the sent_status as sent, which states the mail has been successfully sent.
To check for the unsent mails which could not be sent, we run the below query:
select * from msdb.dbo.sysmail_unsentitems
TO check for the failed mails, which will not even be retried to be sent from the queue, we run the below query:-
select * from msdb.dbo.sysmail_faileditems
For more details on the failure along with the reason, the trouble shoot query would look like:
SELECT items.subject,
    items.last_mod_date
    ,l.description FROM msdb.dbo.sysmail_faileditems as items
INNER JOIN msdb.dbo.sysmail_event_log AS l
    ON items.mailitem_id = l.mailitem_id
GO
The results look like below:

The error description above is like “No Such Host” Error. This error usually comes when we have some smtp server connection settings wrong. We need to troubleshoot that on our own and recheck the settings credentials and then try. If then it does not seem to work, we need to look for the DNS server settings and retry with the configuration again. Nothing to worry for this though..:)
Conclusion
Thus we discussed here about sending mails from our own SQL using the stored procedures and how helpful they can prove to be. Troubleshooting the errors is very easy here and the set as well.
Exceptions and errors are a part of development which cannot be avoided but handling them is a challenge and developers can easily do that.
CodeProject
References
]]>Exceptions, are like part and parcel of an application. They are boon and ban for an application to. Is’nt it?This would be controversial, for developers it helps them track minor and major defects in an application, and somtimes they are frustrating when it lets users land on the Yello screen of death each time. This would make the users mundane to the application. Thus to avoid this, developers handle the exceptions. But still sometimes there are a few unhandled exceptions. Now what is to be done for them? MVC provides us with built-in filters ‘Exception Filters’ about which we will discuss. Lets start..
 cc: Google
Yellow screen of Death can be said as wadrobe malfuction of our application.
Get Started
Exception filters run when some of the exceptions are unhandled and thrown from an invoked action. The reason for the exception can be anything and so is the source of the exception.
Creating an Exception Filter
Custom Exception Filters must implement the built in IExceptionFilter interface. The interface looks as :
public interface IExceptionFilter{
    void OnException(ExceptionContext filterContext)
}
Whenever an unhandled exception is encountered, the OnException method gets invoked. The parameter as we can see, ExceptionContext is derived from the ControllerContext and has a number of built in properties that can be used to get the information about the request causing the exception. There properties ExceptionContext possess are shown in the table:
| Name | Type | Detail |
|---|---|---|
| Result | ActionResult | The result returned by the action being invoked. |
| Exception | Exception | The unhandled exceptions caused from the actions in the applications. |
| ExceptionHandled | BOOL | This is a very handy property, which returns a bool value (true/false) based on if the exception is handled by any of the filters in the applicaiton or not. |
The exception being thrown from the action is detailed by the Exception property and once handled (if), then the property ExceptionHandled can be toggled, so that the other filters would know if the exception has been already handled and cancel the other filter requests to handle. The problem, lies that if the exceptions are not handled, then the default MVC behaviour shows the dreaded yellow screen of death, to the users, which puts up a very bad impact on the users and more importantly, it exposes the application’s handy and secure information to the outside world, which may have hackers and then the application gets into the road to hell. Thus, the exceptions need to be dealt very carefully.
Lets demonstrate one small custom exception filter.
This filter can be stored inside the Filters folder in the web project of the solution. Lets add a file/class called CustomExceptionFilter.cs
public class CustomExceptionFilter : FilterAttribute, IExceptionFilter {
     public void OnException(ExceptionContext filterContext) {
        if(!filterContext.ExceptionHandled && filterContext.Exception is NullReferenceException) {
            filterContext.Result = new RedirectResult("customErrorPage.html");
            filterContext.ExceptionHandled = true;
        }
    }
 }
Now let us understand what this actually does. as we can see this implements the interface as mentioned earlier and thus implements the method, OnException. This mehtod has the parameter ExceptionContext, the properties of which is mentioned in the table. In this custom filter we have handled the most common and neglected exception “Null Reference Exception”, arises when a value returning null is not handled/checked and used in further implementations. The custom filter derives the FilterAttribute as to be used as Attribute over the action or the controller directly like [CustomExceptionFilter]. In this implementation above, we have used almost allthe important properties of the ExceptionContext. First, the check is used for the ExceptionHandled which returns a boolean value if the exception has been handled or not. If not then Check for the type of exception arisen. Since here we have used the NullReferenceException, we check for that exception. Then if the conditions are satisfied/passed we manipulate the result and return the RedirectResult (ActionResult type) and let the users land on a custom error page created in the application, to avoid the yellow dreaded screen.
The use of the filter is pretty simple as this custom filter extends from the FilterAttribute. So based on the usage, this can be used as [CustomExceptionFilter] on the Controller Levelor the individual Action level,which ever is mandate.
//Over controller
 [CustomExceptionFilter]
 public class HomeController:Controller {
    //......
 }
//Over the Action
 [CustomExceptionFilter]
 public ActionResult Index() {
    //.......
 }
Now, lets discuss about the in built HandleAttribute. This is a built in class which is used similar way as a filter attribute in MVC applications. The most important thing is this attribute works only when the custom errors in the web.config is enabledor set to true.
the default mode for this element is RemoteOnly, which willonly work out when application is deployed and request is made from some other systems.
Lets look at the properties of the HandleError Attribute.
- ExceptionType: This property, as the name suggests tells the attribute the type of exception it needs to handle.
- View: This is the property, which we need to specify inorder to lets the attribute, land the end users after handling the exception
- Master: If there is a special layout, we have for the error page, then this master can be set to that layout path, if left empty, this will take the default layout of the application for the error pages.
Thus, the below code snippet shows how to use the HandleError attribute
[HandleError(ExceptionType = typeof(NullReferenceException), View = "CustomErrorPage")] {
public Action Result {
    //........
    var testVal = null;
    //Unhandled and used..
 }
Caution: While reading through the Adam Freeman, a very interesting note of caution was mentioned while using the HandleError attribute. In the custom error page, we would be using the HandleError Info like the Stack Trace, the exception message etc. Since we would not like to show this to the end user, we need to put the stack trace inside a hidden field or make the html tag invisible because The view is not displayed tothe user unless the Exception.StackTrace is included in the View..
Conclusion & References
Thus, we learnt the creation of custom exception filters as well as the built-in filters in MVC applications.There are various ways/tools now tohandle exceptions, but stillwe can make use of these filters in order to avoid detrimental effects on our applications.
References: Adam Freeman-Professional Asp.Net MVC 4 & MSDN
I hope this would help developers & beginners. The concept is interesting when we use them. So start using and enjoy Coding.
Executing complex queries against character-based data on the sql tables can be accomplished using Full Text Queries across SQL as well as Azure SQL databases. There are many a times this type of requirement arises and we search for options for the implementation. One such scenario, I would like to share one such requirement. Suppose, we want users to search records from a table with column FirstName. Now, if users would like to search multiple entries to the search criteria, then how would the query go for search? Interestingly, FTS will do that for us..![]()
Now lets see what steps we need to follow inorder to accomplish and execute Full Text search queries.
Implementation
The very first thing we need to do before atleast writing the query, is to create Catalogs. Now What is a catalog, this catalog will be a warehouse which will contain all the Indexes (FTS indexes). Select the database to which you would like to add the FTS catalog and move to the storage, expand it and you will find:- Full Text Catalogs and Full Text Stoplist
Now the new thing Full Text Stoplist is an interesting concept.
The stoplist is actually a list of words which restricts the SQL to allow them in the FTS indexes, now FTS Index we will discuss next. Now how the stoplist works is, the words mentioned in the stoplist are avoided and not added into the indexes from search criteria’s text.
Thus, the below images show how to add a catalog:-
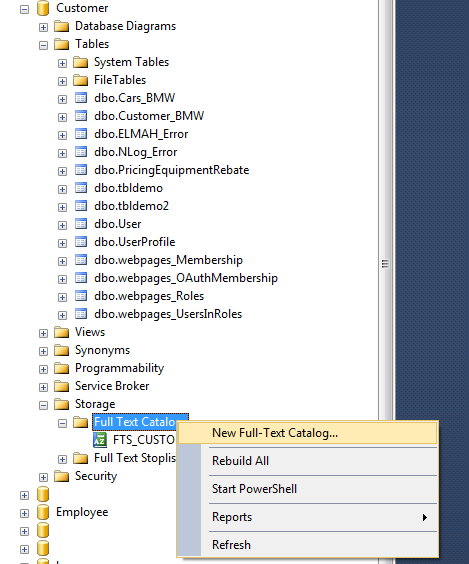
The next step after selecting the New Full-Text Catalog, we get a dialog box, which asks for FTS catalog name. With Accent sensitivity, by default Sensitve. More about accent sensitivity here
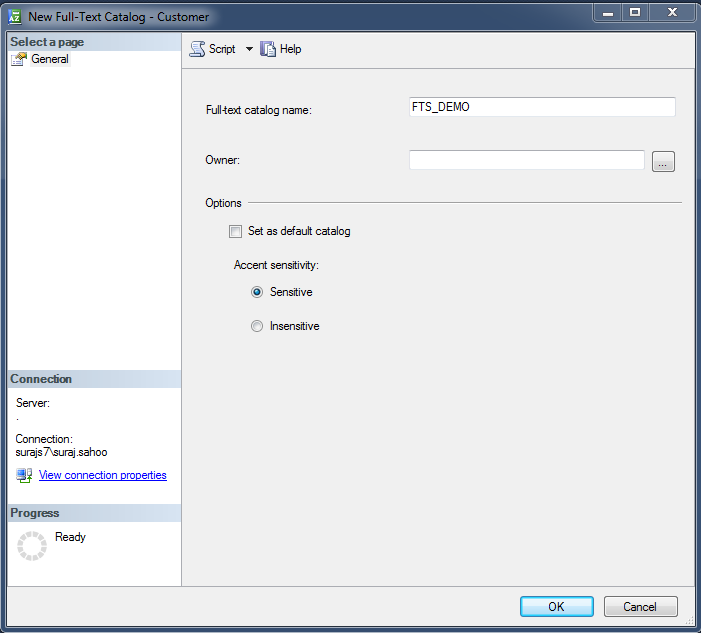
Now, one thing to note here is as far as I implemented, FTS user interface as shown above is not permissible. So to add catalog, we need to query the script. The query goes as below:
CREATE FULLTEXT CATALOG FTS_DEMO
WITH ACCENT_SENSITIVITY = OFF
Now we have catalog ready for the Full Text Search. Now it’s time to add index to the tables required. First, lets discuss what Indexes are and how they behave. These are allowed on a table , i.e. one index per table and atmost 1024 columns are supported per table. On the basis on these indexes the FTS can be applied and queried using the columns in the FTS index. Lets see how to add an FTS Index.
Using the User Interface:-

Just as we see the interface says directly the options to define an index on the table Customer. The following images will follow the steps through.
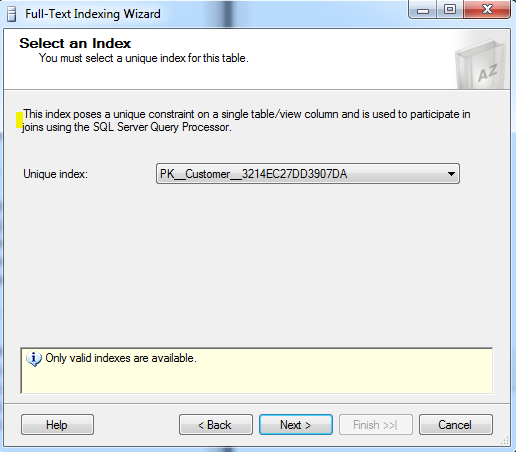
This creates a unique index on the Customer table, thus PK is prefixed. This states that we cannot create another index on the table.
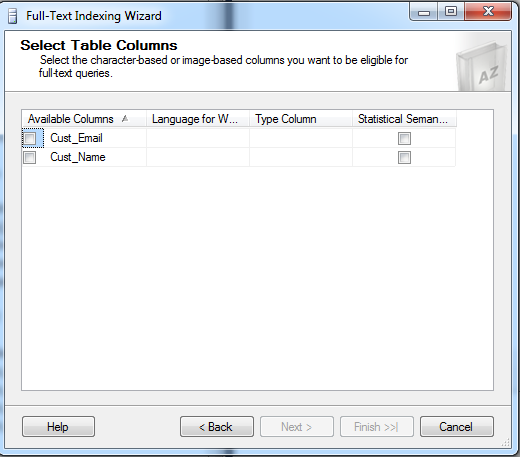
The above dialog states that we need to check inorder to select the columns which we wish to allow into the FTS index. Here I select both the columns. Then,
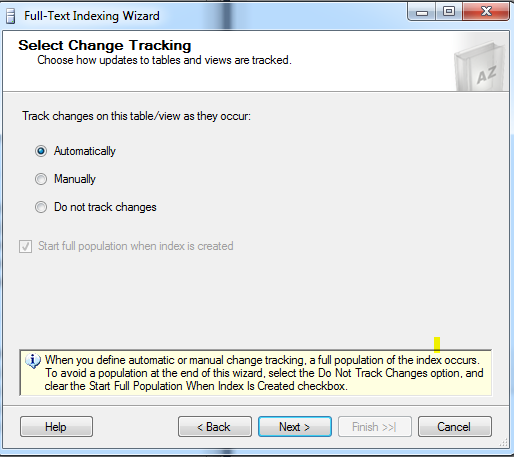
This dialog states that the changes to the table columns are tracked automatically and the indexes are populated automatically.

The above dialog asks to select the catalog into which the indexes for the table are going to be added. Here we select the catalog we created and then click next.
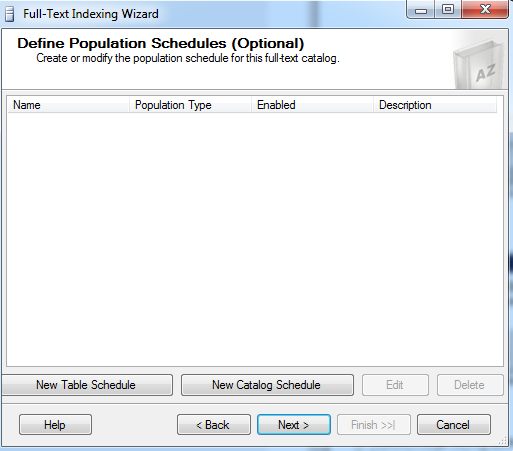
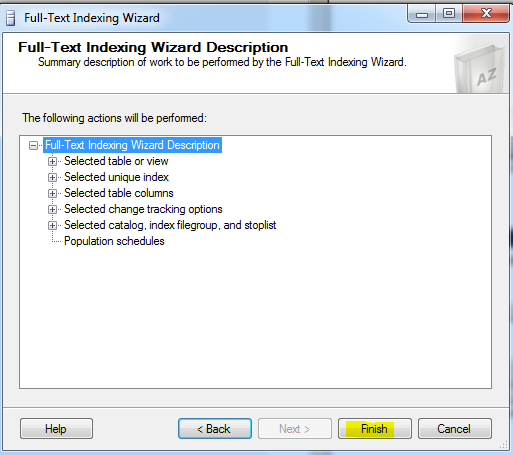
Then click Next and Finish. Thus FTS index is created for the table Customer .
Now to create the Index using query script, we need to just write and run one query as below:
CREATE FULLTEXT INDEX ON dbo.[Customer]
(CustName, CustEmail)
KEY INDEX PK_Customer_Index
ON FTS_DEMO
WITH STOPLIST = SYSTEM
Thus this would create the Index for us and do the same if we follow the above mentioned steps through images. Here one important thing to note is the KEY INDEX should be the primary unique key for that table created. To get the name you can type and execute the following:
sp_help [TABLENAME]
This will give you the name as PK_***** something like this. This is very much required aswe may panic on getting an error saying
A full-text search key must be a unique, non-nullable, single-column index which is not offline, is not defined on a non-deterministic or imprecise nonpersisted computed column, does not have a filter, and has maximum size of 900 bytes. Choose another index for the full-text key.
Now, we are all set to carry on with our query and expect the desired results. The query goes like:
SELECT * FROM dbo.[Customer_BMW]
WHERE CONTAINS(Cust_Email,'gmail')

This is how the syntax goes as above which is simple, this uses the keyword provided by FTS i.e. CONTAINS as it takes one keyword to find a match from the records.
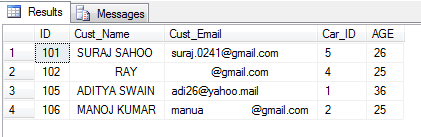
Another is the FREETEXT . What this does is it separates the strings into separate words and then based on it makes a search using the meaning of the words.Using the CONTAINS we can use multiple string entries using OR or AND like below:
SELECT * FROM dbo.[Customer_BMW]
WHERE CONTAINS(Cust_Email,'gmail OR yahoo')
The result goes as below:
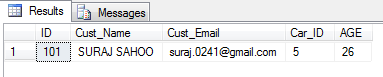
SELECT * FROM dbo.[Customer_BMW]
WHERE CONTAINS(Cust_Email,'gmail AND suraj')
The result goes as below:
Conclusion
Thus, this is how simple and easy Full Text Search implementation is.This will be very handy if such requirement comes up. I hope this helps the readers. Please post the queries if any.
References
Of course the references are the integral part to be shared.
My guru and the master Sql-Blog Authority
MSDN
Happy Reading and Learning.