Introduction
Here I would be demonstrating an application to chat and chat private as well, using SignalR.
Before that we need to know first what is SignalR! SignalR is an open and free library which can be used to have real-time functionality integrated to your web applications. There are a hell lot of areas where SignalR can come handy to make your application more handy and more integrated and more responsive to the end user as well. Real-time means having your server respond as quick as possible to the client as and when a request is made.
Now, take for an instance, we have a requirement to show the user uploading a file, the percentage of that file been uploaded on the server. Or I had come across a scenario where, we had to show the end user, who would be uploading a CSV file with ‘n’ number of rows and process each row for some validations. End user would be wondering what would be going on in the back-end. So, would it be great if we could show him how many rows have been processed and how many are left out! Similar to a progress window. Here, comes the SignalR magic!
Most of us think SignalR would be useful in making chat applications, but NO!,it has much more than just chat! I don’t think the makers of SignalR would have a thought in mind to make a chat application out of it! 
Much of a story now! Lets get into a bit of theory!
Theory
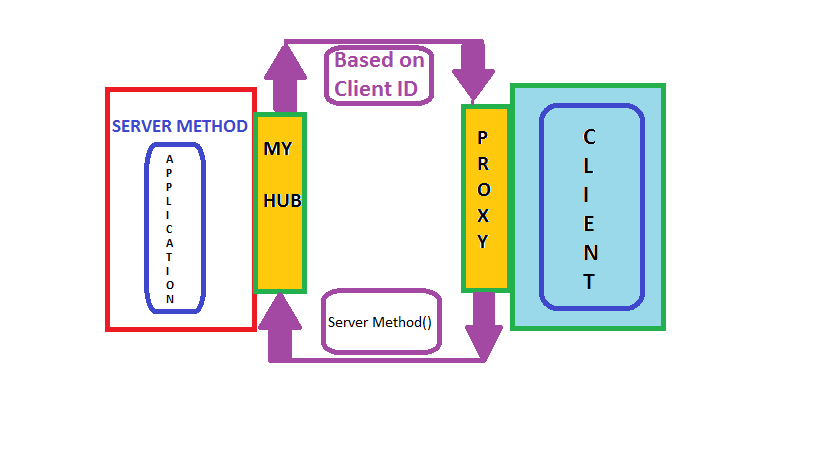
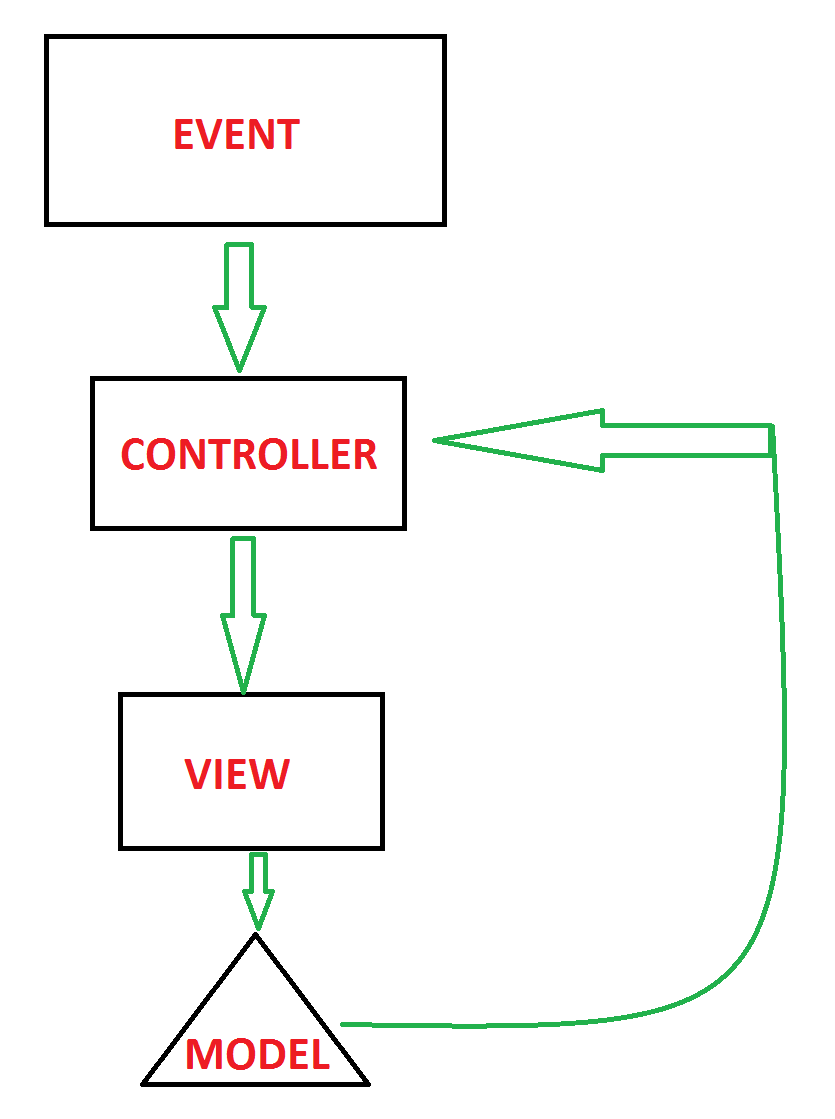
We will look into a simple image below and from that image we will try and gain some knowledge on the flow:
Now a days, every application requires a load of server response in the real time to sustain in the market, as the user expectations have raised high.
Remote Procedure Calls (RPC) is the concept that takes place in the SignalR internally. SignalR provides an API which helps in making the RPC between the server and the client. Actually, from the client side, server side functions are called using JavaScript, once the connection to server is set. The SignalR API also helps creating connections and manage them when required. In simple terms, SignalR provides connection between server and client, letting server to call the funcitons on the client side and from the client side, calling the server side. That somehow is called “Server-Push”.
SignalR starts with HTTP and then to a WebSocket if connection is available. From Wiki,
“WebSocket is a protocol providing full-duplex communication channels over a single TCP connection.”
An advantage of using WebSocket is it can be used by both client and server applications. WebSocket is considered to be the most efficient and consistent medium of communication as, it has the ability to manage server memory in a proper manner and being a full duplex communication, has low latency. These are the considerations made with SignalR which make it more efficient.
The SignalR decides the transport based on the browser, i.e. if the browsers support the kind of transport required by the SignalR. We will discuss the kinds of transports next:
HTML 5 Transports
- WebSockets as we have already discussed. This transport is considered to be true-persistent, creating a two way connection between client and server if the browsers support.
- Server Sent events also called Event Source, which is supported by all browsers except IE.
Comet Transports
Comet usually,is a web application model in which a long-held HTTP request allows server to post data to a client (browser).
- Forever frame This is supported by Internet Explorer only. Creates a hidden frame making a request to endpoint on the server. Server keeps pinging client or sends script to the client, thus providing a one way connection, creating a new connection on every request.
- Ajax Polling This is actually long polling, which is never persistent. This polls the request and waits until and unless the response is received from the server. This introduces latency and the connection resets.
Practical
We will be creating a chat application in order to explain the flow of SignalR. We install the SignalR, create a hub to which the client will interact, calling the server methods and in return the server responds and interact with the client.
You can directly add a new project in VS for the SignalR or create an MVC project and install the SignalR package/libraries from the Nuget.
PM > Install-Package Microsoft.AspNet.SignalR
This is download all the dependencies required for the SignalR.
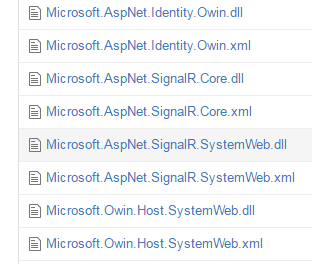
After the successful installation, the above dll’s or packages are installed into your project.
There will be a class file which needs to be added to the root of your project, which would look like:
using Owin;
using Microsoft.Owin;
[assembly: OwinStartup(typeof(SignalRChat.Startup))]
namespace SignalRChat
{
    public class Startup
    {
        public void Configuration(IAppBuilder app)
        {
            // Any connection or hub wire up and configuration should go here
            app.MapSignalR();
        }
    }
}
This is OWIN based applicaiton. Every OWIN application will have a startup.cs class, where the component for the application pipeline are added. The OWIN attribute which specifies the type of property, specifying the project’s start up and the configuration method, sets up the SignalR mapping for the App.
There will be another two script files that would be added as we install the packages for SignalR.
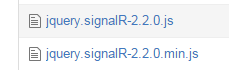
These script files are mandatory to be loaded onto the .cshtml page in order to activate the SignalR.
Lets look into the code straight away:
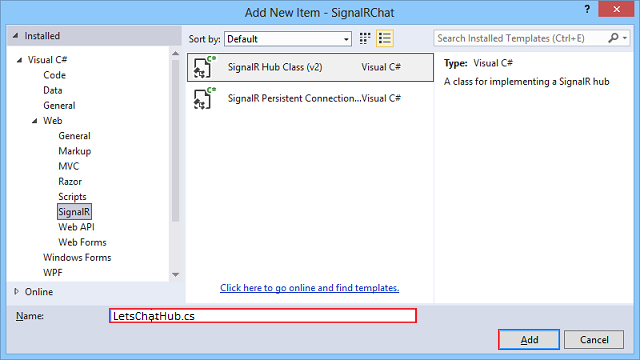
We need to add a new hub class inside a Hub folder. Lets name that LetsChatHub.cs, which would look like:
using System;
using System.Collections.Generic;
using System.Linq;
using System.Web;
using Microsoft.AspNet.SignalR;

namespace LetsChatApplication.Hubs
{
    public class LetsChatHub : Hub
    {
        public void Send(string name, string message,string connId)
        {
            Clients.Client(connId).appendNewMessage(name, message);
        }
    }
}
The above send method accepts the parameters, name (which you would be giving once you navigate onto the url), the message (which the user would be sending from the UI). The other parameter is connId, which would help us have chat private and not send to every user who navigates to the site. If you would like to have every user receive and send the messages who navigates to the URL. To allow every users the access, the code you change as below:
namespace LetsChatApplication.Hubs
{
    public class LetsChatHub : Hub
    {
        public void Send(string name, string message)
        {
            Clients.All.appendNewMessage(name, message);
        }
    }
}
The Send method, is requested from the client with the parameters after the connection is set on the client side and once the server receives the request, it processes and sends back the response to the client, using the appendNewMessage. This appendNewMessage method is added on the client side to receive the response and display on the UI to the client.
You need to add a controller, lets suppose: “LetsChat” with an action “LetsChat”, add a view to that with the below code to it.
The client side code would look like below:
@{
ViewBag.Title = "LetsChat";
}
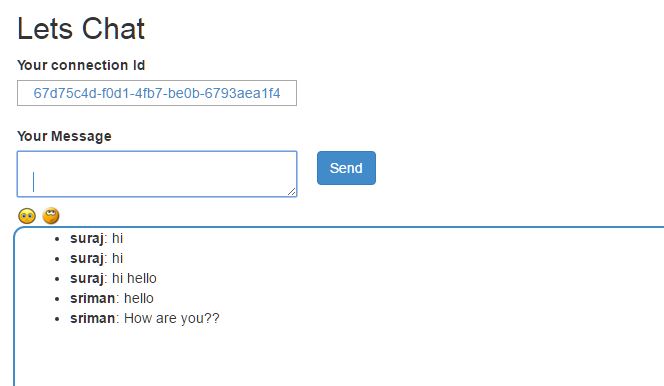
<h2>Lets Chat</h2>
<link href="~/Content/sweetalert.css" rel="stylesheet" />
<div class="form-group col-xl-12">
<label class="control-label">Your connection Id</label><br />
<input type="text" class="col-lg-12 text-primary" id="frndConnId" placeholder="Paste your friend's connection Id" /><br /><br />
<label class="control-label">Your Message</label><br />
<textarea type="text" class="col-lg-10 text-primary" id="message"></textarea>
<input type="button" class="btn btn-primary" id="sendmessage" value="Send" /><br /><br />
<img src="~/Content/smile.jpg" width="20" height="20" id="smile" style="cursor:pointer"/>
<img src="~/Content/uff.jpg" width="20" height="20" id="ufff" style="cursor:pointer" />
<div class="container chatArea">
<input type="hidden" id="displayname" />
<ul id="discussion"></ul>
</div>
</div>
<br />
<input type="hidden" id="connId" />
<!--Reference the autogenerated SignalR hub script. -->
@section scripts {
<script src="~/Scripts/jquery-1.10.2.min.js"></script>
<script src="~/Content/sweetalert.min.js"></script>
<script src="~/Scripts/jquery.signalR-2.2.0.min.js"></script>
<script src="~/signalr/hubs"></script>
<script>
//var userName = "";
//var sessionVal = '';
$(function () {
// Reference the auto-generated proxy for the hub.
var chat = $.connection.letsChatHub;
debugger;
// Create a function that the hub can call back to display messages.
chat.client.addNewMessageToPage = function (name, message) {
// Add the message to the page.
$('#discussion').append('<li><strong>' + htmlEncode(name)
+ '</strong>: ' + htmlEncode(message) + '</li>');
};
// Get the user name and store it to prepend to messages.
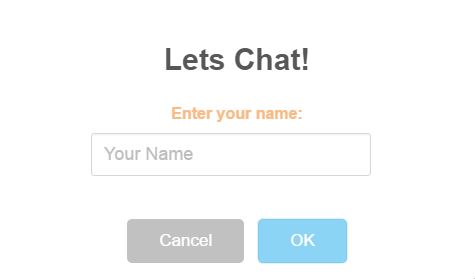
swal({
title: "Lets Chat!",
text: "<span style='color:#f8bb86;font-weight:700;'>Enter your name:</span>",
type: "input",
html: true,
showCancelButton: true,
closeOnConfirm: true,
animation: "slide-from-top",
inputPlaceholder: "Your Name"
},
function (inputValue) {
userName = inputValue;
if (inputValue === false) return false;
if (inputValue === "") {
swal.showInputError("You need to type your name!");
return false;
}
$('#displayname').val(inputValue);
});
// Set initial focus to message input box.
$('#message').focus();
$('#message').keypress(function (e) {
if (e.which == 13) {//Enter key pressed
$('#sendmessage').trigger('click');//Trigger search button click event
}
});
$("#smile").click(function () {
});
// Start the connection.
$.connection.hub.start().done(function () {
$('#sendmessage').click(function () {
// Call the Send method on the hub.
var connId = $("#connId").val();
var frndConnId = $("#frndConnId").val();
var finalConnId = frndConnId == "" ? $.connection.hub.id : frndConnId;
chat.server.send($('#displayname').val(), $('#message').val(), finalConnId);
$("#connId").val($.connection.hub.id);
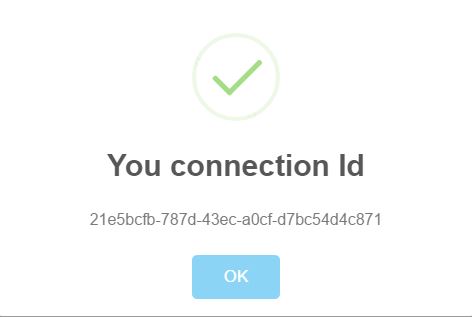
if (frndConnId == "") {
swal("You connection Id", $.connection.hub.id, "success");
}
// Clear text box and reset focus for next comment.
$('#discussion').append('<li><strong>' + htmlEncode($('#displayname').val())
+ '</strong>: ' + htmlEncode($('#message').val()) + '</li>');
$('#message').val('').focus();
});
});
});
// This optional function html-encodes messages for display in the page.
function htmlEncode(value) {
var encodedValue = $('<div />').text(value).html();
return encodedValue;
}
</script>
}
Lets Chat
We have a normal UI in place to add your message and send button to call the server methods.
Lets understand the code above part by part.
var chat = $.connection.letsChatHub;
Here, we set the connection to the Hub class. As you can notice here, letsChatHub, is the same hub class file name which we added to set up the server. The convention as follows, the intial of the methods or the class name starts with lowercase. From here, we use chat to access the Send method.
$.connection.hub.start().done(function () {
                $('#sendmessage').click(function () {
                    // Calls the Send method on the hub.
                    chat.server.send($('#displayname').val(), $('#message').val(), finalConnId);
chat.server.send,is self explanatory, it sets the chat connection to call the server Send method once the connection is set and started.
chat.client.appendNewMessage = function (name, message) {
//
}
This is called, when the Server receives the request and calls back the method on client side.
How the sample would work!
The sample provided for download, will be having few instructions to follow:
- When you navigate to the LetsChat/LetsChat route, an alert would pop up asking you for the name with which you would like to chat. Sweet Alert !!
- Once you enter the name, you see a textbox which asks you for “Your friend’s connection Id”, but since you are starting the chat, you just send a message, and another pop up comes up, with your connection ID, which you need to share with your friends to share your message. Remember, only those who have your ID use it while chatting will be able to see and send through messages to you.
- When you friend navigates, he ought to generate his connection ID and share with you inorder to set up your connection completely. Thus, you need to have the connID to whom you will be sending and vice-versa with your friend as well. Then just chat!!

If you would want to send message to all and make that common, then use the Clients.All code snippet to send all.
Another interesting thing, which was figured out is, the use of @section scripts{}, that lets the Signal R scripts render and active on your page and also using the @section scripts provides your code a good outlook.
Share and Send files using SignalR!!
Ooops!! Nice question right!
It is ideally not advised, rather I would not recommend to send or share files using Signal R. There always is better way to accomplish that. The idea would be using API, you can have an upload area, and use SignalR to show the progress and once upload completes, update the user regarding the completion and generate a download link on the UI for the users to download and view the file.
This is not always the best idea, but is just another idea.
Conclusion
This is just a simple Chat application, which you can use to chat with your friends, if you host on Azure or any other domain. But again,SignalR is not just this much. There is a lot of other effective use of SignalR. Will be sharing more utility of SignalR in few articles more.
References
]]>In this article I will be sharing a basic stuff which comes handy in MVC applications. The HTML helpers provided by the Razor are smart enough to understand and process the work as required.
We will be discussing in brief about the Ajax.BeginForm, which has few concepts hidden within. When we face the difficulty or the issue, we explore and resolve. Same has happened recently with me. So lets start exploring what the hidden secrets are, which actually are very few.
Adding Unobstrusive- Ajax JS
This can be added from the Nuget package manager directly. I find adding from the Package Manager console easy. The script goes like below:
Install-Package jQuery.Ajax.Unobtrusive
Snippet & Learning
AjaxExtensions.BeginForm is a part of System.Web.Mvc.Ajax namespace under the System.Web.MVC assembly. When used in the response it writes the HTML
Introduction
The stand out hero in the market now. AngularJs it is from Google, intensifying the effectiveness of the plain HTML. There has been a constant and roaring buzz in the market on this. We have heard of MVC (Model-View-Controller), MVVM (Model-View-ViewModel) and many more framework. This is simple Javascript framework based on MVW framework.
MVW??

Ok now what is MVW!! It stands for Model-View-Whatever . Like Salman Khan says, Whatever you want to do man!! Just Do! So Angular says, Add Whatever you want man!! 
The reason being is, it is actually close to MVC, MVVM and MVP as well. Earlier it had concepts related to MVC, but after the modification and enhancements and addition of the $scope, it came closer to MVVM framework as well. Thus, the framework became MVW.
Before we start hand on Angular, we need to have the resources required by it and start experimenting in a normal text editor like Notepad++ or Sublime Text. So is it time taking hectic!! Not at all, just navigate now to Angular JS Resources Download add the resources and just start. Even better way!! Just add the below CDN resources and just start.
<script src="https://ajax.googleapis.com/ajax/libs/angularjs/1.3.15/angular.min.js"></script>
Some concepts
Now we have seen a lot of resources explaining the concepts thats new and interesting in Angular JS. Lets get a brief over view on each of the important concepts.
Angular Expressions
This is actually how Angular binds data onto the HTML and makes it dynamic in seconds. The syntax is {{ exp }}. Whatever is written in the braces, that data is bound to the HTML element.
<div ng-app="">
My age is: {{ 15 + 10 }}
</div>
My age is: {{ 15 + 10 }} //Actual angular is used here.
This will display My age is 25 in normal HTML as well.
But one thing, please read further, only this will not let you display the evaluated value.
Angular directives
These are kinds of attributes added to the HTML elements, thus extending a new range of attributes to the HTML. ng- is the attribute syntax, just like data- attributes. There are flexibility in the directives as well. There are few in-build directives and there are directives we can create explicitly. Few of them are listed below along with a detailed example of their usage. Lets follow:
- First and foremost directive is ng-app: This is utmost important directive as it starts/initiates the Angular application inside the HTML. If we remove the ng-app directive then the evaluation will fail as the Angular will not initiate.
- ng-model: This is another important directive which actually makes our HTML dynamic as it stores the data/handles the data for the form or HTML controls which we add n the web pages.
- ng-init: This is responsible to initiate the data for the model properties, in order to have some values pre-populated.
Let’s have a look at a simple code snippet:
<div ng-app="">
<input type="text" ng-model="firstName">
<input type="text" ng-model="lastName">
<span>{{firstName}} {{lastName}}</span>
</div>
Here the ng-model binds the firstName and the lastName as you type in the text box to give a dynamic feel.
To make the default names appear on the screen on the page load, we can use the ng-init to initiate the data for the model, just like below:
<div ng-app="" ng-init="firstName='Suraj';lastName='Sahoo'">
<input type="text" ng-model="firstName">
<input type="text" ng-model="lastName">
<span>{{firstName}} {{lastName}}</span>
</div>
Angular JS – MVC
Angular JS, as we mentioned above follows MVC architecture in the background. In the above simple snippets as we saw, how the data is bound to the view from the model values and presented on the UI.
Thus when the event is fired the Angular Controller is reponsible to fetch the data from http services using the $http.get(url) which in turn then binds data to the model using the ng-model and then data is dynamically bound to the view/html element. The concept here is similar and we will learn more on this once we follow up with the controllers and modules in Angular.
Conclusion
This was all about the start and simple directives to get your hands on Angular JS. In the succeeding modules and blogs, we will discuss more in details.
Hand on Snippet
<!DOCTYPE html>
<html>
<head>
<script src="https://ajax.googleapis.com/ajax/libs/angularjs/1.4.8/angular.min.js"></script>
</head>
<body>
<h2>Welcome To Angular World</h2>
<div ng-app="" class="form-group">
<label>First Name</label><br>
<input type="text" ng-model="firstName" class="form-control"><br>
<label>Last Name</label><br>
<input type="text" ng-model="lastName"><br>
<br>
<span> Your Name is: {{firstName}} {{lastName}}</span>
</div>
</body>
</html>
What’s Next
- Modular approach: Creating Modules in Angular ng-module
- Controllers in Angular ng-controller
- Scope in Angular $scope
- Server interaction and binding data from APIs in MVC & Http Services $http
Generating PDF from your web applications is easy, simple and reliable. There are many tools/packages available in the Nuget. Here, in this article we would learn how to use Rotativa in the MVC applications. Rotativa makes it very easy to generate pdf from an HTML. It is actually derived version of wkhtmltopdf which converts html to pdf. The browsers as they use the webkit engine to render the HTML. According to wiki, WebKit is a layout engine software component for rendering webpages in web browsers. Making custom changes to the pdf document generated is quite simple too. Using this we can directly download the pdf document for the user or else we can also prompt the document inside an i-frame. Lets see how to implement this wonderful tool.
Implementation
Ofcourse, we need to install the package before starting the implementation. To install the package from the package manager console, the command goes like:
Install-Package Rotativa
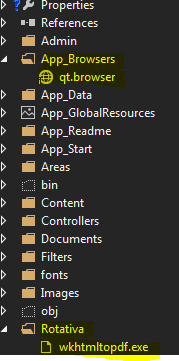
Then, we can find the rotativa reference under the reference, with a separate folder named ‘Rotativa’ with the following contents.
Another folder named App_Browsers which has the contents required by the package Rotativa.
Now we are ready to implement the Rotativa using the codes we will discuss below to generate pdf to directly download it as well as show it in another window. Thus, lets have a look.
To implement the pdf using rotativa, we just need to specify the codes below in a separate action method.
public ActionResult Test()
        {
            var students = new List<xx>
            {
                new xx() {action = "ABC", email = "[email protected]", firstName = "test", lastName = "test"},
                new xx() {action = "ABC", email = "[email protected]", firstName = "test", lastName = "test"},
                new xx() {action = "ABC", email = "[email protected]", firstName = "test", lastName = "test"},
                new xx() {action = "ABC", email = "[email protected]", firstName = "test", lastName = "test"}
            };

            return new Rotativa.ViewAsPdf("TestView", students);
        }
The above code is a simple action method, where we have created a new model and then as we can see, the return statement here, new Rotativa.ViewAsPdf(“TestView”,students). This states that a new rotativa type is created which is used to view the pdf. To this method as you can see, we have passed the first parameter as the View Name and the second parameter as the View Model set for the view. Only the view name can also be used/passed to the overloaded parameter of that method.
- ViewAsPdf:- This method just displays the view as pdf in the same window and to display the same pdf in another window, we can manipulate in the javascript as
window.open(url)
- ViewAsPdf-To Download:-This is not property method of the Rotativa class, but can be used differently to download directly the pdf file. Lets see the code below:
public ActionResult Test()
        {

            var pdfResult = new ViewAsPdf("TestView")
            {
                FileName = "ExamReport.pdf",
                CustomSwitches =
                    "--footer-center \"Name: " + "XYZ" + "  DOS: " +
                    DateTime.Now.Date.ToString("MM/dd/yyyy") + "  Page: [page]/[toPage]\"" +
                    " --footer-line --footer-font-size \"9\" --footer-spacing 6 --footer-font-name \"calibri light\""
            };

           return pdfResult;

        }
Just user to declare a new type as ViewAsPdf and just return to the action. This will directly download the file for you. - ActionAsPdf:- This would return the specified action which returns a view with a viewmodel as pdf. The code would go as below:
public ActionResult Test(int testID)
{
     var students = new List<xx>
            {
                new xx() {action = "ABC", email = "[email protected]", firstName = "test", lastName = "test"},
                new xx() {action = "ABC", email = "[email protected]", firstName = "test", lastName = "test"},
                new xx() {action = "ABC", email = "[email protected]", firstName = "test", lastName = "test"},
                new xx() {action = "ABC", email = "[email protected]", firstName = "test", lastName = "test"}
            };
    // code to retrieve data from a database
    return View(students);
}
These are the common methods being used usually.
Now, There is another beautiful thing to mark here. The customization which can be done to the pdf files. The use of Custom Switches.
var pdfResult = new ViewAsPdf("TestView")
            {
                FileName = "ExamReport.pdf",
                CustomSwitches =
                    "--footer-center \"Name: " + "XYZ" + "  DOS: " +
                    DateTime.Now.Date.ToString("MM/dd/yyyy") + "  Page: [page]/[toPage]\"" +
                    " --footer-line --footer-font-size \"9\" --footer-spacing 6 --footer-font-name \"calibri light\""
            };
The FileName property is used to set the file name for the pdf being downloaded. The Custom Switches is the best property. As we can mark the structure is bit messy, but is not cumbersome. Based on the wkhtmltopdf there are a list of options which can be used to customize the PDF file. Here in the above code snippet, we have a footer customized.
- –footer-center:- This aligns the footer at the center foot of the page.
- Page:[page]/[toPage]:- The [page] to [toPage] marks the current page and the total number of pages in the file.
- –footer-line:-Displays line above the footer
- –footer-font-size:-Sets the font size of the footer elements
- –footer-spacing:-Sets the spacing between the footer-line and the text
- –footer-font-name:-Sets the font family/style of text
For more options and details please visit the url –wkhtmltopdf
Conclusion & References
Thus, we saw how easy it is to implement the Rotativa in MVC applications and generate a pdf in minutes. Implement and enjoy
References:
wkhtmltopdf
Nuget Rotativa
Github Rotativa
]]>In this article , I would be discussing a very interesting topic called WebSecurity in MVC applicationa and how easy and simple it is to implement and understand. Let me share a small incident for which I came across this concept. Usually we create an MVC application and select a template may it be Internet or Empty (these two are used frequently). Based on these templates, the web project gets scaffolded and we get the final project structure to work on. If we select an Internet application, then by default scaffolding we get controller “Home” and “Account” created. ASP.NET MVC bydefault provides the authentication through the Web Security. I tried to customize the way authentication was done and then realized this is so simple and easy, as it reduces so many lines of our codes. Lets discuss more on this with a small Demo.
Lets Play..
Lets briefly get to know what Web Security is!! According to MSDN, it provides security and authentication to Asp.Net web applications with many more features like user account creation, Login User and Log off, Reset & Change Password, with the help of its in-built functions. It internally also does the Password hashing which is one of the main concern during creation of a user account. The different properties and methods are well explained in the MSDN link given above. This is usually called as Helper class that is present in the namespace- “System.WebMatrix.WebData”. When an Internet template is chosen we would find the “Dynamic Link Library” , WebMatrix.WebData.dll
Lets create a new project in Visual studio:
Here I create a new Asp.Net Web Project and name it as “WebSecurityDemo” and after clicking on ok the final creation of project in Visual Studio looks like below:
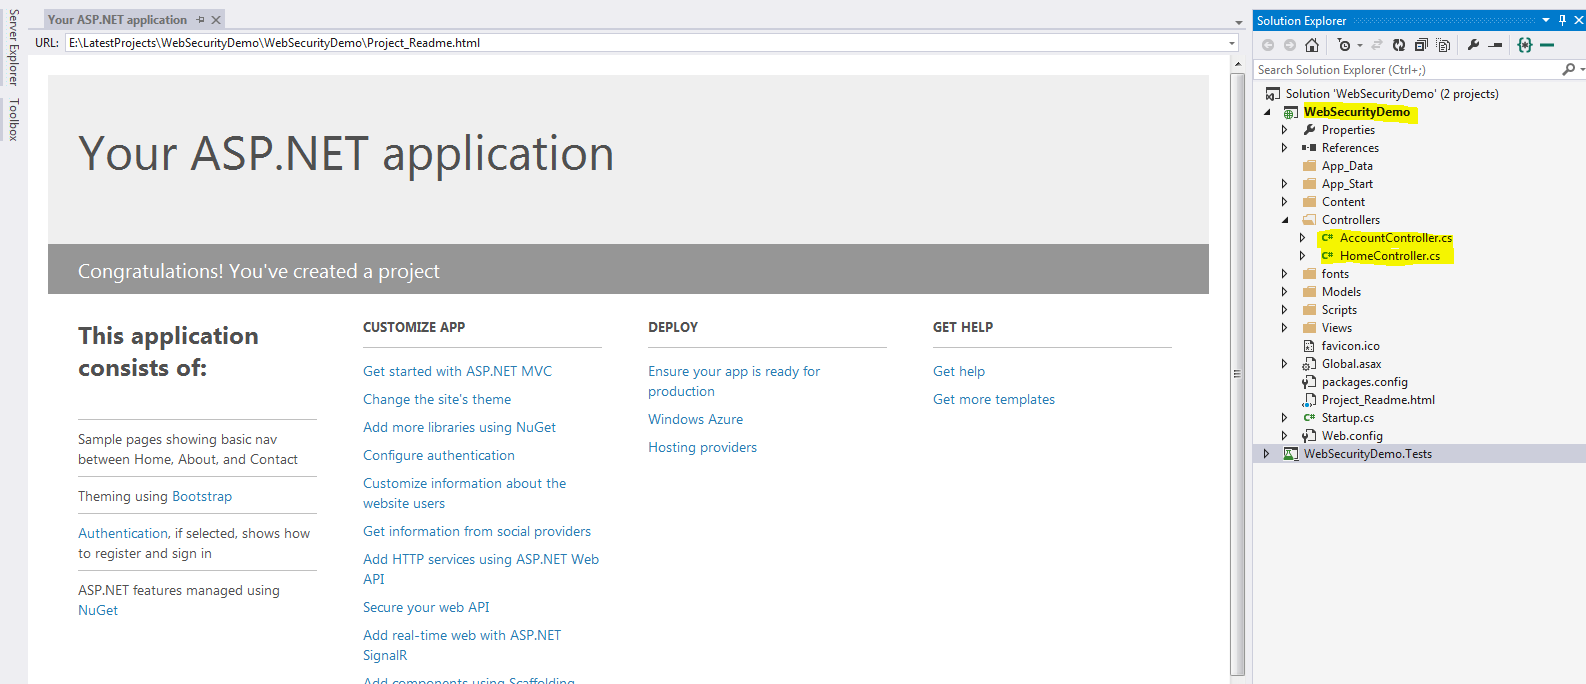
As we can see in the above image, the project is scaffolded based on the Internet template in MVC. This by default creates the Home controller and Account controller with all kinds of authentication and security. This default web application without any coding, gives user options to Register, Login, Log off and OWIN authentication using Facebook, Twitter, G+(this requires some modification which I will be discussing later). But how does this happen!! This is done by the Authorize attribute provided by MVC, which is one of the best assets of MVC. Just specifying an attribute like “[Authorize]” which restrict user access to the methods/actions if specified at controller level or also can be specified at action level, just like the below snippet:
[Authorize]
    [InitializeSimpleMembership]
    public class AccountController : Controller
    {
          [AllowAnonymous]
        public ActionResult Login(string returnUrl)
        {
            ViewBag.ReturnUrl = returnUrl;
            return View();
        }
In the above snippet as you can see the Authorize attribute is given at the controller level, which will restrict users to access the action methods defined inside this controller,but as you can also see another attriute called [AllowAnonymous] this is provided on the action method, which means any user can access this action using the url directly. This attriute overrides the controller level attribute here. The best part to this authorize attributeis we can also override this and create our own custom Authorize attribute like below:-
namespace WebSecurityDemoTest.Filters
{
    public class WebSecurityAuthorize:AuthorizeAttribute
    {
        protected bool AuthorizeCore(HttpContextBase httpContext)
        {
            if (!httpContext.Request.IsAuthenticated)
            {
                return false;
            }
            if (HttpContext.Current.Session["SessionHelper"] == null)
            {
                return false;
            }

            return true;
        }

        protected void HandleUnauthorizedRequest(AuthorizationContext filterContext)
        {
            filterContext.Result = new RedirectResult("/");
            base.HandleUnauthorizedRequest(filterContext);
        }

    }
}
As you might see here, I have created a custom authorize attribute, which first checks if the current http Request is Authenticated or not, Since we will be using FormsAuthentication, this IsAuthenticated gets initialized after Login or inside the LoginPost method like:
FormsAuthentication.SetAuthCookie(userName,true);
The boolean value true does the trick. After successful login when the AuthCookie is set, the IsAuthenticated for the request is set to true. Now if that is not true, then it is handled by the other method i.e. HandleUnAuthorizedRequest. When there is an unauthorize request it checks and return the user back to the default page i.e. the login page. Here, as you can also see I have checked for the session also, after the user has a successful login, I create a session and store the values as is usually done, and based on that also I check if the session is not null, if the AuthorizeCore method returns true, then the user navigates to the desired landing page. Thus, this is how a custom authorize attribute is created.
Now lets discuss more about another class that is created inside the Filters folder, when the project gets created i.e. <em>”InitializeSimpleMembershipAttribute.cs”</em>. This class is responsible to initialize the tables required by the Web Security to run in the database. Lets see how the class looks like and discuss about that:-
using System;
using System.Data.Entity;
using System.Data.Entity.Infrastructure;
using System.Threading;
using System.Web.Mvc;
using WebMatrix.WebData;
using WebSecurityDemoTest.Models;
namespace WebSecurityDemoTest.Filters
{
[AttributeUsage(AttributeTargets.Class | AttributeTargets.Method, AllowMultiple = false, Inherited = true)]
public sealed class InitializeSimpleMembershipAttribute : ActionFilterAttribute
{
private static SimpleMembershipInitializer _initializer;
private static object _initializerLock = new object();
private static bool _isInitialized;
public override void OnActionExecuting(ActionExecutingContext filterContext)
{
// Ensure ASP.NET Simple Membership is initialized only once per app start
LazyInitializer.EnsureInitialized(ref _initializer, ref _isInitialized, ref _initializerLock);
}
private class SimpleMembershipInitializer
{
public SimpleMembershipInitializer()
{
Database.SetInitializer<UsersContext>(null);
try
{
using (var context = new UsersContext())
{
if (!context.Database.Exists())
{
// Create the SimpleMembership database without Entity Framework migration schema
((IObjectContextAdapter)context).ObjectContext.CreateDatabase();
}
}
WebSecurity.InitializeDatabaseConnection("DefaultConnection", "UserProfile", "UserId", "UserName", autoCreateTables: true);
}
catch (Exception ex)
{
throw new InvalidOperationException("The ASP.NET Simple Membership database could not be initialized. For more information, please see https://go.microsoft.com/fwlink/?LinkId=256588", ex);
}
}
}
}
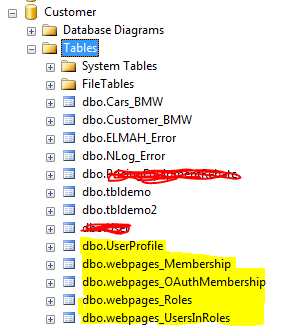
}As you can see, since this class extends itself from the ActionFilterAttribute, then it is used as an attribute only, usually at the controller level as you can check in the first code snippet. [InitializeSimpleMembershipAttribute]. This attribute, what it does in simple language is ensures before any action runs, that the membership has been created at the database level or not. So that when a userregisters it stores the data in the system defined tables. System Defined Tables!!![]() . Yes the tables required for the Websecurity are created once we build and run the application and the controller action gets called which has the attribute defined. But how? The below peice of code snippet does the trick:-
. Yes the tables required for the Websecurity are created once we build and run the application and the controller action gets called which has the attribute defined. But how? The below peice of code snippet does the trick:-
WebSecurity.InitializeDatabaseConnection("DefaultConnection", "UserProfile", "UserId", "UserName", autoCreateTables: true);As you can see the method “InitializeDatabaseConnection” present in the WebSecurity class, explains itself what it does. This initializes the database connection based on the first parameter which is the database name here. Then the sql table with the name gets created, with columns UserId as the primary key and the UserName associated with the user who registers. Now we need to add a Database context to our project:
- Right click on the Model folder. Select Add new Item:
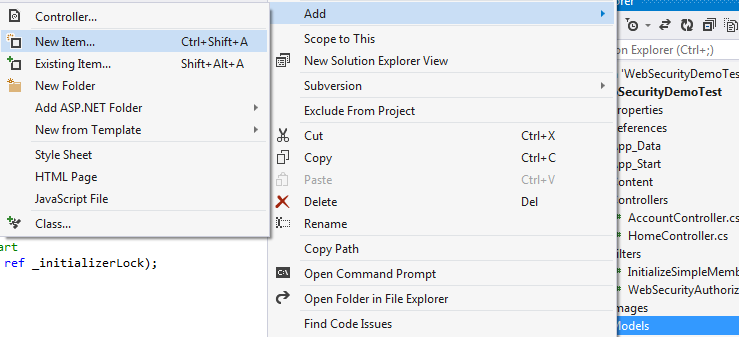
- Then select Data and Add an Ado.Net Entity Data Model with a valid name.
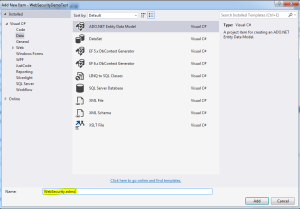 I have named the data model as WebSecurity.edmx. This creates the conceptual model for the database after we give the connection.
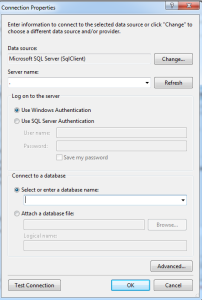
 - Then we need to specify the connection to the database. You can create a sample database or use an existing one. I will be using one existing one and will show how the tables for websecurity get generated. Select Generate from database

- Then the connection needs to be setup. Choose your local server, so in the database textbox enter “.(dot)” which means local DB and that would list the databases present in your local. Choose anyone you wish to.
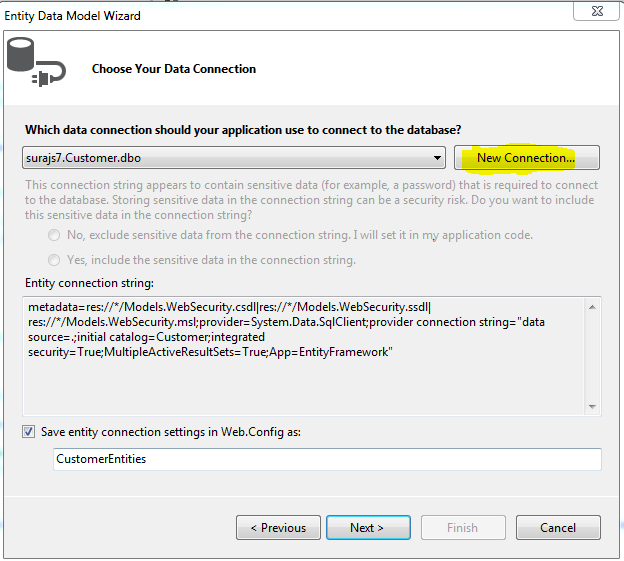
- Thus, when the connection is success and is established, we can find the connection string in theWeb.Config file.

- Then since you can scroll up and see in the InitializeSimpleMembership.cs we have the DefaultConnection specified, we need to change the configuration specified defaultin the web.config connection string, that is change the Data Source = . and remove the AttachedDbFileName entirely and then specify the Initial Catalog as the database name which you have added during the db connection. Finally the connection string with name “DefaultConnection” looks like:
<add name="DefaultConnection" connectionString="Data Source=.;Initial Catalog=Customer;Integrated Security=SSPI;" providerName="System.Data.SqlClient" />
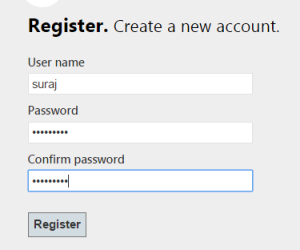
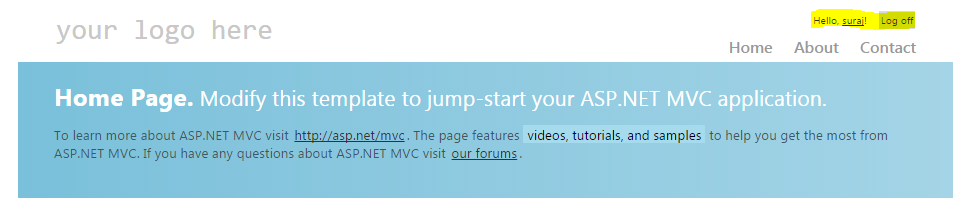
- Thus, we have reached the end to the set up. Now clean and build the solution once and then run. When we run the application, we land on the Home page as the Home controller has no authorization. And also remember one thing the membership/ websecurity tables will only get created once the InitializeSimpleMembership attribute is hit and in the above snippets it gets hit only when the Account controller is accessed. So when we go to any action method that is AllowAnonymous as we also need to land on the page, So we click on the Register.
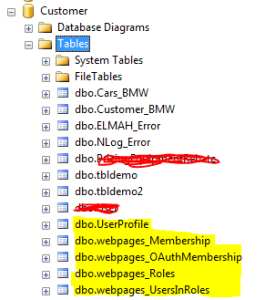
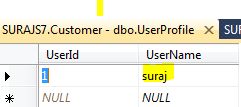
- The below image shows the table created once the attribute is hit/executed. “dbo.webpages_Membership” stores all the information related to the User registered with the User password that is hashed and that to one way for more security. User Id which acts as the foriegn key here to the UserId primary key in the UserProfile table which also contains the UserName which is asked during the registration.
- After the registration, you will find yourself logged in as the UserName entered and the data in the tables would look like:

- Thus this is how the simple attribute, internally does everything.


Now lets check for the codes , the method WebSecurity class implements. First is the “WebSecurity.UserLogin”
WebSecurity.Login(model.UserName, model.Password, persistCookie: model.RememberMe)
This method, takes the UserName, the password and the persistCookie which is the Remember Me check box. This maps the webpages_Membership table and the UserProfile table for the combination of the userName and password, if this satisfies or is perfectly mapped, it redirects user tothe authenticated page, else throws him back to the Login page. if wrong password is entered then it gives the ModelState error as incorrect username and password. If the Remember Me is checked, then the IsPersistent is true in the cookie which is created, then when next time even after closing the browser we come, the cookie persists based on the span it has and authenticates the user without the credentials.
The next method used is “WebSecurity.ChangePassword”
WebSecurity.ChangePassword(User.Identity.Name, model.OldPassword, model.NewPassword)
This method takes the unique username, with the old Password and also the new Password as the parameters. It internally matches first the old password with the User name (Logged In) and then if satisfies stores or replaces the old password with the new one encrypting it or hashing it. This is that simple.
Now the other method and an important one, when the user registered, how did the data get saved into the table!! Nice question .. The answer is another inbuilt method that does the trick here i.e. “WebSecurity.CreateUserAndAccount”
WebSecurity.CreateUserAndAccount(model.UserName, model.Password)
what this does is, takes the parameter as the unique user name and the password, then adds the user name into the UserProfile table that returns the UserId and whichinturn is used as the foreign key with one to one relationship and hashes the password and stores in the webpages_Membership table. This is how a user gets registered so simply using WebSecurity.
There is also a method called Logout, which simply logs out a user. “WebSecurity.Logout()”.
Conclusion
Thus, I discussed in this article the details of WebSecurity class and how to use that in the MVC application. The method and the membership authentication is the same, just we need to customize inorder to have our own hold over it. It is very easy ans simple to use, which makes the code less redundant and reusable and mainly maintainable. This follows usually the DRY concept which is Don’t Repeat Yourself. Thus this suggests to use evrything once, like have an Authorize attribute may it be Custom and reuse it wherever required. WebSecurity has everything defined, we just need to explore and use its methods and properties extensively to reduce the level of coding and LOC.
Thus here I end my article I hope I could explain atleast something.
Though I am not an expert and moreover a human, so mistakes are ovious. i would be glad if you find any or also suggestions and discussion are most welcome.
Share and learn.
CP