Generating PDF from your web applications is easy, simple and reliable. There are many tools/packages available in the Nuget. Here, in this article we would learn how to use Rotativa in the MVC applications. Rotativa makes it very easy to generate pdf from an HTML. It is actually derived version of wkhtmltopdf which converts html to pdf. The browsers as they use the webkit engine to render the HTML. According to wiki, WebKit is a layout engine software component for rendering webpages in web browsers. Making custom changes to the pdf document generated is quite simple too. Using this we can directly download the pdf document for the user or else we can also prompt the document inside an i-frame. Lets see how to implement this wonderful tool.
Implementation
Ofcourse, we need to install the package before starting the implementation. To install the package from the package manager console, the command goes like:
Install-Package Rotativa
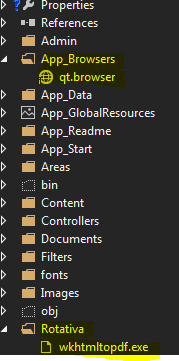
Then, we can find the rotativa reference under the reference, with a separate folder named ‘Rotativa’ with the following contents.
Another folder named App_Browsers which has the contents required by the package Rotativa.
Now we are ready to implement the Rotativa using the codes we will discuss below to generate pdf to directly download it as well as show it in another window. Thus, lets have a look.
To implement the pdf using rotativa, we just need to specify the codes below in a separate action method.
public ActionResult Test()
        {
            var students = new List<xx>
            {
                new xx() {action = "ABC", email = "[email protected]", firstName = "test", lastName = "test"},
                new xx() {action = "ABC", email = "[email protected]", firstName = "test", lastName = "test"},
                new xx() {action = "ABC", email = "[email protected]", firstName = "test", lastName = "test"},
                new xx() {action = "ABC", email = "[email protected]", firstName = "test", lastName = "test"}
            };

            return new Rotativa.ViewAsPdf("TestView", students);
        }
The above code is a simple action method, where we have created a new model and then as we can see, the return statement here, new Rotativa.ViewAsPdf(“TestView”,students). This states that a new rotativa type is created which is used to view the pdf. To this method as you can see, we have passed the first parameter as the View Name and the second parameter as the View Model set for the view. Only the view name can also be used/passed to the overloaded parameter of that method.
- ViewAsPdf:- This method just displays the view as pdf in the same window and to display the same pdf in another window, we can manipulate in the javascript as
window.open(url)
- ViewAsPdf-To Download:-This is not property method of the Rotativa class, but can be used differently to download directly the pdf file. Lets see the code below:
public ActionResult Test()
        {

            var pdfResult = new ViewAsPdf("TestView")
            {
                FileName = "ExamReport.pdf",
                CustomSwitches =
                    "--footer-center \"Name: " + "XYZ" + "  DOS: " +
                    DateTime.Now.Date.ToString("MM/dd/yyyy") + "  Page: [page]/[toPage]\"" +
                    " --footer-line --footer-font-size \"9\" --footer-spacing 6 --footer-font-name \"calibri light\""
            };

           return pdfResult;

        }
Just user to declare a new type as ViewAsPdf and just return to the action. This will directly download the file for you. - ActionAsPdf:- This would return the specified action which returns a view with a viewmodel as pdf. The code would go as below:
public ActionResult Test(int testID)
{
     var students = new List<xx>
            {
                new xx() {action = "ABC", email = "[email protected]", firstName = "test", lastName = "test"},
                new xx() {action = "ABC", email = "[email protected]", firstName = "test", lastName = "test"},
                new xx() {action = "ABC", email = "[email protected]", firstName = "test", lastName = "test"},
                new xx() {action = "ABC", email = "[email protected]", firstName = "test", lastName = "test"}
            };
    // code to retrieve data from a database
    return View(students);
}
These are the common methods being used usually.
Now, There is another beautiful thing to mark here. The customization which can be done to the pdf files. The use of Custom Switches.
var pdfResult = new ViewAsPdf("TestView")
            {
                FileName = "ExamReport.pdf",
                CustomSwitches =
                    "--footer-center \"Name: " + "XYZ" + "  DOS: " +
                    DateTime.Now.Date.ToString("MM/dd/yyyy") + "  Page: [page]/[toPage]\"" +
                    " --footer-line --footer-font-size \"9\" --footer-spacing 6 --footer-font-name \"calibri light\""
            };
The FileName property is used to set the file name for the pdf being downloaded. The Custom Switches is the best property. As we can mark the structure is bit messy, but is not cumbersome. Based on the wkhtmltopdf there are a list of options which can be used to customize the PDF file. Here in the above code snippet, we have a footer customized.
- –footer-center:- This aligns the footer at the center foot of the page.
- Page:[page]/[toPage]:- The [page] to [toPage] marks the current page and the total number of pages in the file.
- –footer-line:-Displays line above the footer
- –footer-font-size:-Sets the font size of the footer elements
- –footer-spacing:-Sets the spacing between the footer-line and the text
- –footer-font-name:-Sets the font family/style of text
For more options and details please visit the url –wkhtmltopdf
Conclusion & References
Thus, we saw how easy it is to implement the Rotativa in MVC applications and generate a pdf in minutes. Implement and enjoy
References:
wkhtmltopdf
Nuget Rotativa
Github Rotativa
]]>Being developers we always face a challenge, to debugand optimize the queries we have written for any request made to the server. Getting the exact time of the queries requested for each page load is next to impossible. Usually we count one two three.. and see the average.. :D. But is this the solution, how often can we do this!! This is not as developers we would want. The network tab in the developers tool gives us the information about the per request made for a page load, but that is not enough for us to know which query is taking more time and which query reuires optimization.
As MiniProfiler suggests
It is capable of profiling calls on raw ADO.NET (SQL Server, Oracle, etc), LINQ-to-SQL, EF (including Code First), Lightspeed and a range of other data access scenarios.
Is’nt that great!! Yes indeed.
Versions
There are different versions available for .NET MVC projects based on the MVC versions. We can get the Install Package with versions from the below provided Links.
- Miniprofiler-The Core needed for profiling
- Miniprofiler for EF 6-The Core needed for profiling EntityFramework version 6+
- Miniprofiler for EF 5-The Core needed for profiling EntityFramework version 5
- Miniprofiler for MVC3-The Core needed for profiling MVC3 applications
- Miniprofiler for MVC4/5-The Core needed for profiling MVC4 & 5 applications
- Miniprofiler for WCF-The Core needed for profiling WCF applications
Get Started
As we all know, for getting the package, we use the Package Managerconsole or Nuget Package. I would be using the PM console for this purpose. I will be installing Miniprofiler for MVC application. Check the image below:

This will add the references to the project. Not ending with this, there comes next the configuration which needs to be done. Check out the configurations below.
Configurations
At first in an MVC application, as we know the heart of the MVC lies in the Global.asax, so we need to configure here first. There is no hard and first rule like, this but I follow this. 
protected void Application_BeginRequest()
        {
         if(request.IsLocal)MiniProfiler.Start();
         //or any number of other checks, up to you, if for all request you need profiling then remove the if condition
        }

        protected void Application_EndRequest()
        {
            MiniProfiler.Stop(); //stop as early as you can, even earlier with Mvc MiniProfiler.MiniProfiler.Stop(discardResults: true);
        }
This is all we need to do to let Miniprofiler get registered to the application. Now comes the question how will the Miniprofiler be displayed to the user(developer). This is simple, we just need to check which page load takes more time and has the maximum number of qeries being called at the same time. Then we just need to place a simple peice of code snippet mentioned below, in the view page, as that needs to be rendered on the view only.
@using StackExchange.Profiling //namespace to be added
<head>
    @MiniProfiler.RenderIncludes()
</head>
Just note the namespace used : using StackExchange.Profiling
Thus when we run the application, the view/layout wherever the RenderIncludes() is there the profiling is done and displays the entire list of queries executed and the time taken. The below is how the profiler looks:
Now you would be wondering where did I mention the profiling to connect to the Entity Framework!! Hold on.. For that we need to install another package through the same PM console and that is Miniprofiler for the EF version based on used in the application.

this will add the package and all the dependencies if not present will be added. Then we need to add a simple code line to the Application_Start method in the Global.asax as below:
MiniProfilerEF.Initialize();
This as it explains itself, will initialize the profiling for the Entityframework operations or the db operations and show the user the entire sql querybeing called/executed during the page load and also the time taken.

The highlighted part in the above image, show the sql query being called and how many times. The red mark indicates that there are duplicate calls being made in the page load, based on which we will be optimizing the queries and reduce the number of db operations to make the page load faster, thus improving performance.
I hope this small peice helps developers beginning their careers. Any modifications, suggestions are mostly welcome.
CP