Scheduled jobs are a part of development, may it be any application. Inventory applications require them the most when they automate almost everything.  SQL Jobs can prove to be handy when a query needs to run and update or insert or anything of that sort at regular intervals as per requirement. These are similar to schedulers to track your reminders and updates.
According to MSDN
SQL Server Agent is a Microsoft Windows service that executes scheduled administrative tasks, which are called jobs in SQL Server 2016.
SQL Jobs are run by the SQL Server Agents. It can be a single operation running in the background or a series of operations.The SQL Jobs can be added using the GUI provided by the SQL Server. But in this article, we will see and understand the Query that helps create SQL Jobs. These jobs can be scheduled to run daily, weekly or on monthly basis.
Straight to the point
We will straight away check and see the snippet and then try understand the parts of it.
BEGIN TRANSACTION;
DECLARE @ReturnCode INT;
SELECT @ReturnCode = 0;
DECLARE @owner_Login_Id NVARCHAR(30),
        @actual_database_name NVARCHAR(30);
SET @owner_Login_Id = N''; -- ADD THE LOGIN NAME TO THE SERVER
SET @actual_database_name = N'DB NAME'; -- ADD THE DATABASE NAME AS REQUIRED

IF NOT EXISTS( SELECT name
               FROM msdb.dbo.syscategories
               WHERE name = N'[Uncategorized (Local)]'
                 AND category_class = 1 )
    BEGIN
        EXEC @ReturnCode = msdb.dbo.sp_add_category
             @class = N'JOB',
             @type = N'LOCAL',
             @name = N'[Uncategorized (Local)]';
        IF( @@ERROR <> 0
         OR @ReturnCode <> 0
          )
        GOTO QuitWithRollback;
    END;
DECLARE @jobId BINARY(16);
EXEC @ReturnCode = msdb.dbo.sp_add_job
     @job_name = N'JOB_NAME',
     @enabled = 1,
     @notify_level_eventlog = 0,
     @notify_level_email = 0,
     @notify_level_netsend = 0,
     @notify_level_page = 0,
     @delete_level = 0,
     @description = N'JOB_DESCRIPTION',
     @category_name = N'[Uncategorized (Local)]',
     @owner_login_name = @owner_Login_Id,
     @job_id = @jobId OUTPUT;
IF( @@ERROR <> 0
 OR @ReturnCode <> 0
  )
GOTO QuitWithRollback;

EXEC @ReturnCode = msdb.dbo.sp_add_jobstep
     @job_id = @jobId,//-- ID of the Job created
     @step_name = N'STEP_NAME', //--Step Name for the JOB
     @step_id = 1,
     @cmdexec_success_code = 0,
     @on_success_action = 1,
     @on_success_step_id = 0,
     @on_fail_action = 2,
     @on_fail_step_id = 0,
     @retry_attempts = 0,
     @retry_interval = 0,
     @os_run_priority = 0,
     @subsystem = N'TSQL',
     @command = N'YOUR QUERY GOES HERE',
     @database_name = @actual_database_name, //--Database name is generic and defined above at the start
     @flags = 0;
IF( @@ERROR <> 0
 OR @ReturnCode <> 0
  )
GOTO QuitWithRollback;
EXEC @ReturnCode = msdb.dbo.sp_update_job
     @job_id = @jobId,
     @start_step_id = 1;
IF( @@ERROR <> 0
 OR @ReturnCode <> 0
  )
GOTO QuitWithRollback;
EXEC @ReturnCode = msdb.dbo.sp_add_jobschedule
     @job_id = @jobId,
     @name = N'JOB_SCHEDULE_NAME',
     @enabled = 1,
     @freq_type = 4,
     @freq_interval = 1,
     @freq_subday_type = 1,
     @freq_subday_interval = 0,
     @freq_relative_interval = 0,
     @freq_recurrence_factor = 0,
     @active_start_date = 20150615,
     @active_end_date = 99991231,
     @active_start_time = 0,
     @active_end_time = 235959,
     @schedule_uid = N'af82656c-e151-4ebb-9fe1-009495e1415d';
IF( @@ERROR <> 0
 OR @ReturnCode <> 0
  )
GOTO QuitWithRollback;
EXEC @ReturnCode = msdb.dbo.sp_add_jobserver
     @job_id = @jobId,
     @server_name = N'(local)';
IF( @@ERROR <> 0
 OR @ReturnCode <> 0
  )
GOTO QuitWithRollback;
COMMIT TRANSACTION;
GOTO EndSave;
QuitWithRollback:
IF( @@TRANCOUNT > 0 )
ROLLBACK TRANSACTION;
EndSave:
GO
The snippet part Line No. 9-12 results the existance of the Local categories. What this does is simple.
From MSDN
Contains the categories used by SQL Server Management Studio to organize jobs
Now, after the check, if the category exists that governs the organization job, it then executes the pre-defined Stored procedure that adds a new category sp_add_category
sp_add_category
     [ [ @class = ] 'class', ]
     [ [ @type = ] 'type', ]
     { [ @name = ] 'name' }
- @class:Class governs the class i.e. may be JOB|ALERT|OPERATOR
- @type: This specifies the type or location of the Job i.e. LOCAL|MULTI-SERVER|NONE
- @name: Category Name that will be added
After this the Job Addition SP is executed. The parameters for the SP needs to be known and why are they added. For more information MSDN can be followed.
This SP sp_add_job simply and only adds the JOB with the specified name. For the execution of JOB and to let it execute the required process, we need to add a JOB STEP, which is created next.
sp_add_jobstep does the job for us. This SP adds the specific Step to be executed or run under that JOB. The parameters here can also be referred from MSDN.
@command is the most important parameter here, as the query that will actually be executeed at intervals and fulfil your requirement will run.
@database_name is also important as this would specify on which database the query would be executed by the JOB.
We are then adding the schedule for the created job using SP sp_add_jobschedule . This Sp adds the required schedule for the JOB and sets the JOB to run based on the schedule. Please refer the MSDN for more info and the parameters definition.
Conclusion
Thats it folks. We have seen the simple query that once run, creates a SQL job for us that can actually execute any query on the background and make life easy. 
Points of Interest
We have followed TRANSACTION in the queries in order to track the errors and if any caused, then we could roll back the changes to avoid ambiguity.
Instead of now following steps to create Jobs using the SQL Server Object Explorer, run the above query, understand the parameters once and then that’s easy.
Hope this helps.
References
]]>A very interesting topic of discussion. We have mail integrated to every application now a days. We integrate email using SMTP settings in the Web.Config in .NET and use the Send method to send mails. Recently, I came across an interesting challenge, where we were to send emails from our SQL Server. Suppose we have to track the successful scheduled sql query execution. We cannot look into the tables it modified every time in order to check if it actually ran through successfully. It would be so nice, if we could get some kind of notification which can help us know about the status of execution. Yes, it is possible to send mails from our sql server using few stored procedures which are actually pre-defined.
Lets learn how:-
Get Started
Remember we will be using pre defined Stored procedure to send the mails. First of all we need to set up an account with the credentials required by the server to send the mails. Usually the mail is sent through SMTP, Simple Mail Transfer Protocol. The settings would depend on the server your aplication demands. Remember the configuration needs to be valid.
Create a Database Account:-
EXEC msdb.dbo.sysmail_add_account_sp
    @account_name = 'SendEmailSqlDemoAccount'
  , @description = 'Sending SMTP mails to users'
  , @email_address = '[email protected]'
  , @display_name = 'Suraj Sahoo'
  , @replyto_address = '[email protected]'
  , @mailserver_name = 'smtp.gmail.com'
  , @port = 587
  , @username = 'XXXXXX'
  , @password = 'XXXXXX'
Go
Please use proper credentials and server settings in order to successfully deliver the mails, else they will fail and be queued.
Nextstep is to create a profile which would be used to tconfigure the database mail. The sp would look like below:
EXEC msdb.dbo.sysmail_add_profile_sp
    @profile_name = 'SendEmailSqlDemoProfile'
  , @description = 'Mail Profile description'
Go
This profile would be used in order to set the mail configuration and the emails and sent.
Next step is to map the account to the profile. This will let the profile know, which account credentials it need to work for sending successfully.
That would look like:
-- Add the account to the profile
EXEC msdb.dbo.sysmail_add_profileaccount_sp
    @profile_name = 'SendEmailSqlDemo'
  , @account_name = 'SendEmailSql'
  , @sequence_number = 1
GO
Thus, we are all set to send the successly emails. The mail sending look up snippet would look like below:
EXEC msdb.dbo.sp_send_dbmail
    @profile_name = 'SendEmailSqlDemo2'
  , @recipients = '[email protected]'
  , @subject = 'Automated Test Results (Successful)'
  , @body = 'The stored procedure finished successfully.'
  , @importance ='HIGH'
GO
The stored procedured being used are sometimes vulnerable to not getting executed. So Try catch block and Begin and End Transaction are mandatory in few Stored Procedures.
Lets take an example here,
Suppose we have a SELECT INSERT query using Stored Procedure, so what happens is we are selecting and inserting from 4 tables, lets say
Users | UserLogin | UserEmployment | Departments
For each new screen creation we are manipulating and selecting the users based on their PK and inserting again into the same tables with a different FK, representing the particular screen. The query would look like below:-
BEGIN TRY
  BEGIN TRAN
 INSERT INTO
   dbo.[User]
 SELECT
    us.UserName,
	us.UserAddress,
	us.UserPhone,
    @fkScreenID
 FROM
   dbo.[User] as us
 WHERE
   UserID= @userID
 COMMIT TRAN
    END TRY
   BEGIN CATCH
  ROLLBACK TRAN
  END
  END CATCH  //Similarly for other tables as well we continue. Its is better to add the Try Catch to whole SP Executing Block
Here, when the transaction in case fails, it would move into the Catch block and there we can have the email sending procedure so as to get a notification regarding the success or failure and reason and where it failed. This would be so helpful for any developer.
Troubleshooting Mails
There are also stored procedure to let us know if the mails are successful, failed or remained in the queue. This is fascinating feature. :).
To check for the mails which were successfully sent and delivered, we run the below query:
select * from msdb.dbo.sysmail_sentitems
Some of the columns it returns are

![]()
In the second image you can see we have the sent_status as sent, which states the mail has been successfully sent.
To check for the unsent mails which could not be sent, we run the below query:
select * from msdb.dbo.sysmail_unsentitems
TO check for the failed mails, which will not even be retried to be sent from the queue, we run the below query:-
select * from msdb.dbo.sysmail_faileditems
For more details on the failure along with the reason, the trouble shoot query would look like:
SELECT items.subject,
    items.last_mod_date
    ,l.description FROM msdb.dbo.sysmail_faileditems as items
INNER JOIN msdb.dbo.sysmail_event_log AS l
    ON items.mailitem_id = l.mailitem_id
GO
The results look like below:

The error description above is like “No Such Host” Error. This error usually comes when we have some smtp server connection settings wrong. We need to troubleshoot that on our own and recheck the settings credentials and then try. If then it does not seem to work, we need to look for the DNS server settings and retry with the configuration again. Nothing to worry for this though..:)
Conclusion
Thus we discussed here about sending mails from our own SQL using the stored procedures and how helpful they can prove to be. Troubleshooting the errors is very easy here and the set as well.
Exceptions and errors are a part of development which cannot be avoided but handling them is a challenge and developers can easily do that.
CodeProject
References
]]>Validations in any application is so critical now a days that developers ought to be on their toes while developing any such critical and sensitive applications. Hackers are now in every corner of the society, avoid them restrict them to post non sense data into your applications. The attacks are so vulnerable that security guard of any application is mandatory.

The security checks and implementations should be alert and active in the application to counter the attacks. Lets start learning about different types of validations we can have in our MVC application.
Server-Side Validation
Lets begin with simple server side validations. Server side validation are required when we post something to the server with an expectation for the response,usually while posting form data. The form data post is generally very vulnerable. The attacks are quite easier for the attacker here. Thus, we need to check on the server if we are receiving valid data or not on our end. Thus, server side validation can to some extent prevent nonsense input data. Lets discuss how to do validation explicitly using view model. Lets discuss how:
Explicitly means, we would be checking on server side after form post by the user, if the data input are valid input or not, then we post back the user with the validation message as response.
Suppose we have a model for the Registration of a user to an application. The model goesas below:
public class RegistrationViewModel(){
    public string FirstName { get; set; }
    public string LastName { get; set; }
    public string Address1 { get; set; }
    public string Address2 { get; set; }
    public string TelNo { get; set; }
}
Thus in the view/UI user will be displayed with the above labels and respective text boxes for input. The razor engine view page in the application looks like:
@model ServerSideValidationDemo.Models.RegistrationViewModel
@{
 ViewBag.Title = "Registration Page";
}

@using (Html.BeginForm())
{
}
Thus, the above snippet would bring the user the UI where the users would post their input and click submit. In the razor view page, you can see the HTML Helper ValidationMessageFor. This helper displays the Validation message returned after validation from the server as response, at the respective model property. Like for example, we want the user to enter the Model property First name as mandatory, then after validation the helper would display the validation message beside the First Name Text Box.
Now lets have a look at the Action snippet to which the post would call after Submit click.
[HttpPost]
public ActionResult UserRegistration(RegistrationViewModel registerModel){
     if (string.IsNullOrEmpty(registerModel.FirstName))
         {
             ModelState.AddModelError("FirstName", "Please enter your first name");
         }
     if (!string.IsNullOrEmpty(registerModel.TelNo))
         {
             Regex telNoRegex= new Regex("^9\d{9}$");
             if (!telNoRegex.IsMatch(registerModel.TelNo))
             ModelState.AddModelError("TelNo", "Please enter correct format of Telephone Number");
         }
     if(ModelState.IsValid){
         return View("Sucess");  //Returns user to success page
         }
      else {
         return View();  //Returns user to the same page back again
        }
 }
Before explaining the above snippet, lets understand how this will be called after Submit click.
@using (Html.BeginForm()), this does the trick even without specifying the Action and controller. This actually internally calls the Post method of the current url, i.e. looks for the HttpPost attribute to the respective action name of the current url. Thus, in this way the post method of UserRegistration gets called and this also post the required view model to the action, fetching the values input by the user.
After the Action Result method gets called, there is check for the properties explicitly. Here, we check if the user has input into the First name or not. If the user skipd the First Name textbox and submits, then we post the user with the validation message saying “Please enter the first name”. This validation check will not let the user post the input, unless he adds the first name. Similarly, the telephone number is also validated with the regular expression(for the indian telephone number) given.
This was all about the validation being done explicitly.
Now, since we are developing an MVC application, it provides pre defined attributes which can be used to validate our post data. The attributes are called Data-Annotations attribute. Lets look at their usages below:
The use of data annotations can be extensively done in order to avoid heavying the controller post action,explicitly checking for each property. The data annotations attribute in a view model would look like below:
public class RegistrationViewModel(){
    [Required]
    [Display(Name = "First name")]
    [StringLength(50, ErrorMessage = "The {0} must be at least {2} characters long.", MinimumLength = 6)]
    public string FirstName { get; set; }
    public string LastName { get; set; }
    public string Address1 { get; set; }
    public string Address2 { get; set; }
    [Required(ErrorMessage = "Please Enter Telephone Number")]
    [Display(Name = "Tele Phone")]
    [RegularExpression(""^9\d{9}$"", ErrorMessage = "Please Enter Correct format of Telephone No.")]
    public string TelNo { get; set; }
}
The view model above uses Data Annotations attributes and all the required validations for the properties are provided. Lets discuss one by one:
- Required:- This attribute forces the user to enter the value for that specific property and then submit the form, else diplays “The FirstName is required.”. Mark here, the previous message would be a default error message where as for the Tele phone number, the custom error message would be displayed.
- Display(Name = ):- This attribute sets the label for the model property. We just need to specify
@Html.LabelFor(m=>m.TeleNo). This would display the specified custom label for the property, here it would display Tele Phone - RegularExpression:- This attribute is very handy specially when we have properties like Email Address, Tele Phone Numbers and specific expressions for passwords in the forms. We just specify the expression in the attribute and it validates the input from user and states if it is valid or else displays the error message.
Thus, here the view page would go like the same as above. And when we submit, the action post method called would be different i.e. much less code. Lets have a look at the action below:-
[HttpPost]
 public ActionResult UserRegistration(RegistrationViewModel registerModel){
    if (ModelState.IsValid)
      {
         return View("Success");//Return to the success
      }
    else
      {
         return View();//Return back to the same view
      }
 }
Thus, the data annotations here made it so simple and easy.
Here then comes another security vulnerability, i.e. Cross-Site Request Forgery Attacks, which can be easily attacked using the simple Fiddler. When we post any data, we can easily manipulate the data posted by one user using the fiddler and damp into the application and even ruin it. This is indeed very dangerous. Lets see how to prevent Cross site forgery attacks
Preventing Cross Site forgery Attacks
In MVC applications, while posting the form data, it is quite simple to prevent such request if understood properly. MVC provides the attribute [ValidatAntiForgeryToken] on the respective action. Lets see the flow in the snippet first.
First we need to place the AntiForgeryToken helper in the razor view page like:
@using(Html.Form("UserRegistration", "Register")) {
    @Html.AntiForgeryToken()
    //Then here normal rest form as mentioned above
 }
Then in the controller “Register” for the action “UserRegistration”(POST) add the attribute like below:
[HttpPost]
[ValidateAntiForgeryToken]
public ActionResult UserRegistration(RegistrationViewModel registerModel){
   //ModeState Valid check and rest code goes here
}
Ok, so we have seen what two simple steps we need to do. Now lets understand how it does. What happens exactly when we do not place these attributes. How vulnerable our controller is and to what extent an attacker can affect the application. Suppose we are on an Edit page, where a user soughts to edit few of his login information. Now an attacker from over a third party domain and host a simple HTML that would post some information to the same Edit action, the user were to. Then, some how the user if navigates to the Html page set up by the attacker, the user unknowingly is posting unwanted data to the server and normal saving to the database. Here the attacker may be replacing the email ids or any other vulnerable information to his own and retrieving the user’s data. BOOM! This is crash, rather a crap!
Thus, what we need to do here, we need to check if the request to the server action is coming from the same domain, the user has logged in ! for this we need to have some header or property which will be mapped when a request is made and if matches then post else let the authentication fail.
This is actually what the attribute does. The ValidateAntiForgeryToken actually sets a cookie to the incoming reuest called __RequestVerificationToken, and the same __RequestVerificationToken is set for the domain in which the user is logged in. Thus, when a request is made from the same domain, the request header cookie should match and let the user post the data, but when a request is made from the third party domain, then the request is rejected since the __RequestVerificationToken will never match, just failing the authentication and preventing the Cross Site Forgery by any attacker.
Now here there is another problem. If any how the attacker gets to know the Anti Forgery Token, then what!! again crap! No there is a way out here as well. The attribute has ability to add a unique/different Salt every time so that the same token is not reused everywhere.
@Html.AntiForgeryToken("SALT") //The salt can be any sort of string(homogeneous mixture :))[ValidateAntiForgeryToken("SALT")]Another concept that is vulnerable to such attacks and may breach the security in the application is SQL Injection Lets discuss this in brief.
SQL Injection Attacks & Prevention Techniques
What exactly is SQL Injection attack? 
SQL Injection is an attack to fool and manipulate the application database. This is done through the malicious input from the user during post methods and if the posted data is not validated before being executed as sql query. This is really very dangerous which can let attackers get all the sensitive data or even delete the records from all tables, truncating them, just by posting a simple query to drop instead of actual data.
In this, the objective of the attacker is to post their query into the application and let the server run and give him the response if not handled in the server end. Lets see how:
Suppose we have a sql query to select the names of houses and display. The query would be like:
var sqlTobeExecuted = "SELECT HouseID, HouseName"+
    "FROM House " +
    "WHERE Address LIKE '" + searchInputParam +"%';
SqlDataAdapter da = new SqlDataAdapter(sqlTobeExecuted , DbCommand);
The above query is not parameterized and is a simple query in string format to get the house details. Now suppose the attacker posts the searchInputParam (which originally comes from the textbox input of the user) as
‘ UNION SELECT id,name FROM sysobjects;–
Mark the statement what becomes after that is passed to the string query,
SELECT HouseID,HouseName FROM House
WHERE Address LIKE ” UNION SELECT id,name FROM sysobjects;–%’
The first apostrophe in the searchInputParam closes the Like parameter in the SQL query and the double dashes “–” comment out the rest of the query. Thus that gives the list of all the HouseNames and also all the tables present in the database . Even they can also get the ids of the sysObjects and use the Ids to retrieve the column names of the database table they want. Suppose there is a table named Users. Oviously the table would have all the user details. Thus, with the id and the table name the attacker can retrieve the column names of the Users table using the below query:
‘ UNION SELECT name FROM syscolumns WHERE id = “USERID”;–
Thus,the whole of the database can be exposed to malicious users at a single click.
To prevent this,
- Encrypt the essential and sensitive data like password, credit card info and other details. So that to some extent if by any how they get the details they cannot decrypt it. Use one way hashing to encrypt the record data.
- Using parameterized queries instead of strings, in order to avoid directly injecting the values from the User input to the query as we saw in the above section. A parameterized query would prevent the malicious input and it would look like below:
var commandToBeExecuted = "SELECT HouseID, HouseName FROM House"+
    "WHERE Address  Like @Address";
SqlCommand cmd = new SqlCommand(commandToBeExecuted , conn);
cmd.Parameters.Add("@Address",address);
As we see in the above query we avoid passing directly the string input, instead we are using parameters into the SQL query, which would prevent such attacks. - use of parameterized Stored Procedures, which also prevent and prove to be a good solution to these mallicious attacks of injection. Also it is advisable to not trust them completely/blindly so it is always better to check for the sensitive data from user inputs and then execute the Stored procedure. This can be done, where the developer can think there are chances of vulnerability.
- Entity Framework & LINQ, it is interesting to note here is while using LINQ to entity, the query generation does not use the string based approach, rather it uses the object model API, thus being not susceptible to SQL injection attacks.
Authentication & Authorization
These two are very very very…important in any application and these are two different concepts all together but are used to solve the same thing,i.e. Security. When we develop an secure application, the Login is highly essential. Thus, properly authenticating users to the application & authorizing users to particular section of the application is challenging. Usually Forms Authentication is implemented across MVC applications. In the web.config file, the following configuration is set:
Only this will not set the authentication. You need more set up be done. This would involve a lot of configuration. WebSecurity in MVC makes it easy and secure to be implemented. It provides tables and hashing as well. The hashing it provides is one way and very secure. You can learn more about implementing Web Security in MVC from
Web Security In MVC
Thus after setting this authentication, then the important thing is Authorization, which can be provided on controller level, action level, which can be customized in order to check for the access levels along with the sessions. Only Authorize attribute would let the check for the session, we can customized to check for the roles and access levels for the screens as well.
[Authorize]
 public class HomeController : Controller
    {
        public ActionResult Index()
        {
            return View();
        }
    }
In the above snippet, the entire controller has been authorized. That is each method inside the controller will be first authorized.
public class HomeController : Controller
    {
      public ActionResult Index()
        {
            return View();
        }
       [Authorize]
       public ActionResult GetHome(){
         return View()
       }
    }
Here, only the action method GetHome is authorized, not the whole controller.
Thus, Authentication and Authorization are very important factors that ought to be taken into consideration.
More security considerations in MVC
Straight from the OWASP scurity points,
Its advisable to hide the MVC versions as well as Asp.Net versions we use, never expose the versions through the headers.
X-AspNet-Version 4.0.30319
X-AspNetMvc-Version 5.0
We need to hide the versions which appears in the Network tab of the developer table.
Lets know how to remove the versions of Asp.Net and Asp.Net Mvc from the headers.
- Asp.net Version:-To hide the X version of the Asp.Net we use the below Web.Config change.
The above will hide the Asp.net versions. - Asp.Net MVC Versions:- To hide the X version of the Asp.Net MVC we use the below change in the Application_Start method of the Global.asax. The snippet would go like below:-
protected void Application_Start()
        {
            MvcHandler.DisableMvcResponseHeader = true;
This hides the Asp.Net MVC version from the headers in the Network tab. - Lastly, there are chances of exposing the Users to the Yellow screen of death, when an exception occurs in the application and is unhandled. Thus, it is advisable to have a custom error page, where users will be landing when exception occur. Lets see how:
Custom errors in the Web config needs to be on. There are three modes of the Custom errors. They are:- On:-
–Prevents the stack trace that is shown when exceptions arise
–Also allows to display custom error pages to the end user
–Custom error pages shown to both Remote Clients as well as Local - Off:-
–Makes the end user view the description of the exception along with the entire stack trace.
–ASP.NET error/exception and stack trace shown to both Remote clients and Local as well. - Remote only:-
–This is the best among all for the developers’ perspective, as this allows the Remote clients to view thecustom error messages/pages.
–Allows the Local users/especially developers to view the ASP.NET errors.
–This is the default value.
The other attribute which is used to the custom error element is defaultredirect. This is used to redirect the users to a default page when exceptions occur.
The exceptions can also be handled globally , application level by using the below snippet:
protected void Application_Error(Object sender, EventArgs e)
{
    Exception ex = Server.GetLastError();  //self explanatory gets the most recent error
    Server.ClearError();  //self explanatory clears the error
        //(Required to clear as otherwise user gets to see the default ASP.NET error handlers)
    Response.Redirect(""); //default redirect.
}
For details you can follow: Custom Errors
Conclusion
Thus, security and validations are very important features to be implemented in any application now a days. According to forbes in a day 30,000 sites were hacked. This is truly an astonishing numbers. And in today’s world most of the sensitive information are being stored on cloud. Thus, in any application the data have a great chance of being exposed and hacked. So security is a major concern and needs to be handled very carefully.
Hopefully, Some of the major points are discussed above and can be implemented in any application to avoid any sort of breaching.
CodeProjectReferences
How can I miss the references from which I learnt and got this opportunity to share with the world.
OWASP Cheat Sheet
Security testing
Sql Injection and Entity Framework - On:-
Executing complex queries against character-based data on the sql tables can be accomplished using Full Text Queries across SQL as well as Azure SQL databases. There are many a times this type of requirement arises and we search for options for the implementation. One such scenario, I would like to share one such requirement. Suppose, we want users to search records from a table with column FirstName. Now, if users would like to search multiple entries to the search criteria, then how would the query go for search? Interestingly, FTS will do that for us..![]()
Now lets see what steps we need to follow inorder to accomplish and execute Full Text search queries.
Implementation
The very first thing we need to do before atleast writing the query, is to create Catalogs. Now What is a catalog, this catalog will be a warehouse which will contain all the Indexes (FTS indexes). Select the database to which you would like to add the FTS catalog and move to the storage, expand it and you will find:- Full Text Catalogs and Full Text Stoplist
Now the new thing Full Text Stoplist is an interesting concept.
The stoplist is actually a list of words which restricts the SQL to allow them in the FTS indexes, now FTS Index we will discuss next. Now how the stoplist works is, the words mentioned in the stoplist are avoided and not added into the indexes from search criteria’s text.
Thus, the below images show how to add a catalog:-
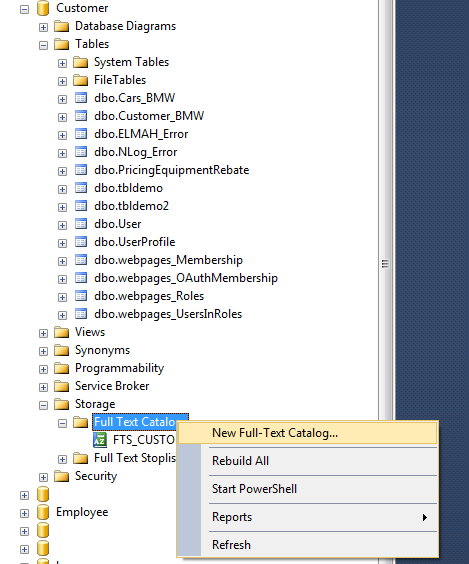
The next step after selecting the New Full-Text Catalog, we get a dialog box, which asks for FTS catalog name. With Accent sensitivity, by default Sensitve. More about accent sensitivity here
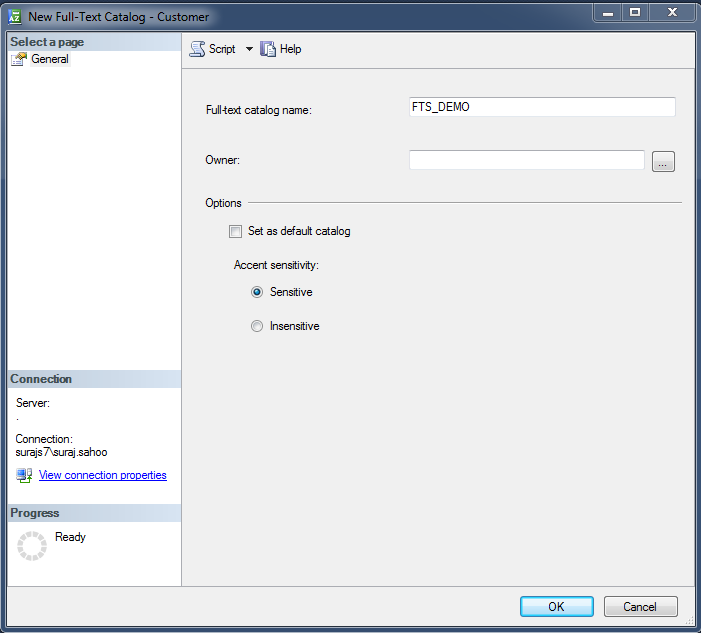
Now, one thing to note here is as far as I implemented, FTS user interface as shown above is not permissible. So to add catalog, we need to query the script. The query goes as below:
CREATE FULLTEXT CATALOG FTS_DEMO
WITH ACCENT_SENSITIVITY = OFF
Now we have catalog ready for the Full Text Search. Now it’s time to add index to the tables required. First, lets discuss what Indexes are and how they behave. These are allowed on a table , i.e. one index per table and atmost 1024 columns are supported per table. On the basis on these indexes the FTS can be applied and queried using the columns in the FTS index. Lets see how to add an FTS Index.
Using the User Interface:-

Just as we see the interface says directly the options to define an index on the table Customer. The following images will follow the steps through.
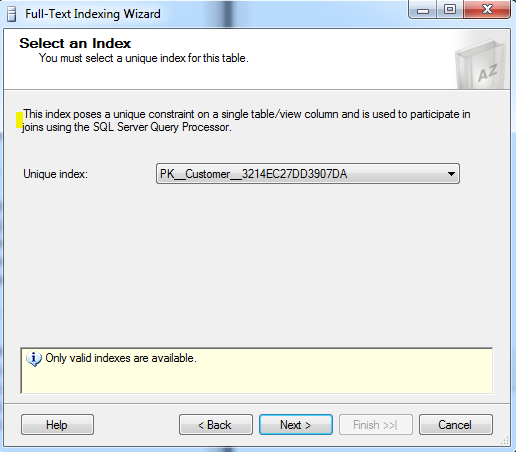
This creates a unique index on the Customer table, thus PK is prefixed. This states that we cannot create another index on the table.
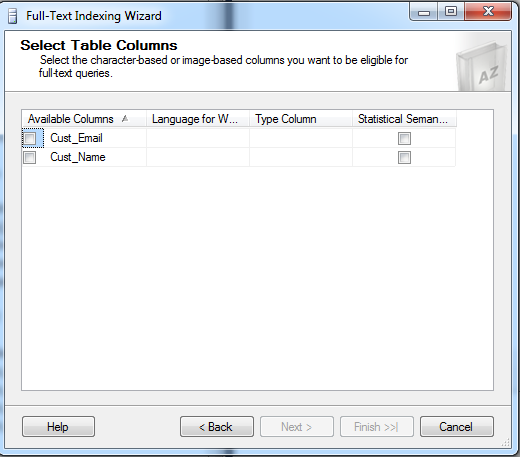
The above dialog states that we need to check inorder to select the columns which we wish to allow into the FTS index. Here I select both the columns. Then,
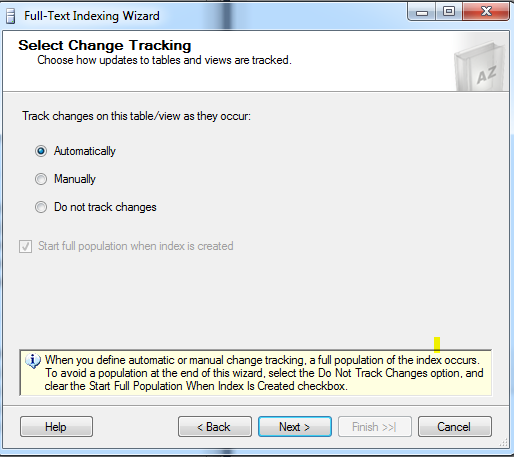
This dialog states that the changes to the table columns are tracked automatically and the indexes are populated automatically.

The above dialog asks to select the catalog into which the indexes for the table are going to be added. Here we select the catalog we created and then click next.
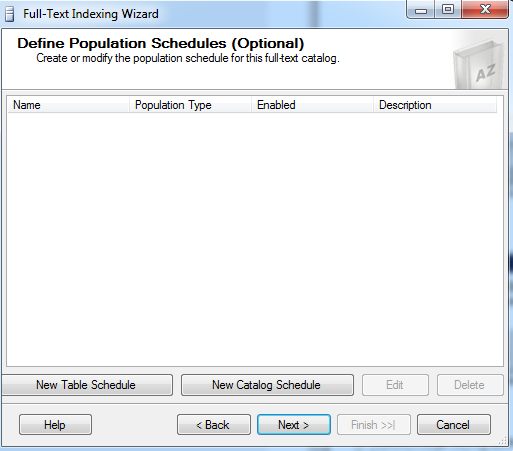
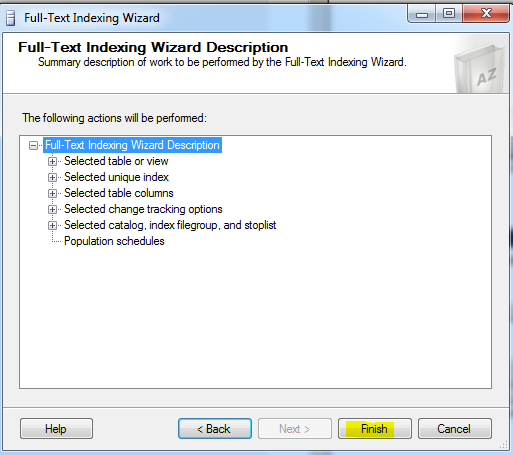
Then click Next and Finish. Thus FTS index is created for the table Customer .
Now to create the Index using query script, we need to just write and run one query as below:
CREATE FULLTEXT INDEX ON dbo.[Customer]
(CustName, CustEmail)
KEY INDEX PK_Customer_Index
ON FTS_DEMO
WITH STOPLIST = SYSTEM
Thus this would create the Index for us and do the same if we follow the above mentioned steps through images. Here one important thing to note is the KEY INDEX should be the primary unique key for that table created. To get the name you can type and execute the following:
sp_help [TABLENAME]
This will give you the name as PK_***** something like this. This is very much required aswe may panic on getting an error saying
A full-text search key must be a unique, non-nullable, single-column index which is not offline, is not defined on a non-deterministic or imprecise nonpersisted computed column, does not have a filter, and has maximum size of 900 bytes. Choose another index for the full-text key.
Now, we are all set to carry on with our query and expect the desired results. The query goes like:
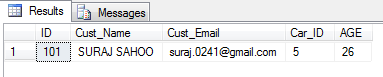
SELECT * FROM dbo.[Customer_BMW]
WHERE CONTAINS(Cust_Email,'gmail')

This is how the syntax goes as above which is simple, this uses the keyword provided by FTS i.e. CONTAINS as it takes one keyword to find a match from the records.
Another is the FREETEXT . What this does is it separates the strings into separate words and then based on it makes a search using the meaning of the words.Using the CONTAINS we can use multiple string entries using OR or AND like below:
SELECT * FROM dbo.[Customer_BMW]
WHERE CONTAINS(Cust_Email,'gmail OR yahoo')
The result goes as below:
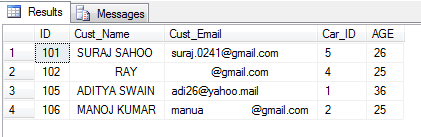
SELECT * FROM dbo.[Customer_BMW]
WHERE CONTAINS(Cust_Email,'gmail AND suraj')
The result goes as below:
Conclusion
Thus, this is how simple and easy Full Text Search implementation is.This will be very handy if such requirement comes up. I hope this helps the readers. Please post the queries if any.
References
Of course the references are the integral part to be shared.
My guru and the master Sql-Blog Authority
MSDN
Happy Reading and Learning.
- SQL Basics
- Introduction
- What is a database?
- What does Relational mean?
- A small example
- SQL Statement
- Naming Things
- Creating Things
- Everything about SELECT Statement
- Introduction
- FROM Clause
- Limiting Result Set
- WHERE Clause
- WHERE Clause
- AND OR
- MORE Operators
- BETWEEN
- LIKE
- IN
- IS and ISNOT
SQL Basics
Introduction
Before I begin, this article is intended to each and every beginner may it be a Software Developer or a Quality Analyst, this is a must know for every software engineer. Some might say we have Database administrator, then why should we, but I feel being developer one should know all round knowledge of whats going on and handle everything.
Here in this article I will be explaining each and every concept in details to get started with SQL (Structured Query Language).
First of all, the question ![]() going on your mind now would be what is SQL?
going on your mind now would be what is SQL?
As mentioned above, SQL stands for Structured Query Language. It is a special-purpose programming language. Its purpose is to manipulate relational databases. Relational databases are one which have detailed information about all the tables in a formally organized manner. The best part here is it contains both the data-definition syntax as well as data-manipulation syntax.
What is a Database?
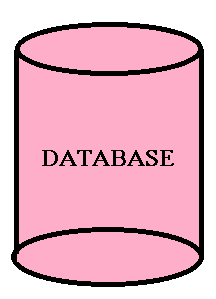
Now the diagram describes what it is.  Database is simple a container that helps organize data in a format or constructive manner. In a database data is stored in a rational way. Now, lets take an example that would make help understand better. For instance our contact list in cell phones. If we think a bit into it, then we realize the contact list is a database with data in it in an organized manner. Then we sort by the letters search the names from the list. Thus we perform query execution on the list to retrieve the records we want. This is the flexibility a simple database provides us. It makes it easier to:
- Query Data
- Update Data
- Insert New Data
- Delete Data
There are basically three types of Databases available:
- Relational Database
- Object-Oriented:-Link to refer
- Document Based:-Link to refer
We will be discussing only on the Relational Database as that is commonly used. I have provided the links to the other types of databases for reference.
What is Relational?
The dictionary meaning to this is “Things that relate each other in a way”. Here the meaning does keeps it consistency. Relational model is the database model on which SQL is based. It is thus a way to describe data and the relationship between those data entities.
In a relational database, data is stored in a construct called Table. Now what is a Table?
- A table is a collection of columns that define the table properties with specific datatype associated, with specific size, thus restricting the size of each record to be inserted into the table.
- Every column can be made required or not required(using the check box available for Null values).
- Rows can be retrieved by asking questions about the data. Like “You would need all the rows of data that have a column(surname) value as having value ‘Ray'”
- An essential part of a table is “Key”. Every table must have a key associated with any column to uniquely identify a table. Usually a table is associated with a key called Primary Key.(We will be discussing about keys in the upcomin modules).
- If more than one table uses the same primary key (one table-Primary key and other named foreign key), then the tables can be merged or joined to give different set of records set.
A small Example
Before starting with the, I hope the readers have a view of the SSMS (SQL Server Management Studio). Here is how the SSMS looks like:

Now lets ask questions to ourself. Why do we at all need database with multiple tables, why not a single table! lets check with an example why?
Suppose we have a User table which would have columns named UserID, FName, LName, Email & PhNo. Now suppose we have only this table and there is a requirement in the future that a user may have more than one Phone number or more than one Email. Just think how would we approch to this, as we cannot store multiple values into a column. Thus, does not this give us an indication to have another table! Just see the difference below:-
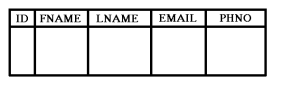
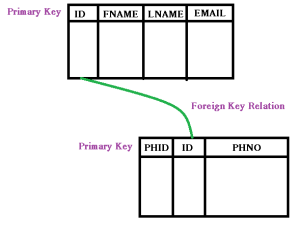
In the above figures, you can see the difference clearly, using the first table will cause real problem and a lot of redundant data/records in the table which anyway violates the Normalization rules (Normalization Rules). Thus creating the secod table which would be having a foreign key relationship with the User table, can now store as many phone numbers as a user can have.
SQL Statement
- A SQL statement is framed from the combination of actionable set of vali words out of which some are SSMS defined and others are user defined.
- A valid SQL statement would be if a statement/query ends with a semicolon (;), it is not like that its mandatory to add semicolon at the end. But it is a part of the ANSI standard, so itisadvisable to use the semicolon at the end of the statement.
- SQL is not case-sensitive. Usually the queries/statements are written in Caps(Capitals). Sometimes the user-defined functions are in the lower case. But oviously the standard needs to be followed for better maintenance and maintain consistency.
- In SQL statement, we can put comments. For single line comments, “–” is used as predecessor for the query as single line comment where as “/**/”, is used for the query as multiple line comments.
- SQL statements start with commands. Comparing with the english language, the commands here are similar to the verbs. For example, SELECT(Command/keyword in SQL)
In generic terms, SELECT would go like below:SELECT VALUES FROM TABLE NAME;
After the command comes the part that is highly dependent on the commands that is to define the set of result/records we would expect from the query like a list of all values of the columns (genrally the wildcard symbol “*” asterix is used to select all columns in table). Then is the FROM clause which is used to fetch records/ column values from which table(as it explains itself).
Naming Things
This might be a bit controversial, as there is nothing called best way to do. So we follow what is followed the most, or follow the conventions already been used. This would differ from person to person. But the most important factor to keep in mind is to have consistency through out. So, that when we see the database the names of the tables define themselves. Some of the rules I am listing below:
- Table name should be singular. A table name describes what the values would be in a row. It is not a hard bound rule, but a rule.
- Column names in a table should not repeat themselves and also same applies at the database level. The repeatation is only allowed when there is a relationship between tables.
- Names are “scoped” in SQL. What this means is a database would have a name. Tables inside database should have a name. Thus while accessing the table, it should be accessed with its “full” name wj=hich would include the database name, separated by periods.
Like TableName:- DatabaseName.Table
ColumnName:- Table.Column
Creating Things
There is a whole set of SQL commands which are required to create and modify the structures/records in the database.
CREATE DATABASE DemoDatabase;
USE DemoDatabase;
CREATE Table DemoDatabase.DemoTable(…);
Here I have only shown the structures, we will be discussing more that ahead.
Datatypes are very vital when we will be creating the tables in a database. Each column in a database has restriction on the datatype of the data that can be stored in the table.
Lets have a look at the datatypes:-
| Data Type | Value/Space |
|---|---|
| CHARACTER | Can hold ‘N’ number of characters which are specified implicitly, to be exact statically that is the number of characters to be accepted in the vallue is set at the time of column creation |
| VARYING CHARACTER | Can hold ‘N’ characters which is set dynamically, that is if MAX is set then it would accept any number of characters sent from the server into the column. |
| BINARY | Stores Hexadecimal data, fixed length with a length of n bytes, where n varies from 1 through 8,000. Used for images and other sort of blobs. |
| VAR BINARY | As the name suggests, it accepts value of varying length. When size is not specified, then default value is taken as 1. |
| SMALLINT | Its length is 2 bytes and ranges from -2^15 (-32,768) to 2^15-1 (32,767) |
| INT | Its length is 4 bytes and ranges from -2^31 (-2,147,483,648) to 2^31-1 (2,147,483,647) |
| BIGINT | Its length is 8 bytes and ranges from -2^63 (-9,223,372,036,854,775,808) to 2^63-1 (9,223,372,036,854,775,807) |
| TINYINT | Its length is 1 byte and ranges from 0-255. Can be used for values with Yes/No or the enumeration types which are limited to fewer values |
| BOOLEAN | Stores TRUE FALSE values. When NOT NULLABLE, then default value is False, else it also accept NULL values. |
| DATE | Stores only Date values, only YEAR MONTH & DAY values in the format YYYY–MM–DD |
| TIME | Stores only time values, only HOUR MINUTE & SECONDS values of a day in the format HH–MM–SS |
| TIMESTAMP | Stores both date & time. This is when date is combined with time of a day with the seconds. Format is just concating both date format and time format |
These are some of the datatypes, I have listed out. The important thing here to keep in mind is, while creating the table, we never actually keep in mind. Thus the datatype play a very important role if we consider the future. Suppose we use the number of user or the userid in a table datatype as smallint or only int even, then sometimes in future may be the number of users increases to a large extent and overlaps the range of the datatypes. Then here the problem arises. You might have heard about the youtube crash for the Gangnam song. The reason behind it was this the issue with the datatype for the number of views..It increased to such extent that it crashed.
Relational Database Management System is based on the relational model. In simple terms, it is a type of database management which stores data in realated tables.
Everything about SELECT statement
Introduction
As we have already discussed about the SSMS where we will be demonstrating our queries. After you read through this part of the article, you would be able to understand the details of using the SELECT statement, asking different types of questions to the select query.
First of all, we store the data in a database to reuse it at some later point of time. Querying data is all about asking questions while retrieving data. Understanding the combination of english and the SQL helps us postulate the queries very easily.
Lets create a database first. Look below at the query.
CREATE DATABASE QUERY:
CREATE DATABASE DemoDatabase;
The above query using the master creates the database named “DemoDatabase”.You can also directly create database using the SSMS UI. See the below images.
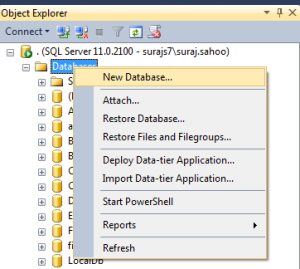
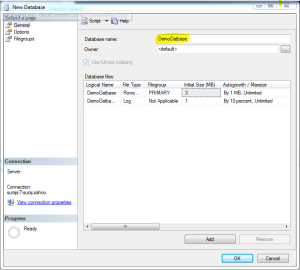
When in the first image as you see, the New Database is clicked, another window pops upas shown in the second image. Add the database name and there and it creates the database for you with a maxsize of unlimited.
Then we create a Table for the storage of records.
CREATING A TABLE:
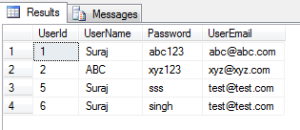
USE DemoDatabase
CREATE TABLE [dbo].[User](
	[UserId] [int] IDENTITY(1,1) NOT NULL,
	[UserName] [nvarchar](50) NULL,
	[Password] [nvarchar](50) NULL,
	[UserEmail] [nvarchar](50) NULL,
 CONSTRAINT [PK_User] PRIMARY KEY CLUSTERED
(
	[UserId]
)WITH (PAD_INDEX = OFF, STATISTICS_NORECOMPUTE = OFF, IGNORE_DUP_KEY = OFF, ALLOW_ROW_LOCKS = ON, ALLOW_PAGE_LOCKS = ON) ON [PRIMARY]
) ON [PRIMARY]
Now the above query creates a table for you, but we need to understand the commands used in the query as some seem understandable where as some are not.
PAD_INDEX:- Specifies the index padding. The default is OFF. More info.
STATISTICS_NORECOMPUTE:- Creation & Recreation of index & auto update of the columns statistics. More info.
ALLOW_ROW_LOCKS:- Enhances performances by locking the entire table rather than locking individual row. By default SQL sets to ON More info.
ALLOW_PAGE_LOCKS:- Set to TRUE/ON when there are chances of high concurrency in order to improve performance. By default SQL sets to ON More info.
Thus, we have created a database which now has a table named User. Now for your information, we can also create table using the SSMS UI as we have done for the database.
We open up the database tree structure and find Tables as a chile tree under it.
We right click on that and select New Table, we get a different UI in the query window now asking for the column names and the datatypes also to set the Nullable/NonNullable with a check box, then lets view the images:
Add the Primary key column and set it as Primary Key like below:
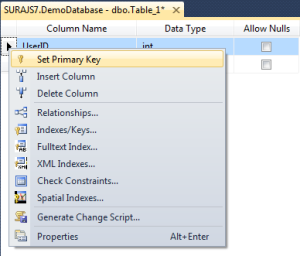 Then we need to set the column as an identity column which will be auto-incremented by 1 everytime a new row is added. The developer need not bother abput incrementing or setting the primary key. Set it as below:

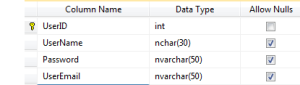
Then we add all the columns with the datatypes mentioned above and save the table with a proper table name. Now here the checkbox for the Nullable column plays a vital role. Think and specify the value here. Finally the UI looks like below:
Thus, now we have created a table also. Now it is time to add records/rows into it. We willbe writing queries to insert the values into the table. Lets see how:
INSERT ROWS INTO TABLE:
INSERT INTO dbo.[User] (UserName,Password,UserEmail)
VALUES ('Suraj','abc123','[email protected]');
Here as you can see we have added only the three column values as the primary key userId is auto-incremented i.e. an Identity column. Thus, this adds the values. For a faster approach, usually developers use the SSMS UI here also to add the records.
We right click on the specific table into which we will be adding records, then click on Edit Top 200(default value) items.
Then we see in a new query window the table columns with the rows of records already added and a default empty row where we will be adding the values like below:
 here we add the values in the row containing NULL values. The Primary key column is non editable as it will increment itself. The other columns are populated with the values to set the table records.
Now lets get back to our topic of discussion Select:
1. Select all records from the table:
SELECT * FROM dbo.[User]
This query is very simple and easy to understand. Here the FROM clause is used which is easy when we retrieve data from a single table. As mentioned above ‘*’ relates to all columns in a table. Thus, the above query returns all the records of all the columns.
Another, point here is if we select some columns out of all columns then we should/must qualify the column names in the Select list of the query.we can bring in the concept of ‘aliasing’ in our next query which selects some columns in the table.
2. Select fewer columns from the table:
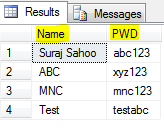
SELECT users.UserName as Name, users.Password as PWD FROM dbo.[User] as users
The above query returns only the User name column as Name and the Password column as PWD in the result set. This is the power of alias, it changes the column head names. Below is the sample result set:
 Similarly you can use shorter Table alias names and use it through out your query for convinence and select as many and the specific columns you need from the table.
There are various ways for limiting the result sets we get. By default all the rows that match the From clause query are retrieved in the result set. There are two different ways to limit the result set of the Select statement.
One is to add conditions to the Query after From clause.
Anoother is to add the DISTINCT qualifier to the Select statement. Distinct is a result set qualifier. Also TOP (number) can be used to limit the result set.
We will see the second type here and move to the condition type consequently.
3. Select Distinct Rows :
SELECT DISTINCT users.UserName as Name FROM dbo.[User] as users;
This query returns all the rows that are distinct based on the names values.
4. Select some rows from TOP:
SELECT TOP 500 users.UserName as Name FROM dbo.[User] as users;
This would return only the top 500 rows no matter how many in total we get as result set.
Next we discuss about the conditions type:
WHERE Clause
This is used after the FROM clause and can be thought of a search from the records using the conditions based on which we would be doing the result search. Searching with lot more precision. The body of the where clause will be one or more expressions with return value as True/False. If the response is true based on the conditions for a specific row coming under the check, then the row gets added to the result set which is retrieved finally from the query.
A simple example here would be Get the list of records/users whose name is ‘Suraj’
5. Select users with UserName as ‘Suraj’:
SELECT * FROM dbo.[User] as users
WHERE users.UserName = 'Suraj' ;
This selects all the users with the username as Suraj, usually this is made as Firstname as Suraj. Thus the result set would look like below:
To master the WHERE clause in SQL we need to master how all the operators available behave. Lets have a look at the operators available with the WHERE clause in SQL and how would they behave:
| Datatype | Behaviour |
|---|---|
| Eqals ‘=’ | Returns true if both the conditions on left and right hand side matches |
| Not Equals to ‘<>’ | Returns true if both the conditions on left and right hand side do not match |
| Greater than ‘>’ | Returns true is the value on the left hand side is larger than the right hand side value |
| Less than ‘<‘ | Returns true is the value on the left hand side is smaller than the right hand side value |
| Greater than or equal to ‘>=’ | Returns true is the value on the left hand side is larger than or same as the right hand side value |
| Less than or equal to ‘<=’ | Returns true is the value on the left hand side is smaller than or same as the right hand side value |
Now lets have a look at the queries and how the behave when operators are applied. Here I will be applying operators on the string values.
6. Select the users with UserName greater than ‘Suraj’:
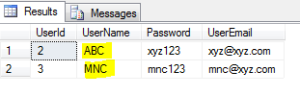
SELECT * FROM dbo.[User] as users
WHERE users.UserName > 'Suraj' ;
The result set here would return the name starting with alphabets more than ‘S’, but remember the check is for each letter until the greater than matches. Result set:
 Thus the name starting with ‘T’is displayed in the result.
Similarly less than and the other operators would work out.
7. Select the users with UserName less than ‘Suraj’:
SELECT * FROM dbo.[User] as users
WHERE users.UserName < 'Suraj' ;
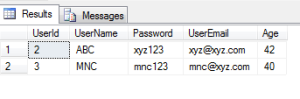
8. Select the users with UserName not equal to ‘Suraj’ :
SELECT * FROM dbo.[User] as users
WHERE users.UserName <> 'Suraj' ;

Then lets peep into the AND OR operators. As we all know each boolean expression can be combined with other boolean expressions. These are combined by using the AND OR operator.
AND means that both the boolean expressions combined by using AND, both must evaluate to True for the row to satisfy to be a part of the result set. Like for example list out the users who have first name as Suraj and email as a specific value. Here as per the simple english language and is to be used here to evaluate and produce the result set.
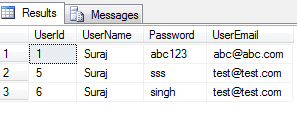
9. Select the users with UserName as ‘Suraj’ & UserEmail as ‘[email protected]’:
SELECT * FROM dbo.[User] as users
WHERE users.UserName ='Suraj' AND users.UserEmail = '[email protected]';
The result set goes as below:
 Thus here in the result set, we can check that both the expressions on the sides of the AND operator turm out to be true for both the rows in the result set.
OR keyword means that any of the expressions on the either side of OR operator can be true, then the row becomes a part of the result set. That is when any of the expression satisfies then the row is a part. Just keep in mind if the first expression turns out to be true then the second expression is not evaluated. If first expression turns to be false, then the second expression is evaluated to be checked.
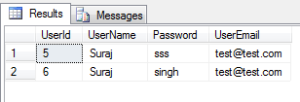
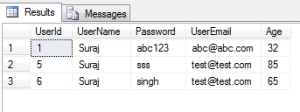
10. Select the users with UserName as ‘Suraj’ or UserEmail as ‘[email protected]’:
SELECT * FROM dbo.[User] as users
WHERE users.UserName ='Suraj' OR users.UserEmail = '[email protected]';
The result set is as below:
 As we see first when the first expression i.e. UserName is Suraj is a part of the result set and also the rows with UserEmail as ‘[email protected]’ .
BETWEEN operator acts on any column and taking two values checking the range. If a row value lies in the range specified in the BETWEEN condition, then the expression evaluates to True.
11. Select the users with age lying between specific value:
SELECT * FROM dbo.[User] as users
WHERE users.Age BETWEEN 25 AND 50 ;
The result set is as below:
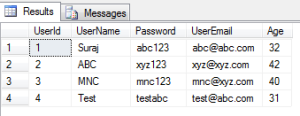 Thus the result set include only those rows where the Age lies between 25 and 50, others are neglected. Between in inclusive of the values being checked.
LIKE operator is a special one which is used with strings. When we give LIKE operator to the strings then it looks and search for those values of the string which match the pattern specified in the LIKE condition. For LIKE ‘%’ is used which is otherwise called wild card symbol. The % can be used anywhere in the string. Like for example, who all are the users whose names start with ‘S’.
12. Select the users with the UserName starting with letter ‘S’:
SELECT * FROM dbo.[User] as users
WHERE users.UserName LIKE 'S%' ;
This gives the result with all the username starting with S. Thus we write Like ‘S%’ wild card symbol specified after the letter means starting with. Specifying wild card symbol at the beginning like ‘%S’ means all usernames ending with S.
SELECT * FROM dbo.[User] as users
WHERE users.UserName LIKE '%C' ;
 Thus this is the result set with the records where the column value UserName contains ‘C’.
IN operator is another special operator which requires column and a list of specified/valued values. Values can be of any datatype. If a row column value matches any of the specified values in the list used for the IN operator, then the row is added to the result set.
SELECT * FROM dbo.[User] as users
WHERE users.UserName IN ('Suraj' , 'test') ;
This gives the result set having all Users with user name Suraj and test. Thus the IN operator seems to overlap with the BETWEEN operator, but they are different in some scenarios.
IS operator is less used and a special keyword, which is usedto check for NULL values. An interesting thing to keep in mind is that the NULL values are not assignable to the ‘=’ operator & its complement is ISNOT.
Conclusion
Thus here I have tried to specify the basics in SQL. As I have mentioned I have tried here, so if any queries, suggestions & concerns are most welcome. Please raise lets discuss and clear out and keep sharing.
References
MSDN
Introduction to SQL by John Flanders.
SQL authority by Pinal Dave
W3 schools
As discussed in my prvious blog post i.e. ELMAH Part-1.
Now in this article I will be explaining the integration of ELMAH with Sql Server(SSMS). This is now-a-days an essential part in any application, that is error and exceptions that rise in the application are logged into the database tables that are related to ELMAH. These table scripts are providedby ELMAH itself. Dont Believe!! I also did not. But that is the truth. Lets see and discuss now..
ELMAH Configuration
Here I am specifying all the requirements for setting up ELMAH in the web.config settings. As the installationand also the setting have been explained in Part-1. Still I am specifying the blocks required in the Web.Config.
Inside the System.webServer block:
<modules runAllManagedModulesForAllRequests="true">
      <add name="ErrorLog" type="Elmah.ErrorLogModule, Elmah" preCondition="managedHandler" />
      <add name="ErrorMail" type="Elmah.ErrorMailModule, Elmah" preCondition="managedHandler" />
    </modules>Snippet
<handlers> <add name="Elmah" verb="POST,GET,HEAD" path="elmah.axd" type="Elmah.ErrorLogPageFactory, Elmah" /> </handlers>
above are the modules and handlers as well.
Inside system.Web:
<httpModules>
      <add name="ErrorLog" type="Elmah.ErrorLogModule, Elmah" />
      <add name="ErrorMail" type="Elmah.ErrorMailModule, Elmah" />
    </httpModules>
    <httpHandlers>
      <add verb="POST,GET,HEAD" path="elmah.axd" type="Elmah.ErrorLogPageFactory, Elmah" />
    </httpHandlers>
The above are the common settings for the ELMAH. Now lets look into the settings required for database settings.
As we all have an access and look at the connection strings. Still lets have a quick look:
<connectionStrings>
    <add name="DefaultConnection" connectionString="Data Source=(LocalDb)\v11.0;AttachDbFilename=|DataDirectory|\aspnet-DemoStart-20141014045047.mdf;Initial Catalog=aspnet-DemoStart-20141014045047;Integrated Security=True" providerName="System.Data.SqlClient" />
  </connectionStrings>
The above is the pattern of the connection strings. Donot use the same one..just kidding.. 
Then the final change for the ELMAH with the Sql :
<elmah>
    <security allowRemoteAccess="yes" />
    <errorMail from="[email protected]" to="[email protected]" subject="DEMO Error" async="false" useSsl="true" />
    <errorLog type="Elmah.SqlErrorLog, Elmah" connectionStringName="DefaultConnection" applicationName="DemoStart"/>
  </elmah>
This was the final change required for the web.config change to integrate ELMAH with SSMS.
Queries for ELMAH
Now, let me reveal the magic to you as I mentioned earlier. Yes guys, queries we donot have to write , ready-made queries are provided by the ELMAH team. The download link for the ELMAH Queries is :-Queries for ELMAH
Just simply download the “.sql” file and run in the SSMS. After execution the tables get created for the ELMAH as well as the stored procedures shown below:

As you can see above, the tables and stored procedures are added into the database. This is so simple and as simple it can be. Is’nt this great!!
Lets see the number of columns and what columns are being created in the table dbo.ELMAH_Error

I hope this helps developers anyway. This article covers all the setting configurations required.
Thus the setup is as simple as it can be. Thanks to Andy French.