In this article I will be sharing a basic stuff which comes handy in MVC applications. The HTML helpers provided by the Razor are smart enough to understand and process the work as required.
We will be discussing in brief about the Ajax.BeginForm, which has few concepts hidden within. When we face the difficulty or the issue, we explore and resolve. Same has happened recently with me. So lets start exploring what the hidden secrets are, which actually are very few.
Adding Unobstrusive- Ajax JS
This can be added from the Nuget package manager directly. I find adding from the Package Manager console easy. The script goes like below:
Install-Package jQuery.Ajax.Unobtrusive
Snippet & Learning
AjaxExtensions.BeginForm is a part of System.Web.Mvc.Ajax namespace under the System.Web.MVC assembly. When used in the response it writes the HTML
In this article I will be sharing a quick and an interesting way to send SMS using a simple C# application. I will be using ViaNett API to send messages from my application. I will be creating a simple windows form which will trigger the API and send the SMS.
Sending SMS has become a common objective for almost every site nowadays. Though they keep irritating you with continuous messages regarding their advertisements.
We use a simple REST API which provided by various providers in the market. You can try out some of them using the free trial version and send SMS. The reliable and faster one can be chosen. Also check for the Support the team provides.
I have thrown my hands at ViaNett and Twilio APIs. Here I will be discussing using ViaNett. Let’s start without actually wasting time.

Get Started
To start with, visit the ViaNett website (ViaNett Free demo Account). Sign up and register you with your email address for the free account, which will provide you with 5 free SMS.
After that, you land on a page having contents like below
Click on the Technical Api and that will navigate to different kinds of API it provides. We here would need the HTTP API in order to send the SMS, as we would be using the WebClient in order to use the API. We will be seeing the code below.
After you click on the HTTP API, you will be navigated to another page which will have the API listed under an Example like below:

Create a script to generate a URL like this: https://smsc.vianett.no/v3/send.ashx?src=xxxxx&dst=xxxxx&msg=Hello+world&username=xxxxx&password=xxxxx Retrieve this web page from your script/application, and the SMS will be sent.
This is the API URL which our Web client will be using.
Now to start with our demo application, we will be creating a windows form application. Now, I will not be writing up and lengthing my article with the step by step image for creating a Windows Form application. Those who are really new to windows form, please follow one of the best links below.
Walkthrough To create Windows Form application
After you create a simple windows form application, it would look something like below:
Create as simple as you can , as this is just for learning purpose. The UserName is the user name you had provided during the ViaNett registration i.e. the email address
The password is the password you had given during the registration in the ViaNett.
Then for the button click we have the following code:

private void button1_Click(object sender, EventArgs e)
        {
            using (var web = new System.Net.WebClient())
            {
                try
                {
                    string userName = txtUserName.Text;
                    string userPassword = txtUserPassword.Text;
                    string msgRecepient = txtPhNumber.Text;
                    string msgText = txtMessage.Text;
                    string url = "https://smsc.vianett.no/v3/send.ashx?" +
                        "src="+msgRecepient +
                        "&dst="+msgRecepient +
                        "&msg="+System.Web.HttpUtility.UrlEncode(msgText,System.Text.Encoding.GetEncoding("ISO-8859-1")) +
                        "&username=" + System.Web.HttpUtility.UrlEncode(userName) +
                        "&password="+userPassword;
                    string result = web.DownloadString(url);
                    if(result.Contains("OK")){
                        MessageBox.Show("Sms sent successfully", "Message", MessageBoxButtons.OK, MessageBoxIcon.Information);
                    }
                    else{
                        MessageBox.Show("Some issue delivering","Message",MessageBoxButtons.OK,MessageBoxIcon.Error);
                    }
                }
                catch (Exception ex)
                {

                }
            }
        }
The above code would look simple rather it is. 
When you select a Windows Form Application, by default System.Web is not added to the reference list. Thus, you need to add that from the assembly list.
System.Web is required as we add the WebClient to use the API and download the response.
Here in the code, just giving a brief on what this snippet intends:
We retrieve each text input from the user, i.e. the User name, User password, Text Message & the User Phone Number. We use these as the URL params to the Service API of the ViaNett.
Then after that we will check for the response after sending the message and accordingly we update the User.
**Point to note is: The country code needs to be prefixed to the phone number, in order to send the message else it will mail back regarding the failure to the registered email.
Conclusion
Thus, this is a small article on the integration and sending SMS using C# aaplication. I hope this helps beginners!! I will come up with more articles with other APIs and their other SMS features they support.
References
]]>Scheduled jobs are a part of development, may it be any application. Inventory applications require them the most when they automate almost everything.  SQL Jobs can prove to be handy when a query needs to run and update or insert or anything of that sort at regular intervals as per requirement. These are similar to schedulers to track your reminders and updates.
According to MSDN
SQL Server Agent is a Microsoft Windows service that executes scheduled administrative tasks, which are called jobs in SQL Server 2016.
SQL Jobs are run by the SQL Server Agents. It can be a single operation running in the background or a series of operations.The SQL Jobs can be added using the GUI provided by the SQL Server. But in this article, we will see and understand the Query that helps create SQL Jobs. These jobs can be scheduled to run daily, weekly or on monthly basis.
Straight to the point
We will straight away check and see the snippet and then try understand the parts of it.
BEGIN TRANSACTION;
DECLARE @ReturnCode INT;
SELECT @ReturnCode = 0;
DECLARE @owner_Login_Id NVARCHAR(30),
        @actual_database_name NVARCHAR(30);
SET @owner_Login_Id = N''; -- ADD THE LOGIN NAME TO THE SERVER
SET @actual_database_name = N'DB NAME'; -- ADD THE DATABASE NAME AS REQUIRED

IF NOT EXISTS( SELECT name
               FROM msdb.dbo.syscategories
               WHERE name = N'[Uncategorized (Local)]'
                 AND category_class = 1 )
    BEGIN
        EXEC @ReturnCode = msdb.dbo.sp_add_category
             @class = N'JOB',
             @type = N'LOCAL',
             @name = N'[Uncategorized (Local)]';
        IF( @@ERROR <> 0
         OR @ReturnCode <> 0
          )
        GOTO QuitWithRollback;
    END;
DECLARE @jobId BINARY(16);
EXEC @ReturnCode = msdb.dbo.sp_add_job
     @job_name = N'JOB_NAME',
     @enabled = 1,
     @notify_level_eventlog = 0,
     @notify_level_email = 0,
     @notify_level_netsend = 0,
     @notify_level_page = 0,
     @delete_level = 0,
     @description = N'JOB_DESCRIPTION',
     @category_name = N'[Uncategorized (Local)]',
     @owner_login_name = @owner_Login_Id,
     @job_id = @jobId OUTPUT;
IF( @@ERROR <> 0
 OR @ReturnCode <> 0
  )
GOTO QuitWithRollback;

EXEC @ReturnCode = msdb.dbo.sp_add_jobstep
     @job_id = @jobId,//-- ID of the Job created
     @step_name = N'STEP_NAME', //--Step Name for the JOB
     @step_id = 1,
     @cmdexec_success_code = 0,
     @on_success_action = 1,
     @on_success_step_id = 0,
     @on_fail_action = 2,
     @on_fail_step_id = 0,
     @retry_attempts = 0,
     @retry_interval = 0,
     @os_run_priority = 0,
     @subsystem = N'TSQL',
     @command = N'YOUR QUERY GOES HERE',
     @database_name = @actual_database_name, //--Database name is generic and defined above at the start
     @flags = 0;
IF( @@ERROR <> 0
 OR @ReturnCode <> 0
  )
GOTO QuitWithRollback;
EXEC @ReturnCode = msdb.dbo.sp_update_job
     @job_id = @jobId,
     @start_step_id = 1;
IF( @@ERROR <> 0
 OR @ReturnCode <> 0
  )
GOTO QuitWithRollback;
EXEC @ReturnCode = msdb.dbo.sp_add_jobschedule
     @job_id = @jobId,
     @name = N'JOB_SCHEDULE_NAME',
     @enabled = 1,
     @freq_type = 4,
     @freq_interval = 1,
     @freq_subday_type = 1,
     @freq_subday_interval = 0,
     @freq_relative_interval = 0,
     @freq_recurrence_factor = 0,
     @active_start_date = 20150615,
     @active_end_date = 99991231,
     @active_start_time = 0,
     @active_end_time = 235959,
     @schedule_uid = N'af82656c-e151-4ebb-9fe1-009495e1415d';
IF( @@ERROR <> 0
 OR @ReturnCode <> 0
  )
GOTO QuitWithRollback;
EXEC @ReturnCode = msdb.dbo.sp_add_jobserver
     @job_id = @jobId,
     @server_name = N'(local)';
IF( @@ERROR <> 0
 OR @ReturnCode <> 0
  )
GOTO QuitWithRollback;
COMMIT TRANSACTION;
GOTO EndSave;
QuitWithRollback:
IF( @@TRANCOUNT > 0 )
ROLLBACK TRANSACTION;
EndSave:
GO
The snippet part Line No. 9-12 results the existance of the Local categories. What this does is simple.
From MSDN
Contains the categories used by SQL Server Management Studio to organize jobs
Now, after the check, if the category exists that governs the organization job, it then executes the pre-defined Stored procedure that adds a new category sp_add_category
sp_add_category
     [ [ @class = ] 'class', ]
     [ [ @type = ] 'type', ]
     { [ @name = ] 'name' }
- @class:Class governs the class i.e. may be JOB|ALERT|OPERATOR
- @type: This specifies the type or location of the Job i.e. LOCAL|MULTI-SERVER|NONE
- @name: Category Name that will be added
After this the Job Addition SP is executed. The parameters for the SP needs to be known and why are they added. For more information MSDN can be followed.
This SP sp_add_job simply and only adds the JOB with the specified name. For the execution of JOB and to let it execute the required process, we need to add a JOB STEP, which is created next.
sp_add_jobstep does the job for us. This SP adds the specific Step to be executed or run under that JOB. The parameters here can also be referred from MSDN.
@command is the most important parameter here, as the query that will actually be executeed at intervals and fulfil your requirement will run.
@database_name is also important as this would specify on which database the query would be executed by the JOB.
We are then adding the schedule for the created job using SP sp_add_jobschedule . This Sp adds the required schedule for the JOB and sets the JOB to run based on the schedule. Please refer the MSDN for more info and the parameters definition.
Conclusion
Thats it folks. We have seen the simple query that once run, creates a SQL job for us that can actually execute any query on the background and make life easy.
Points of Interest
We have followed TRANSACTION in the queries in order to track the errors and if any caused, then we could roll back the changes to avoid ambiguity.
Instead of now following steps to create Jobs using the SQL Server Object Explorer, run the above query, understand the parameters once and then that’s easy.
Hope this helps.
References
]]>
As we discuss in the previous part of Hands on Agular Js-I about the basic and the architecture of the Angular Js and few directives. Here in this part we will check out the other important directives and how Angular interaction with Controller and model is being done on the go. The directives we will discuss in this part of series are very important in order to start and feel the magic of Angular. Here, actually, we get into the depth and controls of Angular. Let’s watch out.
Angular directives
Here we start with the other important directives that would come handy while working on the Angular.
ng-module
Angular modules are the most important directive, they define an angular application. They are the parent set for the other directives or functions of the application, like controllers. Controllers are always contained withing the modules, along with other dependencies. This is the modular approach in Angular. Creating modules for separate section segregates it and create partition/module wise applications.
The modules are defined syntactically as below:
var app = angular.module("app-Services", []);As per the above snippet, we have created an angular module and assigned it to the variable named app. The module name is app-Services. The module is actually defined in the document function of a separate Module script file and reference added to the file wherever required. The definition provided by the Angular Doc is that Module is required to configure the $injector and it contains the services, directives, controllers and other dependencies.
$injectors are the service used to retrieve the pre-defined object instances, invoke methods and load the required modules.
ng-controller
This is another set of directives that defines the controller of the application, which controls the data of the application. They are simple objects defined under the scope of the module. There can be any number of controllers for a specific module. Controllers are defined syntactically as:
var app = angular.module('app-Services', []);
app.controller('myFirstController', function($scope) {
    $scope.firstName = "Suraj";
    $scope.lastName = "Sahoo";
});
The above snippet is a simple controller defined under the module app-Services. The name of the controller is myFirstController and under its scope, two members are initialized, that is firstName & lastName. Thus, when an object of controller is created in the html, which we will see below:
<html>
<body>
<div ng-app="app-Services" ng-controller="myFistController as ctrlFirst">
<span>{{ctrlFirst.firstName}} {{ctrlFirst.lastName}}</span>
</div>
</body>
</html>
Thus, as we see above, the html tag div has the scope for the Module we defined above and the controller defined for the module with the members firstName & lastName. When the controller is instantiated inside the scopr of the div and Module, we have th right to access the data defined inside the controller function. $scope defined within the controller function is is the context via which the model execution is implemented inside the controller. It actually acts as a watch on the model values while binding to the DOM element in the HTML. The $scope can also be used using the this object. The controller also accepts the $http to execute the http services in order to call the api’s to get post and delete any data through the services. Lets see how the controller function can be separated from the declaration and defined as a function.
var app = angular.module('app-Services', []);
app.controller('myFirstController', myFirstController);
function myFirstController($http, $scope) {
    $scope.firstProperty = 'XYZ';
    $http.get('your url').then(function (){
                          //do whatever..
                  }).catch(function (){
                         //do whatever..
              }).finally(function (){
                       //do whatever..
          });
}
});
Now the above, $http is the http module which is used to call the get and post methods or to interact with the server to fetch the records. Call the url, like in ajax we have success and error methods, here we have, then() block, which after fetching successful response, has the logic what to do next. Actually, the $http returns a promise, so we catch that in the then block and attach the response to the scope. The different $hhtp methods are:
- $http.get:- To retrieve information from server for a url requested by the user
- $http.head:- Transfers only the header and the status line only, but is same as GET
- $http.post:- As self explanatory it is, it is used to send the information entered by user to the server.
- $http.put:- This is same as the POSt but is used to create the current reprsentation of the target resource or overwrite it for the same URL
- $http.delete:- This ensures that the current resource for the requested URL is deleted by the server.
The catch finally is same as the try.. catch.. blocks, where inside the catch we can also have the ‘then’ block in order to perform tasks after catch and similarly the ‘finally’ block to ensure what finally the code block will execute.
Filters in Angular JS
These are very interesting features provided by the Angular, which can be frequently used and with ease. We will discuss below the pre-defined filters provided by the framework. We will see the use syntactically after the line by line explanation.
- currency:- This is used as the name suggests, convert a simple number into the format of a currency.
- date:- This is used to format dates in different formats.
- filter:- An interesting filter which actually filters few data from a set of result set data.
- json:- formats an normal object into JSON format
- limitTo:- limits an set of array to specified number of elements or objects.
- lowercase:- converts/formats an string to lower case character.
- number:- formats a simple number into a string.
- orderby:- Orders an array based on an expression.
- uppercase:- Formats the string into a upper case character.
Lets see the work around using the snippets:
var app = angular.module('app-Services', []);
app.controller('myFirstController', function($scope) {
    $scope.firstName = "Suraj";
    $scope.lastName = "Sahoo";
});
<html>
<body>
<div ng-app="app-Services" ng-controller="myFistController as ctrlFirst">
<span>{{ctrlFirst.firstName | uppercase}} {{ctrlFirst.lastName \ lowercase}}</span> //Displays firstName is UPPERCASE and lastName in lowercase
<ul>
  <li ng-repeat="name in names | orderBy:'age'">
    {{ x.name + ', ' + x.age}}
  </li>
</ul>
<span>{{price | currency}}</span>
<li ng-repeat="name in names | filter : 'S'">
    {{ name }} //Filters names based on names containing 'S'
  </li>
</div>
</body>
</html>
In the above snippets, we have used another directive i.e. ng-repeat, that is used to loop through the list of records just like foreach loop.
Another thing here to note is that the filter used in the above snippet, if we use the object containing the data or list of records/names suppose like:
<p><input type="text" ng-model="nameFilter"></p>
<ul>
  <li ng-repeat="name in names | filter:nameFilter">
    {{ name }}
  </li>
</ul>
What the above snippet does is, it loops through the names and based on the entry in the textbox or the user input, Like suppose user enters ‘S’, then the data listed are filtered on the object with the names that Starts With ‘S’.
Thus, we saw how these filters become handy and really useful.
Conclusion
Thus, here in this part we discussed about most of the great features of Angular and saw a few snippets to be used in progress. As I said earlier, in the succeeding modules we will gradually come across more interesting features and overall use of Angular.
Whats Next??
We will next come across how to build applications using Asp.NET MVC, EF Code First, Angular JS. That I assure would be interesting.
References
W3 schools
docs.angularjs.org
Validations in any application is so critical now a days that developers ought to be on their toes while developing any such critical and sensitive applications. Hackers are now in every corner of the society, avoid them restrict them to post non sense data into your applications. The attacks are so vulnerable that security guard of any application is mandatory.

The security checks and implementations should be alert and active in the application to counter the attacks. Lets start learning about different types of validations we can have in our MVC application.
Server-Side Validation
Lets begin with simple server side validations. Server side validation are required when we post something to the server with an expectation for the response,usually while posting form data. The form data post is generally very vulnerable. The attacks are quite easier for the attacker here. Thus, we need to check on the server if we are receiving valid data or not on our end. Thus, server side validation can to some extent prevent nonsense input data. Lets discuss how to do validation explicitly using view model. Lets discuss how:
Explicitly means, we would be checking on server side after form post by the user, if the data input are valid input or not, then we post back the user with the validation message as response.
Suppose we have a model for the Registration of a user to an application. The model goesas below:
public class RegistrationViewModel(){
    public string FirstName { get; set; }
    public string LastName { get; set; }
    public string Address1 { get; set; }
    public string Address2 { get; set; }
    public string TelNo { get; set; }
}
Thus in the view/UI user will be displayed with the above labels and respective text boxes for input. The razor engine view page in the application looks like:
@model ServerSideValidationDemo.Models.RegistrationViewModel
@{
 ViewBag.Title = "Registration Page";
}

@using (Html.BeginForm())
{
}
Thus, the above snippet would bring the user the UI where the users would post their input and click submit. In the razor view page, you can see the HTML Helper ValidationMessageFor. This helper displays the Validation message returned after validation from the server as response, at the respective model property. Like for example, we want the user to enter the Model property First name as mandatory, then after validation the helper would display the validation message beside the First Name Text Box.
Now lets have a look at the Action snippet to which the post would call after Submit click.
[HttpPost]
public ActionResult UserRegistration(RegistrationViewModel registerModel){
     if (string.IsNullOrEmpty(registerModel.FirstName))
         {
             ModelState.AddModelError("FirstName", "Please enter your first name");
         }
     if (!string.IsNullOrEmpty(registerModel.TelNo))
         {
             Regex telNoRegex= new Regex("^9\d{9}$");
             if (!telNoRegex.IsMatch(registerModel.TelNo))
             ModelState.AddModelError("TelNo", "Please enter correct format of Telephone Number");
         }
     if(ModelState.IsValid){
         return View("Sucess");  //Returns user to success page
         }
      else {
         return View();  //Returns user to the same page back again
        }
 }
Before explaining the above snippet, lets understand how this will be called after Submit click.
@using (Html.BeginForm()), this does the trick even without specifying the Action and controller. This actually internally calls the Post method of the current url, i.e. looks for the HttpPost attribute to the respective action name of the current url. Thus, in this way the post method of UserRegistration gets called and this also post the required view model to the action, fetching the values input by the user.
After the Action Result method gets called, there is check for the properties explicitly. Here, we check if the user has input into the First name or not. If the user skipd the First Name textbox and submits, then we post the user with the validation message saying “Please enter the first name”. This validation check will not let the user post the input, unless he adds the first name. Similarly, the telephone number is also validated with the regular expression(for the indian telephone number) given.
This was all about the validation being done explicitly.
Now, since we are developing an MVC application, it provides pre defined attributes which can be used to validate our post data. The attributes are called Data-Annotations attribute. Lets look at their usages below:
The use of data annotations can be extensively done in order to avoid heavying the controller post action,explicitly checking for each property. The data annotations attribute in a view model would look like below:
public class RegistrationViewModel(){
    [Required]
    [Display(Name = "First name")]
    [StringLength(50, ErrorMessage = "The {0} must be at least {2} characters long.", MinimumLength = 6)]
    public string FirstName { get; set; }
    public string LastName { get; set; }
    public string Address1 { get; set; }
    public string Address2 { get; set; }
    [Required(ErrorMessage = "Please Enter Telephone Number")]
    [Display(Name = "Tele Phone")]
    [RegularExpression(""^9\d{9}$"", ErrorMessage = "Please Enter Correct format of Telephone No.")]
    public string TelNo { get; set; }
}
The view model above uses Data Annotations attributes and all the required validations for the properties are provided. Lets discuss one by one:
- Required:- This attribute forces the user to enter the value for that specific property and then submit the form, else diplays “The FirstName is required.”. Mark here, the previous message would be a default error message where as for the Tele phone number, the custom error message would be displayed.
- Display(Name = ):- This attribute sets the label for the model property. We just need to specify
@Html.LabelFor(m=>m.TeleNo). This would display the specified custom label for the property, here it would display Tele Phone - RegularExpression:- This attribute is very handy specially when we have properties like Email Address, Tele Phone Numbers and specific expressions for passwords in the forms. We just specify the expression in the attribute and it validates the input from user and states if it is valid or else displays the error message.
Thus, here the view page would go like the same as above. And when we submit, the action post method called would be different i.e. much less code. Lets have a look at the action below:-
[HttpPost]
 public ActionResult UserRegistration(RegistrationViewModel registerModel){
    if (ModelState.IsValid)
      {
         return View("Success");//Return to the success
      }
    else
      {
         return View();//Return back to the same view
      }
 }
Thus, the data annotations here made it so simple and easy.
Here then comes another security vulnerability, i.e. Cross-Site Request Forgery Attacks, which can be easily attacked using the simple Fiddler. When we post any data, we can easily manipulate the data posted by one user using the fiddler and damp into the application and even ruin it. This is indeed very dangerous. Lets see how to prevent Cross site forgery attacks
Preventing Cross Site forgery Attacks
In MVC applications, while posting the form data, it is quite simple to prevent such request if understood properly. MVC provides the attribute [ValidatAntiForgeryToken] on the respective action. Lets see the flow in the snippet first.
First we need to place the AntiForgeryToken helper in the razor view page like:
@using(Html.Form("UserRegistration", "Register")) {
    @Html.AntiForgeryToken()
    //Then here normal rest form as mentioned above
 }
Then in the controller “Register” for the action “UserRegistration”(POST) add the attribute like below:
[HttpPost]
[ValidateAntiForgeryToken]
public ActionResult UserRegistration(RegistrationViewModel registerModel){
   //ModeState Valid check and rest code goes here
}
Ok, so we have seen what two simple steps we need to do. Now lets understand how it does. What happens exactly when we do not place these attributes. How vulnerable our controller is and to what extent an attacker can affect the application. Suppose we are on an Edit page, where a user soughts to edit few of his login information. Now an attacker from over a third party domain and host a simple HTML that would post some information to the same Edit action, the user were to. Then, some how the user if navigates to the Html page set up by the attacker, the user unknowingly is posting unwanted data to the server and normal saving to the database. Here the attacker may be replacing the email ids or any other vulnerable information to his own and retrieving the user’s data. BOOM! This is crash, rather a crap!
Thus, what we need to do here, we need to check if the request to the server action is coming from the same domain, the user has logged in ! for this we need to have some header or property which will be mapped when a request is made and if matches then post else let the authentication fail.
This is actually what the attribute does. The ValidateAntiForgeryToken actually sets a cookie to the incoming reuest called __RequestVerificationToken, and the same __RequestVerificationToken is set for the domain in which the user is logged in. Thus, when a request is made from the same domain, the request header cookie should match and let the user post the data, but when a request is made from the third party domain, then the request is rejected since the __RequestVerificationToken will never match, just failing the authentication and preventing the Cross Site Forgery by any attacker.
Now here there is another problem. If any how the attacker gets to know the Anti Forgery Token, then what!! again crap! No there is a way out here as well. The attribute has ability to add a unique/different Salt every time so that the same token is not reused everywhere.
@Html.AntiForgeryToken("SALT") //The salt can be any sort of string(homogeneous mixture :))[ValidateAntiForgeryToken("SALT")]Another concept that is vulnerable to such attacks and may breach the security in the application is SQL Injection Lets discuss this in brief.
SQL Injection Attacks & Prevention Techniques
What exactly is SQL Injection attack? 
SQL Injection is an attack to fool and manipulate the application database. This is done through the malicious input from the user during post methods and if the posted data is not validated before being executed as sql query. This is really very dangerous which can let attackers get all the sensitive data or even delete the records from all tables, truncating them, just by posting a simple query to drop instead of actual data.
In this, the objective of the attacker is to post their query into the application and let the server run and give him the response if not handled in the server end. Lets see how:
Suppose we have a sql query to select the names of houses and display. The query would be like:
var sqlTobeExecuted = "SELECT HouseID, HouseName"+
    "FROM House " +
    "WHERE Address LIKE '" + searchInputParam +"%';
SqlDataAdapter da = new SqlDataAdapter(sqlTobeExecuted , DbCommand);
The above query is not parameterized and is a simple query in string format to get the house details. Now suppose the attacker posts the searchInputParam (which originally comes from the textbox input of the user) as
‘ UNION SELECT id,name FROM sysobjects;–
Mark the statement what becomes after that is passed to the string query,
SELECT HouseID,HouseName FROM House
WHERE Address LIKE ” UNION SELECT id,name FROM sysobjects;–%’
The first apostrophe in the searchInputParam closes the Like parameter in the SQL query and the double dashes “–” comment out the rest of the query. Thus that gives the list of all the HouseNames and also all the tables present in the database . Even they can also get the ids of the sysObjects and use the Ids to retrieve the column names of the database table they want. Suppose there is a table named Users. Oviously the table would have all the user details. Thus, with the id and the table name the attacker can retrieve the column names of the Users table using the below query:
‘ UNION SELECT name FROM syscolumns WHERE id = “USERID”;–
Thus,the whole of the database can be exposed to malicious users at a single click.
To prevent this,
- Encrypt the essential and sensitive data like password, credit card info and other details. So that to some extent if by any how they get the details they cannot decrypt it. Use one way hashing to encrypt the record data.
- Using parameterized queries instead of strings, in order to avoid directly injecting the values from the User input to the query as we saw in the above section. A parameterized query would prevent the malicious input and it would look like below:
var commandToBeExecuted = "SELECT HouseID, HouseName FROM House"+
    "WHERE Address  Like @Address";
SqlCommand cmd = new SqlCommand(commandToBeExecuted , conn);
cmd.Parameters.Add("@Address",address);
As we see in the above query we avoid passing directly the string input, instead we are using parameters into the SQL query, which would prevent such attacks. - use of parameterized Stored Procedures, which also prevent and prove to be a good solution to these mallicious attacks of injection. Also it is advisable to not trust them completely/blindly so it is always better to check for the sensitive data from user inputs and then execute the Stored procedure. This can be done, where the developer can think there are chances of vulnerability.
- Entity Framework & LINQ, it is interesting to note here is while using LINQ to entity, the query generation does not use the string based approach, rather it uses the object model API, thus being not susceptible to SQL injection attacks.
Authentication & Authorization
These two are very very very…important in any application and these are two different concepts all together but are used to solve the same thing,i.e. Security. When we develop an secure application, the Login is highly essential. Thus, properly authenticating users to the application & authorizing users to particular section of the application is challenging. Usually Forms Authentication is implemented across MVC applications. In the web.config file, the following configuration is set:
Only this will not set the authentication. You need more set up be done. This would involve a lot of configuration. WebSecurity in MVC makes it easy and secure to be implemented. It provides tables and hashing as well. The hashing it provides is one way and very secure. You can learn more about implementing Web Security in MVC from
Web Security In MVC
Thus after setting this authentication, then the important thing is Authorization, which can be provided on controller level, action level, which can be customized in order to check for the access levels along with the sessions. Only Authorize attribute would let the check for the session, we can customized to check for the roles and access levels for the screens as well.
[Authorize]
 public class HomeController : Controller
    {
        public ActionResult Index()
        {
            return View();
        }
    }
In the above snippet, the entire controller has been authorized. That is each method inside the controller will be first authorized.
public class HomeController : Controller
    {
      public ActionResult Index()
        {
            return View();
        }
       [Authorize]
       public ActionResult GetHome(){
         return View()
       }
    }
Here, only the action method GetHome is authorized, not the whole controller.
Thus, Authentication and Authorization are very important factors that ought to be taken into consideration.
More security considerations in MVC
Straight from the OWASP scurity points,
Its advisable to hide the MVC versions as well as Asp.Net versions we use, never expose the versions through the headers.
X-AspNet-Version 4.0.30319
X-AspNetMvc-Version 5.0
We need to hide the versions which appears in the Network tab of the developer table.
Lets know how to remove the versions of Asp.Net and Asp.Net Mvc from the headers.
- Asp.net Version:-To hide the X version of the Asp.Net we use the below Web.Config change.
The above will hide the Asp.net versions. - Asp.Net MVC Versions:- To hide the X version of the Asp.Net MVC we use the below change in the Application_Start method of the Global.asax. The snippet would go like below:-
protected void Application_Start()
        {
            MvcHandler.DisableMvcResponseHeader = true;
This hides the Asp.Net MVC version from the headers in the Network tab. - Lastly, there are chances of exposing the Users to the Yellow screen of death, when an exception occurs in the application and is unhandled. Thus, it is advisable to have a custom error page, where users will be landing when exception occur. Lets see how:
Custom errors in the Web config needs to be on. There are three modes of the Custom errors. They are:- On:-
–Prevents the stack trace that is shown when exceptions arise
–Also allows to display custom error pages to the end user
–Custom error pages shown to both Remote Clients as well as Local - Off:-
–Makes the end user view the description of the exception along with the entire stack trace.
–ASP.NET error/exception and stack trace shown to both Remote clients and Local as well. - Remote only:-
–This is the best among all for the developers’ perspective, as this allows the Remote clients to view thecustom error messages/pages.
–Allows the Local users/especially developers to view the ASP.NET errors.
–This is the default value.
The other attribute which is used to the custom error element is defaultredirect. This is used to redirect the users to a default page when exceptions occur.
The exceptions can also be handled globally , application level by using the below snippet:
protected void Application_Error(Object sender, EventArgs e)
{
    Exception ex = Server.GetLastError();  //self explanatory gets the most recent error
    Server.ClearError();  //self explanatory clears the error
        //(Required to clear as otherwise user gets to see the default ASP.NET error handlers)
    Response.Redirect(""); //default redirect.
}
For details you can follow: Custom Errors
Conclusion
Thus, security and validations are very important features to be implemented in any application now a days. According to forbes in a day 30,000 sites were hacked. This is truly an astonishing numbers. And in today’s world most of the sensitive information are being stored on cloud. Thus, in any application the data have a great chance of being exposed and hacked. So security is a major concern and needs to be handled very carefully.
Hopefully, Some of the major points are discussed above and can be implemented in any application to avoid any sort of breaching.
CodeProjectReferences
How can I miss the references from which I learnt and got this opportunity to share with the world.
OWASP Cheat Sheet
Security testing
Sql Injection and Entity Framework - On:-
Executing complex queries against character-based data on the sql tables can be accomplished using Full Text Queries across SQL as well as Azure SQL databases. There are many a times this type of requirement arises and we search for options for the implementation. One such scenario, I would like to share one such requirement. Suppose, we want users to search records from a table with column FirstName. Now, if users would like to search multiple entries to the search criteria, then how would the query go for search? Interestingly, FTS will do that for us..![]()
Now lets see what steps we need to follow inorder to accomplish and execute Full Text search queries.
Implementation
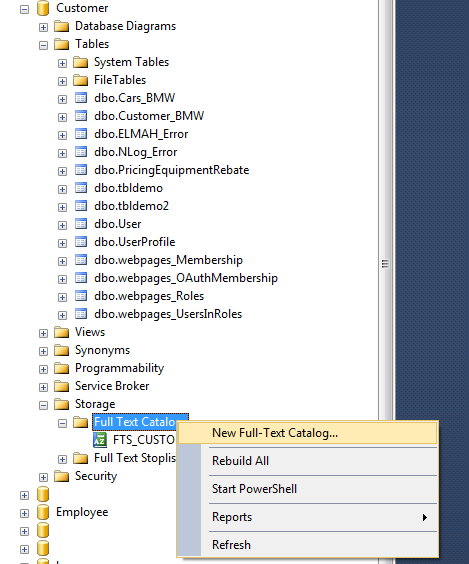
The very first thing we need to do before atleast writing the query, is to create Catalogs. Now What is a catalog, this catalog will be a warehouse which will contain all the Indexes (FTS indexes). Select the database to which you would like to add the FTS catalog and move to the storage, expand it and you will find:- Full Text Catalogs and Full Text Stoplist
Now the new thing Full Text Stoplist is an interesting concept.
The stoplist is actually a list of words which restricts the SQL to allow them in the FTS indexes, now FTS Index we will discuss next. Now how the stoplist works is, the words mentioned in the stoplist are avoided and not added into the indexes from search criteria’s text.
Thus, the below images show how to add a catalog:-
The next step after selecting the New Full-Text Catalog, we get a dialog box, which asks for FTS catalog name. With Accent sensitivity, by default Sensitve. More about accent sensitivity here
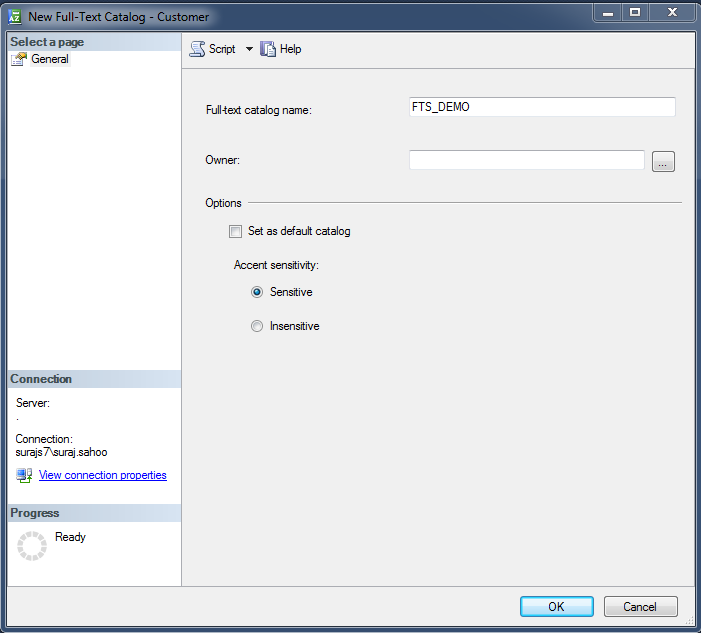
Now, one thing to note here is as far as I implemented, FTS user interface as shown above is not permissible. So to add catalog, we need to query the script. The query goes as below:
CREATE FULLTEXT CATALOG FTS_DEMO
WITH ACCENT_SENSITIVITY = OFF
Now we have catalog ready for the Full Text Search. Now it’s time to add index to the tables required. First, lets discuss what Indexes are and how they behave. These are allowed on a table , i.e. one index per table and atmost 1024 columns are supported per table. On the basis on these indexes the FTS can be applied and queried using the columns in the FTS index. Lets see how to add an FTS Index.
Using the User Interface:-

Just as we see the interface says directly the options to define an index on the table Customer. The following images will follow the steps through.
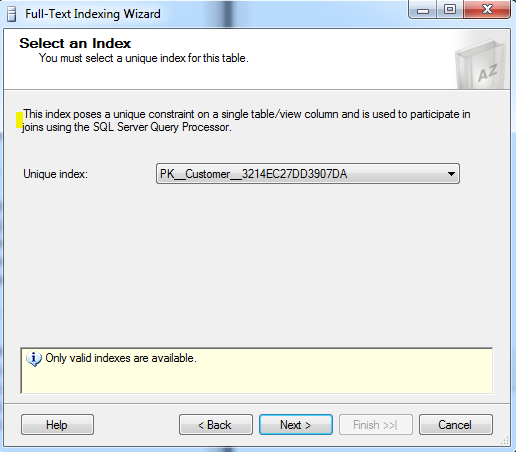
This creates a unique index on the Customer table, thus PK is prefixed. This states that we cannot create another index on the table.
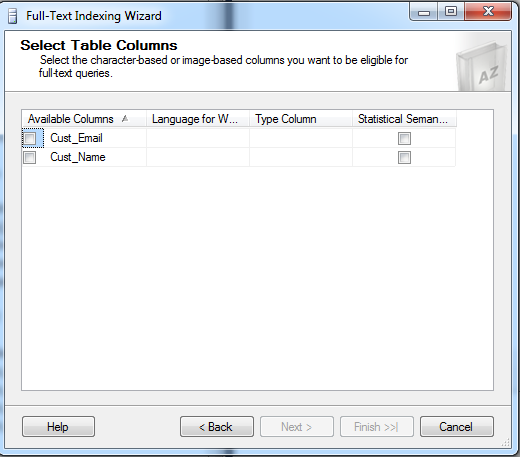
The above dialog states that we need to check inorder to select the columns which we wish to allow into the FTS index. Here I select both the columns. Then,
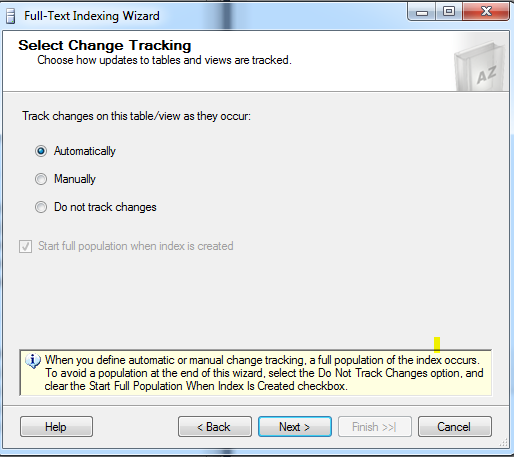
This dialog states that the changes to the table columns are tracked automatically and the indexes are populated automatically.

The above dialog asks to select the catalog into which the indexes for the table are going to be added. Here we select the catalog we created and then click next.
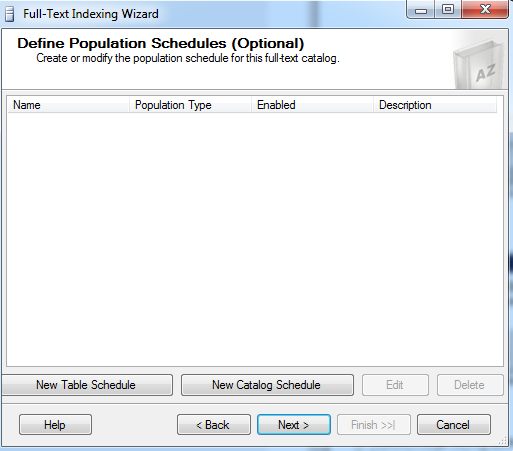
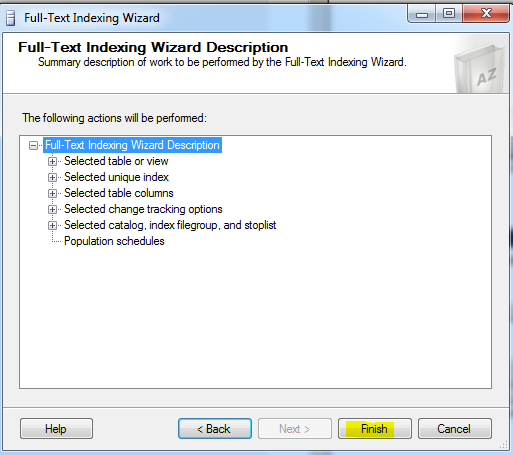
Then click Next and Finish. Thus FTS index is created for the table Customer .
Now to create the Index using query script, we need to just write and run one query as below:
CREATE FULLTEXT INDEX ON dbo.[Customer]
(CustName, CustEmail)
KEY INDEX PK_Customer_Index
ON FTS_DEMO
WITH STOPLIST = SYSTEM
Thus this would create the Index for us and do the same if we follow the above mentioned steps through images. Here one important thing to note is the KEY INDEX should be the primary unique key for that table created. To get the name you can type and execute the following:
sp_help [TABLENAME]
This will give you the name as PK_***** something like this. This is very much required aswe may panic on getting an error saying
A full-text search key must be a unique, non-nullable, single-column index which is not offline, is not defined on a non-deterministic or imprecise nonpersisted computed column, does not have a filter, and has maximum size of 900 bytes. Choose another index for the full-text key.
Now, we are all set to carry on with our query and expect the desired results. The query goes like:
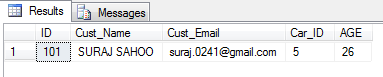
SELECT * FROM dbo.[Customer_BMW]
WHERE CONTAINS(Cust_Email,'gmail')

This is how the syntax goes as above which is simple, this uses the keyword provided by FTS i.e. CONTAINS as it takes one keyword to find a match from the records.
Another is the FREETEXT . What this does is it separates the strings into separate words and then based on it makes a search using the meaning of the words.Using the CONTAINS we can use multiple string entries using OR or AND like below:
SELECT * FROM dbo.[Customer_BMW]
WHERE CONTAINS(Cust_Email,'gmail OR yahoo')
The result goes as below:
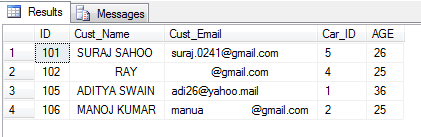
SELECT * FROM dbo.[Customer_BMW]
WHERE CONTAINS(Cust_Email,'gmail AND suraj')
The result goes as below:
Conclusion
Thus, this is how simple and easy Full Text Search implementation is.This will be very handy if such requirement comes up. I hope this helps the readers. Please post the queries if any.
References
Of course the references are the integral part to be shared.
My guru and the master Sql-Blog Authority
MSDN
Happy Reading and Learning.
In this article , I would be discussing a very interesting topic called WebSecurity in MVC applicationa and how easy and simple it is to implement and understand. Let me share a small incident for which I came across this concept. Usually we create an MVC application and select a template may it be Internet or Empty (these two are used frequently). Based on these templates, the web project gets scaffolded and we get the final project structure to work on. If we select an Internet application, then by default scaffolding we get controller “Home” and “Account” created. ASP.NET MVC bydefault provides the authentication through the Web Security. I tried to customize the way authentication was done and then realized this is so simple and easy, as it reduces so many lines of our codes. Lets discuss more on this with a small Demo.
Lets Play..
Lets briefly get to know what Web Security is!! According to MSDN, it provides security and authentication to Asp.Net web applications with many more features like user account creation, Login User and Log off, Reset & Change Password, with the help of its in-built functions. It internally also does the Password hashing which is one of the main concern during creation of a user account. The different properties and methods are well explained in the MSDN link given above. This is usually called as Helper class that is present in the namespace- “System.WebMatrix.WebData”. When an Internet template is chosen we would find the “Dynamic Link Library” , WebMatrix.WebData.dll
Lets create a new project in Visual studio:
Here I create a new Asp.Net Web Project and name it as “WebSecurityDemo” and after clicking on ok the final creation of project in Visual Studio looks like below:
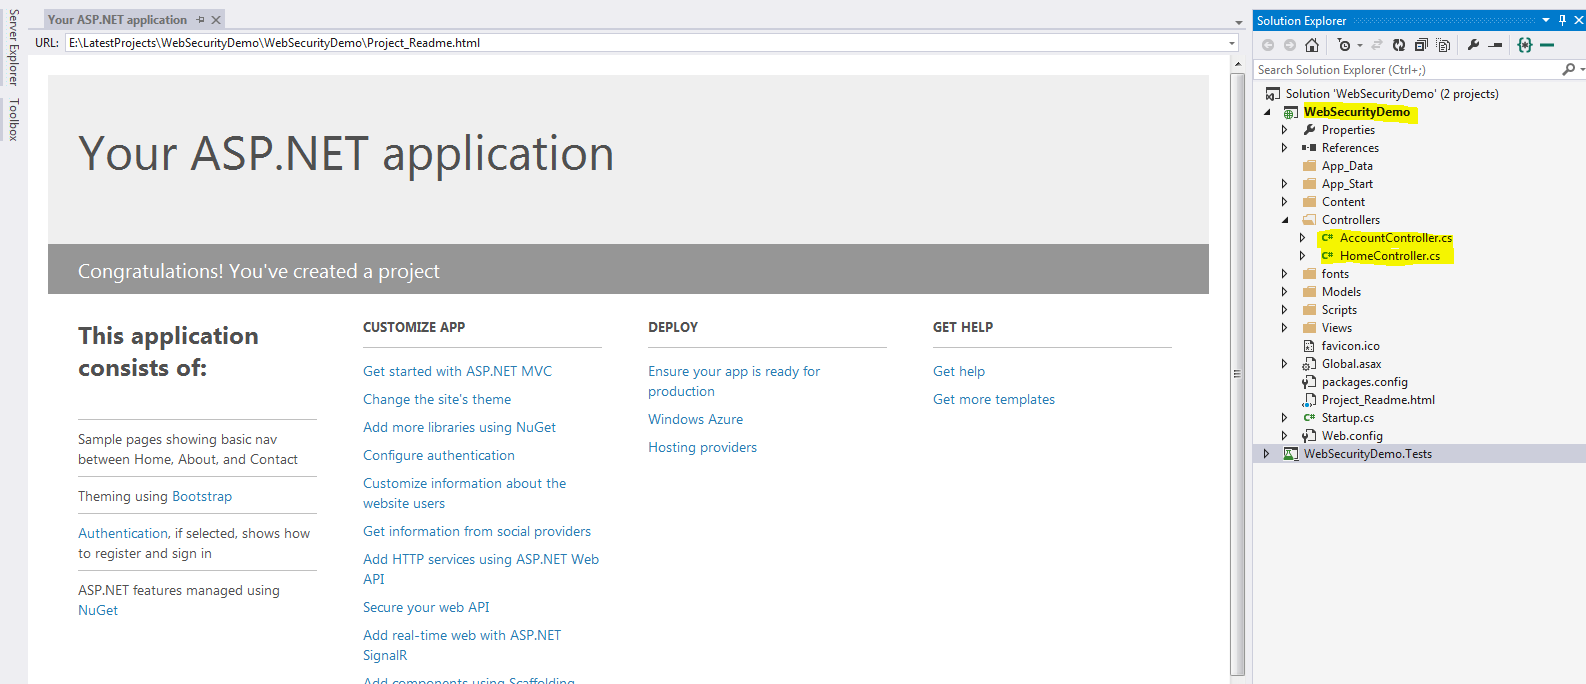
As we can see in the above image, the project is scaffolded based on the Internet template in MVC. This by default creates the Home controller and Account controller with all kinds of authentication and security. This default web application without any coding, gives user options to Register, Login, Log off and OWIN authentication using Facebook, Twitter, G+(this requires some modification which I will be discussing later). But how does this happen!! This is done by the Authorize attribute provided by MVC, which is one of the best assets of MVC. Just specifying an attribute like “[Authorize]” which restrict user access to the methods/actions if specified at controller level or also can be specified at action level, just like the below snippet:
[Authorize]
    [InitializeSimpleMembership]
    public class AccountController : Controller
    {
          [AllowAnonymous]
        public ActionResult Login(string returnUrl)
        {
            ViewBag.ReturnUrl = returnUrl;
            return View();
        }
In the above snippet as you can see the Authorize attribute is given at the controller level, which will restrict users to access the action methods defined inside this controller,but as you can also see another attriute called [AllowAnonymous] this is provided on the action method, which means any user can access this action using the url directly. This attriute overrides the controller level attribute here. The best part to this authorize attributeis we can also override this and create our own custom Authorize attribute like below:-
namespace WebSecurityDemoTest.Filters
{
    public class WebSecurityAuthorize:AuthorizeAttribute
    {
        protected bool AuthorizeCore(HttpContextBase httpContext)
        {
            if (!httpContext.Request.IsAuthenticated)
            {
                return false;
            }
            if (HttpContext.Current.Session["SessionHelper"] == null)
            {
                return false;
            }

            return true;
        }

        protected void HandleUnauthorizedRequest(AuthorizationContext filterContext)
        {
            filterContext.Result = new RedirectResult("/");
            base.HandleUnauthorizedRequest(filterContext);
        }

    }
}
As you might see here, I have created a custom authorize attribute, which first checks if the current http Request is Authenticated or not, Since we will be using FormsAuthentication, this IsAuthenticated gets initialized after Login or inside the LoginPost method like:
FormsAuthentication.SetAuthCookie(userName,true);
The boolean value true does the trick. After successful login when the AuthCookie is set, the IsAuthenticated for the request is set to true. Now if that is not true, then it is handled by the other method i.e. HandleUnAuthorizedRequest. When there is an unauthorize request it checks and return the user back to the default page i.e. the login page. Here, as you can also see I have checked for the session also, after the user has a successful login, I create a session and store the values as is usually done, and based on that also I check if the session is not null, if the AuthorizeCore method returns true, then the user navigates to the desired landing page. Thus, this is how a custom authorize attribute is created.
Now lets discuss more about another class that is created inside the Filters folder, when the project gets created i.e. <em>”InitializeSimpleMembershipAttribute.cs”</em>. This class is responsible to initialize the tables required by the Web Security to run in the database. Lets see how the class looks like and discuss about that:-
using System;
using System.Data.Entity;
using System.Data.Entity.Infrastructure;
using System.Threading;
using System.Web.Mvc;
using WebMatrix.WebData;
using WebSecurityDemoTest.Models;
namespace WebSecurityDemoTest.Filters
{
[AttributeUsage(AttributeTargets.Class | AttributeTargets.Method, AllowMultiple = false, Inherited = true)]
public sealed class InitializeSimpleMembershipAttribute : ActionFilterAttribute
{
private static SimpleMembershipInitializer _initializer;
private static object _initializerLock = new object();
private static bool _isInitialized;
public override void OnActionExecuting(ActionExecutingContext filterContext)
{
// Ensure ASP.NET Simple Membership is initialized only once per app start
LazyInitializer.EnsureInitialized(ref _initializer, ref _isInitialized, ref _initializerLock);
}
private class SimpleMembershipInitializer
{
public SimpleMembershipInitializer()
{
Database.SetInitializer<UsersContext>(null);
try
{
using (var context = new UsersContext())
{
if (!context.Database.Exists())
{
// Create the SimpleMembership database without Entity Framework migration schema
((IObjectContextAdapter)context).ObjectContext.CreateDatabase();
}
}
WebSecurity.InitializeDatabaseConnection("DefaultConnection", "UserProfile", "UserId", "UserName", autoCreateTables: true);
}
catch (Exception ex)
{
throw new InvalidOperationException("The ASP.NET Simple Membership database could not be initialized. For more information, please see https://go.microsoft.com/fwlink/?LinkId=256588", ex);
}
}
}
}
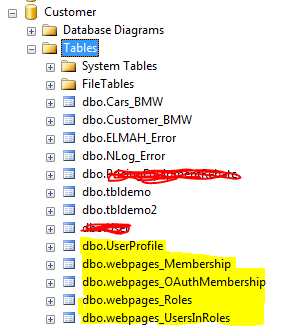
}As you can see, since this class extends itself from the ActionFilterAttribute, then it is used as an attribute only, usually at the controller level as you can check in the first code snippet. [InitializeSimpleMembershipAttribute]. This attribute, what it does in simple language is ensures before any action runs, that the membership has been created at the database level or not. So that when a userregisters it stores the data in the system defined tables. System Defined Tables!!![]() . Yes the tables required for the Websecurity are created once we build and run the application and the controller action gets called which has the attribute defined. But how? The below peice of code snippet does the trick:-
. Yes the tables required for the Websecurity are created once we build and run the application and the controller action gets called which has the attribute defined. But how? The below peice of code snippet does the trick:-
WebSecurity.InitializeDatabaseConnection("DefaultConnection", "UserProfile", "UserId", "UserName", autoCreateTables: true);As you can see the method “InitializeDatabaseConnection” present in the WebSecurity class, explains itself what it does. This initializes the database connection based on the first parameter which is the database name here. Then the sql table with the name gets created, with columns UserId as the primary key and the UserName associated with the user who registers. Now we need to add a Database context to our project:
- Right click on the Model folder. Select Add new Item:
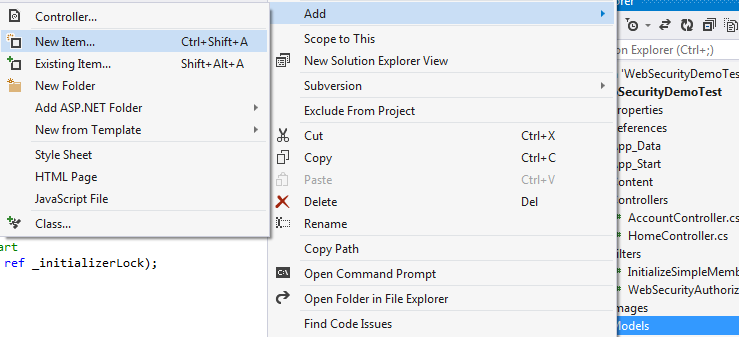
- Then select Data and Add an Ado.Net Entity Data Model with a valid name.
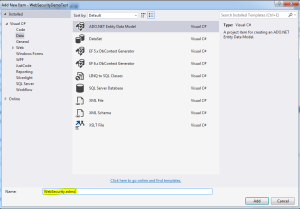 I have named the data model as WebSecurity.edmx. This creates the conceptual model for the database after we give the connection.
 - Then we need to specify the connection to the database. You can create a sample database or use an existing one. I will be using one existing one and will show how the tables for websecurity get generated. Select Generate from database

- Then the connection needs to be setup. Choose your local server, so in the database textbox enter “.(dot)” which means local DB and that would list the databases present in your local. Choose anyone you wish to.
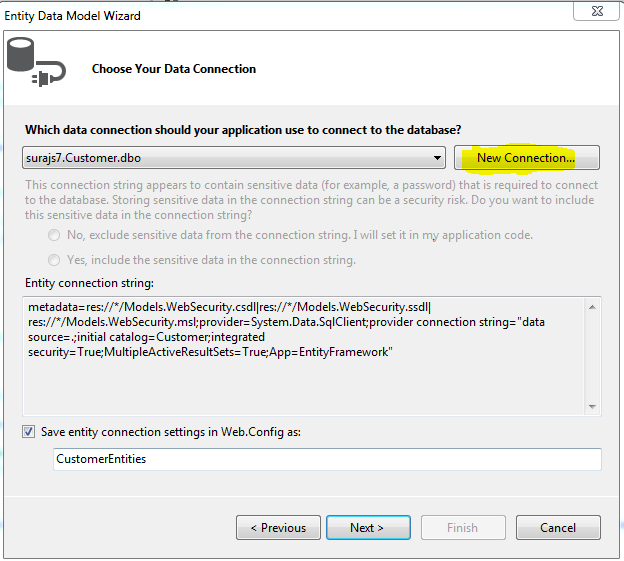
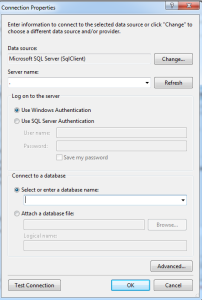
- Thus, when the connection is success and is established, we can find the connection string in theWeb.Config file.

- Then since you can scroll up and see in the InitializeSimpleMembership.cs we have the DefaultConnection specified, we need to change the configuration specified defaultin the web.config connection string, that is change the Data Source = . and remove the AttachedDbFileName entirely and then specify the Initial Catalog as the database name which you have added during the db connection. Finally the connection string with name “DefaultConnection” looks like:
<add name="DefaultConnection" connectionString="Data Source=.;Initial Catalog=Customer;Integrated Security=SSPI;" providerName="System.Data.SqlClient" />
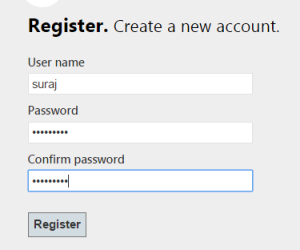
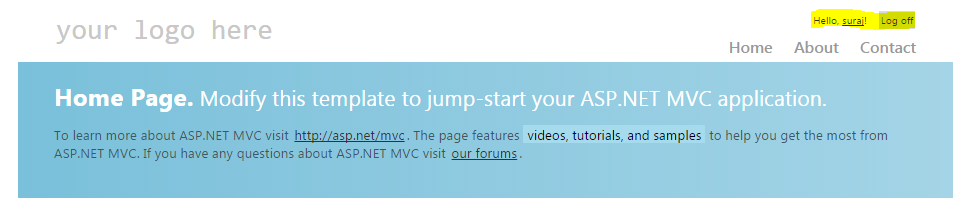
- Thus, we have reached the end to the set up. Now clean and build the solution once and then run. When we run the application, we land on the Home page as the Home controller has no authorization. And also remember one thing the membership/ websecurity tables will only get created once the InitializeSimpleMembership attribute is hit and in the above snippets it gets hit only when the Account controller is accessed. So when we go to any action method that is AllowAnonymous as we also need to land on the page, So we click on the Register.
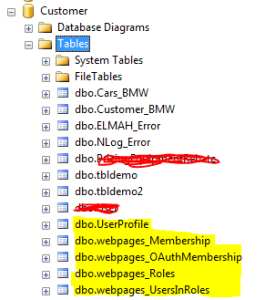
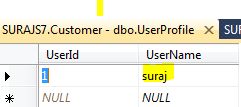
- The below image shows the table created once the attribute is hit/executed. “dbo.webpages_Membership” stores all the information related to the User registered with the User password that is hashed and that to one way for more security. User Id which acts as the foriegn key here to the UserId primary key in the UserProfile table which also contains the UserName which is asked during the registration.
- After the registration, you will find yourself logged in as the UserName entered and the data in the tables would look like:

- Thus this is how the simple attribute, internally does everything.


Now lets check for the codes , the method WebSecurity class implements. First is the “WebSecurity.UserLogin”
WebSecurity.Login(model.UserName, model.Password, persistCookie: model.RememberMe)
This method, takes the UserName, the password and the persistCookie which is the Remember Me check box. This maps the webpages_Membership table and the UserProfile table for the combination of the userName and password, if this satisfies or is perfectly mapped, it redirects user tothe authenticated page, else throws him back to the Login page. if wrong password is entered then it gives the ModelState error as incorrect username and password. If the Remember Me is checked, then the IsPersistent is true in the cookie which is created, then when next time even after closing the browser we come, the cookie persists based on the span it has and authenticates the user without the credentials.
The next method used is “WebSecurity.ChangePassword”
WebSecurity.ChangePassword(User.Identity.Name, model.OldPassword, model.NewPassword)
This method takes the unique username, with the old Password and also the new Password as the parameters. It internally matches first the old password with the User name (Logged In) and then if satisfies stores or replaces the old password with the new one encrypting it or hashing it. This is that simple.
Now the other method and an important one, when the user registered, how did the data get saved into the table!! Nice question .. The answer is another inbuilt method that does the trick here i.e. “WebSecurity.CreateUserAndAccount”
WebSecurity.CreateUserAndAccount(model.UserName, model.Password)
what this does is, takes the parameter as the unique user name and the password, then adds the user name into the UserProfile table that returns the UserId and whichinturn is used as the foreign key with one to one relationship and hashes the password and stores in the webpages_Membership table. This is how a user gets registered so simply using WebSecurity.
There is also a method called Logout, which simply logs out a user. “WebSecurity.Logout()”.
Conclusion
Thus, I discussed in this article the details of WebSecurity class and how to use that in the MVC application. The method and the membership authentication is the same, just we need to customize inorder to have our own hold over it. It is very easy ans simple to use, which makes the code less redundant and reusable and mainly maintainable. This follows usually the DRY concept which is Don’t Repeat Yourself. Thus this suggests to use evrything once, like have an Authorize attribute may it be Custom and reuse it wherever required. WebSecurity has everything defined, we just need to explore and use its methods and properties extensively to reduce the level of coding and LOC.
Thus here I end my article I hope I could explain atleast something.
Though I am not an expert and moreover a human, so mistakes are ovious. i would be glad if you find any or also suggestions and discussion are most welcome.
Share and learn.
CP
- Introduction
- Dependency Inversion Principle
- Bob Martin’s Discovery
- Inversion of Control
- Service Locator
- Dependency Injection
- Constructor Injection
- Setter Injection
- Interface Injection
- Demo
Introduction

How is this concept relevant? Let’s have a look at the traditional architecture generally followed in MVC applications.
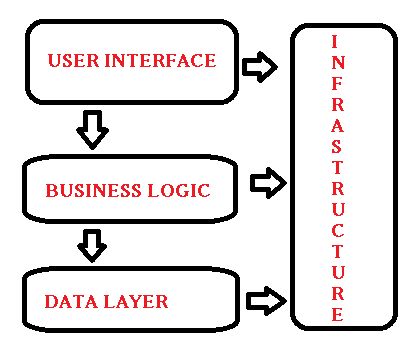
In this architecture, we can see that each of the layers depends on the other layer beneath it. That is why we can say in a technical manner that they are coupled with each other. However, coupling is necessary for every application. Then what is the need for dependency injection, if coupling is necessary? Are we contradicting ourselves? No, we are not. Coupling is necessary, but tight coupling is a big threat to project/application maintainability and performance. Thus, for always having loose coupling or minimal dependency, we require the concept “Dependency Injection”.
In the preceding figure, we see the View layer (UI) has a dependency on the Business Logic Layer that also has a dependency on the Data Layer, thus there is a transitive dependency, but they are still dependencies. Let’s get deeper into what these dependencies mean in real scenarios and how to resolve them.
Dependency Inversion Principle
Quote:
High-Level Modules should not depend upon lower-level modules, rather both should depend upon abstractions.
Now what does that mean? Let me explain this using an example.
In real life, consider our day-to-day chargeable portable devices that we use, like mobile devices, torches, radios and so on. Do these devices have similar charging ports? No, they do not. We need to plug in various chargers for each device. Now wonder if all the devices had similar charging ports, we could use a single charger for each device. This defines the preceding quote. Still in doubt? Okay, let’s look at the figure below:
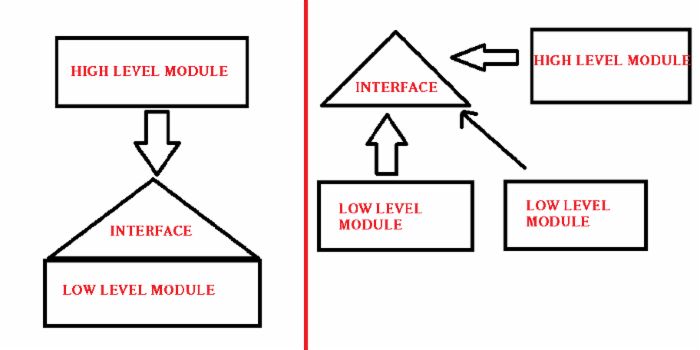
You can see that the figure on the left has a High-Level Module dependent on the interface, also the Low-Level Module is coupled to the interface. Here, only one Low-Level Module exists, so it seems Okay, but in actual applications this is not the case, there may be many Low-Level Modules. Then, if there are so many Low-Level Modules (LLMs) and their associated High-Level Modules (HLM) will have dependency on the interface then it is a threat.
But have a look at the diagram on the right, we can see there is just a single interface and a high-level module and many low-level modules will interact with the interface, here the HLM has the interface and that can be reused and the previous dependency of the HLM on the LLM is avoided. In a more simpler way, instead of a Low-Level Module defining the interface, on which the High-level Module depends on, in the Dependency Inversion Principle, the HLM defines the interface and the LLMs implement the members. This is done using a common interface or an abstract class.
Bob Martin’s Discovery
Bob Martin, commonly known as Uncle Bob, is the founder of the famous SOLID principles, of which Dependency Injection is a part. He explained the concept with a very nice and famous “Copy Read and Write” example.
According to him, a HLM should never depend on the LLM, rather they should have common abstractions. The example that he provided was:
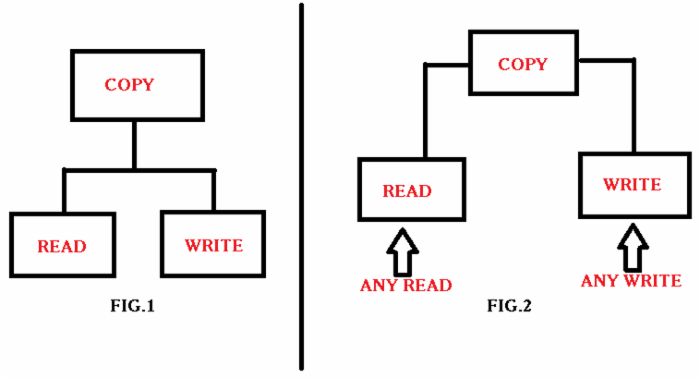
In that figure, suppose there is a copy and there are two methods, Read and Write. Thus the copy module calls the two modules. Now suppose another Write method comes for Write to Disk. Suppose again that we implement the copy method, similarly for the Read method also Read from the keyboard and Read from a TouchPad. This increases the dependency and coupling. So, to avoid that, we can have a common method for Copy that is Read and Write that will be reused by each device from which the read and write would be called respectively.
Here, the Read and Write acts as an abstract classes, since the Copy now does not depend upon whether the future request is a keyboard, a touchpad or a printer or disk.
Thus, the principle of dependency inversion is at the root of many of the benefits claimed for object-oriented technology. Its proper application is necessary for the creation of reusable frameworks. It is also critically important for the construction of code that is resilient to change. And, since the abstractions and details are all isolated from each other, the code is much easier to maintain.
Inversion of Control
Inversion of Control is a style of programming, that has a framework controlling the flow of the application, that is we are trying to change the normal flow or inverse the flow to avoid tight coupling. It works on the Dependency Inversion Principle. This IOC is not only associated with the DIP but is also associated with the Dependency Injection and Service Locator.
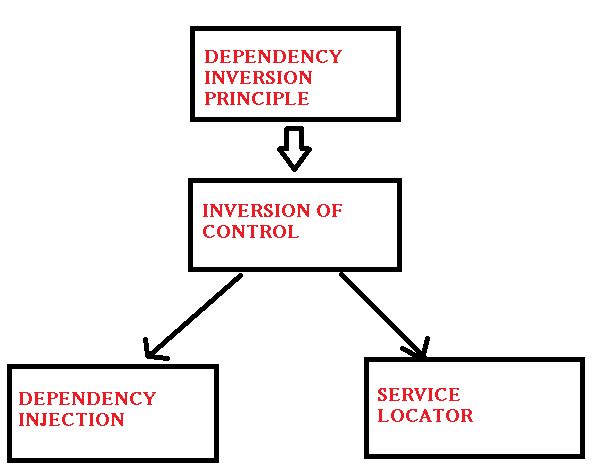
IoC is a way to provide abstraction. A way to change the control. IoC gives some ways to implement DIP. If you want to make a higher-level module independent from the lower-level module then you need to invert the control so that the Low-Level Module is not controlling the interface and the creation of the object. Finally IoC gives some way to invert the control.
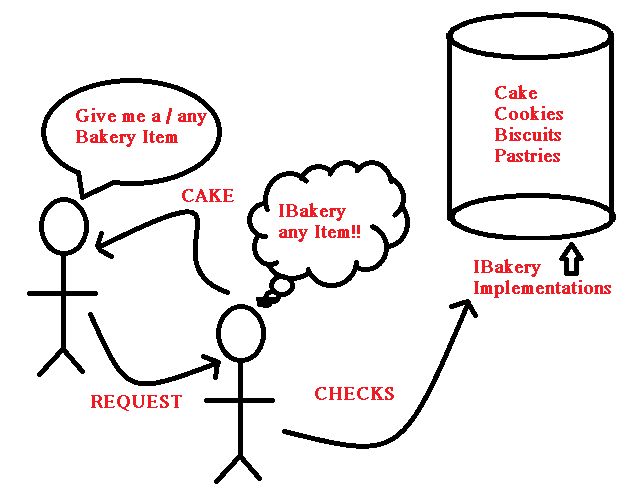
Service Locator
Service Locator also implements the DIP principle and indeed provides us with loosely coupled code. This introduces a locator object, that is used to resolve dependencies within a class. Client uses the locator to find and access the services implemented using the interface. Let’s see that with a code example.
Dependency Injection
Dependency Injection is a type of Inversion of Control, where we move the creation and binding of a dependency to outside of the class, that uses the dependency to access the implemented members of the common interface. This means it is done without any interference of any object, generally by a component that passes constructor parameters and the properties. As without any DI resolves like Ninject, Unity and so on, if we try to invoke the contractor of a class with a parameter, we are thrown an error as:
Quote: No parameter less constructor defined for this object.
Some of the advantages of using Dependency Injection are:
- Reduces Class Coupling.
- Increases Reusability.
- Improves the maintainability for future purposes.
- Improves and catalyses the Unit testing process.
Constructor Injection
Constructor Injection is the most commonly used form of Dependency Injection. As the name suggests, it uses injection into the class level using its constructor. Let’s see a sample code snippet for better understanding:
The preceding code snippet explains the flow. First, we create the dependency by creating the department object for the CheckDepartment() member whose implementation would be used by the class using dependency, that is when we are creating the new instance of the class and passing the dependency. The drawback here may be we cannot create the class and use it without/before passing in the dependency, since we had only the constructor, that would need the dependency.
Setter Injection
Here, we create a setter on the dependent class and use the same setter as a property to set the dependency. In this there is a flexibility to change/set the dependency, since we are the one setting it and in setter injection. Unlike constructor injection we can instantiate the class without passing the dependency. We could set that after instantiating the class also. The code snippet for the setter injection goes as follows in the simplest manner:
Interface Injection
This is also used less in real applications. It is the same as the Setter injection but here, the Dependent class implements the interface. The injector then uses the interface to set the dependency. Interface then defines a method that would be called to do the dependency. Let’s look into the code snippet:
This is similar to a Setter but the difference is that in a Setter we do not get to understand what goes on in the background since we just set the dependency using the setter, but here we know the dependency is coming from the interface after implementing it in the dependent class. Here, after typecasting the employee to the IDepartmentForInject type we are invoking the Inject method.
Demo For Manual Injection
The following is a small demo console application to show dependency injection. You can find the code for download also.
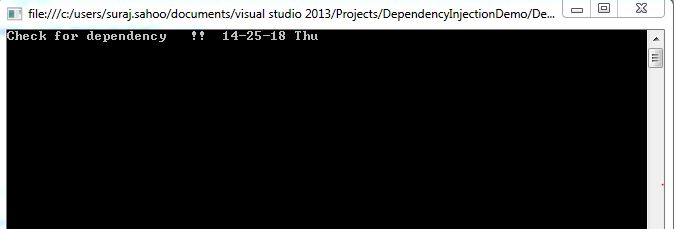
The values in the Autos window in Visual Studio shows how the _department, dependency set in the constructor, has the value from the CheckDepartment that implements IDepartment.
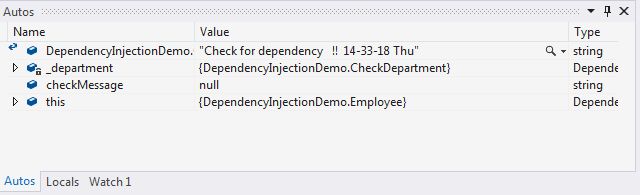
The result that comes is the string returned:
Points of Interest
There are many dependencies resolvers available in Nuget as DLL packages like, Ninject, Unity, StructureMap3, Castle Windsor. But understanding the details of how the background works would be fruitful for using the tools. This is now commonly used and is a confusing topic. I hope this helps anyway.
References:
CP Article
DotNet Tricks
MSDN
In this article, we will be covering the details of why Glimpse is used, what Glimpse has in store for developers.

We have been using MiniProfiler in MVC projects to detect the performance of the Queries called in the server. The number of requests made by the browser to the server, the response time and many other options a developer would get using these extensions.
Glimpse is a new platform for developers to judge their applications. It is an open-source & free diagnostics platform for the web. This is used to get the information about the Asp.Net Web Forms & Asp.Net MVC applications. In simple words:
Quote:If you want to know what exactly is happening on your server, Glimpse will show you.

In this article, we will be using Asp.Net MVC for demonstrating the Glimpse usage. Glimpse is just like Chrome developer tool/Firebug for our server. Glimpse dictionarily** means momentary or partial view, thus it gives us a glimpse of inner workings of Asp.Net applications. It does this by gathering detailed diagnostics information about the behaviour and execution of the application and sending back the data along with the page with separate javascript overlay. Glimpse shows us what data was sent to the server & what data the server sent back, detailed information regarding what code eactly got executed on the server and how long it took.
Why Glimpse is different??

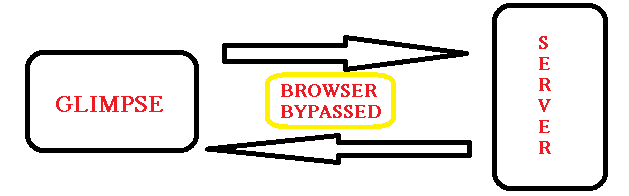
We might now think it is almost same as the Chrome developers/firebug tools, but Glimpse is quite much different than these tools. Even though, it looks the same as the developer tools but still serves a completely different purpose. Glimpse is more focussed on the server. Lets understand the diffenrence more through a small diagram:

Here in the above diagram the dev tool take into consideration the viewpoint of the browser not the server, All the data we get in chrome developer tool is the data that came from the browser not the server. We can get to know the time taken for the request from the time the browser sent the request to the time it gets back response from the server. Here is where the Glimpse come into action, it gives the actual time taken by the exact or particular code executed for the request on the server, that is Glimpse bypasses the Browser in between. See the below diagram:
Glimpse shows us all kinds of information of an MVC application like what routes are registered, what connection strings are used, what flow was through the MVC pipeline, even the configuration present in the Web.config and what Models are bound.
Getting Glimpse
Considering the readers of this article have worked on Asp.Net MVC application and used Nuget package to install plugins and extensions, the easiest way to download and install Glimpse is Nuget Manager or can also be installed through Package manager console. Look at the diagrams below to get both the approaches: 
As you can see in the above image, I have already Installed Glimpse for MVC5, as we install Glimpse MVC4/5/3, the dependencies like Glimpse Core, Glimpse ASP.Net also getinstalled and the references gets added. The above approach is through Nuget package. Below diagram is the approach through Package Manager Console:
 Both the approaches install the Glimpse with the latest version and also add references for the dependencies. This makes changes to the Web.config adding configuration settings for the Glimpse which is shown below:
Configurations
Custom Section :
The diagram below represents the creation of a section inside the Web.config for Glimpse

HttpHandler & HttpModules
The diagram below represents the HttpModules and HttpHandlers created for the Glimpse. Glimpse needs a custom HTTP module and HTTP handler with ASP.NET, in the section if you have IIS 6 or earlier, or in the section for later versions of IIS.
There are two types as mentioned above system.Web & system.webServer
For system.Web
<system.web>
    <httpmodules>
        <add name="Glimpse" type="Glimpse.AspNet.HttpModule, Glimpse.AspNet">
    </add></httpmodules>
    <httphandlers>
       <add path="glimpse.axd" type="Glimpse.AspNet.HttpHandler, Glimpse.AspNet" verb="GET">
    </add></httphandlers>
</system.web>
For system.webServer
<system.webserver>
    <modules>
        <add name="Glimpse" precondition="integratedMode" type="Glimpse.AspNet.HttpModule, Glimpse.AspNet">
    </add></modules>
    <handlers>
        <add name="Glimpse" path="glimpse.axd" precondition="integratedMode" type="Glimpse.AspNet.HttpHandler, Glimpse.AspNet" verb="GET">
    </add></handlers>
</system.webserver>
Main Configuration
I mentioned main configuration as all the manipulations to be done lie changing the configuration for ignoring or adding new tabs to the Glimpse overlay is done here. The configuration looks as below:  Lets look at how the changes are done:
Change Configuration
Configuring the Tabs shown for the Glimpse:
There are mant tabs shown by default to the user. Here I will show you how to disable any tab, to avoid readability issues. Lets see what tabs are shown. Below is the list:
The default Glimpse tabs are:
- Diagnostics:
- Timeline – Glimpse.Core.Tab.Timeline
- Trace – Glimpse.Core.Tab.Trace
- ASP.NET:
- Configuration – Glimpse.AspNet.Tab.Configuration
- Environment – Glimpse.AspNet.Tab.Environment
- Request – Glimpse.AspNet.Tab.Request
- Routes – Glimpse.AspNet.Tab.Routes
- Server – Glimpse.AspNet.Tab.Server
- Session – Glimpse.AspNet.Tab.Session
- ASP.NET MVC:
- Execution – Glimpse.Mvc.Tab.Execution
- Metadata – Glimpse.Mvc.Tab.Metadata
- Model Binding – Glimpse.Mvc.Tab.ModelBinding
- Views – Glimpse.Mvc.Tab.Views
- ADO.NET:
- SQL – Glimpse.ADO.Tab.SQL
These are the default Tabs shown. We will consider only the Diagnostics and the Asp.Net MVC types and how to disable them. The configuration change for disabling is very simple and small. Remember this ignore types are to be added to the Main cofiguration.
<glimpse defaultruntimepolicy="On" endpointbaseuri="~/Glimpse.axd">
    <tabs>
        <ignoredtypes>
            <add type="{Namespace.Type, AssemblyName}">
        </add></ignoredtypes>
    </tabs>
</glimpse>
Configuring the Runtime policy:
Policies control what Glimpse is allowed to do at any given request from the browser. Ploicy by default is Local Policy, which can be disabled and added some other policies.
For example, When we want the Glimpse to run remotely, wechange the following configuration
<glimpse defaultruntimepolicy="On" endpointbaseuri="~/Glimpse.axd">
    <runtimepolicies>
        <ignoredtypes>
            <add type="Glimpse.AspNet.Policy.LocalPolicy, Glimpse.AspNet">
        </add></ignoredtypes>
    </runtimepolicies>
</glimpse>
Start your Glimpse
Now we have discussed uptill now how to and from where to add Glimpse to your application and the changes in the Web.config the installation does. As well as the configuration changes we can do. To start the Glimpse we need to run the application and browse through the same host adding: “host/glimpse.axd” First lets see a diagram that shows the latest Glimpse UI overay. After getting into the browsed link the page shown is as below, that is a part of the page:
After this, we need to click on the Turn Glimpse On. This turns on the Glimpse, then in the application or “/Home/Index” shows a small glimpse “g” icon towards the right bottom. Click on that to see the Glimpse overlay Magic..

The above figure shows the jist or a brief view of the request made & time taken, or the Magic Glimpse has. The below figure shows the detailed window for the Glimpse, this has a part of the window but all the default and MVC tabs are enabled and shown to the end user.

A brief on some important Tabs
Lets discuss briefly on the tabs used by Glimpse or that is displayed to the end user. The tabs let the users know in details about their application and even the machine the application is running on…Strange!! Lets have a look:
Configuration Tab
This tab gives very useful information about the Machine configurations & Web configurations. It gives the details about the application settings, the connection strings used, Web Authentication modes, the custom errors mode and Defaut redirect page, the Http handlers and Http Modules. To literally say, this gives the overview of theconfiguration settings used in Web.config. Have a look at the below image:
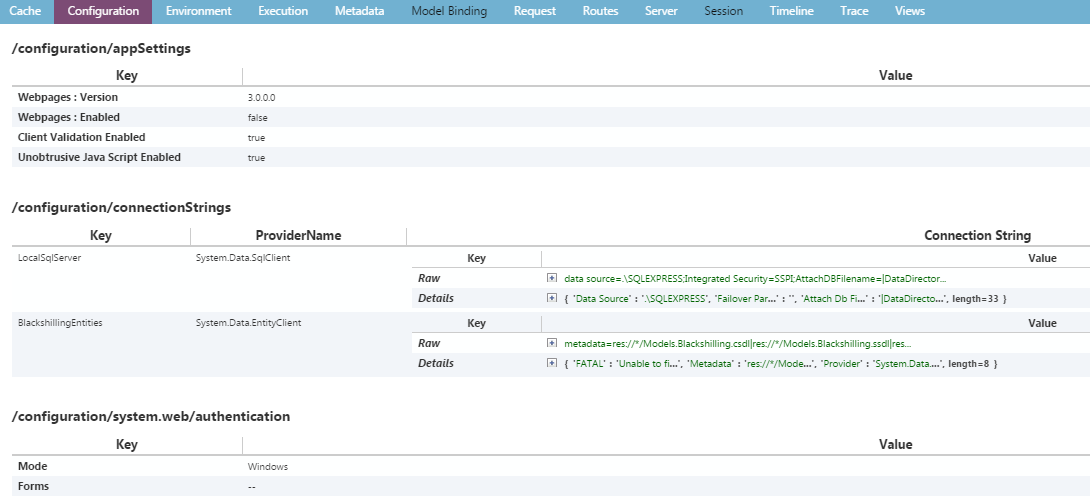
One can mark in the Image or when used in the configuration tab there is Connenction strings, that shows both the default connection present in the Web.config as well as the default connection strings present in the Machine.config. The XML format that is,/configuration/appSettings, makes easier to find it in the Web.config.
Environment Tab
This tab gives information about the Server that handles the request. Shows information like name of theMachine, which dotnet framework application is running. Even the assemblies that are loaded. Lets have a look at the image below showing the Environment tab:
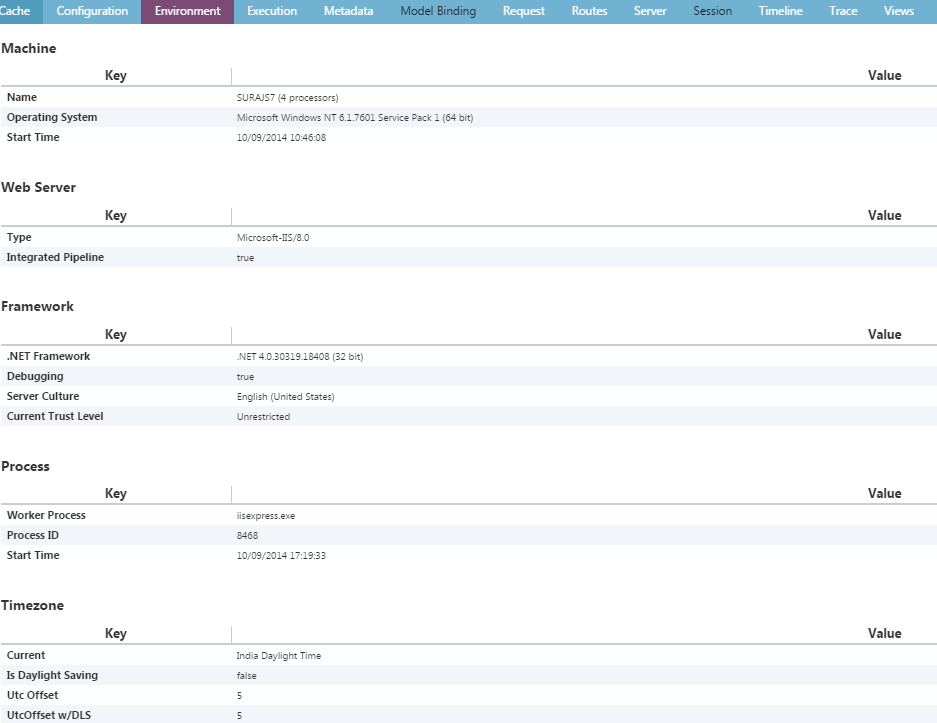
The above image shows the Environment tab and the data it gives. It gives information regarding the Processes running like iisexpress along with its ProcessID, gives information regarding the TimeZone, that would anyhow help developers with the timezone related issues at some point of time. This shows the information about theweb Server also like Microsoft-IIS/8.0 running on my machine. Also the Application assemblies and the system assemblies are produced in this tab.
Request Tab
This tab would seem to have reduntant data that is also present on the developer tools, but that is not the case. It has the exact data that the server received. This tab solves the problem of the developers trying to troubleshoot a tricky issue where the request is being modified or intercepted using fiddler or some other tools before reaching the server or Asp.Net can handle that. Lets have a quick look at the tab image:

As you can see I have highlighted the Query string parameters to show as it is displayed in key value pairs and also in the actual Url. This gives information about the User Host address and User Agent. The Host address is “::1” as i was running the application on my local system.
Routes Tab
This gives the information about all the routes that are registered and which routes are called for a specific page. This also gives information about the Areas if any used, also the Api controllers used & the normal controllers registered in the route.config. Lets have a quick look at the Route tab:

Here, in the Image we see the Constraints & Data tokens highlighted. The greyish background shows the actual route being used for this page. We rarely have constraints and Data tokens defined in our routes,but this information also proves useful. Lets go ahead and look into the code for adding the Constraints and Data token:
using System.Web;
using System.Web.Mvc;
using System.Web.Routing;

namespace KendoMvcDemo
{
    public class RouteConfig
    {
        public static void RegisterRoutes(RouteCollection routes)
        {
            routes.IgnoreRoute("{resource}.axd/{*pathInfo}");
            routes.MapRoute(
                name: "Default",
                url: "{controller}/{action}/{id}",
                defaults: new { controller = "Home", action = "Index", id = UrlParameter.Optional },
                constraints: new RouteValueDictionary { { "id", @"\d" } }
               ).DataTokens = new RouteValueDictionary { { "data", "value" } };
        }
    }
}
This is the Code for adding the constraints, here in the constraints we have added a regular expression to mandate the field id (parameter) to be a single digit value only. We have given some random values to the data tokens.
We can see these data in the Route tab image provided. Now, when we run the application after adding these constraints, we would get IIS forbidden error as the default route now expects an id that to be a single digit.
Session Tab
You might observe in the above images everywhere, the Session is disabled/blackened. This is because we donot have any session defined for this page. Once we define the session for a specific page, then we can view the session to be active with the key value pairs. See the image below that shows the Session defined and the value.

Here, I have defined a session like
public ActionResult Index()
        {
            Session["Test"] = 1;
            var blackshilling = new BlackshillingEntities();
            ViewBag.Properties = blackshilling.Properties;
            ViewBag.Message = "Welcome to ASP.NET MVC!";

            return View();
        }
You can see the value of Session Test as 1 in the image.
Points of Interest
We have discussed much on the Glimpse use and the Important Tabs. Hope this package comes handy for the developers in enhancing and knowing their application better. This would help out during the optimization phase, where it would be required to judge the Sql operations their execution time and many. I will be writing a tip/article on this in upcoming days.
]]>Introduction
Pre-Requisites
This article is meant for my fellow mates who have knowledge on ASP.NET MVC and wondering for an architecture to choose. I am trying to pen this article to be as simple and easy to understand and implement.
Lets Start..
Onion Architecture, the concept introduced by the Jeffery Palermo in 2008 with a aim to make the application loosely coupled and with proper separation between the folders and the different areas of concern in the application. This makes the development easier, the testing of the application easier, the maintainance becomes easier. During the initial stage of development, the SRS(Software Requirement Specifications) is made and proper planning is done regarding what should be the approach, what technologies to be used & after that is done, the most difficult part is choosing the proper architecture so that the maintainance becomes easier. Here, the points that are kept in mind are:-
- All code depends on layers closer or the center
- Domain Models will be at the Center or the Core
- The Inner layer define the Interfaces where as the outer layer implements these interfaces members
- Layered Behaviour around the Domain
- Infrastructure, that would contain Data and the service implementation should be pushed to the edge. Along with the Infrastructure, the UI concerns are also pushed to the edge.
Background
There are a lot of architectures used in web applications, but being decisive and choosing the architecture that would help achieve loose coupling, which is most essential. Loose Coupling, depends on separation of concern, which means each layer would be independent of each other. What is tightly coupled and Loosely coupled?
Yes, exactly as you are thinking my dear readers. But still let me discuss the difference quickly.
A tightly coupling, means where the one object/entity needs to have knowledge of other objects or we can say they depend largely on the interfaces where the service methods are declared. This can be avoided in small applications, but in large applications, these terms are required to be kept in mind else, it may lead to chaos.
A loose coupling, yes the opposite, where there is very less dependency amongst the objects and the interfaces for which there is a chance of clean separation of concern and proper flexibility in the applications as it makes the framework more stable and lets proper maintainability. And it makes the developers happy.

Onion Architecture at glance
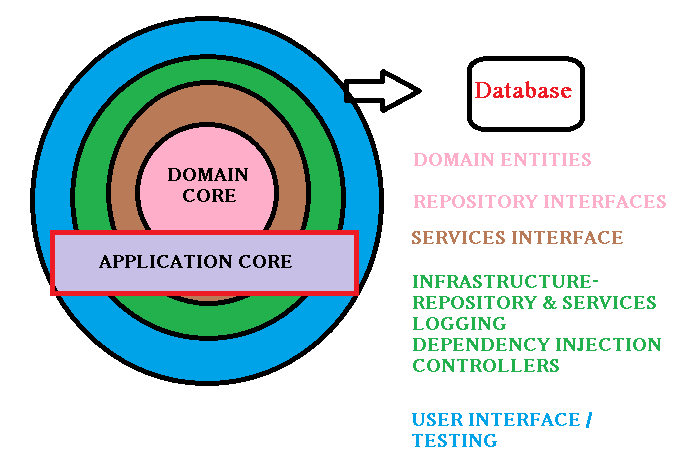
In the above image as we can see, the Core is the Domain model. This layer contains the POCO entities.
Domain objects are:-
- encapsulates application business logic and rules
- maintains any state that is required
- does not depend on external infrastructure concerns
In this article and demo I have added the Repository interfaces in the Core.
The Layers above in brown has the Service Interfaces. The Layer in green is the implementation layer, or the Infrastructure layer, where the Repositories and the Services methods are implemented. The Error Logging(specially NLog) is used. Also the Dependency Injection is implemented here. To inject the dependencies into the controllers
In the layer in blue or the outer layer, has the testing and the User Interfaces.
Thus, this was a simple descriptions of the Architecture, but the below diagram explains better:-
Here we can see there is no transitive dependency betweern the Test, UI and the Data Access which seems better for the Unit testing in MVC applications. This is the layered onion arcitecture that proves to make an application loosely coupled.
The application service implementation as we can see is in a separate laye & the dependency finally is on the Core Domain. The green arrows in the diagram represents the dependencies. Now letslook at a sample code/ The demo is provided in the article for download.
Using the code
In this demo we will see how simple the folder structure of the solution is. Lets see the structure:-
This is how simple the solution of the project would look like if we ollow Onion architecture. Now lets look at an expanded project:-
Lets Discuss on each of the folders one by one
The Core
This is how the core looks like. The core folder contains a class library project, that has Interfaces both for Repositories & Services and Model with the .tt(T4 template)file that is autogenerated containing the POCO entities as I have used Database first approach here. An important thing to note here is, the .edmx file that is generated on using the Database first approach that contains the .tt file. To move that to the Core folder from the .edmx, cut the .tt file and paste that in the folder you want to, here Core->Models->. Only doing this doesnot end the topic, we need to specify the physical path of that file as shown in the diagram below:-
As, you can see in the image, there is a folder called Interface, as the name suggests, this contains the Repositories and Service Interfaces.
Infrastructure
This folder contains more than one project & contains the Integral part of an application. The first project in this project is a class library project, with the first folder Data containing the .edmx file. An .edmx file according to MSDN is a conceptual model and a storage model and the relationships between them. This also contains the Context classes and the .tt file, but regarding .tt file we have already discussed in the core, as we have moved this file to the core project. The first projectalso containes the Repository & Service implementations as mentioned in the interface.
The main and the best part is the second project in the Infrastructure i.e. the Dependency Injection an integral part when we want the Separation of Concern/Loose coupling in an application. In the above figure, we have two classes one for Repository Module and the Service Module. In the demo project, I have used Ninject. On adding Ninject for MVC from Nuget Package, it adds NinjectWebCommon.cs in the App_Start folder which looks like below snippet:
using System.Collections.Generic;
using DemoStart.Core.Interfaces;
using DemoStart.Infrastructure.DependencyInjection;
using DemoStart.Infrastructure.Logging;
using DemoStart.Infrastructure.Services;
using Ninject.Modules;
[assembly: WebActivatorEx.PreApplicationStartMethod(typeof(DemoStart.App_Start.NinjectWebCommon), "Start")]
[assembly: WebActivatorEx.ApplicationShutdownMethodAttribute(typeof(DemoStart.App_Start.NinjectWebCommon), "Stop")]

namespace DemoStart.App_Start
{
    using System;
    using System.Web;

    using Microsoft.Web.Infrastructure.DynamicModuleHelper;

    using Ninject;
    using Ninject.Web.Common;

    public static class NinjectWebCommon
    {
        private static readonly Bootstrapper bootstrapper = new Bootstrapper();

        ///
        <summary> /// Starts the application /// </summary>

        public static void Start()
        {
            DynamicModuleUtility.RegisterModule(typeof(OnePerRequestHttpModule));
            DynamicModuleUtility.RegisterModule(typeof(NinjectHttpModule));
            bootstrapper.Initialize(CreateKernel);
        }

        <summary> /// Stops the application. /// </summary>

        public static void Stop()
        {
            bootstrapper.ShutDown();
        } ///

        <summary> /// Creates the kernel that will manage your application. /// </summary>

        /// <returns>The created kernel.</returns>

        private static IKernel CreateKernel()
        {
            var kernel = new StandardKernel();
            try
            {
                kernel.Bind<func<ikernel>>().ToMethod(ctx => () => new Bootstrapper().Kernel);
                kernel.Bind<ihttpmodule>().To<httpapplicationinitializationhttpmodule>();
                RegisterServices(kernel);
                return kernel;
            }
            catch
            {
                kernel.Dispose();
                throw;
            }
        }

        <summary> /// Load your modules or register your services here! /// </summary>

        ///The kernel.

        private static void RegisterServices(IKernel kernel)
        {
            var modules = new List<ininjectmodule>
            {
                new RepositoryModule(), new ServiceModule()
            };

            kernel.Load(modules);
            kernel.Bind<iloggingservice>().To<loggingservice>();
        }
    }
}
Once we have added the Ninject for the MVC in our project, the next big thing to do is to bind the Interfaces of the repositories and services to the Implementations like as below snippet:
For RepositoryModule.cs
public class RepositoryModule :NinjectModule
    {
        public override void Load()
        {
            // BINDINGS..
            Bind<idemointerfacerepository>().To<demointerfaceimplementationrepository>();
        }
    }
For ServiceModule.cs
public class ServiceModule : NinjectModule
    {
       public override void Load()
       {
           // BINDINGS..
           Bind<idemointerfaceservice>().To<demointerfaceimplementationservice>();

       }
    }
Now, you would be wondering why Repository and Service?? The Service methods are the Bridge/Flyover between the Controller/Business Logic and the Repository implementation, for making it more loosely couple as there would be another layer between the Business logic and the Data access layer.
The next project is the Logging project that is the error logging that helps in logging the errors/exceptions to the database. Here in this demo project, I have used NLog.
Dependencies
In this architecture, the Web project has its dependencies on the other two projects i.e. the Core & the Infrastructure.
The Infrastructure project depends on the Core & the Core is independent for every other. As per the diagram for the Onion Architecture we have proved that the Core remains in the Core/Center and there is no transitive dependency amongst the UI , the Test with the data Access Layer. Check the images below:-
You can see check the dependencies among the projects and the Core which is independent.
Points of Interest
Finally, straight from the words of Jeffery Palermo, the father of this concept:-
- The application is built around an independent object model.
- The layers inside define the Interfaces(the core) and the Outer layers implement
- The coupling direction is towards the center as the name suggests ONION
Thus, the Onion Architecture helps decouple the Infrastructure and the Business(Controller) & the User Interface(Views) without getting into the OOPS concept or has no new concepts with regards to the domain-driven approach.
This is thus a very simple and general, but very effective architecture, I hope readers would love this.
References
Download the source code from dropbox and get set goo…:)
]]>