In this article I will be sharing a basic stuff which comes handy in MVC applications. The HTML helpers provided by the Razor are smart enough to understand and process the work as required.
We will be discussing in brief about the Ajax.BeginForm, which has few concepts hidden within. When we face the difficulty or the issue, we explore and resolve. Same has happened recently with me. So lets start exploring what the hidden secrets are, which actually are very few.
Adding Unobstrusive- Ajax JS
This can be added from the Nuget package manager directly. I find adding from the Package Manager console easy. The script goes like below:
Install-Package jQuery.Ajax.Unobtrusive
Snippet & Learning
AjaxExtensions.BeginForm is a part of System.Web.Mvc.Ajax namespace under the System.Web.MVC assembly. When used in the response it writes the HTML
JSON Java Script Object Notation , a very familiar and commonly used concept. It is a data interchange medium and is very lightweight. It is one kind of a syntax for storing and passing data. Since it is Java script object notation, it uses the java script style of syntax, but actually is text only. It also is language independent. The format would look like below:
{"Books":[
    {"name":"Asp.Net Mvc", "code":"111"},
    {"name":"Angular Js", "code":"112"},
    {"name":"Javascript", "code":"113"},
    {"name":"CLR", "code":"114"}
]}
Now this, JSON object can be created and used to POST or GET in MVC application. Usually, when we do an ajax call, we get the HTML fragments and send them to the browser or append to any DOM elements. That is acceptable, but sending HTML elements with data is not advisable, so would not that be great to send data in a specific format and the browser assigns the data into the HTML. Here, JSON comes in handy. Lets see how. I will explain in simple terms and snippets for better understanding as this topic is not complex at all.
Peek into Snippets!!
I will proceed with an anticipation that readers are aware of MVC (Model, View & Controller), as I will not be sharing the steps to create an MVC project. So, Lets start.
When we create a controller in an MVC project, we know the default type added is ActionResult, which is generic to other types of method types pre-defined like: ViewResult, JsonResult, etc.. Thus, for returning a JSON data, we can use either ActionResult or JsonResult,but preferably use JsonResult as we already know the type, the method will return. JsonResult, is actually a special ActionResult, which suggests the ViewEngine that an object of JSON type will be returned rather than normal HTML.
Lets see the snippet and then try and understand.
using System;
using System.Collections.Generic;
using System.Linq;
using System.Web;
using System.Web.MVC;
using DemoJsonTest.Models;

namespace DemoJsonTest.Controllers {
    public class EmployeeController : Controller {
        private Employee[] employeeData = {
            new Employee {Name:"Suraj Sahoo",EmpCode:"EMP042"},
            new Employee {Name:"Suraj Sharma",EmpCode:"EMP044"},
            new Employee {Name:"Suraj Ray",EmpCode:"EMP041"}
        };

    public ActionResult Index() {
        return View();
    }

    public JsonResult GetEmployeeDataJson(string empCode) {
        var employee = employeeData.Where(emp => emp.EmpCode == empCode).SingleOrDefault();
        return Json(employee, JsonRequestBehaviour.AllowGet);
    }
Thus,in the above code, we have shown a normal controller, in whose constructor we have explicitly initialized a model named Employee with few dummy data. Then the main part is the JsonReult method using which, we are filtering the data based on the parameter passed, here EmpCode and then returning the Json object. Mark here, we have used JsonRequestBehaviour.AllowGet. Now whats this. This has an interesting concept behind it. Usually, the browsers to avoid malicious sites trying to intercept JSON data returned, in response to a GET request, it does not respond to GET requests by default.
System.InvalidOperationException: This request has been blocked because sensitive information could be disclosed to third party web sites when this is used in a GET request. To allow GET requests, set JsonRequestBehavior to AllowGet.
The above is a part of the error thrown when we miss AllowGet. That is self explanatory actually. 
We usually us ajax options, i.e. success method to process the JSON data received from the GET request and append or set to the HTML DOM elements.
<script type="text/javascript">
$.ajax({
    url: "GET REQUEST URL",
    type:"GET",
    success: function(empData) {
            var trgt = $("#tblEmployee");
            target.append("<tr><td>" + empData.Name + "</td><td>" + empData.EmpCode + "</td></tr>");
        },
    error: function() {
      //Do something..
        }

});
// ]]></script>
Thus, in the above snippet, we are fetching the data in JSON format from the GET response and binding to the table html dom.
A point to note here is that, when we assign/cast (actually) a model into JSON object and we explicitly specify few properties of the model and miss out on others, MVC framework is clever enough to first convert the model with each property into JSON and then assign default values to those properties which we have missed. Lets see an example of conversion:
{ "EmployeeId":0, "Name":"Suraj Sahoo", "EmpCode":"042",
     "IsActiveEmployee": false, "DepartmentId": null }
Mark here,that we have only specified the values of Name and the EmpCode, all other values assigned after JSON conversion by the MVC smart framework.
Conclusion
We saw and discussed a very simple and interesting topic regarding the JSON in MVC and how smartly MVC handles the conversion. This helps when we use API and then return JSON,XML to interchange and expose our data. JSON is actually an alternative to XML form of data exchange. For angular JS now a dayswhich is in demand,we use the API controller, return JSON data and take the advantage of Angular two-way binding.
I hope this helps the beginners out there learning MVC. This is a part of it. Enjoy coding. Open to suggestions. Don’t miss to add your feedback. 
Cloud! Cloud! Cloud! What is this cloud! What is Azure! What is cloud computing again!
Oh! So many questions, when we get into this software industry. We will discuss about cloud computing and then move to Azure.

Cloud computing is one the most hyped and most demanding is the industry now.It is actually a paradigm shift for providing computing over the internet. Innovations are what now the companies are looking forward to. Cloud computing is a big enemy to On-premise computing which has been prevailing since long and is still in process. Now what is On-premise computing, when the solutions are installed on user/user’s systems, whereas cloud provides solutions via the Internet. Cloud computing now no longer wastes your time and space with installing the hardware, servers physically, it just needs a good reliable internet connection.
Cloud comprises of various virtual Data Centers that provide different software, hardware & information resources/services. Organizations now just need to connect to the cloud and use the available resources based on their requirement.
Cloud computing for organizations can be done in three ways:

- Private: This is only for one organization and is totally secure as the name itself is private.
- Public: This is acquired and managed by the cloud service provider and it provides the highest level of efficiency for the resources provided by the cloud provider.
- Hybrid: This is the blend of both private and public, where few resources are added and managed in under the public i.e. the cloud provider and few other resources are managed by the organization. This also provides increased efficiency.
We will now learn more facts and information to make our understanding on cloud clear ..:D

Microsoft Azure
Microsoft Azure is a cloud computing platform provided by Microsoft, previously named as Windows Azure. Lets have a pictorial view of what Azure can provide:

This is what the summary is about azure. All the overheads i.e. the Operating system to be used for the application we develop, the network on which we have the application set up, the storage space and how scalable is the storage used, Monitoring the performance of the application. These are few important things we note and keep in mind before developing an application.
Just imagine, how it would be if we have a provider which will handle and manage for us and let us only focus on our application development? Would not that be just great? Here come the hero, Microsoft Azure.

Microsoft Azure, the cloud service provider provides us with all the required resources.
According to Garnet,
A style of computing in which scalable and elastic IT enabled capabilities are derived as a service using the internet technologies.
Below image shows how the Microsoft Azure portal looks like:

The above image shows the various resources Azure portal provides us.
App Services: These are the Web app services on which we deploy our websites in general. Suppose we create an MVC application and want to run on Azure, we need to create a web app service on which the Website will be deployed and running.
Virtual Machines (Classic): As Microsoft suggests, the VMs are the same but the classic mode denotes that the old platform/portal is outdated but the API is still intact. This will not support the newest resources added, whereas in new mode, it supports the very new and updated added resources.
Sql Databases: This as discussed below also, helps create a database for the application. The creation would need a new or existing server on which it will run and also based on location. we have discussed more on this below.
Cloud Services: It is one of the PaaS services provided bt Azure. This can simply be thought of as a collection of number of VMs which in turn would have software installed on them.
Microsoft Azure runs on three basic structures. Iaas, Paas & Saas. Lets discuss about them in brief below:
Iaas (Infrastructure as a Service)
Infrastructure as a service when used by the organization, provides the infrastructure resources required for the build. Here you are concerned only for the service we get from the Infrastructure, for example Database service. Microsoft provides with the Remote Desktops, Virtual machines, Servers as IaaS resources.
PaaS (Platform as a Service)
This is the platform which Microsoft Azure provides required for only development. Here we only need to focus on the development, maintenance and management of the application. Azure SQL Database, HD Insights, Application Insights,Azure Storage, Active directory are all a part of PaaS of Azure.
The difference would go like, PaaS have more economic advantage than IaaS, where as IaaS has more control over the entire resources being used may it be, OS, servers, VMs, etc.
Lets see an example how we can add a IaaS service and PaaS i.e. for instance Database (SQL):
At first as we have seen the azure portal above in the image, now we click on SQL Database and then on Add like below:

Then we will see a new tab besides the above tab on the same window like below:

This is the new portal style in which the tabs open up side by side, whereas in earlier portal, every time a new tab was overlapping the clicked tab.
Here on this image, there are many things we need to know. Remember we are going to add a new Sql Database.
First it asks for the database name, enter the name. Then the next box is for the Server name. Once you click on the Server, the tab opens up with options such as Create a new server or use existing. Here I am adding a new server instance.
Another interesting thing to mark is Location. Out of different options, be decisive and wise in choosing the location based on the nearest location to the deployment server, to decrease the latency rate.
Here, while creating the database, we created a new Server instance with a name and location. The Server here acts as IaaS and the Database as PaaS.

Virtual Machines (IaaS):
There are a lot of services provided by Microsoft Azure, while adding a new virtual machine, we have options for adding as a Windows Server, Linux, Joomla and many more pre-build images. Interesting is they provide you with an image of Sql Sevrer. We take this as an example and see how to add VMs.
As you see above, when we select the Sql Server as our VM, it means it will create a Windows Server with Sql Server (* version) installed on it. The list of versions is shown in the image. i would be selecting 2016 instance and lets see what happens.


When we click the Sql Server version to be created, the above tab pops up, to configure the settings for the VM. The above details are just names and password you would be using for login.

This the VM configuration, the windows server configuration on which our SQL 2016 would be installed. Select any one and proceed with the other configuration. The next are default setting, you may change also based on your need.
Then finally hit Ok to create the VM, it will start the initial deployment and after submitting the deployment, it will take few minutes, to complete and set up the VM for you to download the VM instance and use using Remote desktop connection.
The configuration can be seen on All resources and on click of the virtual machine.
As you can see here, the OS is Windows, and every Virtual Machine requires a Virtual Network to be created, so while creating the virtual machine, a virtual network is created in the setting, if wished the name of VN can be changes as in this case it is, surajsql2016.
Then after the VM is updated and set up is completed, you will get a notification regarding the same.
Then hit Connect, this will download the .rdp file. Then as you know the process, add the username password you had set up during the configuration of VM and play around on the Server with SQL 2016 installed on it.
SaaS (Software as a service)
This is an interesting concept provided by the cloud. This lets users access to online applications like Sharepoint online, MS Office based on subscription. This can also be termed as software delivered over internet/web. We need not worry about the installation the bit information, OS, etc before using the product/software.
Here comes another interesting fact about microsoft azure. The Pay as you Go model.
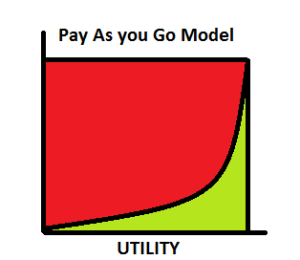
Here the payment is like the electricity use.  You pay only when you use. That is called utility. You are not asked to pay for units that you have not used at all, right? May sound weird but true.
Microsoft Azure also follows the utility graph. It is the green in the graph. Only pay for the services you use and that are up and running. Is’nt that great! economical..:)
Conclusion
Thus, here we just had a brief idea about what the Cloud computing is, why Microsoft Azure, the architecture, different platforms. I upcoming modules we will have a detailed walk through of the Azure portal and learn how to create an MVC application and deploy to the Azure app service.
Resources:- Google Images, Microsoft Azure Site
There exists an assumption that there is a direct relationship between the requested URLs and the files stored on the server. But does this make sense in an MVC application, where requests are processed by action methods and controllers and there is no relation to files on the server (disk).
MVC applications use routing system in order to track the request and give response to the users. The routing system helps create patterns of URLs, that to pattern of our wish. The routing system does the following job, Incoming URL examination- It checks the url requested and it intends the controller and action and based on the url, it redirects the controller based on the client request. This is a very interesting and an important subject of discussion. Once we create an MVC application, it is already configured to use Asp.Net routing system. There are four sections that are any way required relevantly for the routing system in the application. They are:
- system.web httpModules:- These are required to configure the modules within an application. Http Modules are assemblies that are called on every request made to the application.
- system.web.httpHandlers:- This runs in response to the request made to the application.
The above mentioned are required for the routing system and should be present in the configuration of the application. We need to make sure the above configurations exist in our application.
Lets start with snippets
public class RouteConfig {
    public static void Registerroutes (RouteCollection routes) {
         routes.IgnoreRoute("{resource}.axd/{*pathInfo}");
         routes.MapRoute (
            name : "Default",
            url: "{controller}/{action}/{id}",
            defaults: new { controller = "Home", action = "Index", id = UrlParameter.Optional }
    );
}
Now, this RouteConfig.cs resides inside the App.Config folder. The RegisterRoutes method inside the RouteConfig.cs gets called from the heart of the MVC application i.e. Global.asax.cs, which sets the core MVC features when the application is started. The called RegisterRoutes method gets called inside Global.asax.cs as follows:
RouteConfig.RegisterRoutes(RouteTables.Routes);
To the method as we can see the parameter is passed i.e. RouteTables.Routes which is a collection routes or the instance of the RouteCollection.cs. To register adding a new route, we need to register inside the RegisterRoutes method as below:
Route demoRoute = new Route("{controller}/{action}", new MvcRouteHandler());
routes.Add("DemoRoute", demoRoute);
Lets understand the above snippet, Here a new route named demoRoute is being created. MvcRouteHandler() is also passed to the constructor. This extends the IHttpHandler and passes the request. routes , the object above is an instance of the RouteCollection class which is passed from the Global.asax.cs. There is another easy way of registering routes, i.e. by using MapRoute method defined by RouteCollection class like below:
routes.MapRoute("RouteName", "{controller}/{action})One thing to note here is, if the route incase donot match any of the routes in the RouteCollection, then the error is thrown to the user. generally, default route is set to Index as action. Then, the url with https://demosite/home will also get the user to the Index action method. If both the controller and action are provided to the routes, then routes match url with no segments (if default is defined in the RouteConfig). Generally, the controller if only used in the url, then the Controller’s action Index method is called i.e.
https://demosite.com/Admin
This would call the Admin Index method. If any other action method is called, then similarly based on the segments in the url requested, the action in the specified controller is called.
Static URL Segments
There is this concept of static url segments. This is rarely used but the concept is quite interesting. Here, the route is registered inside RouteConfig like below:
routes.MapRoute(""), "X{controller}/{action}");Here, what happens is whatever is present after X or suffixed to X, that controller and action gets called. For example, https://demosite.com/XAdmin/Index, here what happens is the controller Admin and the Action Index is called.
There is a concept of Route Ordering as well, in which in the order the routes are defined in the RouteCollection, the same order the route mapping is done. I.E. when a URL requests is made to the application, the route config maps the route defined until a match is found in the same order routes are defined.
Another interesting fact to notice here, Suppose we have a controller named “Admin” and sometime in the future we require to modify the name of that controller. Now if we donot modify our RouteConfig, we would get a 404 NOT FOUND error. To avoid this we do the following modification in the Route.Config.cs:
public static void RegisterRoutes (RouteCollection routes) {
   routes.MapRoute ("Admin","Admin/{action}",
      new {controller="Home"});
  }
Thus, when a request as /Admin/Index comes to the server, the controller called is /Home/Index, avoiding the 404 error page. Since, there is no segment variable supplied, so default provided is used. The same can be done in case of an Action as well, i.e. if an action is removed from the controller, we can have a default route check for that action as well and redirect to the specified and default route URL if not found. Like as below:
routes.MapRoute("Admin","Admin/department",
    new {controller = "Admin",action = "Index"});
Defining Custom Segment Variables
Controller and Action are common part of any url request to the MVC application and these would be considered as the in-built segment variables. But there are other segment variables that can be customized for the service requests. Lets take a look at a snippet:
public static void RegisterRoutes(RouteCollection routes) {
    routes.MapRoute("RouteDemo", "{controller}/{action}/<b>{id}</b>")
        new {controller = "Admin" , action="GetDept", id = "DefaultID"});
}
Here we can see we have declared a custom varialble “id” with a default value. Thus any url request with two or three segment variables would work out. If the id is not specified explicitly in the URL, then it takes the default id value.
Usually,the third segment variable is used to fetch the parameter to be utilized in the service methods.
public ActionResult GetDepartment(int id) {
  //Used id to get the particular department.
}
Here if id is not provided in the URL, then it searches using default id specified and may return null. Thus, to avoid, we can also defined the third segment variable to be optional, so that we have action to also return result if no id is specified in the URL.
routes.MapRoute("OptionalRoute", "{controller}/{action}/{id}",
     new {controller = "Admin", action = "GetDept", id = <b>UrlParameter.Optional</b> });
Thus the UrlParameter.Optional makes the third segment variable optional and rund through without any default variables as well.
Prioritizing Controllers with same name using name spaces
This is a very interesting and strong concept which can be really handy, when working on a huge MVC application. Lets take a scenario to understand this, suppose we have a controller name “Home “inside the controllers folder and another controller with same name “Home” inside another folder say “AddonControllers”. So when we run the project and hit the URL /Home/Index, then the routing and mapping that searches the URL requested, will be in ambiguity as it fetches two controllers with same names. Thus this will throw an error with the exception message as :
Multiple types were found that match the controller named “Home”. This can happen if the route that services this request (‘{controller}/{action}/{id}’) does not specify the namespace to search for a controller that matches the request..
Thus, from the error message itself we can get that this error can be resolved easily by specifying the name space for which you want to prioritize the search when URL request is made to the server. Lets see how:
routes.MapRoute("DemoRoute", "{controller}/{action}/{id}",
      new {controller = "Home", action = "Index", id = <b>UrlParameter.Optional</b> },
       <b> new []{"URLsAndRoutes.AddonControllers"}</b>);
Here, specifying the new array of strings and saying the MVC routing to search for the controller everytime in the AddonControllers or the specified namespace first and if not found then move into the controllers folder to search for the match of the URL request. This really would of high use when the requirement is as such.
Conclusion & Points of Interests
Thus here we discussed about one of the critical concepts of MVC. Routing and pipelining is a mandatory concept to know to start with learning MVC. using MVC application and not using Routing is not wise. There are opportunities to manipulate and customize the Routing system, so it is always advisable to use Routing whenever MVC application is in picture. The URL segment variables Controllers, Actions and parameters are required to customize the URLs to th convinience of the end users. The routing can narrow down the search of the routes if the maximum hit URL requests are ordered highly in the Route Collection.
References
Asp.NET MVC Professional by Adam Freeman.
CodeProject
A very interesting topic of discussion. We have mail integrated to every application now a days. We integrate email using SMTP settings in the Web.Config in .NET and use the Send method to send mails. Recently, I came across an interesting challenge, where we were to send emails from our SQL Server. Suppose we have to track the successful scheduled sql query execution. We cannot look into the tables it modified every time in order to check if it actually ran through successfully. It would be so nice, if we could get some kind of notification which can help us know about the status of execution. Yes, it is possible to send mails from our sql server using few stored procedures which are actually pre-defined.
Lets learn how:-
Get Started
Remember we will be using pre defined Stored procedure to send the mails. First of all we need to set up an account with the credentials required by the server to send the mails. Usually the mail is sent through SMTP, Simple Mail Transfer Protocol. The settings would depend on the server your aplication demands. Remember the configuration needs to be valid.
Create a Database Account:-
EXEC msdb.dbo.sysmail_add_account_sp
    @account_name = 'SendEmailSqlDemoAccount'
  , @description = 'Sending SMTP mails to users'
  , @email_address = '[email protected]'
  , @display_name = 'Suraj Sahoo'
  , @replyto_address = '[email protected]'
  , @mailserver_name = 'smtp.gmail.com'
  , @port = 587
  , @username = 'XXXXXX'
  , @password = 'XXXXXX'
Go
Please use proper credentials and server settings in order to successfully deliver the mails, else they will fail and be queued.
Nextstep is to create a profile which would be used to tconfigure the database mail. The sp would look like below:
EXEC msdb.dbo.sysmail_add_profile_sp
    @profile_name = 'SendEmailSqlDemoProfile'
  , @description = 'Mail Profile description'
Go
This profile would be used in order to set the mail configuration and the emails and sent.
Next step is to map the account to the profile. This will let the profile know, which account credentials it need to work for sending successfully.
That would look like:
-- Add the account to the profile
EXEC msdb.dbo.sysmail_add_profileaccount_sp
    @profile_name = 'SendEmailSqlDemo'
  , @account_name = 'SendEmailSql'
  , @sequence_number = 1
GO
Thus, we are all set to send the successly emails. The mail sending look up snippet would look like below:
EXEC msdb.dbo.sp_send_dbmail
    @profile_name = 'SendEmailSqlDemo2'
  , @recipients = '[email protected]'
  , @subject = 'Automated Test Results (Successful)'
  , @body = 'The stored procedure finished successfully.'
  , @importance ='HIGH'
GO
The stored procedured being used are sometimes vulnerable to not getting executed. So Try catch block and Begin and End Transaction are mandatory in few Stored Procedures.
Lets take an example here,
Suppose we have a SELECT INSERT query using Stored Procedure, so what happens is we are selecting and inserting from 4 tables, lets say
Users | UserLogin | UserEmployment | Departments
For each new screen creation we are manipulating and selecting the users based on their PK and inserting again into the same tables with a different FK, representing the particular screen. The query would look like below:-
BEGIN TRY
  BEGIN TRAN
 INSERT INTO
   dbo.[User]
 SELECT
    us.UserName,
	us.UserAddress,
	us.UserPhone,
    @fkScreenID
 FROM
   dbo.[User] as us
 WHERE
   UserID= @userID
 COMMIT TRAN
    END TRY
   BEGIN CATCH
  ROLLBACK TRAN
  END
  END CATCH  //Similarly for other tables as well we continue. Its is better to add the Try Catch to whole SP Executing Block
Here, when the transaction in case fails, it would move into the Catch block and there we can have the email sending procedure so as to get a notification regarding the success or failure and reason and where it failed. This would be so helpful for any developer.
Troubleshooting Mails
There are also stored procedure to let us know if the mails are successful, failed or remained in the queue. This is fascinating feature. :).
To check for the mails which were successfully sent and delivered, we run the below query:
select * from msdb.dbo.sysmail_sentitems
Some of the columns it returns are

![]()
In the second image you can see we have the sent_status as sent, which states the mail has been successfully sent.
To check for the unsent mails which could not be sent, we run the below query:
select * from msdb.dbo.sysmail_unsentitems
TO check for the failed mails, which will not even be retried to be sent from the queue, we run the below query:-
select * from msdb.dbo.sysmail_faileditems
For more details on the failure along with the reason, the trouble shoot query would look like:
SELECT items.subject,
    items.last_mod_date
    ,l.description FROM msdb.dbo.sysmail_faileditems as items
INNER JOIN msdb.dbo.sysmail_event_log AS l
    ON items.mailitem_id = l.mailitem_id
GO
The results look like below:

The error description above is like “No Such Host” Error. This error usually comes when we have some smtp server connection settings wrong. We need to troubleshoot that on our own and recheck the settings credentials and then try. If then it does not seem to work, we need to look for the DNS server settings and retry with the configuration again. Nothing to worry for this though..:)
Conclusion
Thus we discussed here about sending mails from our own SQL using the stored procedures and how helpful they can prove to be. Troubleshooting the errors is very easy here and the set as well.
Exceptions and errors are a part of development which cannot be avoided but handling them is a challenge and developers can easily do that.
CodeProject
References
]]>Validations in any application is so critical now a days that developers ought to be on their toes while developing any such critical and sensitive applications. Hackers are now in every corner of the society, avoid them restrict them to post non sense data into your applications. The attacks are so vulnerable that security guard of any application is mandatory.

The security checks and implementations should be alert and active in the application to counter the attacks. Lets start learning about different types of validations we can have in our MVC application.
Server-Side Validation
Lets begin with simple server side validations. Server side validation are required when we post something to the server with an expectation for the response,usually while posting form data. The form data post is generally very vulnerable. The attacks are quite easier for the attacker here. Thus, we need to check on the server if we are receiving valid data or not on our end. Thus, server side validation can to some extent prevent nonsense input data. Lets discuss how to do validation explicitly using view model. Lets discuss how:
Explicitly means, we would be checking on server side after form post by the user, if the data input are valid input or not, then we post back the user with the validation message as response.
Suppose we have a model for the Registration of a user to an application. The model goesas below:
public class RegistrationViewModel(){
    public string FirstName { get; set; }
    public string LastName { get; set; }
    public string Address1 { get; set; }
    public string Address2 { get; set; }
    public string TelNo { get; set; }
}
Thus in the view/UI user will be displayed with the above labels and respective text boxes for input. The razor engine view page in the application looks like:
@model ServerSideValidationDemo.Models.RegistrationViewModel
@{
 ViewBag.Title = "Registration Page";
}

@using (Html.BeginForm())
{
}
Thus, the above snippet would bring the user the UI where the users would post their input and click submit. In the razor view page, you can see the HTML Helper ValidationMessageFor. This helper displays the Validation message returned after validation from the server as response, at the respective model property. Like for example, we want the user to enter the Model property First name as mandatory, then after validation the helper would display the validation message beside the First Name Text Box.
Now lets have a look at the Action snippet to which the post would call after Submit click.
[HttpPost]
public ActionResult UserRegistration(RegistrationViewModel registerModel){
     if (string.IsNullOrEmpty(registerModel.FirstName))
         {
             ModelState.AddModelError("FirstName", "Please enter your first name");
         }
     if (!string.IsNullOrEmpty(registerModel.TelNo))
         {
             Regex telNoRegex= new Regex("^9\d{9}$");
             if (!telNoRegex.IsMatch(registerModel.TelNo))
             ModelState.AddModelError("TelNo", "Please enter correct format of Telephone Number");
         }
     if(ModelState.IsValid){
         return View("Sucess");  //Returns user to success page
         }
      else {
         return View();  //Returns user to the same page back again
        }
 }
Before explaining the above snippet, lets understand how this will be called after Submit click.
@using (Html.BeginForm()), this does the trick even without specifying the Action and controller. This actually internally calls the Post method of the current url, i.e. looks for the HttpPost attribute to the respective action name of the current url. Thus, in this way the post method of UserRegistration gets called and this also post the required view model to the action, fetching the values input by the user.
After the Action Result method gets called, there is check for the properties explicitly. Here, we check if the user has input into the First name or not. If the user skipd the First Name textbox and submits, then we post the user with the validation message saying “Please enter the first name”. This validation check will not let the user post the input, unless he adds the first name. Similarly, the telephone number is also validated with the regular expression(for the indian telephone number) given.
This was all about the validation being done explicitly.
Now, since we are developing an MVC application, it provides pre defined attributes which can be used to validate our post data. The attributes are called Data-Annotations attribute. Lets look at their usages below:
The use of data annotations can be extensively done in order to avoid heavying the controller post action,explicitly checking for each property. The data annotations attribute in a view model would look like below:
public class RegistrationViewModel(){
    [Required]
    [Display(Name = "First name")]
    [StringLength(50, ErrorMessage = "The {0} must be at least {2} characters long.", MinimumLength = 6)]
    public string FirstName { get; set; }
    public string LastName { get; set; }
    public string Address1 { get; set; }
    public string Address2 { get; set; }
    [Required(ErrorMessage = "Please Enter Telephone Number")]
    [Display(Name = "Tele Phone")]
    [RegularExpression(""^9\d{9}$"", ErrorMessage = "Please Enter Correct format of Telephone No.")]
    public string TelNo { get; set; }
}
The view model above uses Data Annotations attributes and all the required validations for the properties are provided. Lets discuss one by one:
- Required:- This attribute forces the user to enter the value for that specific property and then submit the form, else diplays “The FirstName is required.”. Mark here, the previous message would be a default error message where as for the Tele phone number, the custom error message would be displayed.
- Display(Name = ):- This attribute sets the label for the model property. We just need to specify
@Html.LabelFor(m=>m.TeleNo). This would display the specified custom label for the property, here it would display Tele Phone - RegularExpression:- This attribute is very handy specially when we have properties like Email Address, Tele Phone Numbers and specific expressions for passwords in the forms. We just specify the expression in the attribute and it validates the input from user and states if it is valid or else displays the error message.
Thus, here the view page would go like the same as above. And when we submit, the action post method called would be different i.e. much less code. Lets have a look at the action below:-
[HttpPost]
 public ActionResult UserRegistration(RegistrationViewModel registerModel){
    if (ModelState.IsValid)
      {
         return View("Success");//Return to the success
      }
    else
      {
         return View();//Return back to the same view
      }
 }
Thus, the data annotations here made it so simple and easy.
Here then comes another security vulnerability, i.e. Cross-Site Request Forgery Attacks, which can be easily attacked using the simple Fiddler. When we post any data, we can easily manipulate the data posted by one user using the fiddler and damp into the application and even ruin it. This is indeed very dangerous. Lets see how to prevent Cross site forgery attacks
Preventing Cross Site forgery Attacks
In MVC applications, while posting the form data, it is quite simple to prevent such request if understood properly. MVC provides the attribute [ValidatAntiForgeryToken] on the respective action. Lets see the flow in the snippet first.
First we need to place the AntiForgeryToken helper in the razor view page like:
@using(Html.Form("UserRegistration", "Register")) {
    @Html.AntiForgeryToken()
    //Then here normal rest form as mentioned above
 }
Then in the controller “Register” for the action “UserRegistration”(POST) add the attribute like below:
[HttpPost]
[ValidateAntiForgeryToken]
public ActionResult UserRegistration(RegistrationViewModel registerModel){
   //ModeState Valid check and rest code goes here
}
Ok, so we have seen what two simple steps we need to do. Now lets understand how it does. What happens exactly when we do not place these attributes. How vulnerable our controller is and to what extent an attacker can affect the application. Suppose we are on an Edit page, where a user soughts to edit few of his login information. Now an attacker from over a third party domain and host a simple HTML that would post some information to the same Edit action, the user were to. Then, some how the user if navigates to the Html page set up by the attacker, the user unknowingly is posting unwanted data to the server and normal saving to the database. Here the attacker may be replacing the email ids or any other vulnerable information to his own and retrieving the user’s data. BOOM! This is crash, rather a crap!
Thus, what we need to do here, we need to check if the request to the server action is coming from the same domain, the user has logged in ! for this we need to have some header or property which will be mapped when a request is made and if matches then post else let the authentication fail.
This is actually what the attribute does. The ValidateAntiForgeryToken actually sets a cookie to the incoming reuest called __RequestVerificationToken, and the same __RequestVerificationToken is set for the domain in which the user is logged in. Thus, when a request is made from the same domain, the request header cookie should match and let the user post the data, but when a request is made from the third party domain, then the request is rejected since the __RequestVerificationToken will never match, just failing the authentication and preventing the Cross Site Forgery by any attacker.
Now here there is another problem. If any how the attacker gets to know the Anti Forgery Token, then what!! again crap! No there is a way out here as well. The attribute has ability to add a unique/different Salt every time so that the same token is not reused everywhere.
@Html.AntiForgeryToken("SALT") //The salt can be any sort of string(homogeneous mixture :))[ValidateAntiForgeryToken("SALT")]Another concept that is vulnerable to such attacks and may breach the security in the application is SQL Injection Lets discuss this in brief.
SQL Injection Attacks & Prevention Techniques
What exactly is SQL Injection attack? 
SQL Injection is an attack to fool and manipulate the application database. This is done through the malicious input from the user during post methods and if the posted data is not validated before being executed as sql query. This is really very dangerous which can let attackers get all the sensitive data or even delete the records from all tables, truncating them, just by posting a simple query to drop instead of actual data.
In this, the objective of the attacker is to post their query into the application and let the server run and give him the response if not handled in the server end. Lets see how:
Suppose we have a sql query to select the names of houses and display. The query would be like:
var sqlTobeExecuted = "SELECT HouseID, HouseName"+
    "FROM House " +
    "WHERE Address LIKE '" + searchInputParam +"%';
SqlDataAdapter da = new SqlDataAdapter(sqlTobeExecuted , DbCommand);
The above query is not parameterized and is a simple query in string format to get the house details. Now suppose the attacker posts the searchInputParam (which originally comes from the textbox input of the user) as
‘ UNION SELECT id,name FROM sysobjects;–
Mark the statement what becomes after that is passed to the string query,
SELECT HouseID,HouseName FROM House
WHERE Address LIKE ” UNION SELECT id,name FROM sysobjects;–%’
The first apostrophe in the searchInputParam closes the Like parameter in the SQL query and the double dashes “–” comment out the rest of the query. Thus that gives the list of all the HouseNames and also all the tables present in the database . Even they can also get the ids of the sysObjects and use the Ids to retrieve the column names of the database table they want. Suppose there is a table named Users. Oviously the table would have all the user details. Thus, with the id and the table name the attacker can retrieve the column names of the Users table using the below query:
‘ UNION SELECT name FROM syscolumns WHERE id = “USERID”;–
Thus,the whole of the database can be exposed to malicious users at a single click.
To prevent this,
- Encrypt the essential and sensitive data like password, credit card info and other details. So that to some extent if by any how they get the details they cannot decrypt it. Use one way hashing to encrypt the record data.
- Using parameterized queries instead of strings, in order to avoid directly injecting the values from the User input to the query as we saw in the above section. A parameterized query would prevent the malicious input and it would look like below:
var commandToBeExecuted = "SELECT HouseID, HouseName FROM House"+
    "WHERE Address  Like @Address";
SqlCommand cmd = new SqlCommand(commandToBeExecuted , conn);
cmd.Parameters.Add("@Address",address);
As we see in the above query we avoid passing directly the string input, instead we are using parameters into the SQL query, which would prevent such attacks. - use of parameterized Stored Procedures, which also prevent and prove to be a good solution to these mallicious attacks of injection. Also it is advisable to not trust them completely/blindly so it is always better to check for the sensitive data from user inputs and then execute the Stored procedure. This can be done, where the developer can think there are chances of vulnerability.
- Entity Framework & LINQ, it is interesting to note here is while using LINQ to entity, the query generation does not use the string based approach, rather it uses the object model API, thus being not susceptible to SQL injection attacks.
Authentication & Authorization
These two are very very very…important in any application and these are two different concepts all together but are used to solve the same thing,i.e. Security. When we develop an secure application, the Login is highly essential. Thus, properly authenticating users to the application & authorizing users to particular section of the application is challenging. Usually Forms Authentication is implemented across MVC applications. In the web.config file, the following configuration is set:
Only this will not set the authentication. You need more set up be done. This would involve a lot of configuration. WebSecurity in MVC makes it easy and secure to be implemented. It provides tables and hashing as well. The hashing it provides is one way and very secure. You can learn more about implementing Web Security in MVC from
Web Security In MVC
Thus after setting this authentication, then the important thing is Authorization, which can be provided on controller level, action level, which can be customized in order to check for the access levels along with the sessions. Only Authorize attribute would let the check for the session, we can customized to check for the roles and access levels for the screens as well.
[Authorize]
 public class HomeController : Controller
    {
        public ActionResult Index()
        {
            return View();
        }
    }
In the above snippet, the entire controller has been authorized. That is each method inside the controller will be first authorized.
public class HomeController : Controller
    {
      public ActionResult Index()
        {
            return View();
        }
       [Authorize]
       public ActionResult GetHome(){
         return View()
       }
    }
Here, only the action method GetHome is authorized, not the whole controller.
Thus, Authentication and Authorization are very important factors that ought to be taken into consideration.
More security considerations in MVC
Straight from the OWASP scurity points,
Its advisable to hide the MVC versions as well as Asp.Net versions we use, never expose the versions through the headers.
X-AspNet-Version 4.0.30319
X-AspNetMvc-Version 5.0
We need to hide the versions which appears in the Network tab of the developer table.
Lets know how to remove the versions of Asp.Net and Asp.Net Mvc from the headers.
- Asp.net Version:-To hide the X version of the Asp.Net we use the below Web.Config change.
The above will hide the Asp.net versions. - Asp.Net MVC Versions:- To hide the X version of the Asp.Net MVC we use the below change in the Application_Start method of the Global.asax. The snippet would go like below:-
protected void Application_Start()
        {
            MvcHandler.DisableMvcResponseHeader = true;
This hides the Asp.Net MVC version from the headers in the Network tab. - Lastly, there are chances of exposing the Users to the Yellow screen of death, when an exception occurs in the application and is unhandled. Thus, it is advisable to have a custom error page, where users will be landing when exception occur. Lets see how:
Custom errors in the Web config needs to be on. There are three modes of the Custom errors. They are:- On:-
–Prevents the stack trace that is shown when exceptions arise
–Also allows to display custom error pages to the end user
–Custom error pages shown to both Remote Clients as well as Local - Off:-
–Makes the end user view the description of the exception along with the entire stack trace.
–ASP.NET error/exception and stack trace shown to both Remote clients and Local as well. - Remote only:-
–This is the best among all for the developers’ perspective, as this allows the Remote clients to view thecustom error messages/pages.
–Allows the Local users/especially developers to view the ASP.NET errors.
–This is the default value.
The other attribute which is used to the custom error element is defaultredirect. This is used to redirect the users to a default page when exceptions occur.
The exceptions can also be handled globally , application level by using the below snippet:
protected void Application_Error(Object sender, EventArgs e)
{
    Exception ex = Server.GetLastError();  //self explanatory gets the most recent error
    Server.ClearError();  //self explanatory clears the error
        //(Required to clear as otherwise user gets to see the default ASP.NET error handlers)
    Response.Redirect(""); //default redirect.
}
For details you can follow: Custom Errors
Conclusion
Thus, security and validations are very important features to be implemented in any application now a days. According to forbes in a day 30,000 sites were hacked. This is truly an astonishing numbers. And in today’s world most of the sensitive information are being stored on cloud. Thus, in any application the data have a great chance of being exposed and hacked. So security is a major concern and needs to be handled very carefully.
Hopefully, Some of the major points are discussed above and can be implemented in any application to avoid any sort of breaching.
CodeProjectReferences
How can I miss the references from which I learnt and got this opportunity to share with the world.
OWASP Cheat Sheet
Security testing
Sql Injection and Entity Framework - On:-
- Welcome to C#
- Working with Variables, Operators & Expressions
- Understanding your first C# program
Welcome to C#
C# .NET is a powerful language, which is generally called Component Oriented Language. Now we have heard of Object Oriented Language, but what is component oriented language!! Though the difference is fairly blurr and thin, but the reason why this new concept came associated with C# is that a new technique was to be introduced that would develop software combining some pre-existing features (OOP) and welcoming some new components. Some of the components are :
- Properties
- Methods
- Events
- Attribute(Metadata-Data about Data)
- Assemblies/Packages
Another major characteristic is introduction to SOC and SOA. SOC is separation of concern via partial classes in c# and SOA is service oriented architecture concept while programming in C#.
Versions in C#
I am mentioning below the versions till date. Data issued from C# Indepth. Please visit or follow the book to know more about the different Versions.
- C#- version 1
- C#- version 2: As mentioned, in this version, Generics, Nullable types(), anonynous types & Iterators(blocks) were introduced.
- C#- version 3: As mentioned implicit typing, object and collection initializers, anonymous types, automatic properties, lambda expressions, extension methods, query expressions were introduced.
- C#- version 4: As mentioned dynamic typing, optional parameters, named arguments, and generic variance were introduced.
- C#- version 5: As mentioned asynchronous functions, caller info attributes(This is a very new concept and an interesting one too. These attributes track information about the calling methods/properties and many more.), and a tweak to foreach(one of the example is Parallel.Foreach(with Lambda expression)) iteration variable capture were introduced.
A small incident to share, I always wondered why C sharp?? It is kind of a successor for C++ or what? I always wondered, and I feel many beginner developers would be wondering. Thanks to Wiki the datawarehouse for every bit of concept in the world for letting me know why? Without any delay, straight from the WIKI,
The name “C sharp” was inspired by musical notation where a sharp indicates that the written note should be made a semitone higher in pitch. The sharp symbol also resembles a ligature of four “+” symbols, which thus implies that it is an increment of C++.
Now lets get along and start learning from basics.
Camel & Pascal Case Notations
Every time a developer gets into these concepts, but sometimes beginners like me would wonder what these actually are!!.
Camel case are used for naming fields where as Pascal case are used for naming properties, function names. In Pascal case, the starting letters in the multiword name are capitalized where as in Came case except the very frst letter all are capitalized like below:
- Pascal Case:- GetSumFromNumbers
- Camel Case:- getFirstNumber
Working with Variables, Operators & Expressions
Before getting into the variables, lets get into what is an identifier. Identifiers are the names that are used to identify elements in the program. In C#, there are certain conventions to be followed:
- Only letters are allowed(may it be uppercase or lowercase), digits and underscore(_) characters are allowed.
- An identifier should always start with a letter.
For example, _getSum, GetSum, Get_sum are valid identifiers. Just to remember or keep in mind everytime that C# is case sensitive so getSum and GetSum are different and give different meanings.
Keywords, there are many keywords that are predefined in C#, for more info on the keywords, follow the below link: C# keywords
Now lets get back to our topic of discussion, variables. A variable is a location with memory or storage location that stores/holds a value. A variable in a program holds a unique name, its like madatory to give it a unique name. A variable holds temporary information. A variable is used to get the value that it holds after assigning. Below I specify the naming conventions to be followed while declaring variables specified by Microsoft .NET team:
- Underscores are advised not to be used
- Case differing names for variables should be avoided. Like, abcTest or AbcTest to be used in the same file and same time. This would also mean Identifiers with same name and different case should be avoided.
- It is advised to start the name with a lowercase. This would be consistent through out as it would lead to easy mantenance.
- Camel case notations should be used, forexample, abcTest, myVariable, as such.
Declaring Variables is easy and simple. Usually keyword var is used when the type is to be implicitly decided. If any datatype is already used during declaring the vriable, then it is explicitly typed.
var setAge; //implicitly typed
int setAge; //explicitly typed
setAge = 45; //values assigned
As in the above peice of snippet, you can see the statement ends with a semicolon “;” that as simple marks the end or compiler to know that the statement ends here. Equals operator is used to assign the value to the declared variable. C# also uses same the operators that we as developers have been using in the former programming languages (+(plus), -(subtraction), *(asterix/multiplication), /(divide) and also the modulo operator(%)). These are as we know called the arithmetic operators. We cannot apply the arithmetic operations on the datatypes except int(integer type) in a similar way.
int a = 4 + 3;
string b = "4"+"3";
Console.Writeline(a);//Prints 7
Console.Writeline(b);//Prints 43 not 7
However using explicit conversion, string can be converted into integers. For incrementing the values, the increment and decrement operators are also strongly followed in C#.
count= count + 1; //Can be incremented but should not be written like this
count++; //This is how increment should be done

count = count - 1;
count = count--;
Understand your first C# program
As we all know, every program follow a common rule that is Input, Process & Output. Lets have go at it.
using System;
namespace ConsoleDemoApplication
{
    class Program
    {
        static void Main(string[] args)
        {
            string firstName; //Variable for storing string value
            string lastName;

            //Displaying message for entering value
            Console.WriteLine("Please Enter Your First Name");
            //Accepting and holding values in name variable
            firstName = Console.ReadLine();

            Console.WriteLine("Please Enter Your Last Name");
            lastName = Console.ReadLine();

            //Displaying Output
            //{0}{1} take the variable names that are assigned during the runtime by the user
            Console.WriteLine("Welcome {0} {1} in your first C-sharp program", firstName,lastName);

            //Holding console screen
            Console.ReadLine();
        }
    }
}
When we run the above program, we get the below output. I am showing the output step wise, so that you get to know the importance of the Console.WriteLine & Console.ReadLine
. As we see in the image, the console window opens up when the project runs and asks for the first name as we see in the program first comes Console.WriteLine(), then when user enters the name Console.ReadLine(), plays its role and stores it in the variable memory firstName.
As we see in the image, the console window opens up when the project runs and asks for the last name as we see in the program first comes Console.WriteLine(), then when user enters the name Console.ReadLine(), plays its role and stores it in the variable memory lastName.
Now when a final enter is pressed by the user with curosity to know what the program gives! Yes it gives the desired out put. It concats the variables where the names/values entered by the user are temporarily stored in memory. {0} {1}, this actually contain the values entered by the user when asked and as mentioned concats the input and displays the full name as the output. This could also have been achieved by using the “+” operator like:
string fullName = firstName + " " + lastName; //+ operator concats the strings
Console.WriteLine("Welcome {0} in your first C-sharp program", fullName);
There are many libraries that may be used in your program. These libraries need to be mentioned at the top of your program i.e. which is called Namespaces and they are used using a using keyword. Yes so many use…!!
When on the console window, something needs to be displayed, Console.WriteLine() is used and when we need to take the Input from the user and store in memory, Console.ReadLine() is used. This is a simple and basic difference. The {0} used in our program, acts as asimple placeholder where the dynamic values are used by specifying the argument at the end. The many the arguments, the many the placeholders to be used.
Conclusion
Thanks guys for having patience and reading through. This is what I could cover in the first part and will continue some more interesting topics in the second part. Lets learn Lets explore and Lets share…
Any suggestions and corrctions are humbly accepted as we all keep learning at every step.
Follow the C# 6 New Features for more info on the upcoming version C# 6.
Refrences
- Visual C# .NET- John Sharp and Jon Jagger
- MSDN
- Csharp Tutorials
MVC Framework
MVC (Model View Controller), is simply a framework used to design web applications, as simple its definition could be.
- Model : This layer represents the core of an application. It is responsible for maintaining the data of the application or can be termed to be the Business layer.
- View : As the name says about itself, this layer displays the data fetched or the designs. This can be termed simply as Display layer.
- Controller : This handles the input to the database or fetches the data from the database records. This can be simply termed as Input layer.
The three layers are interconnected and are dependant on each other. The below figure will explain better:-
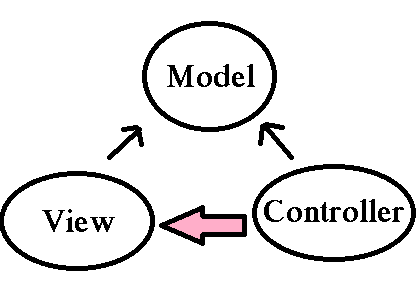 As we can see above, the Data layer or the Model that deals with the data is accessed both by the View and Controller. Here, in MVC there is separation between every laye, that helps in loose coupling the items and also in application development process. Now, one might wonder what exactly Separation of Concern means! This can be framed as there should not be or there should be minimal overlapping/dependancy of functions in an application. For example, take the scenario of the View and the Controller. Can they be separately done!! That is can their be no dependancy between them!! View is the presentation layer and the Controller is the action layer. We can have in real scenario a controller without a View, but a view without a controller sounds a bit radical. This is not necessarily true always. So, we can conclude here that Separation of Concern can be minimal but still lies a grey line. NOTE: Thus always have separate UI layer, Data access layer & Logic Layer in order to achieve clean separation.
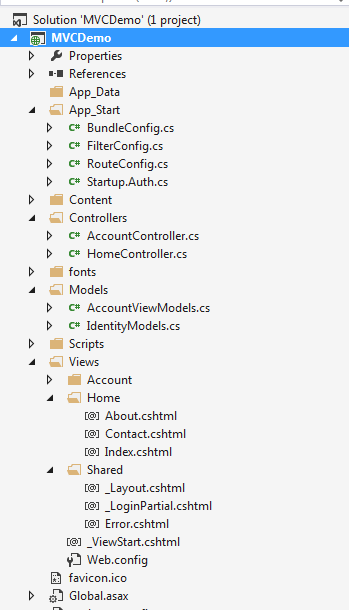
The above image displays the simple MVC folder structure. The Models having the Entities, Controllers as well as the Views for each controller, the shared folder having the master pages.
 Lets get into more details…..
Models
Models(in a bit more depth) : Contains all the application logic i.e.
- Business logic
- Validation Logic
- Data access logic
This holds as well as manipulates the data in the database. This folder contains the classes/entities that are required and present in the application.
Views
Views(in a bit more depth) : The View generally stores the Html files may it be .cshtml or .vbhtml (C# and VB) respectively. These may have extensions as html, asp, aspx. The interesting thing is every controller there is a view folder and for every action a view. There is always a Shared folder inside View, that is used to have the Layout or the Master pages.
Controllers
Controllers(in a bit more depth) : This contains the controller classes responsible for input and responses. The name of the Controller ends with Controller to distinguish. For example, “HomeController.cs”. Every controller implements the Icontroller interface from the System.Web.Mvc namespace.
public interface Icontroller {
void Execute(RequestContext requestContext);
}
The single method Execute is invoked when a request is targeted at the controller class. What happens to the request that comes to the application? The request that comes to the web application first goes through the UrlRoutingModule object (System.Web.Routing.UrlRoutingModule). The request gets parsed and then the route selection is done. When the application starts up, it runs the Application_Start() method present in the Global.asax that marks the application initialization.
- HttpHandlers and HttpModules:- Module or the HttpModules is an assembly, that is called on every request that is made to our application. Where as the HttpHandlers is the solution/answer or running in response to the request made.
Pipeline In MVC
- ROUTING:- This is the first step in the MVC pipeline, it is a pattern to match the incoming url request to the application. These URL are matched to the URLs registered to the Route Table. The route table has its set up done in the Global.asax. The routes are registered to the RouteConfig class that has the route URLs to be mapped and ignored in the application. Lets have a look at it:-
protected void Application_Start()
{
RouteConfig.RegisterRoutes(RouteTables.Routes);
}
public class RouteConfig
{
public static void RegisterRoutes(RouteCollection routes)
{
routes.Ignore(“{resource}.axd/{*pathinfo}”);
routes.MapRoute(
name:"",
url:"{controller}/{action}/{id}",
defaults: new {controller = "Home",action="Index",id=UrlParameter.optional}
);
}
}
Then the UrlRoutingModule discussed above finds a matching route for the incoming URL from the Route Table. When it matches, it retreives the IRouteHandler instance for that route (MvcRoutehandler). Then the IRouteHandler’s GetHttpHandler() is called and finally the ProcessRequest() method is invoked. Then MvcRoutehandler instantiates and executes controller.
Here as you can see, the URL has the {controller}/{action}/{id}, the id is optional which is defined in the defaults. URL may also be only {controller}/{action}. As the routes would be specified or registered in the Route Table, so will the navigation will be.

public class TenantController : Controller  //Derived from Base controller
    {
      public ActionResult Index() //Default Action method-URL: /Home/Index
        {
           return View();
        }
      public ActionResult Index(int id) //Action Method with an Id as parameter
                                        // -URL: /Home/Index/3
        {
          return View();
        }
     }
This is how the routing works on incoming request from the browser. Similarly we can use custom routes also as not always we will be using Home/Index .. 
public class RouteConfig
{
public static void RegisterRoutes(RouteCollection routes)
{
routes.Ignore(“{resource}.axd/{*pathinfo}”);
routes.MapRoute(
name:"Employee",
url:"{controller}/{action}/{id}",
defaults: new{controller = "Employee",action="Add",id=UrlParameter.optional}//Adds a new employee action
);
}
}
If the Url matches any of the routing registered in the Table, the user lands on the View else 404 errornot found page.
- Initialization of Controller :- The real processing starts by the use of ProcessRequest(), that uses the IcontrollerFactory instance to create the corresponding controller for the URL request. The IcontrollerFactory returns the appropriate controller for the request and instantiates that. Then the Execute() method mentioned above is invoked.
- Invoking Controller Action :- The Execute() method refers the RouteData to get the appropriate action for the controller in the Url request. The controller then invokes its own InvokeAction() method.
public virtual bool InvokeAction(ControllerContext controllerContext, string actionName)
After getting the appropriate action, then comes the work of the model binders, default being System.Web.Mvc.DefaultModelBinder, receives the Http request, validates and does the conversions requiqred and also mapping the input values from the user.
- Render View :- The user now would be expecting the beauty of the application to be shown. The View follows the same pattern as the Route. That is, the controller factory has a property known as ViewFactory(), which is a type of IviewFactory. This IviewFactory defines a method called CreateView(), that gets a name and instantiates and return IView, that has a property/method called RenderView() that has the necessary context information from the HttpResponse and returns the Html data as response.

Conclusion
This was the basic and foremost things to knowabout MVC. These are all done on the background. Being Developers, not bothering about the flow is now worthy enough. Thus, Just adding a Controller an action to it and oviously a View to it, does not mean we have done something great!! You would always prefer a pot full with water rather than the one that is almost empty!!

. We are done with the first part. We will be covering interesting topics for learning MVC in part-2
Hope this helps any way. Any suggestions, queries and comments are most welcome.
Dotnet Tricks
Adam Freeman Pro Asp.Net MVC4
Windows Azure provides various cloud enabled storage services and Blob storage is one of them. BLOB stands for “Binary Large Object” which means unstructured data that typically includes images, documents, audio, video or other multimedia objects. The main purpose for using BLOB cloud services is it has a many advantages over storing files in local file systems.
As the msdn suggests the advantages are :-
- It is highly Scalable : that is a single storage account(will be discussed ahead) can store hundreds of terabytes of data and one can have multiple storage accounts.
- It is Durable : that is every file(images, documents, audio, video or other) stored, automatically has a backup.
And many more, for the time these are of more focus.
This article mainly focuses on use of cloud services as here is Azure, checking for containers in our development storage and creating blobs dynamically into it and uploading files to it, as its being used in almost every sites.
In order to develop Azure Cloud enabled applications, we need to install SDK(Software Development Kit-A software development tool required to create application for specific software) first. The best way to develop SDK is :
- https://azure.microsoft.com/en-us/downloads/ go to this site and download the Azure SDK for Visual Studio 2013/12.
- Else go to Visual Studio->Select new project->Select Cloud->
It will then redirect you to download the SDK if its not installed.
- After selecting the cloud, select your project as “Windows Azure Cloud Services”. Then add another project to your solution as MVC Web Role from the popup you get after choosing the Azure Cloud Services. Now you have your solution with two projects a Cloud Service and an MVC . **One thing to keep in mind here is the WebRole.cs has an On Start() method that executes before Global.asax.
- Then in the Cloud Service Project (for this blog I have given the name as UploadTrial1), we can find a Roles Folder. In that folder select the MVCWebRole, it redirects you to the configurations of it. Select the settings and Add Settings, with any name and then select Windows Azure Storage Emulator. There are other options like Manually Entered Credentials and Your Subscriptions. These are required during Deployment and selecting Windows Azures Storage Emulator sets UseDevelopmentStorage=true, that means our local storage.
Now lets start our play with MVC, Add a class to it that would create and check for the containers(I have named as BlobStorageServices.cs) and the code goes as mentioned below:-
//namespaces used
using Microsoft.WindowsAzure.ServiceRuntime;
using Microsoft.WindowsAzure.Storage;
using Microsoft.WindowsAzure.Storage.Blob;
using System;
using System.Collections.Generic;
using System.Linq;
using System.Web;
namespace MvcWebRole1
{
//Container information
public class BlobStorageServices
{
public CloudBlobContainer GetCloudBlobContainer()
{
CloudStorageAccount storageAccount = CloudStorageAccount.Parse(RoleEnvironment.GetConfigurationSettingValue("ImageUploadSetting"));//gets settings value
CloudBlobClient blobClient = storageAccount.CreateCloudBlobClient();//activates the storage account on local
CloudBlobContainer blobContainer = blobClient.GetContainerReference("imagesupload");
if(blobContainer.CreateIfNotExists())
{
blobContainer.SetPermissions(new BlobContainerPermissions { PublicAccess = BlobContainerPublicAccessType.Blob });//Allowing public Access

}

return blobContainer;

}

}

}
Now add a action method to your HomeController. I have named the action as Upload[HttpGet]/[HttpPost]. The code goes below:-
BlobStorageServices blobStorageServices = new BlobStorageServices();//Instantiate object of the class we just created for containers.
/// <summary>
/// Uploads this Image.
/// </summary>
/// <returns>Views of blobs</returns>
[HttpGet]
public ActionResult Upload()
{
CloudBlobContainer blobContainer = blobStorageServices.GetCloudBlobContainer();
List<string> blobs=new List<string>();
foreach(var blobItem in blobContainer.ListBlobs())
{
blobs.Add(blobItem.Uri.ToString());//Returns all the blobs Uri in the container.
}
return View(blobs);//Returns to view to display all blobs.

}
/// <summary>
/// Uploads the specified image.
/// </summary>
/// <param name="image">The image.</param>
/// <returns>Redirected to Upload Action</returns>
[HttpPost]
public ActionResult Upload(HttpPostedFileBase image) //Accept the posted file
{
try
{
if (image.ContentLength > 0)
{
CloudBlobContainer blobContainer = blobStorageServices.GetCloudBlobContainer();
CloudBlockBlob blob = blobContainer.GetBlockBlobReference(image.FileName);   //First Blob

// Upload content to the blob, which will create the blob if it does not already exist.
blob.UploadFromStream(image.InputStream);
}
}
catch(Exception ex)  //Catches Null Exception here and stores it to blob
{
CloudBlobContainer blobContainer = blobStorageServices.GetCloudBlobContainer();
CloudBlockBlob blob2 = blobContainer.GetBlockBlobReference("myfile.txt");  //Second Blob
blob2.UploadText(ex.ToString());
}
return RedirectToAction("Upload");
}
Here I have gone for an exception handling and a better way is I am uploading the exception content creating another blob (myfile.txt). Here we upload image and a text file that includes exception, incase it occurs.
Now lets work on the UI part. I am coding a simple UI design and the code goes here:-I have used Razor in MVC4.
@{
ViewBag.Title = "Upload";
}
<h2>Upload Image</h2>
<p>
@using (Html.BeginForm("Upload", "Home", FormMethod.Post, new { enctype = "multipart/form-data" }))
{
<input type="file" name="image" />
<input type="submit" value="Upload" />
}

</p>
<ul>

@foreach (var item in Model)
{
<li>
<img src="@item" alt="Images uploaded"width="150"height="150" />
</li>
}
</ul>
Lets just overview about the WebRole, WorkerRole and Queue in Azure:-
Web Role in Windows Azure are special purpose services and provide a dedicated IIS used for hosting web application, we can easily add and deploy application to webrole and scale as per our compatibility as per requirement.It is basically front-end that appears to the users.
Worker Role are processes that can do some work as the name suggests. For example, compressing an uploaded image automatically or on the fly, any changes in the database, best is notifications that are recieved.
Queue contain set of messages and those messages should be queue. The main thing is that Web Role, Worker Role and Queues are Virtual Machines running on cloud.
]]>A Favicon (“favorites icon”), is an icon associated with a particular website or webpage that is displayed in the browser address bar next to a site’s URL. Favicon is a little icon, but plays a subtle and important role. It acts as a brand.
What Is It Exactly?
 The WordPress Favicon
This Favicon is very familiar, which can be seen next to the Title of any WordPress WebPage and some other places as described below.
Where this Favicon is Displayed?
It is displayed at three places.
- The URL in the address bar
- The websites name in the list of bookmarks
- In the browsers that support a new feature Tabbed Browsing (Tabbed browsing is a function of some Web Browsers that allow uses to surf and view multiple pages by loading the Websites into “tabbed” sections of one page, rather than multiple pages. This allows the user to view a selection of favorite sites in one window, view multiple search results at the same time, and would allow you to set several pages as your home page, rather than just one)
Using the Code
It is very simple and easy. Follow the steps described below.
Step 1: Go to some online Favicon Generator Website
I recommend Favicon Generator.
Step 2: Browse/Create Favicon for your Website
That would become your Website’s brand image.
Step 3: Generate the Favicon and Download
Add it in your root directory and remember to rename it as sometimes it does not refresh itself if Internet Template is used.
Step 4: Add the Following Code inside head Section of Web Page
<span class="code-keyword" style="color: blue;"><</span><span class="code-leadattribute" style="color: maroon;">link</span> <span class="code-attribute" style="color: red;">rel</span><span class="code-keyword" style="color: blue;">="</span><span class="code-keyword" style="color: blue;">shortcut icon"</span> <span class="code-attribute" style="color: red;">href</span><span class="code-keyword" style="color: blue;">="</span><span class="code-keyword" style="color: blue;">https://www.codeproject.com/NAME of your FAVICON.ico"</span> <span class="code-attribute" style="color: red;">type</span><span class="code-keyword" style="color: blue;">="</span><span class="code-keyword" style="color: blue;">image/x-icon"</span><span class="code-keyword" style="color: blue;">></span>
Put the above code in the <head>.......</head> section of your webpages if Empty Template is used, else in theLayout Page for Internet template.
Points of Interest
While working on a demo, I saw a Favicon in my root directory and got curious to know what is the use. I saw this when I used an Internet Template in ASP.NET MVC4 not an Empty Template. Hope beginners like me get to know about this and use this with their Websites.
Give your Website a brand with these steps and enjoy. 
This is trivial and my very first Tip and Post too, wanted to start with this.
Happy Coding
]]>