Topics Covered
- Introduction to Razor
- Why Razor?
- Difference Between Razor & ASPX
- Step by Step approach towards use of Razor
Introduction to Razor
Razor is the name of the view engine that was introduced by Microsoft in MVC3. A view engine processes ASP.NET content & looks for instructions, typically to insert dynamic content into the output sent to the browser. There are two types of view engines used in ASP.NET, ASPX engine works on the <% and %> tags that has been the mainstay of ASP.NET development and the Razor engine that works on regions of content denoted within the @ symbol/character. The other view engines used are SPARK & NHaml. You can get to know about customizing the view engines and what it’s purpose is here: ^Customized View Engines
Razor is not a programming language but a server side markup language. The Razor view engine is optimized around HTML generation using a code focused templating approach. Razor supports both the languages C# and VB.
Syntax Rules for C#
- Razor code blocks are enclosed within @(..)
- Inline expressions like variables and the methods service calls are prepended with “@”
- Statements within the @(..)are the code statements and end with semicolon(;)
- Variables as normal are declared using the
varkeyword - C# codes are case sensitive
- These have the extension .cshtml
Syntax Rules for VB
- Razor code blocks here are enclosed using @Code … End Code
- Inline expressions like variables and the methods service calls are prepended with “@”
- Variables are declared using DIM keyword
- VB codes are not case sensitive
- They have extension .vbhtml
Why Razor ?
Now the question arises Why Razor!! Ok let’s now discuss the major advantages of Razor or the optimizations which the Microsoft developers thought of overcoming using Razor.. Advantages(straight from ScottGu):-Compact, Expressive & Fluid:
The number of characters and keywords are minimized that enables a fast, fluid code writing. Unlike most template syntaxes, you do not need to stop your coding to explicitly mention server blocks within the HTML. The parser is smart enough to get this from the code. This make really compact and expressive code which is clean & fast to type.
Has great Intellisence
The intellisence provided make the job more easier and the code completion statements more smooth.
Unit Testing Compatibility
This has the ability to unit test the view page without the involvement of the controllers or web server & also can be hosted in any unit test project.
Difference Between Razor & ASPX
- Razor Engine is an advanced view engine that got its name with MVC3. This is not a new language but is a new markup syntax. where as Web Form Engine is the default view engine for the ASP.NET MVC that is included with ASP.NET MVC from the beginning.
- The namespace for Razor Engine is
System.Web.Razorwhereas namespace for Webform Engine isSystem.Web.Mvc.WebFormViewEngine. - The extensions for this type is .cshtml or .vbhtml whereas the extension for ASPX is .aspx
- The syntax goes as below:
Razor- @Html.ActionLink("","")whereas ASPX-<% Html.ActionLink("", "")%> - As mentioned above, Razor supports Unit testing and to be specific TDD (Test Driven Development) where as ASPX does not support TDD.
Step by Step Approach Towards Use of Razor
We have to go into the coding now. We will discuss step by step the implementation and use of Razor. We will create a new MVC project in Visual Studio and then move forward.
Step 1
Create a new Project in Visual Studio. Follow the below steps to get a broader view of creating a new MVC project.
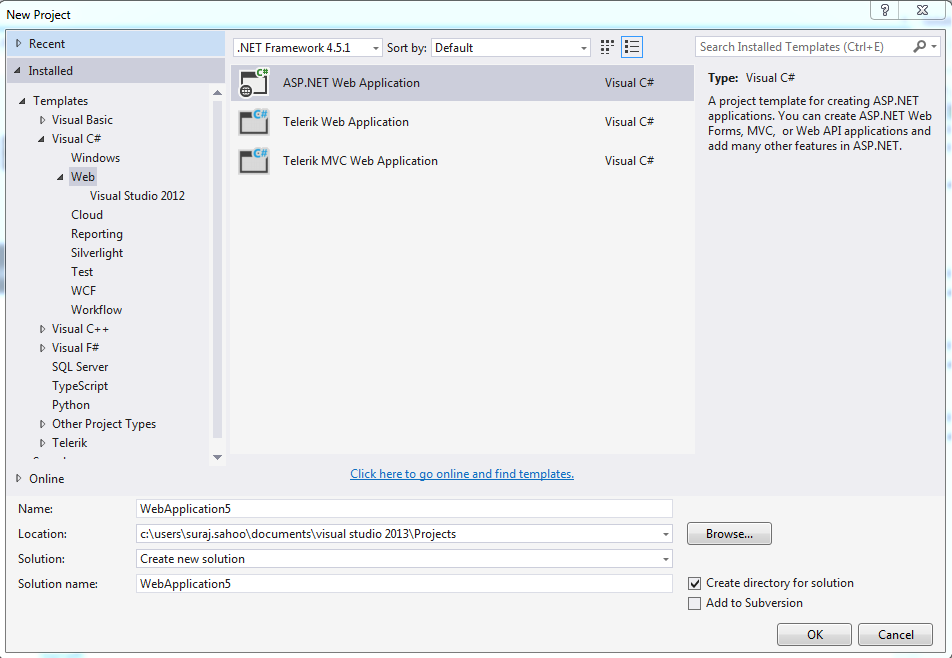
In the above image, we can see when a new project is opted in Visual Studio, this modal pops up asking the user that is us to select which type of project we want to develop. Here, we would like to create an ASP.NET Web Project. So, we have chosen that and give a name to the Project.
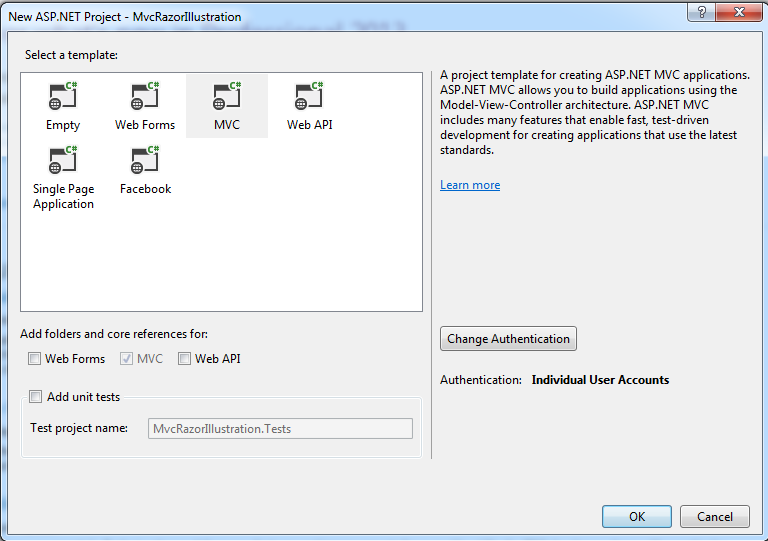
The above image is the pop up that opens up after the ASP.NET project is selected. This asks whether we need a Web API, MVC, Web Form. MVC is by default selected and we need that here.  On click of OK, Visual Studio is smart enough to create the project base with the basic MVC architecture. The structure is the below image:

Here, you can see the folders the Visual Studio creates for a new project. You can get a broader idea on MVC architecture and the flow in link: ^MVC Architecture.
Defining a Model
Model: This layer represents the core of an application. It is responsible for maintaining the data of the application or can be termed to be the Business layer. As you can see in the project folder structure in the Visual Studio, there is a Models folder. This folder contains the classes & Entities to be used in the project. By default, Visual Studio 2013 for MVC 5 provides two classes in this folder, that is: AccountViewModel.cs & IdentityModel.cs. To start with, we first add a model class to the Model folder. Let’s add a class called EmployeeDemoViewModel.csand the class looks as the below snippet:
|
1 2 3 4 5 6 7 8 9 10 11 12 13 14 15 16 17 |
namespace MvcRazorIllustration.Models { public class EmployeeDemoViewModel { [Required(ErrorMessage = "This information is required.")] [StringLength(50, ErrorMessage = " ")] [Display(Name = "Employee Name")] public string EmployeeName { get; set; } public string EmployeeEmail { get; set; } [Required(ErrorMessage = "This information is required.")] [StringLength(50, ErrorMessage = " ")] [Display(Name = "Employee Address")] public string EmployeeAdress { get; set; } public string PhoneNo { get; set; } } } |
The above properties have been added after adding the class. Our next task is to add a controller. Let’s look below.
Defining a Controller
Controller handles the input to the database or vice-versa that is to fetch data from the database records. This can be simply termed as Input layer. In this demo, we will add our custom code blocks to the default Action methods provided by the Visual Studio, using an Internet template. I will be using custom static values, not retrieving from the database, as this I would be covering when I will write about Entity Framework. So thus theIndex() action method was the prey here for me in the Home Controller.The code snippet goes below:
|
1 2 3 4 5 6 7 8 9 10 11 12 13 14 15 16 17 18 19 20 21 22 23 24 25 26 27 28 29 30 31 32 33 34 35 |
using System.Web.Mvc; using MvcRazorIllustration.Models; namespace MvcRazorIllustration.Controllers { public class HomeController : Controller { public ActionResult Index() { //Creating the new instance of the viewmodel and assigning custom values not dynamic var viewModel = new EmployeeDemoViewModel { EmployeeName = "Suraj Sahoo", EmployeeAdress = "Madhupatana", PhoneNo = "8270669104" }; return View(viewModel);//Returning the view with the viewmodel properties that will be accessed in the view. } public ActionResult About() { ViewBag.Message = "Your application description page."; return View(); } public ActionResult Contact() { ViewBag.Message = "Your contact page."; return View(); } } } |
Now we have the viewmodel assigned values. We need to bind these values in the Index Viewpage, i.e.,Index.cshtml/Index.vbhtml. Now let’s look below at the View snippet.
Defining a View
In the view page is where the role of Razor comes into play. Here we use the Model and access the values using Razor syntaxes to retrieve the values or fetch the values may it be from database, but we can call fetch from Server side. The code snippet goes below:
|
1 2 3 4 5 6 7 8 9 10 |
@model MvcRazorIllustration.Models.EmployeeDemoViewModel @{ ViewBag.Title = "Home Page"; } <div><span class="text-danger h2">@Model.EmployeeName</span><br /> <span class="text-danger h2">@Model.EmployeeAdress</span><br /> <span class="text-danger h2">@Model.EmployeeEmail</span><br /> <span class="text-danger h2">@Model.PhoneNo</span></div> |
As you can see, the lines of code and how good is the Razor!! This serves a purpose. We have in the snippet declared the use of the specific model to be used to fetch the values & as we have mentioned earlier, the Razor syntax prepends the fetching values code with “@“.
After the code block gets executed, the magic is seen.
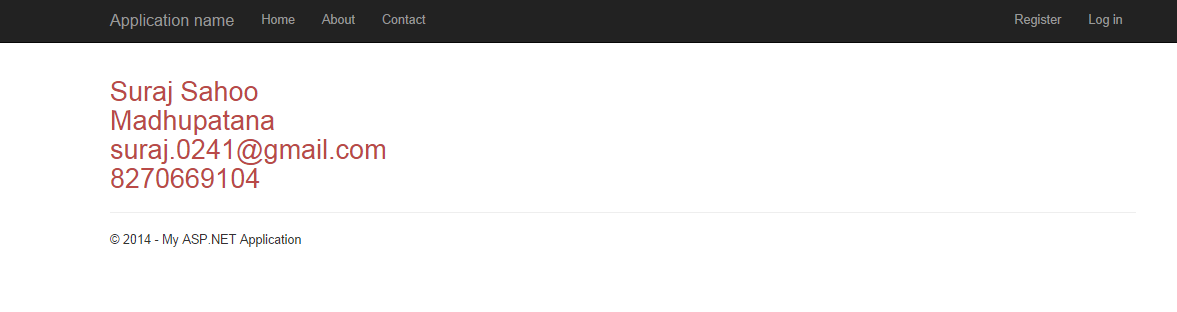
As we can see here, the static or custom values we had assigned to the model properties are reflecting in the view by the use of Razor syntax. Similarly, even if we fetch the values from the database, the code syntax for the Razor in the view page remains the same. The best part is we can use if else, foreach statements using the Razor inside a viewpage also. Let’s look at how:
|
1 2 3 4 5 6 7 8 9 10 11 12 13 14 15 16 17 18 19 20 21 22 23 24 25 26 27 28 29 30 31 32 33 34 35 36 |
//if else condition @if(){ //do anything .... } else{ //do something .... } //foreach condition @foreach(var view in viewModel) { @view.Propertyname1 @view.Propertyname2 } //for loop @for(var i=0;i<10;i++){ Line No. @i } //switch case @switch(bakeryItem) { case "Cake": message="This is the Vanilla."; break; case "Pastries": message="This is butterscotch."; break; default: message="This is strawberry"; break; } |
Using Razor to request for another action method, the syntax goes as below:
|
1 2 |
@Html.RenderAction("","") @Html.ActionLink("Action Link to be shown","Action Name","Controller Name") |
This is how convenient and expressive and optimized Razor is.
HTML Form Elements Use
Here, let’s discuss about the use of form elements using Razor: Suppose we want the model property to be shown inside a textbox. So we write:
|
1 2 3 4 5 6 7 |
@Html.TextBoxFor(m=>m.EmployeeName) //This prints just the name inside a textbox @Html.TextBoxFor(m=>m.EmployeeName, new{@class="input-lg", @id="ANY NAME"}) //This is adding a class to the Textbox as well as an Id. @Html.TextBoxFor(m=>m.EmployeeName, new{@style="color:red;"})//This is adding styles to the Textbox or any form elements. |
As we saw above, we applied Razor only to Textbox, we could also apply for:
|
1 2 3 4 5 6 |
@Html.Label("Employee")//Html.Label gives you a label for an input //whose name matches the specified input text (more specifically, //for the model property matching the string expression) @Html.LabeFor(m=>m.EmployeeAddress)// gives you a label for the property //represented by the provided expression (a model property) |
As mentioned above, @Html.Label is similar to <label for="Employee">Employee</label>, just prints the name provided to be a label. whereas @Html.LabelFor(m=>m.EmployeeAddress) is similar to <label for="EmployeeAddress">@Model.EmployeeAddress</label>.
Let’s create a form to be submitted suppose using Razor syntax:
|
1 2 3 4 5 6 7 8 9 10 11 12 13 14 15 16 17 18 19 20 21 22 |
@using (Html.BeginForm("ACTION", "CONTROLLER", FormMethod.Post, new { id = "frmDemo", @class = "form-horizontal container-fluid" })) { @Html.HiddenFor(m => m.EmployeeID, new { @id = "txtEmployeeID"}) <div class="control-group">@Html.LabelFor(m=>m.EmployeeName) <div class="controls">@Html.TextBoxFor(m=>m.EmployeeName, new{@class="input-lg"}) @Html.ValidationMessageFor (m=>m.EmployeeName)// Validation message provided with the data annotation attribute in the model</div> </div> <div class="control-group">@Html.LabelFor (m=>m.EmployeeName)//if data annotation attributeDisplayName is used. <div class="controls">@Html.TextBoxFor(m=>m.EmployeeAddress) @Html.ValidationMessageFor(m=>m.EmployeeAddress)</div> </div> <input class="btn btn-primary" type="button" value="Submit" /> } @Html.HiddenFor(m=>m.EmployeeID), this is a nice thing to be used in a form, because this value is hidden that means, the field will not be seen to the end user but can be used in the post method. This is the magic of Razor using the @Html.BeginForm we can call Post method directly onclick of the submit button. |
Points of Interest
Escape Character
To escape the “@” character using Razor, we prepend two “@@” to another @. Like below:
|
1 2 3 |
@@@CodeIn @@CodeIn suraj sahoo |
The first one would write @C# Second one would write @@CodeIn and third one would write suraj sahoo. This is the Razor Parser that is smart enough to know and read the @ symbol and how to render and write the values.
Raw in Razor
Another importance of the Razor is suppose we are using any Text editor as here in CodeProject is using, the source code is stored into the database and when the article is published, the source code or the HTML codes are decoded or unencoded to display the beautified version of the source which the user had written. This is simply rendered at the server into the viewmodel property and then accessed in the View page:
|
1 |
@Html.Raw(@Model.TextEditorText) |
To declare any variable globally or use the layout in a viewpage, the Razor syntax provides an easier way to code them like:
|
1 2 3 4 5 6 |
@{ Layout="~/Views/Shared/Layout.cshtml"; var url = "www.google.com"; } Click here to go to <a href="@url" target="_blank">Google |
Comments in Razor
Commenting in Razor goes as below:
|
1 |
@*.......//Comments ... *@ |
Render Sections
RenderSection() is a method from System.Web.WebPages namespace & the WebPageBase class. To be exact, RenderSection() method is of two types, i.e., same method but with different parameters.
They are:
RenderSection(string): This method just renders the contents of a named section in the layout Pages, as simple as this could be (the definition ).RenderSection(string, Boolean): This renders the named section similar to the previous method, but also specifies whether the section is required. This method with an extra parameter does a great bit of work, which we will discuss below.
Why is this required by the way!!
As we know, something to explain has a better way of understanding if explained through an example. So, let’s take one.
Suppose we are designing an application that has three pages. The “Home”, “About”, “Topics” pages and obviously all the pages have different content.
Now, we have a small sidebar on all the three pages and the content for Home and About pages are same that is the contacts of the Admin, & the Topics page has the contact replaced by a cloud structure displaying all the Tags for the articles/topics.
As we would know by now that these three pages will use the same layout and the sidebar would be displayed at the same place for the pages. Here is where the Render Section method comes into play.
In the layout.cshtml(C# Razor), wherever we need the sidebar section to be rendered, we write as@RenderSection("Section Name").
And in the individual pages those use the Layout, we define the section there as , @section “Section Name(remove the quotes)”{…..}. Wherever and whatever the contents might be just define it and render once in the Layout. This simplifies the work of writing the HTML codes and the css also..
This sounds so simple, until you have only three pages. Give a thought, is this possible always!! No. In a web application, there might be many pages using the layout. Here is what an important point about Render Section comes, which we should keep in mind before using.
“Every Page that uses the Layout, and the layout.cshtml has a RenderSection(), that page needs to have the section with that name defined”. Else this also throws the user to the yellow screen of death (depending on the Custom Errors mode) or nothing a blank pageas whole parts of a page are not yet rendered. The exact exception is:
|
1 |
"System.Web.Exception: Section not defined:"SECTION NAME"." |
Just give a thought if there are many pages, where would you search for, where you have missed to define the section. This is not a feasible solution right?
So, it is better to use the second method, i.e. RenderSection(string, Boolean).
If we use the RenderSection("SECTION NAME", required:false), what this means is, if a section is required and is not defined in the page and the section is optional in some page, then by the use of this method the RenderSection() method will render nothing and no runtime error would occur.
If we use the RenderSection("SECTION NAME", required:true), then we need to define the section in each page as we are prescribing here that section needs to be rendered on each page using the layout. We can also define a blank section to avoid the runtime error.
Using Conditional Detection for presence of a section.
We can also use another small piece of code to avoid the runtime error and detect that the section is defined or not. Here goes the code:
|
1 2 3 4 5 6 7 8 9 10 |
@if(IsSectionDefined("SECTION NAME")) { @RenderSection("SECTION NAME") } else { ..... } |
We could also define a specific section and reuse it in other view pages. Let’s see the snippet for creating a section:
|
1 2 3 4 5 |
@section DemoSection{ //section code goes here } @RenderSection("DemoSection",false) |
Render Body method is used in the Layout page to render the body sections of the view page that use Layout. In the Layout page:
|
1 2 3 |
<div id="head">//Head section goes here..</div> <div id="body">@RenderBody()</div> |
We could also RenderPage with:
|
1 |
@RenderPage("~/Views/Shared/_DemoPage.cshtml") |
We could also send some data using View Bag from the server side method in order to save database transactions.
|
1 |
@ViewBag.Message |
I am penning this article for those who are new to MVC and would like to take this as their future in Software industry. I have tried to explain this in as simple a manner as I could. Hope the beginners get some value to learn from this.